OpenVINO™ によるスタイル転送
この Jupyter ノートブックはオンラインで起動でき、ブラウザーのウィンドウで対話型環境を開きます。ローカルにインストールすることもできます。次のオプションのいずれかを選択します。
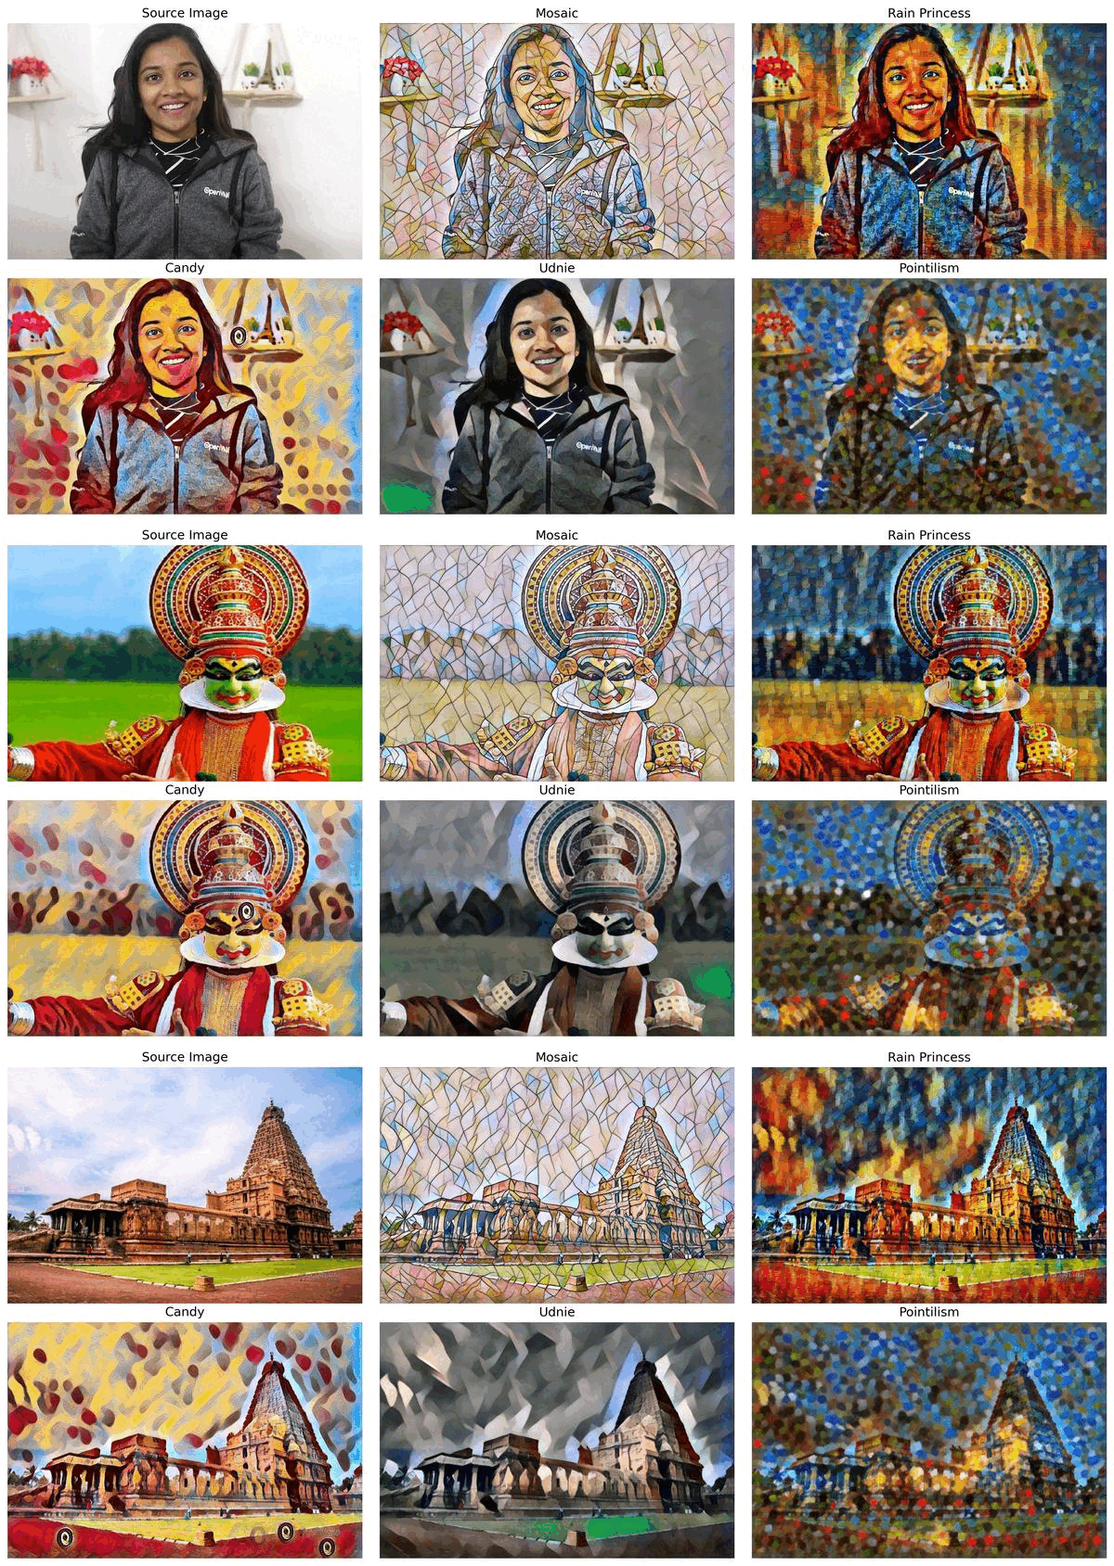
このノートブックは、ONNX モデル・リポジトリーのスタイル転送モデルを使用して、OpenVINO によるスタイル転送を示します。具体的には、画像のコンテンツと別の画像のスタイルを混合するように設計された高速ニューラルスタイル転送モデルです。

スタイル転送
このノートブックでは、モザイク、レインプリンセス、キャンディ、ウドニー、点描の 5 つの事前トレーニング済みモデルを使用します。モデルは ONNX モデル・リポジトリーのものであり、研究論文リアルタイム・スタイル転送と超解像度、およびインスタンス正規化による知覚損失に基づいています。このノートブックの最後では、ウェブカメラからのリアルタイムの推論結果が表示されます。 さらに、ビデオファイルをアップロードすることもできます。
注: コンピューターにウェブカメラが搭載されている場合、ノートブックでリアルタイムの結果をストリーミングで確認できます。ノートブックをサーバーで実行する場合、ウェブカメラは機能しませんが、ビデオファイルを使用して推論を実行できます。
目次
準備
要件をインストール
%pip install -q "openvino>=2023.1.0"
%pip install -q opencv-python requests tqdm

# Fetch `notebook_utils` module
import urllib.request
urllib.request.urlretrieve(
    url='https://raw.githubusercontent.com/openvinotoolkit/openvino_notebooks/main/notebooks/utils/notebook_utils.py',
    filename='notebook_utils.py'
)
インポート
import collections
import time

import cv2
import numpy as np
from pathlib import Path
from IPython import display
from ipywidgets import interactive, ToggleButtons
import openvino as ov

import notebook_utils as utils
スタイル転送を行うには、モザイク、レインプリンセス、キャンディ、ウドニー、点描のいずれかのスタイルを選択します。
# Option to select different styles
styleButtons = ToggleButtons(
    options=['MOSAIC', 'RAIN-PRINCESS', 'CANDY', 'UDNIE', 'POINTILISM'],
    description="Click one of the styles you want to use for the style transfer",
    disabled=False,
    style={'description_width': '300px'})

interactive(lambda option: print(option), option=styleButtons)
モデル
モデルのダウンロード
前の手順で選択したスタイル転送モデルがダウンロードされていない場合、 model_path にダウンロードされます。モデルは ONNX Model Zoo によって .onnx 形式で提供されるため、OpenVINO で直接使用できます。ただし、このノートブックでは、変換 API を使用して ONNX を FP16 精度の OpenVINO 中間表現 (IR) に変換する方法も説明します。
# Directory to download the model from ONNX model zoo
base_model_dir = "model"
base_url = "https://github.com/onnx/models/raw/69d69010b7ed6ba9438c392943d2715026792d40/archive/vision/style_transfer/fast_neural_style/model"

# Selected ONNX model will be downloaded in the path
model_path = Path(f"{styleButtons.value.lower()}-9.onnx")

style_url = f"{base_url}/{model_path}"
utils.download_file(style_url, directory=base_model_dir)
ONNX モデルを OpenVINO IR 形式に変換
次のステップでは、ONNX モデルを FP16 精度の OpenVINO IR 形式に変換します。ONNX モデルは OpenVINO ランタイムによって直接サポートされていますが、OpenVINO 最適化ツールと機能を活用するには、それらを IR 形式に変換すると便利です。モデル変換 API の ov.convert_model Python 関数を使用できます。変換されたモデルはモデル・ディレクトリーに保存されます。この関数は OpenVINO モデルクラスのインスタンスを返します。これは Python インターフェイスですぐに使用できますが、以降に実行するため OpenVINO IR 形式にシリアル化することもできます。モデルがすでに変換されている場合、この手順をスキップできます。
# Construct the command for model conversion API.

ov_model = ov.convert_model(f"model/{styleButtons.value.lower()}-9.onnx")
ov.save_model(ov_model, f"model/{styleButtons.value.lower()}-9.xml")
# Converted IR model path
ir_path = Path(f"model/{styleButtons.value.lower()}-9.xml")
onnx_path = Path(f"model/{model_path}")
モデルのロード
ONNX モデルと変換された IR モデルの両方がモデル・ディレクトリーに保存されます。
モデルを実行するには、数行のコードで済みます。まず、OpenVINO ランタイムを初期化します。次に、.bin および .xml ファイルからネットワーク・アーキテクチャーとモデルの重みを読み取り、目的のデバイス用にコンパイルします。GPU を選択した場合は、起動時間が CPU よりも多少長くなるため、読み込みが完了するまで少し待つ必要があることがあります。
OpenVINO が推論に最適なデバイスを自動的に選択するようにするには、AUTO を使用します。ほとんどの場合、最適なデバイスは GPU です (パフォーマンスは向上しますが、起動時間がわずかに長くなります)。下のドロップダウン・リストから利用可能なデバイスを 1 つ選択できます。
OpenVINO ランタイムは、ONNX モデル・リポジトリーから ONNX モデルを直接読み込むことができます。このような場合、IR モデルではなく ONNX パスを使用してモデルをロードします。最良の結果を得るには、OpenVINO 中間表現 (IR) モデルをロードすることをお勧めします。
# Initialize OpenVINO Runtime.
core = ov.Core()

# Read the network and corresponding weights from ONNX Model.
# model = ie_core.read_model(model=onnx_path)

# Read the network and corresponding weights from IR Model.
model = core.read_model(model=ir_path)
import ipywidgets as widgets

device = widgets.Dropdown(
    options=core.available_devices + ["AUTO"],
    value='AUTO',
    description='Device:',
    disabled=False,
)


# Compile the model for CPU (or change to GPU, etc. for other devices)
# or let OpenVINO select the best available device with AUTO.
device
compiled_model = core.compile_model(model=model, device_name=device.value)

# Get the input and output nodes.
input_layer = compiled_model.input(0)
output_layer = compiled_model.output(0)
入力レイヤーと出力レイヤーには、それぞれ入力ノードと出力ノードの名前があります。fast-neural-style-mosaic-onnx の場合、(1, 3, 224, 224) 形状の入力と出力が 1 つずつあります。
print(input_layer.any_name, output_layer.any_name)
print(input_layer.shape)
print(output_layer.shape)

# Get the input size.
N, C, H, W = list(input_layer.shape)
画像を前処理
モデルを実行する前に入力画像を前処理します。元の画像と入力テンソルを一致させるため、画像の次元とチャネル順序を準備します
フレームを前処理して、
unit8からfloat32に変換します。ネットワーク入力サイズに合わせて配列を転置します
# Preprocess the input image.
def preprocess_images(frame, H, W):
    """
    Preprocess input image to align with network size

    Parameters:
        :param frame:  input frame
        :param H:  height of the frame to style transfer model
        :param W:  width of the frame to style transfer model
        :returns: resized and transposed frame
    """
    image = np.array(frame).astype('float32')
    image = cv2.cvtColor(image, cv2.COLOR_RGB2BGR)
    image = cv2.resize(src=image, dsize=(H, W), interpolation=cv2.INTER_AREA)
    image = np.transpose(image, [2, 0, 1])
    image = np.expand_dims(image, axis=0)
    return image
様式化された画像を後処理するヘルパー関数
変換された IR モデルは、(1, 3, 224, 224) 形状の NumPy float32 配列を出力します。
# Postprocess the result
def convert_result_to_image(frame, stylized_image) -> np.ndarray:
    """
    Postprocess stylized image for visualization

    Parameters:
        :param frame:  input frame
        :param stylized_image:  stylized image with specific style applied
        :returns: resized stylized image for visualization
    """
    h, w = frame.shape[:2]
    stylized_image = stylized_image.squeeze().transpose(1, 2, 0)
    stylized_image = cv2.resize(src=stylized_image, dsize=(w, h), interpolation=cv2.INTER_CUBIC)
    stylized_image = np.clip(stylized_image, 0, 255).astype(np.uint8)
    stylized_image = cv2.cvtColor(stylized_image, cv2.COLOR_BGR2RGB)
    return stylized_image
メイン処理関数
スタイル転送機能は、ウェブカメラまたはビデオファイルを使用して、さまざまな動作モードで実行できます。
def run_style_transfer(source=0, flip=False, use_popup=False, skip_first_frames=0):
    """
    Main function to run the style inference:
    1. Create a video player to play with target fps (utils.VideoPlayer).
    2. Prepare a set of frames for style transfer.
    3. Run AI inference for style transfer.
    4. Visualize the results.
    Parameters:
        source: The webcam number to feed the video stream with primary webcam set to "0", or the video path.
        flip: To be used by VideoPlayer function for flipping capture image.
        use_popup: False for showing encoded frames over this notebook, True for creating a popup window.
        skip_first_frames: Number of frames to skip at the beginning of the video.
    """
    # Create a video player to play with target fps.
    player = None
    try:
        player = utils.VideoPlayer(source=source, flip=flip, fps=30, skip_first_frames=skip_first_frames)
        # Start video capturing.
        player.start()
        if use_popup:
            title = "Press ESC to Exit"
            cv2.namedWindow(winname=title, flags=cv2.WINDOW_GUI_NORMAL | cv2.WINDOW_AUTOSIZE)

        processing_times = collections.deque()
        while True:
            # Grab the frame.
            frame = player.next()
            if frame is None:
                print("Source ended")
                break
            # If the frame is larger than full HD, reduce size to improve the performance.
            scale = 720 / max(frame.shape)
            if scale < 1:
                frame = cv2.resize(src=frame, dsize=None, fx=scale, fy=scale,
                                   interpolation=cv2.INTER_AREA)
            # Preprocess the input image.

            image = preprocess_images(frame, H, W)

            # Measure processing time for the input image.
            start_time = time.time()
            # Perform the inference step.
            stylized_image = compiled_model([image])[output_layer]
            stop_time = time.time()

            # Postprocessing for stylized image.
            result_image = convert_result_to_image(frame, stylized_image)

            processing_times.append(stop_time - start_time)
            # Use processing times from last 200 frames.
            if len(processing_times) > 200:
                processing_times.popleft()
            processing_time_det = np.mean(processing_times) * 1000

            # Visualize the results.
            f_height, f_width = frame.shape[:2]
            fps = 1000 / processing_time_det
            cv2.putText(result_image, text=f"Inference time: {processing_time_det:.1f}ms ({fps:.1f} FPS)",
                        org=(20, 40),fontFace=cv2.FONT_HERSHEY_COMPLEX, fontScale=f_width / 1000,
                        color=(0, 0, 255), thickness=1, lineType=cv2.LINE_AA)

            # Use this workaround if there is flickering.
            if use_popup:
                cv2.imshow(title, result_image)
                key = cv2.waitKey(1)
                # escape = 27
                if key == 27:
                    break
            else:
                # Encode numpy array to jpg.
                _, encoded_img = cv2.imencode(".jpg", result_image, params=[cv2.IMWRITE_JPEG_QUALITY, 90])
                # Create an IPython image.
                i = display.Image(data=encoded_img)
                # Display the image in this notebook.
                display.clear_output(wait=True)
                display.display(i)
    # ctrl-c
    except KeyboardInterrupt:
        print("Interrupted")
    # any different error
    except RuntimeError as e:
        print(e)
    finally:
        if player is not None:
            # Stop capturing.
            player.stop()
        if use_popup:
            cv2.destroyAllWindows()
スタイル転送の実行
次に、ウェブカメラまたはビデオファイルのビデオを使用して、スタイル転送モデルを適用します。デフォルトでは、プライマリー・ウェブカメラは source=0 に設定されます。複数のウェブカメラがある場合、0 から始まる連続した番号が割り当てられます。前面カメラを使用するには、flip=True を設定します。一部のウェブブラウザー、特に Mozilla Firefox ではちらつきが発生する場合があります。ちらつきが発生する場合、use_popup=True を設定してください。
注: ウェブカメラを使用するには、ウェブカメラを備えたコンピューター上でこの Jupyter ノートブックを実行する必要があります。サーバー上で実行すると、ウェブカメラにアクセスできなくなります。ただし、最終ステップではビデオファイルに対して推論を実行することはできます。
ウェブカメラがない場合でも、ビデオファイルを使用してこのデモを実行できます。OpenCV でサポートされている形式であればどれでも機能します。
USE_WEBCAM = False

cam_id = 0
video_file = "https://storage.openvinotoolkit.org/repositories/openvino_notebooks/data/data/video/Coco%20Walking%20in%20Berkeley.mp4"

source = cam_id if USE_WEBCAM else video_file

run_style_transfer(source=source, flip=isinstance(source, int), use_popup=False)