TensorFlow オブジェクト検出モデルを OpenVINO™ に変換
この Jupyter ノートブックはオンラインで起動でき、ブラウザーのウィンドウで対話型環境を開きます。ローカルにインストールすることもできます。次のオプションのいずれかを選択します。


TensorFlow (略して TF) は、マシンラーニング向けのオープンソース・フレームワークです。
TensorFlow オブジェクト検出 API は、TensorFlow 上に構築されたオープンソースのコンピューター・ビジョン・フレームワークです。これは、同じ画像内の複数のオブジェクトを特定できるオブジェクト検出、および画像のセグメント化モデルの構築に使用されます。TensorFlow オブジェクト検出 API はさまざまなアーキテクチャーとモデルをサポートしており、TensorFlow ハブからダウンロードできます。
このチュートリアルでは、モデル・コンバーターを使用して、TensorFlow Faster R-CNN with Resnet-50 V1 インスタンス・セグメント化モデルを OpenVINO 中間表現 (OpenVINO IR) 形式に変換する方法を説明します。OpenVINO IR を作成した後、OpenVINO ランタイムにモデルをロードし、サンプルイメージを使用して推論を実行します。
目次
必要条件
必要なパッケージをインストールします。
%pip install -q "openvino>=2023.1.0" "numpy>=1.21.0" "opencv-python" "matplotlib>=3.4"
Note: you may need to restart the kernel to use updated packages.
ノートブックはユーティリティー関数を使用します。以下のセルは、GitHub から notebook_utils Python モジュールをダウンロードします。
# Fetch the notebook utils script from the openvino_notebooks repo
import urllib.request

urllib.request.urlretrieve(
    url="https://raw.githubusercontent.com/openvinotoolkit/openvino_notebooks/main/notebooks/utils/notebook_utils.py",
    filename="notebook_utils.py",
);
インポート
# Standard python modules
from pathlib import Path

# External modules and dependencies
import cv2
import matplotlib.pyplot as plt
import numpy as np
# OpenVINO import
import openvino as ov

# Notebook utils module
from notebook_utils import download_file
設定
モデル関連の変数を定義し、対応するディレクトリーを作成します。
# Create directories for models files
model_dir = Path("model")
model_dir.mkdir(exist_ok=True)

# Create directory for TensorFlow model
tf_model_dir = model_dir / "tf"
tf_model_dir.mkdir(exist_ok=True)

# Create directory for OpenVINO IR model
ir_model_dir = model_dir / "ir"
ir_model_dir.mkdir(exist_ok=True)

model_name = "faster_rcnn_resnet50_v1_640x640"

openvino_ir_path = ir_model_dir / f"{model_name}.xml"

tf_model_url = "https://www.kaggle.com/models/tensorflow/faster-rcnn-resnet-v1/frameworks/tensorFlow2/variations/faster-rcnn-resnet50-v1-640x640/versions/1?tf-hub-format=compressed"

tf_model_archive_filename = f"{model_name}.tar.gz"
TensorFlow ハブからモデルをダウンロード
TensorFlow オブジェクト検出モデル (faster_rcnn_resnet50_v1_640x640) を含むアーカイブを TensorFlow ハブからダウンロードします。
download_file(
    url=tf_model_url,
    filename=tf_model_archive_filename,
    directory=tf_model_dir
)
model/tf/faster_rcnn_resnet50_v1_640x640.tar.gz: 0%| | 0.00/101M [00:00<?, ?B/s]
PosixPath('/opt/home/k8sworker/ci-ai/cibuilds/ov-notebook/OVNotebookOps-609/.workspace/scm/ov-notebook/notebooks/120-tensorflow-object-detection-to-openvino/model/tf/faster_rcnn_resnet50_v1_640x640.tar.gz')
ダウンロードしたアーカイブから TensorFlow オブジェクト検出モデルを抽出します。
import tarfile

with tarfile.open(tf_model_dir / tf_model_archive_filename) as file:
    file.extractall(path=tf_model_dir)
モデルを OpenVINO IR に変換
OpenVINO モデル・コンバーター API を使用して、TensorFlow モデルを OpenVINO IR に変換できます。
ov.convert_model 関数は TensorFlow モデルへのパスを受け入れ、このモデルを表す OpenVINO モデルクラスのインスタンスを返します。また、TensorFlow ハブのモデル概要ページに記載されているモデル入力形状 (input_shape) を提供する必要があります。
変換されたモデルは、compile_model を使用してデバイスにロードする準備ができており、また、save_model 関数を使用してディスクに保存して、将来モデルを実行する際にロード時間を短縮することもできます。
モデル変換と TensorFlow モデルのサポートの詳細については、モデル準備ガイドを参照してください。
ov_model = ov.convert_model(tf_model_dir)

# Save converted OpenVINO IR model to the corresponding directory
ov.save_model(ov_model, openvino_ir_path)
変換されたモデルの推論テスト
推論デバイスの選択
OpenVINO を使用して推論を実行するためにドロップダウン・リストからデバイスを選択します。
import ipywidgets as widgets

core = ov.Core()
device = widgets.Dropdown(
    options=core.available_devices + ["AUTO"],
    value='AUTO',
    description='Device:',
    disabled=False,
)

device
Dropdown(description='Device:', index=1, options=('CPU', 'AUTO'), value='AUTO')
モデルのロード
core = ov.Core()
openvino_ir_model = core.read_model(openvino_ir_path)
compiled_model = core.compile_model(model=openvino_ir_model, device_name=device.value)
モデルの情報を取得
Resnet-50 V1 オブジェクト検出モデルを使用した高速 R-CNN には、可変サイズの 3 チャネル画像の 1 つの入力があります。入力テンソルの形状は [1, height, width, 3] で、値は [0, 255] です。
モデル出力辞書にはいくつかのテンソルが含まれています。
num_detections-[N]形式の検出回数。[ymin, xmin, ymax, xmax]形式で指定されたdetection_boxes- すべてのN個の検出の境界ボックス座標。detection_classes- ラベルファイルからのN検出クラス・インデックスのサイズ。detection_scores- 検出されたクラスごとのN個の検出スコア (信頼度)。raw_detection_boxes- 非最大値抑制なしでデコードされた検出ボックス。raw_detection_scores- 生の検出ボックスのクラス・スコア・ロジット。detection_anchor_indices- NMS 後の検出のアンカー・インデックス。detection_multiclass_scores- 背景クラスを含む画像内の検出ボックスのクラススコア分布 (背景を含む)。
このチュートリアルでは、主に detection_boxes、detection_classes、detection_scores テンソルを使用します。重要なことは、これらのテンソルの値は互いに対応しており、最高の検出スコアによって順序付けられていることです。最初の検出ボックスは、最初の検出クラスと最初の (そして最高の) 検出スコアに対応します。
モデルの入力、出力、およびその形式の詳細については、TensorFlow ハブのモデルの概要ページを参照してください。
model_inputs = compiled_model.inputs
model_input = compiled_model.input(0)
model_outputs = compiled_model.outputs

print("Model inputs count:", len(model_inputs))
print("Model input:", model_input)

print("Model outputs count:", len(model_outputs))
print("Model outputs:")
for output in model_outputs:
    print("  ", output)
Model inputs count: 1
Model input: <ConstOutput: names[input_tensor] shape[1,?,?,3] type: u8>
Model outputs count: 8
Model outputs:
   <ConstOutput: names[detection_anchor_indices] shape[1,?] type: f32>
   <ConstOutput: names[detection_boxes] shape[1,?,..8] type: f32>
   <ConstOutput: names[detection_classes] shape[1,?] type: f32>
   <ConstOutput: names[detection_multiclass_scores] shape[1,?,..182] type: f32>
   <ConstOutput: names[detection_scores] shape[1,?] type: f32>
   <ConstOutput: names[num_detections] shape[1] type: f32>
   <ConstOutput: names[raw_detection_boxes] shape[1,300,4] type: f32>
   <ConstOutput: names[raw_detection_scores] shape[1,300,91] type: f32>
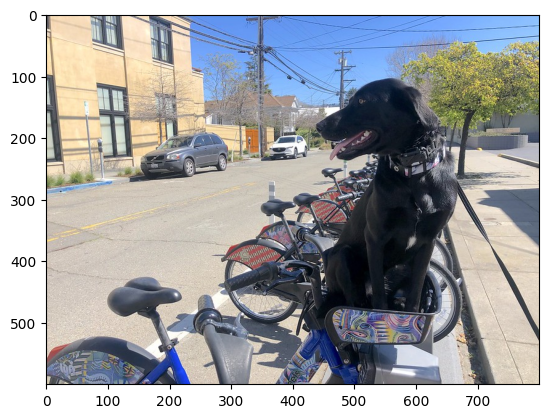
テスト推論用の画像を取得
画像を読み込んで保存します。
image_path = Path("./data/coco_bike.jpg")

download_file(
    url="https://storage.openvinotoolkit.org/repositories/openvino_notebooks/data/data/image/coco_bike.jpg",
    filename=image_path.name,
    directory=image_path.parent,
)
'data/coco_bike.jpg' already exists.
PosixPath('/opt/home/k8sworker/ci-ai/cibuilds/ov-notebook/OVNotebookOps-609/.workspace/scm/ov-notebook/notebooks/120-tensorflow-object-detection-to-openvino/data/coco_bike.jpg')
画像を読み取り、サイズを変更して、ネットワークの入力形状に変換します。
# Read the image
image = cv2.imread(filename=str(image_path))

# The network expects images in RGB format
image = cv2.cvtColor(image, code=cv2.COLOR_BGR2RGB)

# Resize the image to the network input shape
resized_image = cv2.resize(src=image, dsize=(255, 255))

# Transpose the image to the network input shape
network_input_image = np.expand_dims(resized_image, 0)

# Show the image
plt.imshow(image)
<matplotlib.image.AxesImage at 0x7f62f45088e0>
推論の実行
inference_result = compiled_model(network_input_image)
テスト画像に対するモデル推論の後、結果からオブジェクト検出データを抽出できます。モデル結果のさらなる視覚化には、detection_boxes、detection_boxes、detection_classes および detection_scores 出力が使用されます。
_, detection_boxes, detection_classes, _, detection_scores, num_detections, _, _ = model_outputs

image_detection_boxes = inference_result[detection_boxes]
print("image_detection_boxes:", image_detection_boxes)

image_detection_classes = inference_result[detection_classes]
print("image_detection_classes:", image_detection_classes)

image_detection_scores = inference_result[detection_scores]
print("image_detection_scores:", image_detection_scores)

image_num_detections = inference_result[num_detections]
print("image_detections_num:", image_num_detections)

# Alternatively, inference result data can be extracted by model output name with `.get()` method
assert (inference_result[detection_boxes] == inference_result.get("detection_boxes")).all(), "extracted inference result data should be equal"
image_detection_boxes: [[[0.1645457  0.54601336 0.8953864  0.85500604]
  [0.67189544 0.01240015 0.9843237  0.53085935]
  [0.49188587 0.0117609  0.98050654 0.8866383 ]
  ...
  [0.43604603 0.59332204 0.4692565  0.6341099 ]
  [0.46022677 0.59246916 0.48732638 0.61871874]
  [0.47092935 0.4351712  0.5583364  0.5072162 ]]]
image_detection_classes: [[18.  2.  2.  3.  2.  8.  2.  2.  3.  2.  4.  4.  2.  4. 16.  1.  1.  2.
  27.  8. 62.  2.  2.  4.  4.  2. 18. 41.  4.  4.  2. 18.  2.  2.  4.  2.
  27.  2. 27.  2.  1.  2. 16.  1. 16.  2.  2.  2.  2. 16.  2.  2.  4.  2.
   1. 33.  4. 15.  3.  2.  2.  1.  2.  1.  4.  2.  3. 11.  4. 35.  4.  1.
  40.  2. 62.  2.  4.  4. 36.  1. 36. 36. 31. 77.  2.  1. 51.  1. 34.  3.
   2.  3. 90.  2.  1.  2.  1.  2.  1.  1.  2.  4. 18.  2.  3.  2. 31.  1.
   1.  2.  2. 33. 41. 41. 31.  3.  1. 36.  3. 15. 27. 27.  4.  4.  2. 37.
   3. 15.  1. 35. 27.  4. 36.  4. 88.  3.  2. 15.  2.  4.  2.  1.  3.  4.
  27.  4.  3. 16. 44.  1.  1. 23.  4.  1.  4.  3.  4. 15. 62. 36. 77.  3.
   1. 28. 27. 35.  2. 36. 75. 28. 27.  8.  3. 36.  4. 44.  2. 35.  4.  1.
   3.  1.  1. 35. 87.  1.  1.  1. 15. 84.  1.  1.  1.  3.  1. 35.  1.  1.
   1. 62. 15.  1. 15. 44.  1. 41.  1. 62.  4.  4.  3. 43. 16. 35. 15.  2.
   4. 34. 14.  3. 62. 33.  4. 41.  2. 35. 18.  3. 15.  1. 27.  4. 87.  2.
  19. 21.  1.  1. 27.  1.  3.  3.  2. 15. 38.  1.  1. 15. 27.  4.  4.  3.
  84. 38.  1. 15.  3. 20. 62. 58. 41. 20.  2.  4. 88. 62. 15. 31.  1. 31.
  14. 19.  4.  1.  2.  8. 18. 15.  4.  2.  2.  2. 31. 84. 15.  3. 28.  2.
  27. 18. 15.  1. 31. 28.  1. 41.  8.  1.  3. 20.]]
image_detection_scores: [[0.9810079  0.9406672  0.9318088  0.877368   0.8406416  0.590001
  0.55449295 0.53957206 0.49390146 0.48142543 0.46272704 0.44070077
  0.40116653 0.34708446 0.31795666 0.27489546 0.24746332 0.23632598
  0.23248206 0.22401379 0.21871354 0.20231584 0.19377239 0.14768413
  0.1455532  0.14337878 0.12709719 0.12582931 0.11867398 0.11002147
  0.10564942 0.09225623 0.08963215 0.08887199 0.08704525 0.08072542
  0.08002211 0.07911447 0.0666113  0.06338121 0.06100726 0.06005874
  0.05798694 0.05364129 0.0520498  0.05011013 0.04850959 0.04709018
  0.04469205 0.04128502 0.04075819 0.03989548 0.03523409 0.03272378
  0.03108071 0.02970156 0.028723   0.02845931 0.02585638 0.02348842
  0.0233041  0.02148155 0.02133748 0.02086138 0.02035652 0.01959795
  0.01931953 0.01926655 0.01872199 0.0185623  0.01853302 0.01838779
  0.01818969 0.01780701 0.01727104 0.0166365  0.01586579 0.01579063
  0.01573381 0.01528252 0.01502847 0.01451413 0.01439992 0.01428944
  0.01419329 0.01380476 0.01360496 0.0129911  0.01249144 0.01198867
  0.01148862 0.01145841 0.01144459 0.01139607 0.01113943 0.01108592
  0.01089338 0.01082358 0.01051232 0.01027328 0.01006837 0.00979451
  0.0097324  0.00960593 0.00957182 0.00953105 0.00949826 0.00942655
  0.00942555 0.00931226 0.00907306 0.00887798 0.00884452 0.00881256
  0.00864548 0.00854316 0.00849879 0.00849662 0.00846909 0.00820138
  0.00816586 0.00791354 0.00790157 0.0076993  0.00768906 0.00766408
  0.00766065 0.00764457 0.0074557  0.00721993 0.00706666 0.00700596
  0.0067884  0.00648049 0.00646963 0.0063817  0.00635814 0.00625102
  0.0062297  0.00599666 0.00591931 0.00585055 0.00578007 0.00576511
  0.00572359 0.00560452 0.00558355 0.00556507 0.00553867 0.00548295
  0.00547356 0.00543471 0.00543378 0.00540831 0.0053792  0.00535764
  0.00523385 0.00518935 0.00505314 0.00505005 0.00492085 0.0048256
  0.00471783 0.00470318 0.00464703 0.00461124 0.004583   0.00457273
  0.00455803 0.00454314 0.00454088 0.00441311 0.00437612 0.00426319
  0.00420744 0.00415996 0.00409997 0.00409557 0.00407971 0.00405195
  0.00404085 0.00399853 0.00399512 0.00393439 0.00390283 0.00387302
  0.0038489  0.00382758 0.00380028 0.00379529 0.00376791 0.00374193
  0.00371191 0.0036963  0.00366445 0.00358808 0.00351783 0.00350439
  0.00344527 0.00343266 0.00342918 0.0033823  0.00332239 0.00330844
  0.00329753 0.00327267 0.00315135 0.0031098  0.00308979 0.00308362
  0.00305496 0.00304868 0.00304044 0.00303659 0.00302582 0.00301237
  0.00298851 0.00291267 0.00290264 0.00289242 0.00287722 0.00286563
  0.0028257  0.00282502 0.00275258 0.00274531 0.0027204  0.00268617
  0.00261917 0.00260795 0.00256594 0.00254094 0.00252856 0.00250768
  0.00249793 0.00249551 0.00248255 0.00247911 0.00246619 0.00241695
  0.00240165 0.00236032 0.00235902 0.00234437 0.00234337 0.0023379
  0.00233535 0.00230773 0.00230558 0.00229113 0.00228888 0.0022631
  0.00225214 0.00224186 0.00222553 0.00219966 0.00219677 0.00217865
  0.00217775 0.00215921 0.0021541  0.00214997 0.00212954 0.00211928
  0.0021005  0.00205066 0.0020487  0.00203887 0.00203537 0.00203026
  0.00201357 0.00199936 0.00199386 0.00197951 0.00197287 0.00195502
  0.00194848 0.00192128 0.00189951 0.00187285 0.0018519  0.0018299
  0.00179158 0.00177908 0.00176328 0.00176319 0.00175034 0.00173788
  0.00172983 0.00172819 0.00168272 0.0016768  0.00167543 0.00167397
  0.0016395  0.00163637 0.00163319 0.00162886 0.00162824 0.00162028]]
image_detections_num: [300.]
推論結果の可視化
推論結果を視覚化するためのユーティリティー関数を定義します
import random
from typing import Optional


def add_detection_box(box: np.ndarray, image: np.ndarray, label: Optional[str] = None) -> np.ndarray:
    """
    Helper function for adding single bounding box to the image

    Parameters
    ----------
    box : np.ndarray
        Bounding box coordinates in format [ymin, xmin, ymax, xmax]
    image : np.ndarray
        The image to which detection box is added
    label : str, optional
        Detection box label string, if not provided will not be added to result image (default is None)

    Returns
    -------
    np.ndarray
        NumPy array including both image and detection box

    """
    ymin, xmin, ymax, xmax = box
    point1, point2 = (int(xmin), int(ymin)), (int(xmax), int(ymax))
    box_color = [random.randint(0, 255) for _ in range(3)]
    line_thickness = round(0.002 * (image.shape[0] + image.shape[1]) / 2) + 1

    cv2.rectangle(img=image, pt1=point1, pt2=point2, color=box_color, thickness=line_thickness, lineType=cv2.LINE_AA)

    if label:
        font_thickness = max(line_thickness - 1, 1)
        font_face = 0
        font_scale = line_thickness / 3
        font_color = (255, 255, 255)
        text_size = cv2.getTextSize(text=label, fontFace=font_face, fontScale=font_scale, thickness=font_thickness)[0]
        # Calculate rectangle coordinates
        rectangle_point1 = point1
        rectangle_point2 = (point1[0] + text_size[0], point1[1] - text_size[1] - 3)
        # Add filled rectangle
        cv2.rectangle(img=image, pt1=rectangle_point1, pt2=rectangle_point2, color=box_color, thickness=-1, lineType=cv2.LINE_AA)
        # Calculate text position
        text_position = point1[0], point1[1] - 3
        # Add text with label to filled rectangle
        cv2.putText(img=image, text=label, org=text_position, fontFace=font_face, fontScale=font_scale, color=font_color, thickness=font_thickness, lineType=cv2.LINE_AA)
    return image
from typing import Dict

from openvino.runtime.utils.data_helpers import OVDict


def visualize_inference_result(inference_result: OVDict, image: np.ndarray, labels_map: Dict, detections_limit: Optional[int] = None):
    """
    Helper function for visualizing inference result on the image

    Parameters
    ----------
    inference_result : OVDict
        Result of the compiled model inference on the test image
    image : np.ndarray
        Original image to use for visualization
    labels_map : Dict
        Dictionary with mappings of detection classes numbers and its names
    detections_limit : int, optional
        Number of detections to show on the image, if not provided all detections will be shown (default is None)
    """
    detection_boxes: np.ndarray = inference_result.get("detection_boxes")
    detection_classes: np.ndarray = inference_result.get("detection_classes")
    detection_scores: np.ndarray = inference_result.get("detection_scores")
    num_detections: np.ndarray = inference_result.get("num_detections")

    detections_limit = int(
        min(detections_limit, num_detections[0])
        if detections_limit is not None
        else num_detections[0]
    )

    # Normalize detection boxes coordinates to original image size
    original_image_height, original_image_width, _ = image.shape
    normalized_detection_boxex = detection_boxes[::] * [
        original_image_height,
        original_image_width,
        original_image_height,
        original_image_width,
    ]

    image_with_detection_boxex = np.copy(image)

    for i in range(detections_limit):
        detected_class_name = labels_map[int(detection_classes[0, i])]
        score = detection_scores[0, i]
        label = f"{detected_class_name} {score:.2f}"
        add_detection_box(
            box=normalized_detection_boxex[0, i],
            image=image_with_detection_boxex,
            label=label,
        )

    plt.imshow(image_with_detection_boxex)
このノートブックで使用されている TensorFlow オブジェクト検出モデル (faster_rcnn_resnet50_v1_640x640) は、91 クラスの COCO 2017 データセットでトレーニングされました。視覚化エクスペリエンスを向上させるため、クラス番号やインデックスの代わりに、人間が判読できるクラス名を持つ COCO データセット・ラベルを使用できます。
COCO データセットのクラスラベルは、Open Model Zoo からダウンロードできます。
coco_labels_file_path = Path("./data/coco_91cl.txt")

download_file(
    url="https://raw.githubusercontent.com/openvinotoolkit/open_model_zoo/master/data/dataset_classes/coco_91cl.txt",
    filename=coco_labels_file_path.name,
    directory=coco_labels_file_path.parent,
)
data/coco_91cl.txt: 0%| | 0.00/421 [00:00<?, ?B/s]
PosixPath('/opt/home/k8sworker/ci-ai/cibuilds/ov-notebook/OVNotebookOps-609/.workspace/scm/ov-notebook/notebooks/120-tensorflow-object-detection-to-openvino/data/coco_91cl.txt')
次に、ダウンロードしたファイルから検出クラスの番号とその名前のマッピングを含む辞書 coco_labels_map を作成する必要があります。
with open(coco_labels_file_path, "r") as file:
    coco_labels = file.read().strip().split("\n")
    coco_labels_map = dict(enumerate(coco_labels, 1))

print(coco_labels_map)
{1: 'person', 2: 'bicycle', 3: 'car', 4: 'motorcycle', 5: 'airplan', 6: 'bus', 7: 'train', 8: 'truck', 9: 'boat', 10: 'traffic light', 11: 'fire hydrant', 12: 'street sign', 13: 'stop sign', 14: 'parking meter', 15: 'bench', 16: 'bird', 17: 'cat', 18: 'dog', 19: 'horse', 20: 'sheep', 21: 'cow', 22: 'elephant', 23: 'bear', 24: 'zebra', 25: 'giraffe', 26: 'hat', 27: 'backpack', 28: 'umbrella', 29: 'shoe', 30: 'eye glasses', 31: 'handbag', 32: 'tie', 33: 'suitcase', 34: 'frisbee', 35: 'skis', 36: 'snowboard', 37: 'sports ball', 38: 'kite', 39: 'baseball bat', 40: 'baseball glove', 41: 'skateboard', 42: 'surfboard', 43: 'tennis racket', 44: 'bottle', 45: 'plate', 46: 'wine glass', 47: 'cup', 48: 'fork', 49: 'knife', 50: 'spoon', 51: 'bowl', 52: 'banana', 53: 'apple', 54: 'sandwich', 55: 'orange', 56: 'broccoli', 57: 'carrot', 58: 'hot dog', 59: 'pizza', 60: 'donut', 61: 'cake', 62: 'chair', 63: 'couch', 64: 'potted plant', 65: 'bed', 66: 'mirror', 67: 'dining table', 68: 'window', 69: 'desk', 70: 'toilet', 71: 'door', 72: 'tv', 73: 'laptop', 74: 'mouse', 75: 'remote', 76: 'keyboard', 77: 'cell phone', 78: 'microwave', 79: 'oven', 80: 'toaster', 81: 'sink', 82: 'refrigerator', 83: 'blender', 84: 'book', 85: 'clock', 86: 'vase', 87: 'scissors', 88: 'teddy bear', 89: 'hair drier', 90: 'toothbrush', 91: 'hair brush'}
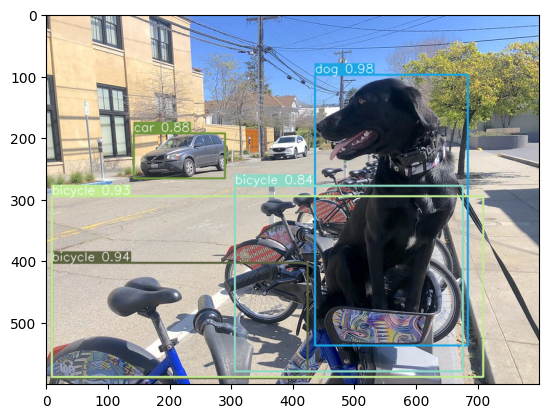
最後に、元のテスト画像でモデル推論結果を視覚化する準備が整いました。
visualize_inference_result(
    inference_result=inference_result,
    image=image,
    labels_map=coco_labels_map,
    detections_limit=5,
)
次のステップ
このセクションでは、OpenVINO を使用してアプリケーションのパフォーマンスをさらに向上させる方法に関する提案を示します。
非同期推論パイプライン
非同期 API の主な利点は、デバイスが推論でビジー状態のときに、アプリケーションが現在の推論が完了するのを待つのではなく、他のタスク (例えば、入力の入力や他の要求のスケジュール設定) を並行して実行できることです。OpenVINO を使用して非同期推論を実行する方法を理解するには、非同期 API のチュートリアルを参照してください。
モデルへの統合前処理
前処理 API を使用すると、前処理をモデルの一部にすることができ、アプリケーション・コードと追加の画像処理ライブラリーへの依存関係が削減されます。前処理 API の主な利点は、前処理手順が実行グラフに統合され、アプリケーションの一部として常に CPU 上で実行されるのではなく、選択したデバイス (CPU/GPU など) 上で実行されることです。これにより、選択したデバイスの使用率が向上します。
詳細については、前処理の最適化チュートリアルと前処理 API の概要を参照してください。