話者ダイアライゼーション
この Jupyter ノートブックは、ローカルへのインストール後にのみ起動できます。

話者ダイアライゼーションは、人間の音声を含むオーディオストリームを、各話者の ID に応じて均質なセグメントに分割するプロセスです。オーディオストリームを話者の順番に構造化し、話者認識システムと併用して話者の適切なの身元を提供することで、自動音声文字変換の読みやすさを向上させることができます。“誰がいつ話したか” という問いに答えるために使用されます。

image.png
毎年収集される放送、会議録音、ボイスメールの数が増加するにつれて、話者ダイアライゼーションはスピーチ・コミュニティーで大きな注目を集めています。話者ダイアライゼーションは、話者ラベルを使用して文字起こしを充実させる音声認識システムに不可欠な機能です。
話者ダイアライゼーションは、翻訳の読みやすさを向上させ、会話の内容をよりよく理解するために使用されます。話者ダイアライゼーションは、会話から重要なポイントやアクション項目を抽出し、誰が何を話したかを特定するのに役立ちます。また、オーディオに何人のスピーカーがいたかを識別するのにも役立ちます。
このチュートリアルでは、pyannote.audio と OpenVINO を使用して話者ダイアライゼーションのパイプラインを構築する方法について説明します。pyannote.audio は、話者ダイアライゼーション用に Python で書かれたオープンソース・ツールキットです。PyTorch ディープラーニング・フレームワークに基づいて、組み合わせによって最適化し、話者ダイアライゼーション・パイプラインを構築できる、トレーニング可能なエンドツーエンドのニューラル・ビルディング・ブロックのセットを提供します。pyannote の事前トレーニング済みモデルの詳細については、モデルカード、リポジトリー、論文をご覧ください。
目次
必要条件
%pip install -q "librosa>=0.8.1" "matplotlib<3.8" "ruamel.yaml>=0.17.8,<0.17.29" --extra-index-url https://download.pytorch.org/whl/cpu torch torchvision torchaudio git+https://github.com/eaidova/pyannote-audio.git@hub0.10 openvino>=2023.1.0
DEPRECATION: pytorch-lightning 1.6.5 has a non-standard dependency specifier torch>=1.8.*. pip 24.1 will enforce this behaviour change. A possible replacement is to upgrade to a newer version of pytorch-lightning or contact the author to suggest that they release a version with a conforming dependency specifiers. Discussion can be found at https://github.com/pypa/pip/issues/12063
ERROR: pip's dependency resolver does not currently take into account all the packages that are installed. This behaviour is the source of the following dependency conflicts.
googleapis-common-protos 1.62.0 requires protobuf!=3.20.0,!=3.20.1,!=4.21.1,!=4.21.2,!=4.21.3,!=4.21.4,!=4.21.5,<5.0.0.dev0,>=3.19.5, but you have protobuf 3.20.1 which is incompatible.
onnx 1.15.0 requires protobuf>=3.20.2, but you have protobuf 3.20.1 which is incompatible.
paddlepaddle 2.6.0 requires protobuf>=3.20.2; platform_system != "Windows", but you have protobuf 3.20.1 which is incompatible.
ppgan 2.1.0 requires imageio==2.9.0, but you have imageio 2.33.1 which is incompatible.
ppgan 2.1.0 requires librosa==0.8.1, but you have librosa 0.9.2 which is incompatible.
ppgan 2.1.0 requires opencv-python<=4.6.0.66, but you have opencv-python 4.9.0.80 which is incompatible.
tensorflow 2.12.0 requires protobuf!=4.21.0,!=4.21.1,!=4.21.2,!=4.21.3,!=4.21.4,!=4.21.5,<5.0.0dev,>=3.20.3, but you have protobuf 3.20.1 which is incompatible.
tensorflow-metadata 1.14.0 requires protobuf<4.21,>=3.20.3, but you have protobuf 3.20.1 which is incompatible.
Note: you may need to restart the kernel to use updated packages.
パイプラインの準備
従来の話者ダイアライゼーション・システムは、次の 5 つのステップのプロセスに一般化できます。
特徴抽出: 生の波形をメルスペクトログラムなどのオーディオ特徴に変換します。
音声アクティビティー検出: 音声アクティビティーが観察されたオーディオ内のチャンクを識別します。静寂やノイズには興味がないので、それらの無関係なチャンクを無視します。
話者変更検出: 音声に含まれる会話内の話者変更ポイントを識別します。
音声ターン表現: 特徴表現を作成して各サブチャンクをエンコードします。
音声ターンのクラスタリング: ベクトル表現に基づいてサブチャンクをクラスタリングします。クラスター数 (k) の可用性と前のステップの埋め込みプロセスに基づいて、異なるクラスタリング・アルゴリズムが適用される場合があります。
最終的な出力は、オーディオストリームからのさまざまなサブチャンクのクラスターになります。各クラスターには匿名識別子 (speaker_a、..) を与えることができ、それをオーディオストリームにマッピングして、話者認識オーディオ・タイムラインを作成できます。
次の図では、典型的な話者ダイアライゼーション・パイプラインを確認できます。
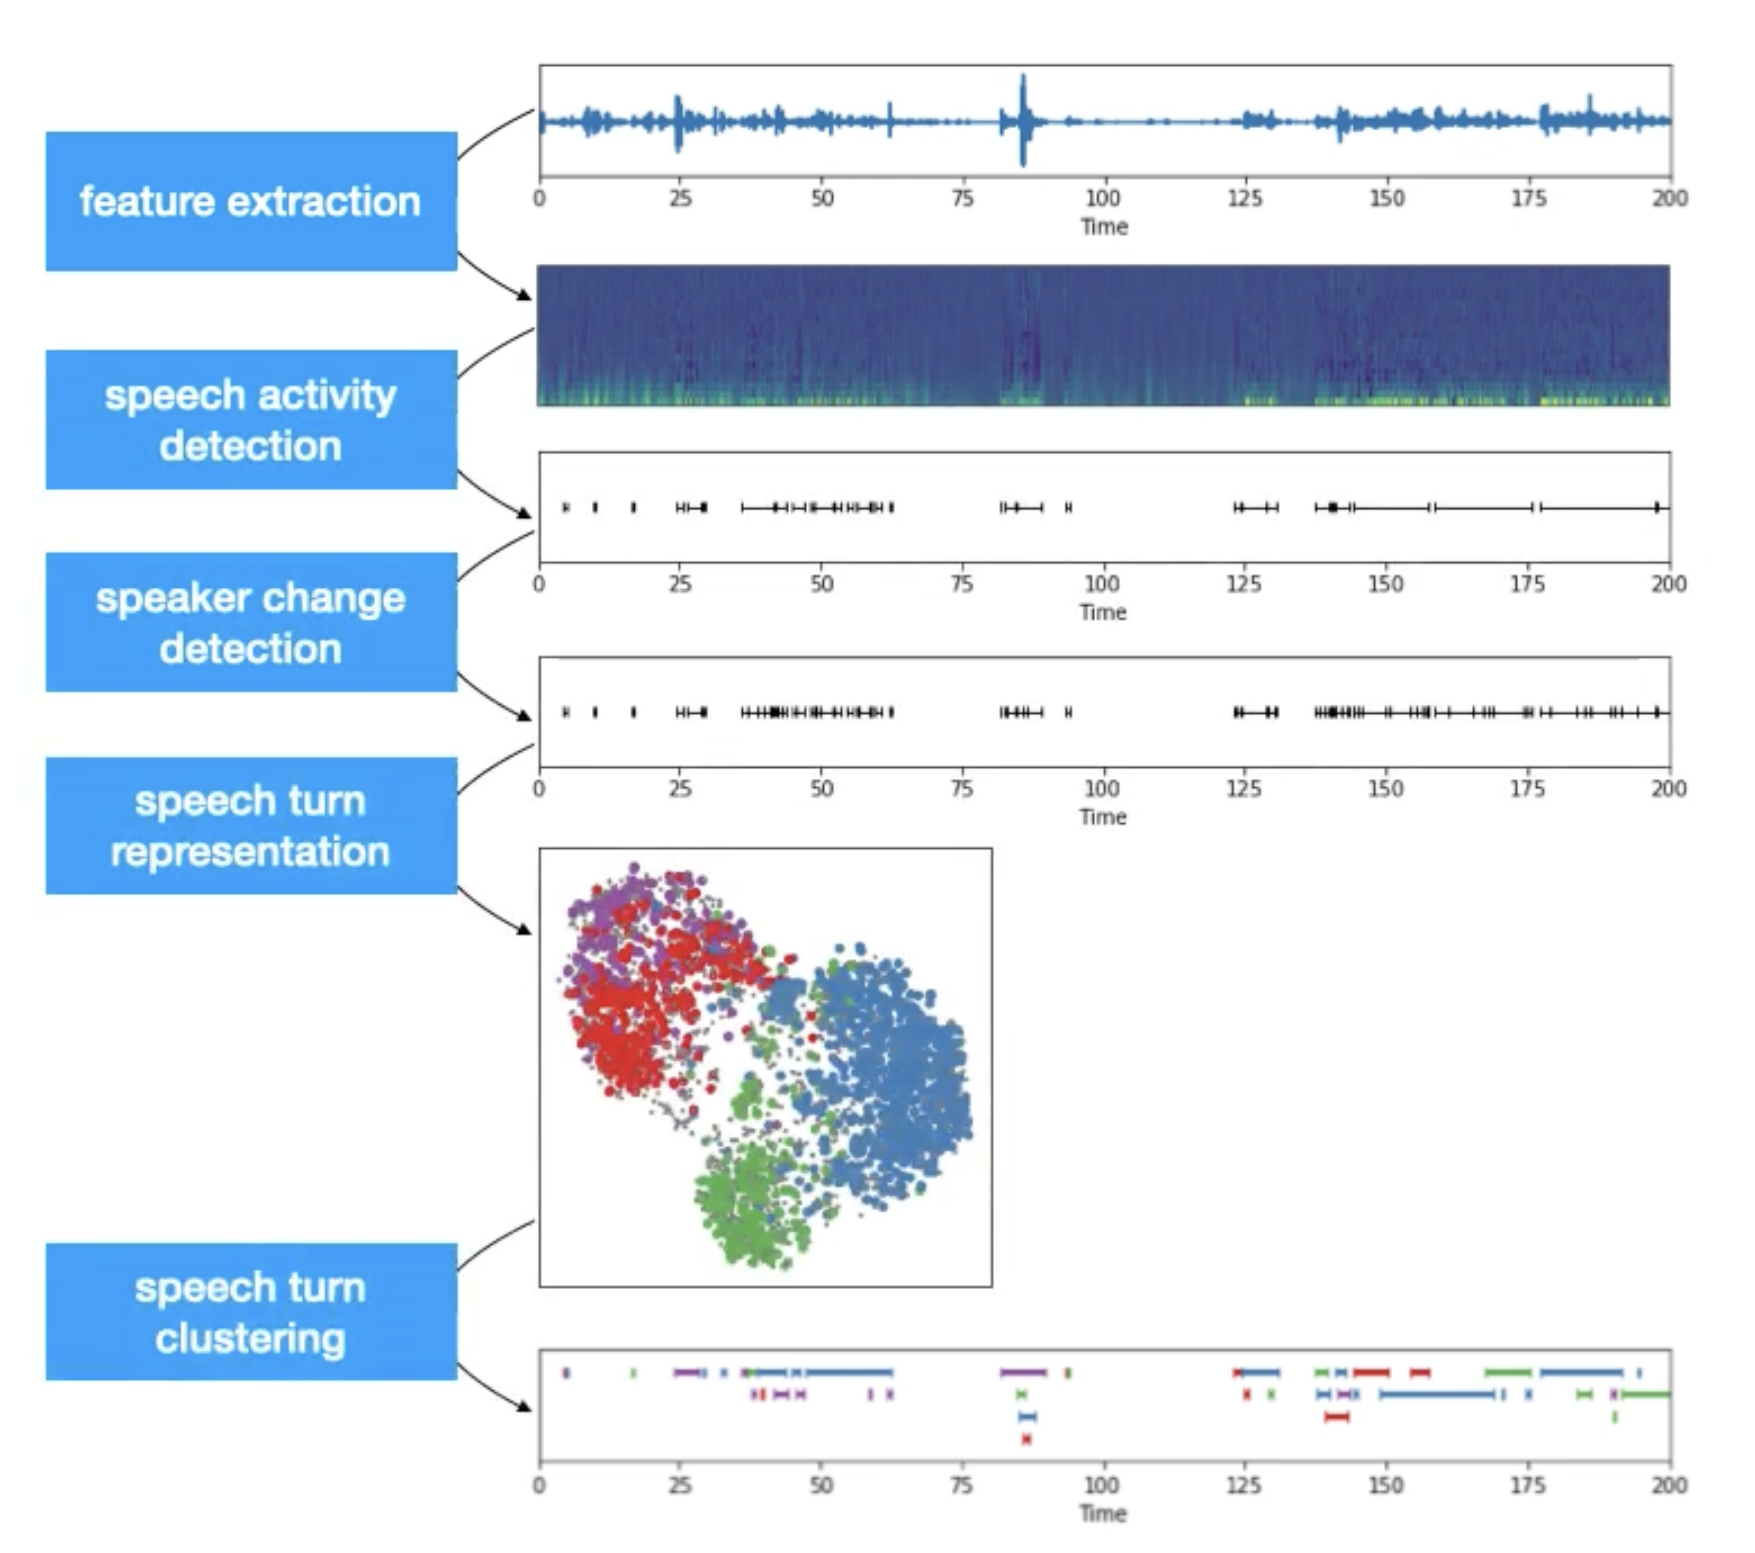
diarization_pipeline
簡単に言えば、話者ダイアライゼーションは、話者セグメント化と話者クラスタリングを組み合わせたものです。最初の目的は、オーディオストリーム内の話者変更ポイントを見つけることです。2 つ目は、話者特性に基づいて音声セグメントをグループ化します。
pyannote.audio ライブラリーを使用して話者ダイアライゼーション・パイプラインをインスタンス化するには、Pipeline クラスをインポートし、パイプライン構成または Hugging Face Hubからの識別を含むディレクトリーへのパスを指定して from_pretrained メソッドを使用する必要があります。
注: このチュートリアルでは、デモ目的でのみ提供されるモデル
philschmid/pyannote-speaker-diarization-endpointの非公式バージョンを使用します。元のモデル (pyannote/speaker-diarization) では、ダウンロードまたは重み付けを使用する前にモデルライセンスに同意する必要があります。続行する前に、pyannote/speaker-diarization にアクセスしてライセンスを読んで同意してください。このモデルを使用するには、Hugging Face Hub に登録したユーザーである必要があります。以下のコードを実行するには、アクセストークンを使用する必要があります。アクセストークンの詳細については、ドキュメントのセクションを参照してください。次のコードを使用して、ノートブック環境で Hugging Face Hub にログインできます。
## login to huggingfacehub to get access to pre-trained model

from huggingface_hub import notebook_login, whoami

try:
    whoami()
    print('Authorization token already provided')
except OSError:
    notebook_login()
from pyannote.audio import Pipeline

pipeline = Pipeline.from_pretrained("philschmid/pyannote-speaker-diarization-endpoint")
テスト・オーディオ・ファイルのロード
import sys

sys.path.append("../utils")

from notebook_utils import download_file

test_data_url = "https://github.com/pyannote/pyannote-audio/raw/develop/tutorials/assets/sample.wav"

sample_file = 'sample.wav'
download_file(test_data_url, 'sample.wav')
AUDIO_FILE = {'uri': sample_file.replace('.wav', ''), 'audio': sample_file}
sample.wav: 0%| | 0.00/938k [00:00<?, ?B/s]
import librosa
import matplotlib.pyplot as plt
import librosa.display
import IPython.display as ipd
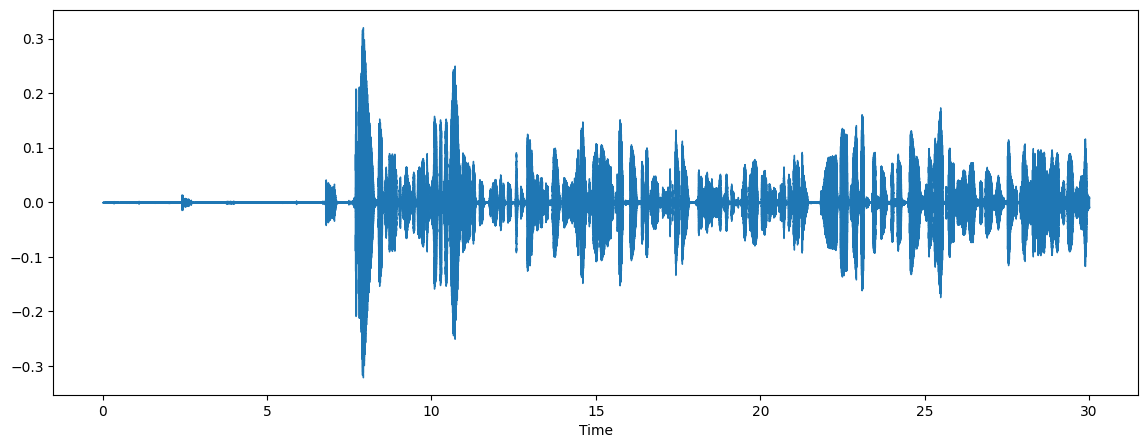
audio, sr = librosa.load(sample_file)
plt.figure(figsize=(14, 5))
librosa.display.waveshow(audio, sr=sr)
ipd.Audio(sample_file)
推論パイプラインの実行
推論を実行するには、パイプラインにオーディオを入力するパスを提供する必要があります。
%%capture
import time

start = time.perf_counter()
diarization = pipeline(AUDIO_FILE)
end = time.perf_counter()
print(f"Diarization pipeline took {end - start:.2f} s")
Diarization pipeline took 15.72 s
パイプラインを実行した結果は、各話者がいつ話すかを示す図として表すことができます。
diarization

各時間枠と対応する話者を印刷することもできます。
for turn, _, speaker in diarization.itertracks(yield_label=True):
    print(f"start={turn.start:.1f}s stop={turn.end:.1f}s speaker_{speaker}")
start=6.7s stop=7.1s speaker_SPEAKER_00
start=7.6s stop=8.6s speaker_SPEAKER_00
start=8.6s stop=10.0s speaker_SPEAKER_02
start=9.8s stop=11.0s speaker_SPEAKER_00
start=10.6s stop=14.7s speaker_SPEAKER_02
start=14.3s stop=17.9s speaker_SPEAKER_01
start=17.9s stop=21.5s speaker_SPEAKER_02
start=18.3s stop=18.4s speaker_SPEAKER_01
start=21.7s stop=28.6s speaker_SPEAKER_01
start=27.8s stop=29.5s speaker_SPEAKER_02
モデルを OpenVINO 中間表現形式に変換
OpenVINO で最良の結果を得るには、モデルを OpenVINO IR 形式に変換することを推奨します。OpenVINO は ONNX 変換を介して PyTorch をサポートします。PyTorch から ONNX モデルをエクスポートするには、torch.onnx.export を使用します。初期化されたモデルのインスタンスと、形状推論の入力例を提供する必要があります。ov.convert_model 機能を使用して ONNX モデルを変換します。mo.convert_model 関数は、デバイスにロードして予測を開始できる状態の OpenVINO モデルを返します。ov.save_model を使用して、次回の利用のためディスクに保存できます。
from pathlib import Path
import torch
import openvino as ov

core = ov.Core()

ov_speaker_segmentation_path = Path("pyannote-segmentation.xml")

if not ov_speaker_segmentation_path.exists():
    onnx_path = ov_speaker_segmentation_path.with_suffix(".onnx")
    torch.onnx.export(pipeline._segmentation.model, torch.zeros((1, 1, 80000)), onnx_path, input_names=["chunks"], output_names=["outputs"], dynamic_axes={"chunks": {0: "batch_size", 2: "wave_len"}})
    ov_speaker_segmentation = ov.convert_model(onnx_path)
    ov.save_model(ov_speaker_segmentation, str(ov_speaker_segmentation_path))
    print(f"Model successfully converted to IR and saved to {ov_speaker_segmentation_path}")
else:
    ov_speaker_segmentation = core.read_model(ov_speaker_segmentation_path)
    print(f"Model successfully loaded from {ov_speaker_segmentation_path}")
Model successfully converted to IR and saved to pyannote-segmentation.xml
推論デバイスの選択
OpenVINO を使用して推論を実行するためにドロップダウン・リストからデバイスを選択します。
import ipywidgets as widgets

device = widgets.Dropdown(
    options=core.available_devices + ["AUTO"],
    value='AUTO',
    description='Device:',
    disabled=False,
)

device
Dropdown(description='Device:', index=1, options=('CPU', 'AUTO'), value='AUTO')
セグメント化モデルを OpenVINO に置き換え
core = ov.Core()

ov_seg_model = core.compile_model(ov_speaker_segmentation, device.value)
infer_request = ov_seg_model.create_infer_request()
ov_seg_out = ov_seg_model.output(0)
import numpy as np


def infer_segm(chunks: torch.Tensor) -> np.ndarray:
    """
    Inference speaker segmentation mode using OpenVINO
    Parameters:
        chunks (torch.Tensor) input audio chunks
    Return:
        segments (np.ndarray)
    """
    res = ov_seg_model(chunks)
    return res[ov_seg_out]


pipeline._segmentation.infer = infer_segm
OpenVINO で話者ダイアライゼーションを実行
start = time.perf_counter()
diarization = pipeline(AUDIO_FILE)
end = time.perf_counter()
print(f"Diarization pipeline took {end - start:.2f} s")
Diarization pipeline took 15.12 s
diarization

for turn, _, speaker in diarization.itertracks(yield_label=True):
    print(f"start={turn.start:.1f}s stop={turn.end:.1f}s speaker_{speaker}")
start=6.7s stop=7.1s speaker_SPEAKER_00
start=7.6s stop=8.6s speaker_SPEAKER_00
start=8.6s stop=10.0s speaker_SPEAKER_02
start=9.8s stop=11.0s speaker_SPEAKER_00
start=10.6s stop=14.7s speaker_SPEAKER_02
start=14.3s stop=17.9s speaker_SPEAKER_01
start=17.9s stop=21.5s speaker_SPEAKER_02
start=18.3s stop=18.4s speaker_SPEAKER_01
start=21.7s stop=28.6s speaker_SPEAKER_01
start=27.8s stop=29.5s speaker_SPEAKER_02
ご覧のとおり、結果は同じレベルの精度を維持しています。