OpenVINO™ によるリアルタイムの物体検出
この Jupyter ノートブックはオンラインで起動でき、ブラウザーのウィンドウで対話型環境を開きます。ローカルにインストールすることもできます。次のオプションのいずれかを選択します。


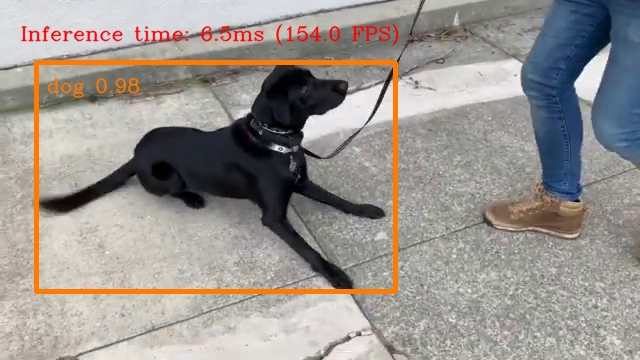
このノートブックは、Open Model Zoo の SSDLite MobileNetV2 を使用して、OpenVINO によるリアルタイムの物体検出を示します。このノートブックの最後では、ウェブカメラからのリアルタイムの推論結果が表示されます。 さらに、ビデオファイルをアップロードすることもできます。
注: このノートブックをウェブカメラで使用するには、ウェブカメラを備えたコンピューター上でノートブックを実行する必要があります。サーバー上でノートブックを実行すると、ウェブカメラは機能しなくなります。ただし、ビデオの推論を行うことはできます。
目次
準備
要件をインストール
%pip install -q "openvino-dev>=2023.1.0"
%pip install -q tensorflow
%pip install -q opencv-python requests tqdm

# Fetch `notebook_utils` module
import urllib.request
urllib.request.urlretrieve(
    url='https://raw.githubusercontent.com/openvinotoolkit/openvino_notebooks/main/notebooks/utils/notebook_utils.py',
    filename='notebook_utils.py'
)
DEPRECATION: pytorch-lightning 1.6.5 has a non-standard dependency specifier torch>=1.8.*. pip 24.1 will enforce this behaviour change. A possible replacement is to upgrade to a newer version of pytorch-lightning or contact the author to suggest that they release a version with a conforming dependency specifiers. Discussion can be found at https://github.com/pypa/pip/issues/12063
Note: you may need to restart the kernel to use updated packages.
('notebook_utils.py', <http.client.HTTPMessage at 0x7fcca8595400>)
インポート
import collections
import tarfile
import time
from pathlib import Path

import cv2
import numpy as np
from IPython import display
import openvino as ov
from openvino.tools.mo.front import tf as ov_tf_front
from openvino.tools import mo

import notebook_utils as utils
モデル
モデルのダウンロード
notebook_utils ファイルの関数である download_file を使用します。ディレクトリー構造が自動的に作成され、選択したモデルがダウンロードされます。パッケージがすでにダウンロードされ解凍されている場合、この手順はスキップされます。選択したモデルはパブリック・ディレクトリーから取得されます。つまり、OpenVINO 中間表現 (OpenVINO IR) に変換する必要があります。
注:
ssdlite_mobilenet_v2以外のモデルを使用する場合は、前処理および後処理だけでなく、異なる変換パラメーターが必要になる場合があります。
# A directory where the model will be downloaded.
base_model_dir = Path("model")

# The name of the model from Open Model Zoo
model_name = "ssdlite_mobilenet_v2"

archive_name = Path(f"{model_name}_coco_2018_05_09.tar.gz")
model_url = f"https://storage.openvinotoolkit.org/repositories/open_model_zoo/public/2022.1/{model_name}/{archive_name}"

# Download the archive
downloaded_model_path = base_model_dir / archive_name
if not downloaded_model_path.exists():
    utils.download_file(model_url, downloaded_model_path.name, downloaded_model_path.parent)

# Unpack the model
tf_model_path = base_model_dir / archive_name.with_suffix("").stem / "frozen_inference_graph.pb"
if not tf_model_path.exists():
    with tarfile.open(downloaded_model_path) as file:
        file.extractall(base_model_dir)
model/ssdlite_mobilenet_v2_coco_2018_05_09.tar.gz: 0%| | 0.00/48.7M [00:00<?, ?B/s]
モデルの変換
事前トレーニングされたモデルは TensorFlow 形式です。OpenVINO で使用するには、モデル変換 API (mo.convert_model 関数) を使用して OpenVINO IR 形式に変換します。モデルがすでに変換されている場合、この手順はスキップされます。
precision = "FP16"
# The output path for the conversion.
converted_model_path = Path("model") / f"{model_name}_{precision.lower()}.xml"

# Convert it to IR if not previously converted
trans_config_path = Path(ov_tf_front.__file__).parent / "ssd_v2_support.json"
if not converted_model_path.exists():
    ov_model = mo.convert_model(
        tf_model_path,
        compress_to_fp16=(precision == 'FP16'),
        transformations_config=trans_config_path,
        tensorflow_object_detection_api_pipeline_config=tf_model_path.parent / "pipeline.config",
        reverse_input_channels=True
    )
    ov.save_model(ov_model, converted_model_path)
    del ov_model
[ WARNING ] The Preprocessor block has been removed. Only nodes performing mean value subtraction and scaling (if applicable) are kept.
モデルのロード
モデルを実行するには、数行のコードで済みます。まず、OpenVINO ランタイムを初期化します。次に、.bin および .xml ファイルからネットワーク・アーキテクチャーとモデルの重みを読み取り、目的のデバイス用にコンパイルします。GPU を選択した場合、CPU に比べて起動時間が非常に長くなるため、しばらく待機する必要があります。
どのハードウェアが最高のパフォーマンスを提供するか OpenVINO に決定をゆだねることもあります。それには、AUTOを使用してください。
import ipywidgets as widgets

core = ov.Core()

device = widgets.Dropdown(
    options=core.available_devices + ["AUTO"],
    value='AUTO',
    description='Device:',
    disabled=False,
)


device
Dropdown(description='Device:', index=1, options=('CPU', 'AUTO'), value='AUTO')
# Read the network and corresponding weights from a file.
model = core.read_model(model=converted_model_path)
# Compile the model for CPU (you can choose manually CPU, GPU etc.)
# or let the engine choose the best available device (AUTO).
compiled_model = core.compile_model(model=model, device_name=device.value)

# Get the input and output nodes.
input_layer = compiled_model.input(0)
output_layer = compiled_model.output(0)

# Get the input size.
height, width = list(input_layer.shape)[1:3]
入力レイヤーと出力レイヤーには、それぞれ入力ノードと出力ノードの名前があります。SSDLite MobileNetV2 の場合、入力が 1 つ、出力が 1 つあります。
input_layer.any_name, output_layer.any_name
('image_tensor:0', 'detection_boxes:0')
処理
処理結果
最初に、使用可能なクラスをすべてリストし、それらのカラーを作成します。次に、後処理ステージで、正規化された座標 [0, 1] のボックスをピクセル座標 [0, image_size_in_px] のボックスに変換します。その後、非最大抑制を使用して、重複する検出と確率しきい値 (0.5) を下回る検出を拒否します。最後に、ボックスとその中にラベルを描画します。
# https://tech.amikelive.com/node-718/what-object-categories-labels-are-in-coco-dataset/
classes = [
    "background", "person", "bicycle", "car", "motorcycle", "airplane", "bus", "train",
    "truck", "boat", "traffic light", "fire hydrant", "street sign", "stop sign",
    "parking meter", "bench", "bird", "cat", "dog", "horse", "sheep", "cow", "elephant",
    "bear", "zebra", "giraffe", "hat", "backpack", "umbrella", "shoe", "eye glasses",
    "handbag", "tie", "suitcase", "frisbee", "skis", "snowboard", "sports ball", "kite",
    "baseball bat", "baseball glove", "skateboard", "surfboard", "tennis racket", "bottle",
    "plate", "wine glass", "cup", "fork", "knife", "spoon", "bowl", "banana", "apple",
    "sandwich", "orange", "broccoli", "carrot", "hot dog", "pizza", "donut", "cake", "chair",
    "couch", "potted plant", "bed", "mirror", "dining table", "window", "desk", "toilet",
    "door", "tv", "laptop", "mouse", "remote", "keyboard", "cell phone", "microwave", "oven",
    "toaster", "sink", "refrigerator", "blender", "book", "clock", "vase", "scissors",
    "teddy bear", "hair drier", "toothbrush", "hair brush"
]

# Colors for the classes above (Rainbow Color Map).
colors = cv2.applyColorMap(
    src=np.arange(0, 255, 255 / len(classes), dtype=np.float32).astype(np.uint8),
    colormap=cv2.COLORMAP_RAINBOW,
).squeeze()


def process_results(frame, results, thresh=0.6):
    # The size of the original frame.
    h, w = frame.shape[:2]
    # The 'results' variable is a [1, 1, 100, 7] tensor.
    results = results.squeeze()
    boxes = []
    labels = []
    scores = []
    for _, label, score, xmin, ymin, xmax, ymax in results:
        # Create a box with pixels coordinates from the box with normalized coordinates [0,1].
        boxes.append(
            tuple(map(int, (xmin * w, ymin * h, (xmax - xmin) * w, (ymax - ymin) * h)))
        )
        labels.append(int(label))
        scores.append(float(score))

    # Apply non-maximum suppression to get rid of many overlapping entities.
    # See https://paperswithcode.com/method/non-maximum-suppression
    # This algorithm returns indices of objects to keep.
    indices = cv2.dnn.NMSBoxes(
        bboxes=boxes, scores=scores, score_threshold=thresh, nms_threshold=0.6
    )

    # If there are no boxes.
    if len(indices) == 0:
        return []

    # Filter detected objects.
    return [(labels[idx], scores[idx], boxes[idx]) for idx in indices.flatten()]


def draw_boxes(frame, boxes):
    for label, score, box in boxes:
        # Choose color for the label.
        color = tuple(map(int, colors[label]))
        # Draw a box.
        x2 = box[0] + box[2]
        y2 = box[1] + box[3]
        cv2.rectangle(img=frame, pt1=box[:2], pt2=(x2, y2), color=color, thickness=3)

        # Draw a label name inside the box.
        cv2.putText(
            img=frame,
            text=f"{classes[label]} {score:.2f}",
            org=(box[0] + 10, box[1] + 30),
            fontFace=cv2.FONT_HERSHEY_COMPLEX,
            fontScale=frame.shape[1] / 1000,
            color=color,
            thickness=1,
            lineType=cv2.LINE_AA,
        )

    return frame
メイン処理関数
指定されたソースでオブジェクト検出を実行します。ウェブカメラまたはビデオファイルのいずれか。
# Main processing function to run object detection.
def run_object_detection(source=0, flip=False, use_popup=False, skip_first_frames=0):
    player = None
    try:
        # Create a video player to play with target fps.
        player = utils.VideoPlayer(
            source=source, flip=flip, fps=30, skip_first_frames=skip_first_frames
        )
        # Start capturing.
        player.start()
        if use_popup:
            title = "Press ESC to Exit"
            cv2.namedWindow(
                winname=title, flags=cv2.WINDOW_GUI_NORMAL | cv2.WINDOW_AUTOSIZE
            )

        processing_times = collections.deque()
        while True:
            # Grab the frame.
            frame = player.next()
            if frame is None:
                print("Source ended")
                break
            # If the frame is larger than full HD, reduce size to improve the performance.
            scale = 1280 / max(frame.shape)
            if scale < 1:
                frame = cv2.resize(
                    src=frame,
                    dsize=None,
                    fx=scale,
                    fy=scale,
                    interpolation=cv2.INTER_AREA,
                )

            # Resize the image and change dims to fit neural network input.
            input_img = cv2.resize(
                src=frame, dsize=(width, height), interpolation=cv2.INTER_AREA
            )
            # Create a batch of images (size = 1).
            input_img = input_img[np.newaxis, ...]

            # Measure processing time.

            start_time = time.time()
            # Get the results.
            results = compiled_model([input_img])[output_layer]
            stop_time = time.time()
            # Get poses from network results.
            boxes = process_results(frame=frame, results=results)

            # Draw boxes on a frame.
            frame = draw_boxes(frame=frame, boxes=boxes)

            processing_times.append(stop_time - start_time)
            # Use processing times from last 200 frames.
            if len(processing_times) > 200:
                processing_times.popleft()

            _, f_width = frame.shape[:2]
            # Mean processing time [ms].
            processing_time = np.mean(processing_times) * 1000
            fps = 1000 / processing_time
            cv2.putText(
                img=frame,
                text=f"Inference time: {processing_time:.1f}ms ({fps:.1f} FPS)",
                org=(20, 40),
                fontFace=cv2.FONT_HERSHEY_COMPLEX,
                fontScale=f_width / 1000,
                color=(0, 0, 255),
                thickness=1,
                lineType=cv2.LINE_AA,
            )

            # Use this workaround if there is flickering.
            if use_popup:
                cv2.imshow(winname=title, mat=frame)
                key = cv2.waitKey(1)
                # escape = 27
                if key == 27:
                    break
            else:
                # Encode numpy array to jpg.
                _, encoded_img = cv2.imencode(
                    ext=".jpg", img=frame, params=[cv2.IMWRITE_JPEG_QUALITY, 100]
                )
                # Create an IPython image.
                i = display.Image(data=encoded_img)
                # Display the image in this notebook.
                display.clear_output(wait=True)
                display.display(i)
    # ctrl-c
    except KeyboardInterrupt:
        print("Interrupted")
    # any different error
    except RuntimeError as e:
        print(e)
    finally:
        if player is not None:
            # Stop capturing.
            player.stop()
        if use_popup:
            cv2.destroyAllWindows()
実行
リアルタイムの物体検出の実行
ウェブカメラをビデオ入力として使用します。デフォルトでは、プライマリー・ウェブカメラは source=0 に設定されます。複数のウェブカメラがある場合、0 から始まる連続した番号が割り当てられます。前面カメラを使用する場合は、flip=True を設定します。一部のウェブブラウザー、特に Mozilla Firefox ではちらつきが発生する場合があります。ちらつきが発生する場合は、use_popup=True を設定してください。
注: このノートブックをウェブカメラで使用するには、ウェブカメラを備えたコンピューター上でノートブックを実行する必要があります。ノートブックをサーバー (Binder など) 上で実行する場合、ウェブカメラは機能しません。このノートブックをリモート・コンピューター (Binder など) で実行する場合、ポップアップ・モードは機能しない可能性があります。
ウェブカメラがない場合でも、ビデオファイルを使用してこのデモを実行できます。OpenCV でサポートされている形式であればどれでも機能します。
オブジェクト検出を実行します。
USE_WEBCAM = False

video_file = "https://storage.openvinotoolkit.org/repositories/openvino_notebooks/data/data/video/Coco%20Walking%20in%20Berkeley.mp4"
cam_id = 0

source = cam_id if USE_WEBCAM else video_file

run_object_detection(source=source, flip=isinstance(source, int), use_popup=False)
Source ended