Würstchen と OpenVINO による画像生成
この Jupyter ノートブックは、ローカルへのインストール後にのみ起動できます。

Würstchen は拡散モデルであり、テキスト条件モデルは高度に圧縮された画像の潜在空間で機能します。ツールキットの重要性データを圧縮すると、トレーニングと推論の両方で計算コストを大幅に削減できます。1024x1024 の画像でのトレーニングには、32x32 でのトレーニングよりもはるかにコストがかかります。通常、他のワークでは、4 倍から 8 倍の空間圧縮の範囲で、比較的小さな圧縮が利用されます。Würstchen はこれを極端に推し進めています。斬新な設計により、42 倍の空間圧縮を実現しました。一般的な方法では 16 倍の空間圧縮後に詳細な画像を忠実に再構築できないため、これはこれまでには得られなかったことです。Würstchen は 2 段階の圧縮 (以下、デコーダーと呼びます) を採用しています。1 つ目は VQGAN、2 つ目は拡散オートエンコーダです (詳細は論文をご覧ください)。3 番目のモデル (以下、事前 と呼びます) は、その高度に圧縮された潜在空間で学習されます。このトレーニングでは、現在の最高性能のモデルで使用される計算のほんの一部しか必要としないため、推論もより低コストで高速になります。
Hugging Face Hub の Würstchen モデルの PyTorch バージョンを使用します。
目次
必要条件
%pip install -q  "diffusers>=0.21.0" transformers accelerate matplotlib gradio "openvino>=2023.2.0" --extra-index-url https://download.pytorch.org/whl/cpu
%pip install -q datasets "nncf>=2.7.0"
Note: you may need to restart the kernel to use updated packages.
from pathlib import Path
from collections import namedtuple
import gc

import diffusers
import torch
import matplotlib.pyplot as plt
import gradio as gr
import numpy as np

import openvino as ov
MODELS_DIR = Path("models")
PRIOR_TEXT_ENCODER_PATH = MODELS_DIR / "prior_text_encoder.xml"
PRIOR_PRIOR_PATH = MODELS_DIR / "prior_prior.xml"
DECODER_PATH = MODELS_DIR / "decoder.xml"
TEXT_ENCODER_PATH = MODELS_DIR / "text_encoder.xml"
VQGAN_PATH = MODELS_DIR / "vqgan.xml"

MODELS_DIR.mkdir(parents=True, exist_ok=True)
BaseModelOutputWithPooling = namedtuple("BaseModelOutputWithPooling", "last_hidden_state")
DecoderOutput = namedtuple("DecoderOutput", "sample")
元のモデルをロード
パイプラインをロードするには、diffusers.AutoPipelineForText2Image の from_pretrained メソッドを使用します。
pipeline = diffusers.AutoPipelineForText2Image.from_pretrained("warp-diffusion/wuerstchen")
ロードされたモデルは WuerstchenCombinedPipeline タイプであり、事前部分とデコーダー部分の 2 つの部分で構成されます。
元のモデルを推測
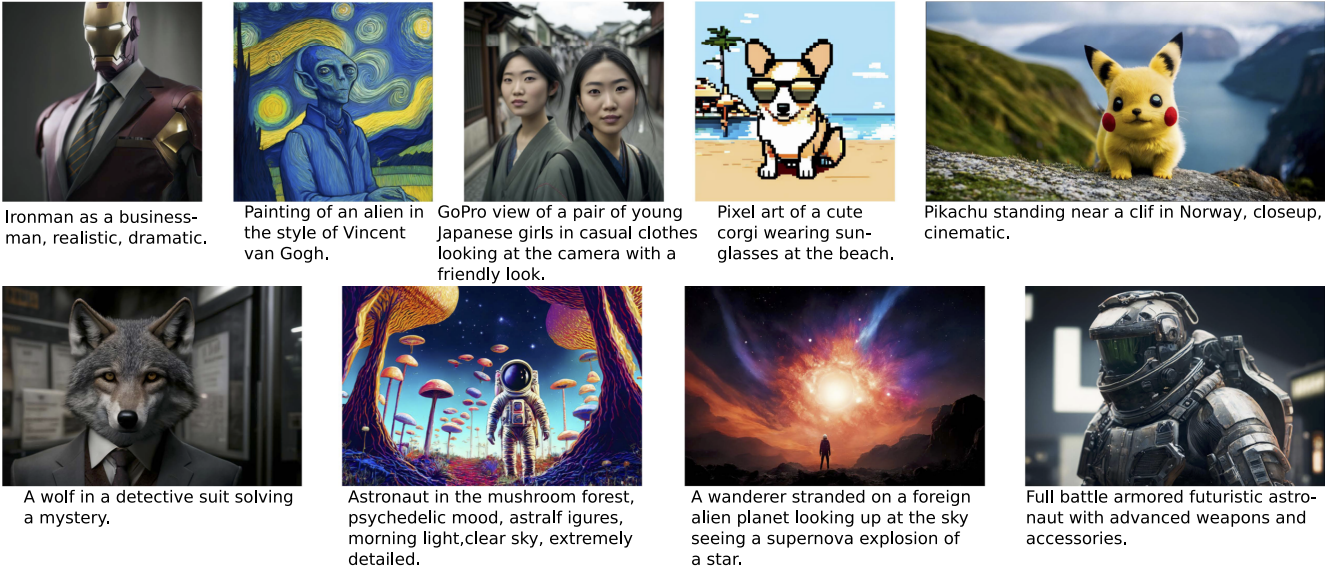
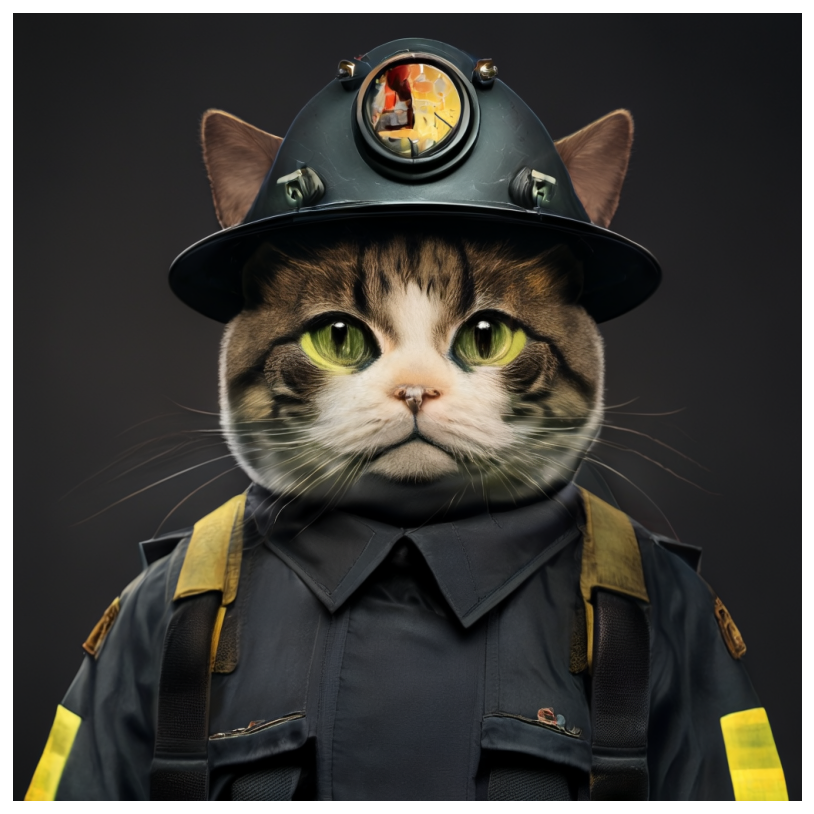
caption = "Anthropomorphic cat dressed as a fire fighter"
negative_prompt = ""
generator = torch.Generator().manual_seed(1)
output = pipeline(
    prompt=caption,
    height=1024,
    width=1024,
    negative_prompt=negative_prompt,
    prior_guidance_scale=4.0,
    decoder_guidance_scale=0.0,
    output_type="pil",
    generator=generator,
).images
plt.figure(figsize=(8 * len(output), 8), dpi=128)
for i, x in enumerate(output):
    plt.subplot(1, len(output), i + 1)
    plt.imshow(x)
    plt.axis("off")
モデルを OpenVINO IR に変換
主なモデル・コンポーネント:
- 事前ステージ: テキスト条件付き LDM を使用して画像の低次元潜在空間表現を作成します。
- デコーダーステージ: 事前ステージからの表現を使用して、別の LDM を使用して高次元の潜在空間に潜在画像を生成し、VQGAN デコーダーを使用して潜在画像をデコードしてフル解像度の出力画像を生成します。
パイプラインは、prior_pipe プロパティーによってアクセスされる事前パイプラインと、decoder_pipe プロパティーによってアクセスされるデコーダー・パイプラインの 2 つのサブパイプラインで構成されます。
# Prior pipeline
pipeline.prior_text_encoder.eval()
pipeline.prior_prior.eval()

# Decoder pipeline
pipeline.decoder.eval()
pipeline.text_encoder.eval()
pipeline.vqgan.eval();
次に、PyTorch モジュールの変換関数を定義します。ov.convert_model 関数を使用して OpenVINO 中間表現オブジェクトを取得し、ov.save_model 関数でそれを XML ファイルとして保存します。
def convert(model: torch.nn.Module, xml_path: Path, **convert_kwargs):
    if not xml_path.exists():
        converted_model = ov.convert_model(model, **convert_kwargs)
        ov.save_model(converted_model, xml_path, compress_to_fp16=False)
        del converted_model

        # Clean torch jit cache
        torch._C._jit_clear_class_registry()
        torch.jit._recursive.concrete_type_store = torch.jit._recursive.ConcreteTypeStore()
        torch.jit._state._clear_class_state()

        gc.collect()
以前のパイプライン
このパイプラインは、テキスト・エンコーダーと事前拡散モデルで構成されています。ここからは、入力パラメーターを使用して変換時に常に固定形状を使用し、メモリーをあまり消費しないモデルを生成します。
テキスト・エンコーダー・モデルには 2 つの入力があります。
input_ids: トークン化された入力文のベクトル。デフォルトのトークナイザー・ベクトルの長さは 77 です。attention_mask: 注意マスクを記述するinput_idsと同じ長さのベクトル。
convert(
    pipeline.prior_text_encoder,
    PRIOR_TEXT_ENCODER_PATH,
    example_input={
        "input_ids": torch.zeros(1, 77, dtype=torch.int32),
        "attention_mask": torch.zeros(1, 77),
    },
    input={"input_ids": ((1, 77),), "attention_mask": ((1, 77),)},
)
del pipeline.prior_text_encoder
del pipeline.prior_pipe.text_encoder
gc.collect()
2058
事前モデルは、テキスト埋め込みから画像埋め込みを近似する標準的な unCLIP 事前モデルです。UNet と同様に、サンプル、タイムステップ、エンコーダーの隠し状態の 3 つの入力があります。
convert(
    pipeline.prior_prior,
    PRIOR_PRIOR_PATH,
    example_input=[torch.zeros(2, 16, 24, 24), torch.zeros(2), torch.zeros(2, 77, 1280)],
    input=[((2, 16, 24, 24),), ((2),), ((2, 77, 1280),)],
)
del pipeline.prior_prior
del pipeline.prior_pipe.prior
gc.collect()
0
デコーダー・パイプライン
デコーダー・パイプラインは、デコーダー、テキスト・エンコーダー、VQGAN の 3 つの部分で構成されます。
デコーダーモデルは WuerstchenDiffNeXt UNet デコーダーです。入力は次のとおりです。
x: サンプルr: タイムステップeffnet: 補間ブロックclip: エンコーダーの隠し状態
convert(
    pipeline.decoder,
    DECODER_PATH,
    example_input={
        "x": torch.zeros(1, 4, 256, 256),
        "r": torch.zeros(1),
        "effnet": torch.zeros(1, 16, 24, 24),
        "clip": torch.zeros(1, 77, 1024),
    },
    input={
        "x": ((1, 4, 256, 256),),
        "r": ((1),),
        "effnet": ((1, 16, 24, 24),),
        "clip": ((1, 77, 1024),),
    },
)
del pipeline.decoder
del pipeline.decoder_pipe.decoder
gc.collect()
0
メイン・テキスト・エンコーダーには、以前のパイプラインのテキスト・エンコーダーと同じ入力パラメーターと形状があります。
convert(
    pipeline.text_encoder,
    TEXT_ENCODER_PATH,
    example_input={
        "input_ids": torch.zeros(1, 77, dtype=torch.int32),
        "attention_mask": torch.zeros(1, 77),
    },
    input={"input_ids": ((1, 77),), "attention_mask": ((1, 77),)},
)
del pipeline.text_encoder
del pipeline.decoder_pipe.text_encoder
gc.collect()
0
パイプラインは、VQGAN モデルのデコードメソッドを使用してフルサイズの出力画像を取得します。ここではデコード部分のみのラッパーモジュールを作成します。デコーダーは、4x256x256 の潜在画像を入力として受け取ります。
class VqganDecoderWrapper(torch.nn.Module):
    def __init__(self, vqgan):
        super().__init__()
        self.vqgan = vqgan

    def forward(self, h):
        return self.vqgan.decode(h)
convert(
    VqganDecoderWrapper(pipeline.vqgan),
    VQGAN_PATH,
    example_input=torch.zeros(1, 4, 256, 256),
    input=(1, 4, 256, 256),
)
del pipeline.decoder_pipe.vqgan
gc.collect()
0
モデルのコンパイル
core = ov.Core()
OpenVINO を使用して推論を実行するデバイスをドロップダウン・リストから選択します。
import ipywidgets as widgets

device = widgets.Dropdown(
    options=core.available_devices + ["AUTO"],
    value='AUTO',
    description='Device:',
    disabled=False,
)

device
Dropdown(description='Device:', index=4, options=('CPU', 'GPU.0', 'GPU.1', 'GPU.2', 'AUTO'), value='AUTO')
ov_prior_text_encoder = core.compile_model(PRIOR_TEXT_ENCODER_PATH, device.value)
ov_prior_prior = core.compile_model(PRIOR_PRIOR_PATH, device.value)
ov_decoder = core.compile_model(DECODER_PATH, device.value)
ov_text_encoder = core.compile_model(TEXT_ENCODER_PATH, device.value)
ov_vqgan = core.compile_model(VQGAN_PATH, device.value)
パイプラインの構築
元の WuerstchenCombinedPipeline クラスとの対話を可能にするため、コンパイルされたモデルの呼び出し可能なラッパークラスを作成します。すべてのラッパークラスは np.array ではなく torch.Tensor を返すことに注意してください。
class TextEncoderWrapper:
    dtype = torch.float32  # accessed in the original workflow

    def __init__(self, text_encoder):
        self.text_encoder = text_encoder

    def __call__(self, input_ids, attention_mask):
        output = self.text_encoder({"input_ids": input_ids, "attention_mask": attention_mask})[
            "last_hidden_state"
        ]
        output = torch.tensor(output)
        return BaseModelOutputWithPooling(output)
class PriorPriorWrapper:
    config = namedtuple("PriorPriorWrapperConfig", "c_in")(16)  # accessed in the original workflow

    def __init__(self, prior):
        self.prior = prior

    def __call__(self, x, r, c):
        output = self.prior([x, r, c])[0]
        return torch.tensor(output)
class DecoderWrapper:
    dtype = torch.float32  # accessed in the original workflow

    def __init__(self, decoder):
        self.decoder = decoder

    def __call__(self, x, r, effnet, clip):
        output = self.decoder({"x": x, "r": r, "effnet": effnet, "clip": clip})[0]
        output = torch.tensor(output)
        return output
class VqganWrapper:
    config = namedtuple("VqganWrapperConfig", "scale_factor")(0.3764)  # accessed in the original workflow

    def __init__(self, vqgan):
        self.vqgan = vqgan

    def decode(self, h):
        output = self.vqgan(h)[0]
        output = torch.tensor(output)
        return DecoderOutput(output)
パイプラインにラッパー・インスタンスを挿入。
pipeline.prior_pipe.text_encoder = TextEncoderWrapper(ov_prior_text_encoder)
pipeline.prior_pipe.prior = PriorPriorWrapper(ov_prior_prior)

pipeline.decoder_pipe.decoder = DecoderWrapper(ov_decoder)
pipeline.decoder_pipe.text_encoder = TextEncoderWrapper(ov_text_encoder)
pipeline.decoder_pipe.vqgan = VqganWrapper(ov_vqgan)
推論
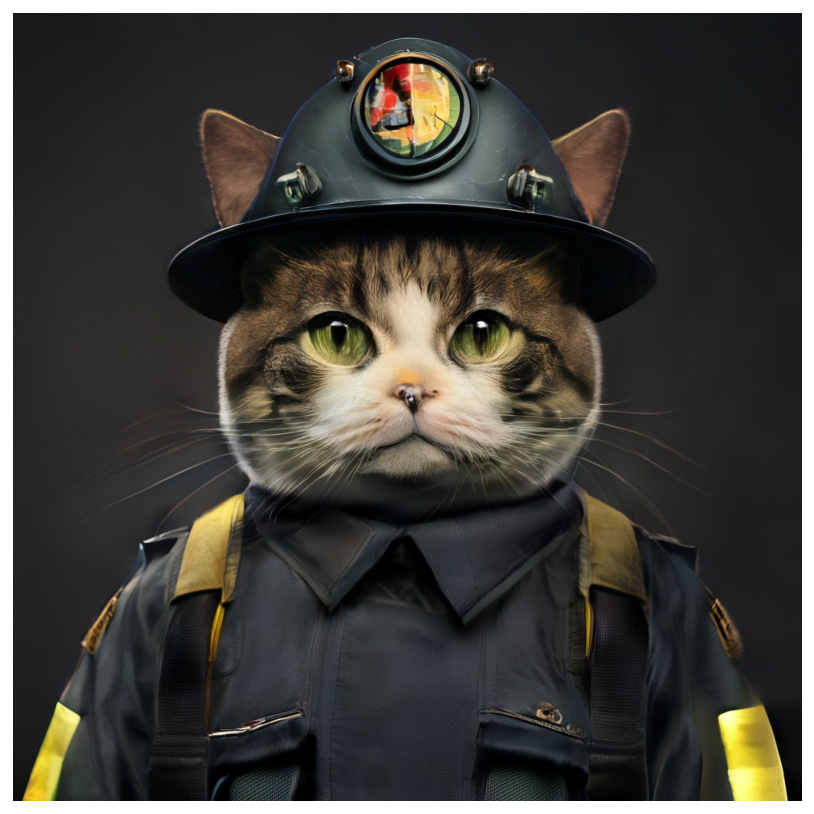
caption = "Anthropomorphic cat dressed as a fire fighter"
negative_prompt = ""
generator = torch.Generator().manual_seed(1)

output = pipeline(
    prompt=caption,
    height=1024,
    width=1024,
    negative_prompt=negative_prompt,
    prior_guidance_scale=4.0,
    decoder_guidance_scale=0.0,
    output_type="pil",
    generator=generator,
).images
plt.figure(figsize=(8 * len(output), 8), dpi=128)
for i, x in enumerate(output):
    plt.subplot(1, len(output), i + 1)
    plt.imshow(x)
    plt.axis("off")
量子化
NNCF は、量子化レイヤーをモデルグラフに追加し、トレーニング・データセットのサブセットを使用してこれらの追加の量子化レイヤーのパラメーターを初期化することで、トレーニング後の量子化を可能にします。量子化操作は FP32/FP16 ではなく INT8 で実行されるため、モデル推論が高速化されます。
WuerstchenPriorPipeline 構造によれば、事前モデルは各拡散ステップで推論を繰り返すサイクルで使用されますが、テキスト・エンコーダーは 1 回だけ関与します。また、WuerstchenDecoderPipeline では、デコーダーモデルはループで使用され、他のパイプライン・コンポーネントは 1 回だけ推論されます。そのため、事前モデルとデコーダーモデルの計算コストと速度がパイプラインのクリティカル・パスになります。パイプラインの残りのパーツを量子化しても、推論パフォーマンスは大幅に向上せず、精度が大幅に低下する可能性があります。
最適化プロセスには次の手順が含まれます。
量子化用のキャリブレーション・データセットを作成します。
nncf.quantize()を実行して、量子化されたモデルを取得します。openvino.save_model()関数を使用してINT8モデルを保存します。
モデルの推論速度を向上させるため量子化を実行するかどうかを以下で選択してください。
to_quantize = widgets.Checkbox(
    value=True,
    description='Quantization',
    disabled=False,
)

to_quantize
to_quantize が選択されていない場合に量子化をスキップする skip magic 拡張機能をロードします。
import sys
sys.path.append("../utils")

int8_pipeline = None

%load_ext skip_kernel_extension
キャリブレーション・データセットの準備
Hugging Face の検証 conceptual_captions データセットの一部をキャリブレーション・データとして使用します。キャリブレーション用の中間モデル入力を収集するには、CompiledModel をカスタマイズする必要があります。
%%skip not $to_quantize.value

class CompiledModelDecorator(ov.CompiledModel):
    def __init__(self, compiled_model):
        super().__init__(compiled_model)
        self.data_cache = []

    def __call__(self, *args, **kwargs):
        self.data_cache.append(*args)
        return super().__call__(*args, **kwargs)
%%skip not $to_quantize.value

import datasets
from tqdm.notebook import tqdm
from transformers import set_seed

set_seed(1)

def collect_calibration_data(pipeline, subset_size):
    pipeline.set_progress_bar_config(disable=True)

    original_prior = pipeline.prior_pipe.prior.prior
    original_decoder = pipeline.decoder_pipe.decoder.decoder
    pipeline.prior_pipe.prior.prior = CompiledModelDecorator(original_prior)
    pipeline.decoder_pipe.decoder.decoder = CompiledModelDecorator(original_decoder)

    dataset = datasets.load_dataset("conceptual_captions", split="train").shuffle(seed=42)
    pbar = tqdm(total=subset_size)
    diff = 0
    for batch in dataset:
        prompt = batch["caption"]
        if len(prompt) > pipeline.tokenizer.model_max_length:
            continue
        _ = pipeline(
            prompt=prompt,
            height=1024,
            width=1024,
            negative_prompt="",
            prior_guidance_scale=4.0,
            decoder_guidance_scale=0.0,
            output_type="pil",
        )
        collected_subset_size = len(pipeline.prior_pipe.prior.prior.data_cache)
        if collected_subset_size >= subset_size:
            pbar.update(subset_size - pbar.n)
            break
        pbar.update(collected_subset_size - diff)
        diff = collected_subset_size

    prior_calibration_dataset = pipeline.prior_pipe.prior.prior.data_cache
    decoder_calibration_dataset = pipeline.decoder_pipe.decoder.decoder.data_cache
    pipeline.prior_pipe.prior.prior = original_prior
    pipeline.decoder_pipe.decoder.decoder = original_decoder
    pipeline.set_progress_bar_config(disable=False)
    return prior_calibration_dataset, decoder_calibration_dataset
%%skip not $to_quantize.value

PRIOR_PRIOR_INT8_PATH = MODELS_DIR / "prior_prior_int8.xml"
DECODER_INT8_PATH = MODELS_DIR / "decoder_int8.xml"

if not (PRIOR_PRIOR_INT8_PATH.exists() and DECODER_INT8_PATH.exists()):
    subset_size = 300
    prior_calibration_dataset, decoder_calibration_dataset = collect_calibration_data(pipeline, subset_size=subset_size)
量子化を実行
事前トレーニング済みの変換済み OpenVINO モデルから量子化モデルを作成します。BiasCorrectionWürstchen モデルの精度向上が最小限であり、量子化時間が増加したため、アルゴリズムは無効になっています。事前モデルとデコーダーモデルはトランスフォーマー・ベースのバックボーン・ネットワークであり、モデル内に追加のトランスフォーマー・パターンを指定するには model_type=nncf.ModelType.TRANSFORMER を使用します。FP16 精度で精度に敏感なレイヤーを保持することにより、NNCF PTQ 後の精度を維持します。
私たちの実験によると、以前のモデルにおける最初と最後の畳み込みレイヤーの量子化は、生成結果に大きな影響を与えます。FP16 の精度を維持するために IgnoredScope を使用することを推奨します。
注: 量子化は時間とメモリーを消費する操作です。以下の量子化コードの実行には時間がかかる場合があります。
%%skip not $to_quantize.value

import nncf
from nncf.scopes import IgnoredScope

if not PRIOR_PRIOR_INT8_PATH.exists():
    prior_model = core.read_model(PRIOR_PRIOR_PATH)
    quantized_prior_prior = nncf.quantize(
        model=prior_model,
        subset_size=subset_size,
        calibration_dataset=nncf.Dataset(prior_calibration_dataset),
        model_type=nncf.ModelType.TRANSFORMER,
        ignored_scope=IgnoredScope(names=[
            "__module.projection/aten::_convolution/Convolution",
            "__module.out.1/aten::_convolution/Convolution"
        ]),
        advanced_parameters=nncf.AdvancedQuantizationParameters(
            disable_bias_correction=True
        )
    )
    ov.save_model(quantized_prior_prior, PRIOR_PRIOR_INT8_PATH)
%%skip not $to_quantize.value

if not DECODER_INT8_PATH.exists():
    decoder_model = core.read_model(DECODER_PATH)
    quantized_decoder = nncf.quantize(
        model=decoder_model,
        calibration_dataset=nncf.Dataset(decoder_calibration_dataset),
        subset_size=len(decoder_calibration_dataset),
        model_type=nncf.ModelType.TRANSFORMER,
        advanced_parameters=nncf.AdvancedQuantizationParameters(
            disable_bias_correction=True
        )
    )
    ov.save_model(quantized_decoder, DECODER_INT8_PATH)
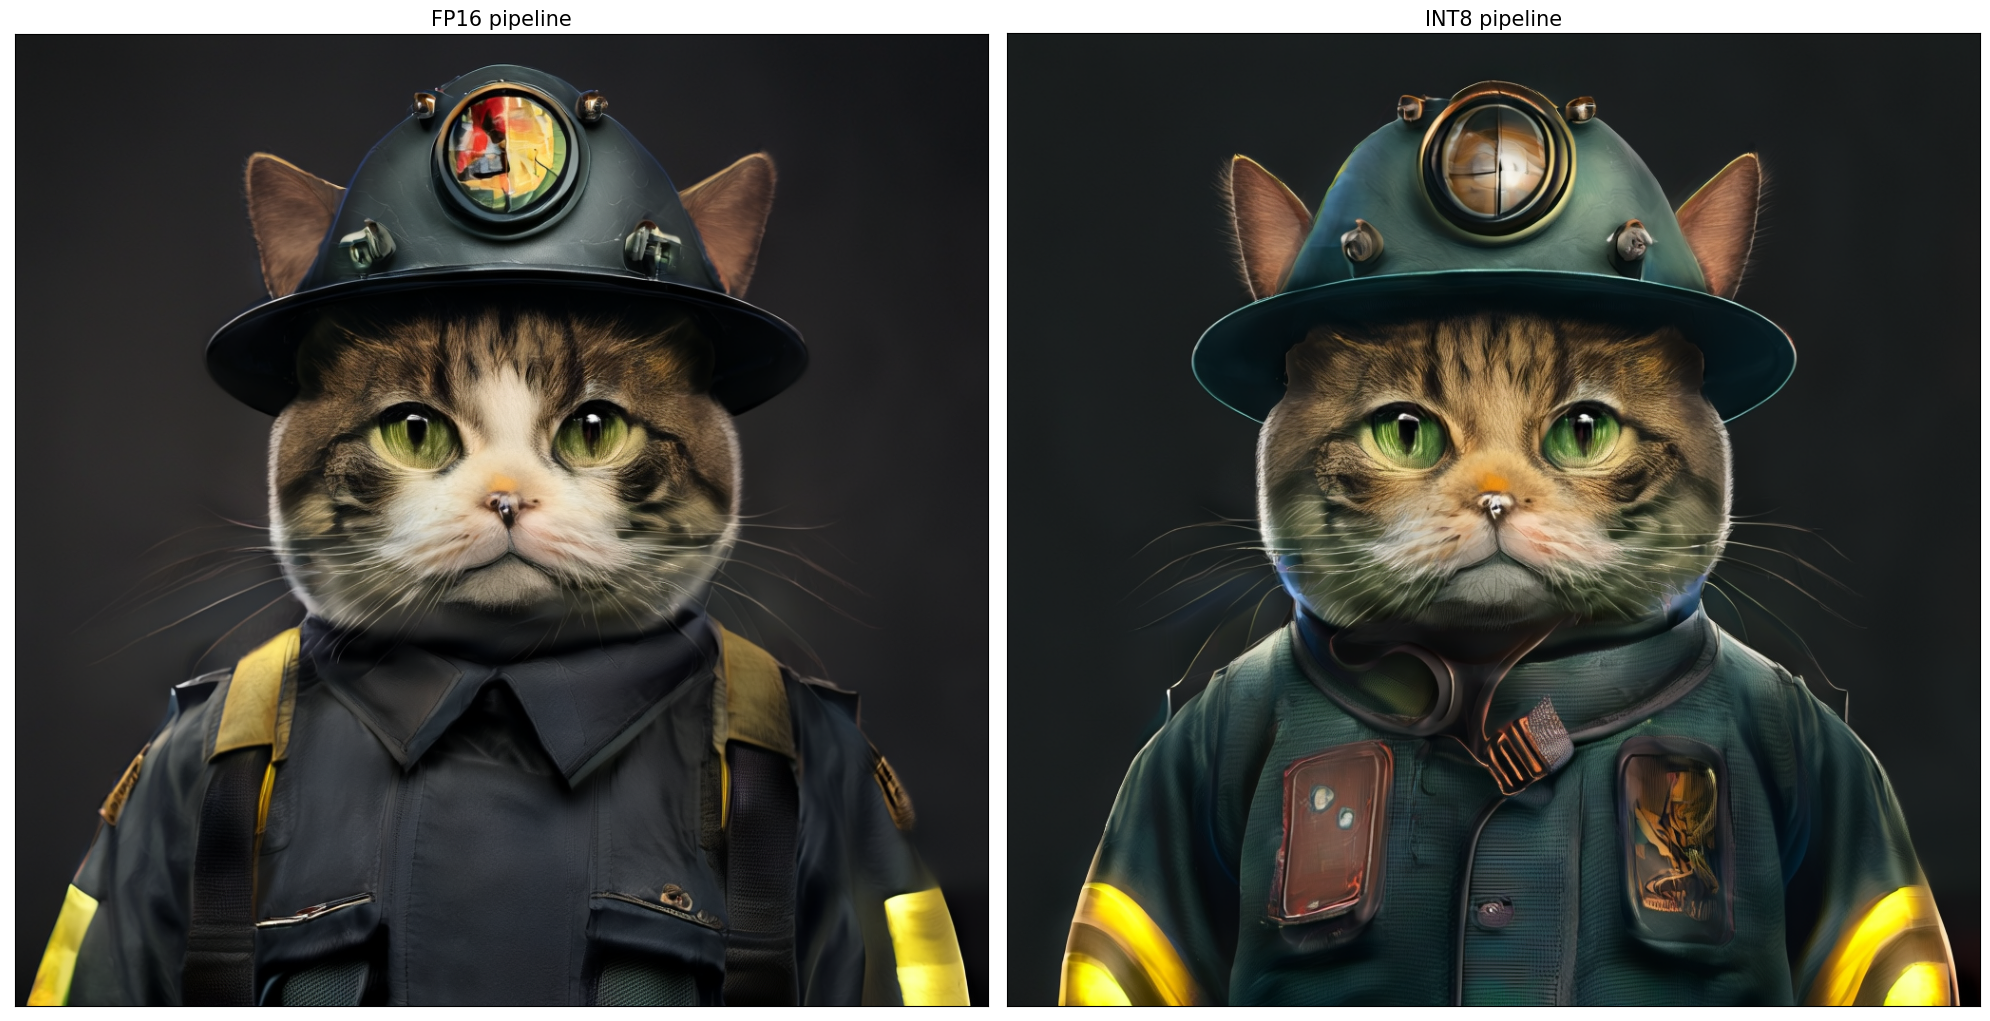
元のパイプラインと最適化されたパイプラインによって生成された画像を比較します。
%%skip not $to_quantize.value

import matplotlib.pyplot as plt
from PIL import Image

def visualize_results(orig_img:Image.Image, optimized_img:Image.Image):
    """
    Helper function for results visualization

    Parameters:
       orig_img (Image.Image): generated image using FP16 models
       optimized_img (Image.Image): generated image using quantized models
    Returns:
       fig (matplotlib.pyplot.Figure): matplotlib generated figure contains drawing result
    """
    orig_title = "FP16 pipeline"
    control_title = "INT8 pipeline"
    figsize = (20, 20)
    fig, axs = plt.subplots(1, 2, figsize=figsize, sharex='all', sharey='all')
    list_axes = list(axs.flat)
    for a in list_axes:
        a.set_xticklabels([])
        a.set_yticklabels([])
        a.get_xaxis().set_visible(False)
        a.get_yaxis().set_visible(False)
        a.grid(False)
    list_axes[0].imshow(np.array(orig_img))
    list_axes[1].imshow(np.array(optimized_img))
    list_axes[0].set_title(orig_title, fontsize=15)
    list_axes[1].set_title(control_title, fontsize=15)

    fig.subplots_adjust(wspace=0.01, hspace=0.01)
    fig.tight_layout()
    return fig
%%skip not $to_quantize.value

caption = "Anthropomorphic cat dressed as a fire fighter"
negative_prompt = ""

int8_pipeline = diffusers.AutoPipelineForText2Image.from_pretrained("warp-diffusion/wuerstchen")

int8_prior_prior = core.compile_model(PRIOR_PRIOR_INT8_PATH)
int8_pipeline.prior_pipe.prior = PriorPriorWrapper(int8_prior_prior)

int8_decoder = core.compile_model(DECODER_INT8_PATH)
int8_pipeline.decoder_pipe.decoder = DecoderWrapper(int8_decoder)

int8_pipeline.prior_pipe.text_encoder = TextEncoderWrapper(ov_prior_text_encoder)
int8_pipeline.decoder_pipe.text_encoder = TextEncoderWrapper(ov_text_encoder)
int8_pipeline.decoder_pipe.vqgan = VqganWrapper(ov_vqgan)
%%skip not $to_quantize.value

generator = torch.Generator().manual_seed(1)
int8_output = int8_pipeline(
    prompt=caption,
    height=1024,
    width=1024,
    negative_prompt=negative_prompt,
    prior_guidance_scale=4.0,
    decoder_guidance_scale=0.0,
    output_type="pil",
    generator=generator,
).images
%%skip not $to_quantize.value

fig = visualize_results(output[0], int8_output[0])
モデルのファイルサイズを比較
%%skip not $to_quantize.value

fp16_ir_model_size = PRIOR_PRIOR_PATH.with_suffix(".bin").stat().st_size / 2**20
quantized_model_size = PRIOR_PRIOR_INT8_PATH.with_suffix(".bin").stat().st_size / 2**20

print(f"FP16 Prior size: {fp16_ir_model_size:.2f} MB")
print(f"INT8 Prior size: {quantized_model_size:.2f} MB")
print(f"Prior compression rate: {fp16_ir_model_size / quantized_model_size:.3f}")
FP16 Prior size: 3790.42 MB
INT8 Prior size: 951.03 MB
Prior compression rate: 3.986
%%skip not $to_quantize.value

fp16_ir_model_size = DECODER_PATH.with_suffix(".bin").stat().st_size / 2**20
quantized_model_size = DECODER_INT8_PATH.with_suffix(".bin").stat().st_size / 2**20

print(f"FP16 Decoder size: {fp16_ir_model_size:.2f} MB")
print(f"INT8 Decoder size: {quantized_model_size:.2f} MB")
print(f"Decoder compression rate: {fp16_ir_model_size / quantized_model_size:.3f}")
FP16 Decoder size: 4025.90 MB
INT8 Decoder size: 1010.20 MB
Decoder compression rate: 3.985
FP16 モデルと INT8 パイプラインの推論時間を比較
FP16 および INT8 パイプラインの推論パフォーマンスを測定するため、3 つのサンプルの平均推論時間を使用します。
注: 最も正確なパフォーマンス推定を行うには、他のアプリケーションを閉じた後、ターミナル/コマンドプロンプトで
benchmark_appを実行することを推奨します。
%%skip not $to_quantize.value

import time

def calculate_inference_time(pipeline):
    inference_time = []
    pipeline.set_progress_bar_config(disable=True)
    caption = "Anthropomorphic cat dressed as a fire fighter"
    for i in range(3):
        start = time.perf_counter()
        _ = pipeline(
            prompt=caption,
            height=1024,
            width=1024,
            prior_guidance_scale=4.0,
            decoder_guidance_scale=0.0,
            output_type="pil",
        )
        end = time.perf_counter()
        delta = end - start
        inference_time.append(delta)
    pipeline.set_progress_bar_config(disable=False)
    return np.mean(inference_time)
%%skip not $to_quantize.value

fp_latency = calculate_inference_time(pipeline)
print(f"FP16 pipeline: {fp_latency:.3f} seconds")
int8_latency = calculate_inference_time(int8_pipeline)
print(f"INT8 pipeline: {int8_latency:.3f} seconds")
print(f"Performance speed up: {fp_latency / int8_latency:.3f}")
FP16 pipeline: 199.484 seconds
INT8 pipeline: 78.734 seconds
Performance speed up: 2.534
インタラクティブな推論
インタラクティブなデモを起動するため量子化モデルを使用するかどうか以下で選択してください。
quantized_model_present = int8_pipeline is not None

use_quantized_model = widgets.Checkbox(
    value=quantized_model_present,
    description='Use quantized model',
    disabled=not quantized_model_present,
)

use_quantized_model
pipe = int8_pipeline if use_quantized_model.value else pipeline

def generate(caption, negative_prompt, prior_guidance_scale, seed):
    generator = torch.Generator().manual_seed(seed)
    image = pipe(
        prompt=caption,
        height=1024,
        width=1024,
        negative_prompt=negative_prompt,
        prior_num_inference_steps=30,
        prior_guidance_scale=prior_guidance_scale,
        generator=generator,
        output_type="pil",
    ).images[0]
    return image
demo = gr.Interface(
    generate,
    [
        gr.Textbox(label="Caption"),
        gr.Textbox(label="Negative prompt"),
        gr.Slider(2, 20, step=1, label="Prior guidance scale"),
        gr.Slider(0, np.iinfo(np.int32).max, label="Seed")
    ],
    "image",
    examples=[["Anthropomorphic cat dressed as a firefighter", "", 4, 0]],
    allow_flagging="never",
)
try:
    demo.queue().launch(debug=False)
except Exception:
    demo.queue().launch(debug=False, share=True)
# if you are launching remotely, specify server_name and server_port
# demo.launch(server_name='your server name', server_port='server port in int')
# Read more in the docs: https://gradio.app/docs/