Segmind-VegaRT と OpenVINO による高解像度の画像生成
この Jupyter ノートブックは、ローカルへのインストール後にのみ起動できます。

Segmind Vega モデルは、Stable Diffusion XL (SDXL) の 70% 縮小バージョンを抽出したもので、高品質のテキストから画像への生成機能を維持しながら高速化を実現します。Segmind Vega は、テキストから画像へのモデル分野において重要なマイルストーンとなり、効率性と速度の新たな基準を示しました。コンパクトで強力な設計で、パラメーターは 7 億 4,500 万個です。この合理化されたアーキテクチャーにより、クラス最小であるだけでなく、前世代の製品の性能を上回る超高速パフォーマンスも保証されます。Vega はモデル最適化における画期的な進歩を表しています。SD 1.5 の 8 億 5,900 万のパラメーターや SDXL の 26 億の膨大なパラメーターと比較すると、コンパクトなサイズは、サイズとパフォーマンスの優れたバランスを維持しています。高品質の画像を迅速に提供できる Vega の能力は、比類のない速度、効率、精度の組み合わせを提供し、この分野で革命的な成果をもたらします。
Segmind Vega は、SDXL モデルの対称的な抽出バージョンであり、70% 以上小型化され、約 100% 高速化されています。ダウンブロックには 2 億 4,700 万個のパラメーターが含まれ、ミッドブロックには 3,100 万個、アップブロックには 4 億 6,000 万個のパラメーターが含まれます。サイズの違いを除けば、アーキテクチャーは SDXL と実質的に同一であり、調整を全く必要としないか最小限の調整で既存のインターフェイスとの互換性を確保します。SD1.5 モデルよりも小型ですが、Vega は SDXL アーキテクチャーにより高解像度の生成をサポートしており、Stable Diffusion 1.5 の理想的な代替品となっています。
Segmind VegaRT は、Vega モデル用の精製された LCM-LoRA アダプターであり、これにより、高品質の画像を生成する推論ステップの数を 2 ~ 8 ステップに削減できました。潜在的一貫性モデル (LCM) LoRA は、Simian Luo、Yiqin Tan、Suraj Patil、Daniel Gu 氏らによる LCM-LoRA: A universal Stable-Diffusion Acceleration Module で提案されました。
モデルの詳細については、Segmind のブログ投稿をご覧ください。
このチュートリアルでは、OpenVINO を使用して Segmind-VegaRT を実行および最適化する方法について説明します。Hugging Face Diffusers ライブラリーの事前トレーニング済みモデルを使用します。ユーザー・エクスペリエンスを簡素化するために、Hugging Face Optimum Intel ライブラリーを使用してモデルを OpenVINO™ IR 形式に変換します。さらに、NNCF を使用した量子化 UNet モデルでパイプラインのレイテンシーを改善する方法も示します。
目次
必要条件
%pip install -q --extra-index-url https://download.pytorch.org/whl/cpu\
torch transformers diffusers "git+https://github.com/huggingface/optimum-intel.git" gradio "openvino>=2023.3.0"
WARNING: Skipping openvino-dev as it is not installed.
WARNING: Skipping openvino as it is not installed.
Note: you may need to restart the kernel to use updated packages.
Note: you may need to restart the kernel to use updated packages.
PyTorch モデルの準備
推論用の Segmind-VegaRT モデルを準備するには、まず Segmind-Vega パイプラインを作成する必要があります。その後、潜在的整合性モデル機能を有効にするには、add_lora_weights メソッドを使用して VegaRT LCM アダプターを統合し、スケジューラーを LCMScheduler に置き換える必要があります。次のノートブックを実行する手順を簡素化するため、作成されたパイプラインをディスクに保存します。
import torch
from diffusers import LCMScheduler, AutoPipelineForText2Image
import gc
from pathlib import Path

model_id = "segmind/Segmind-Vega"
adapter_id = "segmind/Segmind-VegaRT"
pt_model_dir = Path('segmind-vegart')

if not pt_model_dir.exists():
    pipe = AutoPipelineForText2Image.from_pretrained(model_id, torch_dtype=torch.float16, variant="fp16")
    pipe.scheduler = LCMScheduler.from_config(pipe.scheduler.config)
    pipe.load_lora_weights(adapter_id)
    pipe.fuse_lora()

    pipe.save_pretrained('segmind-vegart')
    del pipe
    gc.collect()
2024-01-24 14:12:38.551058: I tensorflow/core/util/port.cc:110] oneDNN custom operations are on. You may see slightly different numerical results due to floating-point round-off errors from different computation orders. To turn them off, set the environment variable TF_ENABLE_ONEDNN_OPTS=0.
2024-01-24 14:12:38.591203: I tensorflow/core/platform/cpu_feature_guard.cc:182] This TensorFlow binary is optimized to use available CPU instructions in performance-critical operations.
To enable the following instructions: AVX2 AVX512F AVX512_VNNI FMA, in other operations, rebuild TensorFlow with the appropriate compiler flags.
2024-01-24 14:12:39.344351: W tensorflow/compiler/tf2tensorrt/utils/py_utils.cc:38] TF-TRT Warning: Could not find TensorRT
モデルを OpenVINO 形式に変換
OpenVINO 中間表現 (IR) 形式にエクスポートするには、optimal-cli インターフェイスを使用します。
モデルを変換するための Optimum CLI インターフェイスは、OpenVINO へのエクスポートをサポートします (optimum-intel バージョン 1.12 以降でサポートされます)。
一般的なコマンド形式:
optimum-cli export openvino --model <model_id_or_path> --task <task> <output_dir>
ここで、task はモデルをエクスポートするタスクです。指定されていない場合は、モデルに基づいてタスクが自動的に推論されます。利用可能なタスクはモデルによって異なります。Segmind-Vega は SDXL と互換性のあるインターフェースを使用しているため、stable-diffusion-xl を選択する必要があります。
タスクとモデルクラス間のマッピングについては、Optimum TaskManager のドキュメントを参照してください。
さらに、圧縮モデルを FP16 にする場合は --fp16 の重みを指定し、圧縮モデルを INT8 にする場合は --int8 の重みを指定することもできます。INT8 の場合は nncf をインストールする必要があることに注意してください。
サポートされている引数の完全なリストは --help で参照できます。詳細と使用例については、Optimum ドキュメントを確認してください。
Tiny Autoencoder の場合、ov.convert_model 関数を使用して ov.Model を取得し、ov.save_model を使用して保存します。モデルは、パイプラインで別々に使用される 2 つの部分で構成されています。1 つは、画像から画像への生成タスクで潜在空間に入力画像をエンコードする vae_encoder で、もう 1 つは拡散結果を画像形式にデコードする vae_decoder です。
from pathlib import Path

model_dir = Path("openvino-segmind-vegart")
sdxl_model_id = "./segmind-vegart"
tae_id = "madebyollin/taesdxl"
skip_convert_model = model_dir.exists()
import torch
import openvino as ov
from diffusers import AutoencoderTiny
import gc

class VAEEncoder(torch.nn.Module):
    def __init__(self, vae):
        super().__init__()
        self.vae = vae

    def forward(self, sample):
        return self.vae.encode(sample)

class VAEDecoder(torch.nn.Module):
    def __init__(self, vae):
        super().__init__()
        self.vae = vae

    def forward(self, latent_sample):
        return self.vae.decode(latent_sample)

def convert_tiny_vae(model_id, output_path):
    tiny_vae = AutoencoderTiny.from_pretrained(model_id)
    tiny_vae.eval()
    vae_encoder = VAEEncoder(tiny_vae)
    ov_model = ov.convert_model(vae_encoder, example_input=torch.zeros((1,3,512,512)))
    ov.save_model(ov_model, output_path / "vae_encoder/openvino_model.xml")
    tiny_vae.save_config(output_path / "vae_encoder")
    vae_decoder = VAEDecoder(tiny_vae)
    ov_model = ov.convert_model(vae_decoder, example_input=torch.zeros((1,4,64,64)))
    ov.save_model(ov_model, output_path / "vae_decoder/openvino_model.xml")
    tiny_vae.save_config(output_path / "vae_decoder")
    del tiny_vae
    del ov_model
    gc.collect()


if not skip_convert_model:
    !optimum-cli export openvino --model $sdxl_model_id --task stable-diffusion-xl $model_dir --fp16
    convert_tiny_vae(tae_id, model_dir)
テキストから画像への生成
テキストから画像への生成により、テキストの説明を使用して画像を作成できます。画像の生成を開始するには、まずモデルを読み込む必要があります。OpenVINO モデルをロードして OpenVINO ランタイムで推論を実行するには、Diffusers の StableDiffusionXLPipeline を Optimum の OVStableDiffusionXLPipeline に置き換える必要があります。パイプラインの初期化は from_pretrained メソッドを使用して開始され、OpenVINO モデルを含むディレクトリーを渡す必要があります。さらに、推論デバイスを指定することもできます。
時間を節約するために、このノートブックではイメージからイメージへの生成については説明しません。すでに述べたように、Segmind-Vega は Stable Diffusion XL パイプラインと互換性があり、画像間タスクで Stable Diffusion XL 推論を実行するために必要な手順がこのノートブックで説明されています。
テキストから画像を生成する推論デバイスを選択
import ipywidgets as widgets

core = ov.Core()

device = widgets.Dropdown(
    options=core.available_devices + ["AUTO"],
    value='AUTO',
    description='Device:',
    disabled=False,
)

device
Dropdown(description='Device:', index=3, options=('CPU', 'GPU.0', 'GPU.1', 'AUTO'), value='AUTO')
from optimum.intel.openvino import OVStableDiffusionXLPipeline

text2image_pipe = OVStableDiffusionXLPipeline.from_pretrained(model_dir, device=device.value)
INFO:nncf:NNCF initialized successfully. Supported frameworks detected: torch, tensorflow, onnx, openvino
The config attributes {'interpolation_type': 'linear', 'skip_prk_steps': True, 'use_karras_sigmas': False} were passed to LCMScheduler, but are not expected and will be ignored. Please verify your scheduler_config.json configuration file.
Compiling the vae_decoder to AUTO ...
Compiling the unet to AUTO ...
Compiling the text_encoder_2 to AUTO ...
Compiling the vae_encoder to AUTO ...
Compiling the text_encoder to AUTO ...
from transformers import set_seed
set_seed(23)
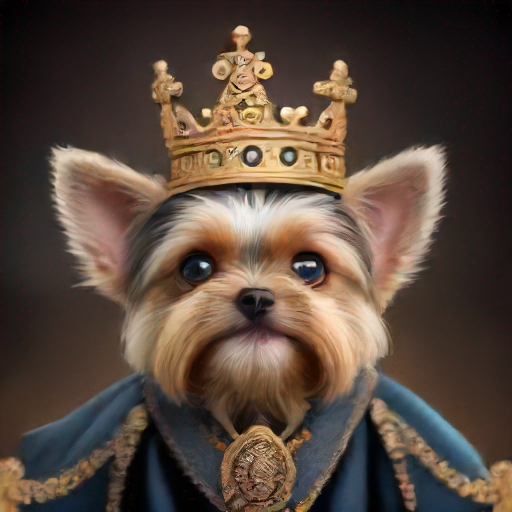
prompt = "A cinematic highly detailed shot of a baby Yorkshire terrier wearing an intricate Italian priest robe, with crown"
image = text2image_pipe(prompt, num_inference_steps=4, height=512, width=512, guidance_scale=0.5).images[0]
image.save("dog.png")
image
0%| | 0/4 [00:00<?, ?it/s]
del text2image_pipe
gc.collect();
量子化
NNCF は、量子化レイヤーをモデルグラフに追加し、トレーニング・データセットのサブセットを使用してこれらの追加の量子化レイヤーのパラメーターを初期化することで、トレーニング後の量子化を可能にします。量子化操作は FP32/FP16 ではなく INT8 で実行されるため、モデル推論が高速化されます。
Segmind-VEGAModel 構造によれば、UNet モデルはパイプライン全体の実行時間の大部分を占めます。ここでは、NNCF を使用して UNet 部分を最適化し、計算コストを削減してパイプラインを高速化する方法を説明します。SDXL パイプラインの残りのパーツを量子化しても、推論パフォーマンスは大幅に向上せず、精度が大幅に低下する可能性があります。
最適化プロセスには次の手順が含まれます。
量子化用のキャリブレーション・データセットを作成します。
nncf.quantize()を実行して、量子化されたモデルを取得します。openvino.save_model()関数を使用してINT8モデルを保存します。
モデルの推論速度を向上させるため量子化を実行するかどうかを以下で選択してください。
to_quantize = widgets.Checkbox(
    value=True,
    description='Quantization',
    disabled=False,
)

to_quantize
Checkbox(value=True, description='Quantization')
import sys
sys.path.append("../utils")

int8_pipe = None

if to_quantize.value and "GPU" in device.value:
    to_quantize.value = False
42
%load_ext skip_kernel_extension
キャリブレーション・データセットの準備
Hugging Face の検証 conceptual_captions データセットの一部をキャリブレーション・データとして使用します。キャリブレーション用の中間モデル入力を収集するには、CompiledModel をカスタマイズする必要があります。
UNET_INT8_OV_PATH = model_dir / "optimized_unet" / "openvino_model.xml"

def disable_progress_bar(pipeline, disable=True):
    if not hasattr(pipeline, "_progress_bar_config"):
        pipeline._progress_bar_config = {'disable': disable}
    else:
        pipeline._progress_bar_config['disable'] = disable
%%skip not $to_quantize.value

import datasets
import numpy as np
from tqdm.notebook import tqdm
from transformers import set_seed
from typing import Any, Dict, List

set_seed(1)

class CompiledModelDecorator(ov.CompiledModel):
    def __init__(self, compiled_model: ov.CompiledModel, data_cache: List[Any] = None):
        super().__init__(compiled_model)
        self.data_cache = data_cache if data_cache else []

    def __call__(self, *args, **kwargs):
        self.data_cache.append(*args)
        return super().__call__(*args, **kwargs)

def collect_calibration_data(pipe, subset_size: int) -> List[Dict]:
    original_unet = pipe.unet.request
    pipe.unet.request = CompiledModelDecorator(original_unet)

    dataset = datasets.load_dataset("conceptual_captions", split="train").shuffle(seed=42)
    disable_progress_bar(pipe)

    # Run inference for data collection
    pbar = tqdm(total=subset_size)
    diff = 0
    for batch in dataset:
        prompt = batch["caption"]
        if len(prompt) > pipe.tokenizer.model_max_length:
            continue
        _ = pipe(
            prompt,
            num_inference_steps=1,
            height=512,
            width=512,
            guidance_scale=0.0,
            generator=np.random.RandomState(987)
        )
        collected_subset_size = len(pipe.unet.request.data_cache)
        if collected_subset_size >= subset_size:
            pbar.update(subset_size - pbar.n)
            break
        pbar.update(collected_subset_size - diff)
        diff = collected_subset_size

    calibration_dataset = pipe.unet.request.data_cache
    disable_progress_bar(pipe, disable=False)
    pipe.unet.request = original_unet
    return calibration_dataset
%%skip not $to_quantize.value

if not UNET_INT8_OV_PATH.exists():
    text2image_pipe = OVStableDiffusionXLPipeline.from_pretrained(model_dir, device=device.value)
    unet_calibration_data = collect_calibration_data(text2image_pipe, subset_size=200)
量子化を実行
事前トレーニング済みの変換済み OpenVINO モデルから量子化モデルを作成します。最初と最後の畳み込みレイヤーの量子化は、生成結果に影響します。FP16 精度で精度に敏感な畳み込みレイヤーを維持するには、IgnoredScope を使用することをお勧めします。
注: 量子化は時間とメモリーを消費する操作です。以下の量子化コードの実行には時間がかかる場合があります。
%%skip not $to_quantize.value

import nncf
from nncf.scopes import IgnoredScope

UNET_OV_PATH = model_dir / "unet" / "openvino_model.xml"
if not UNET_INT8_OV_PATH.exists():
    unet = core.read_model(UNET_OV_PATH)
    quantized_unet = nncf.quantize(
        model=unet,
        model_type=nncf.ModelType.TRANSFORMER,
        calibration_dataset=nncf.Dataset(unet_calibration_data),
        ignored_scope=IgnoredScope(
            names=[
                "__module.model.conv_in/aten::_convolution/Convolution",
                "__module.model.up_blocks.2.resnets.2.conv_shortcut/aten::_convolution/Convolution",
                "__module.model.conv_out/aten::_convolution/Convolution"
            ],
        ),
    )
    ov.save_model(quantized_unet, UNET_INT8_OV_PATH)
%%skip not $to_quantize.value
def create_int8_pipe(model_dir, unet_int8_path, device, core, unet_device='CPU'):
int8_pipe = OVStableDiffusionXLPipeline.from_pretrained(model_dir, device=device, compile=True)
del int8_pipe.unet.request
del int8_pipe.unet.model
gc.collect()
int8_pipe.unet.model = core.read_model(unet_int8_path)
int8_pipe.unet.request = core.compile_model(int8_pipe.unet.model, unet_device or device)
return int8_pipe
int8_text2image_pipe = create_int8_pipe(model_dir, UNET_INT8_OV_PATH, device.value, core)
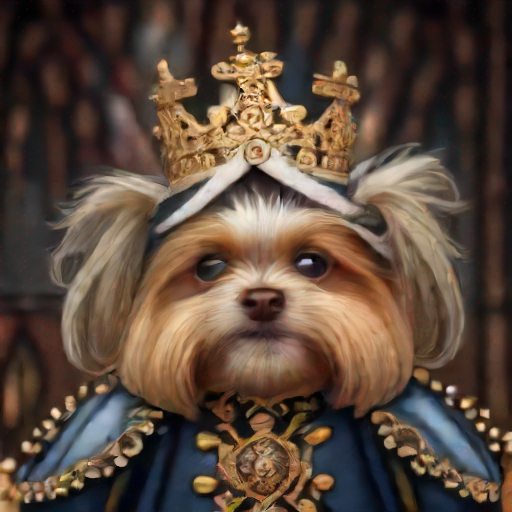
set_seed(23)
image = int8_text2image_pipe(prompt, num_inference_steps=4, height=512, width=512, guidance_scale=0.5).images[0]
display(image)
The config attributes {'interpolation_type': 'linear', 'skip_prk_steps': True, 'use_karras_sigmas': False} were passed to LCMScheduler, but are not expected and will be ignored. Please verify your scheduler_config.json configuration file.
Compiling the vae_decoder to AUTO ...
Compiling the unet to AUTO ...
Compiling the text_encoder to AUTO ...
Compiling the text_encoder_2 to AUTO ...
Compiling the vae_encoder to AUTO ...
0%| | 0/4 [00:00<?, ?it/s]
UNet ファイルサイズを比較
%%skip not $to_quantize.value

fp16_ir_model_size = UNET_OV_PATH.with_suffix(".bin").stat().st_size / 1024
quantized_model_size = UNET_INT8_OV_PATH.with_suffix(".bin").stat().st_size / 1024

print(f"FP16 model size: {fp16_ir_model_size:.2f} KB")
print(f"INT8 model size: {quantized_model_size:.2f} KB")
print(f"Model compression rate: {fp16_ir_model_size / quantized_model_size:.3f}")
FP16 model size: 1455519.49 KB
INT8 model size: 729448.00 KB
Model compression rate: 1.995
FP16 および INT8 パイプラインの推論パフォーマンスを測定するには、キャリブレーション・サブセットの推論時間の中央値を使用します。
注: 最も正確なパフォーマンス推定を行うには、他のアプリケーションを閉じた後、ターミナル/コマンドプロンプトで
benchmark_appを実行することを推奨します。
%%skip not $to_quantize.value

import time

validation_size = 7
calibration_dataset = datasets.load_dataset("conceptual_captions", split="train")
validation_data = []
for idx, batch in enumerate(calibration_dataset):
    if idx >= validation_size:
        break
    prompt = batch["caption"]
    validation_data.append(prompt)

def calculate_inference_time(pipe, dataset):
    inference_time = []
    disable_progress_bar(pipe)

    for prompt in dataset:
        start = time.perf_counter()
        image = pipe(
            prompt,
            num_inference_steps=4,
            guidance_scale=1.0,
            generator=np.random.RandomState(23)
        ).images[0]
        end = time.perf_counter()
        delta = end - start
        inference_time.append(delta)
    disable_progress_bar(pipe, disable=False)
    return np.median(inference_time)
/home/ea/work/openvino_notebooks/test_env/lib/python3.8/site-packages/datasets/table.py:1421: FutureWarning: promote has been superseded by mode='default'.
  table = cls._concat_blocks(blocks, axis=0)
%%skip not $to_quantize.value

int8_latency = calculate_inference_time(int8_text2image_pipe, validation_data)

del int8_text2image_pipe
gc.collect()

text2image_pipe = OVStableDiffusionXLPipeline.from_pretrained(model_dir, device=device.value)
fp_latency = calculate_inference_time(text2image_pipe, validation_data)

del text2image_pipe
gc.collect()
print(f"FP16 pipeline latency: {fp_latency:.3f}")
print(f"INT8 pipeline latency: {int8_latency:.3f}")
print(f"Text-to-Image generation speed up: {fp_latency / int8_latency:.3f}")
The config attributes {'interpolation_type': 'linear', 'skip_prk_steps': True, 'use_karras_sigmas': False} were passed to LCMScheduler, but are not expected and will be ignored. Please verify your scheduler_config.json configuration file.
Compiling the vae_decoder to AUTO ...
Compiling the unet to AUTO ...
Compiling the text_encoder to AUTO ...
Compiling the text_encoder_2 to AUTO ...
Compiling the vae_encoder to AUTO ...
FP16 pipeline latency: 11.029
INT8 pipeline latency: 5.967
Text-to-Image generation speed up: 1.849
インタラクティブなデモ
独自のテキスト記述を使用してモデル作業を確認できるようになりました。テキストボックスにテキストプロンプトを入力し、[Run] ボタンで生成を開始します。さらに、追加のパラメーターを使用して生成を制御することもできます。
- シード - 初期化用のランダムシード
- ステップ - 生成ステップの数
- 高さと幅 - 生成された画像のサイズ
インタラクティブなデモを起動するため量子化モデルを使用するかどうか以下で選択してください。
quantized_model_present = UNET_INT8_OV_PATH.exists()

use_quantized_model = widgets.Checkbox(
    value=quantized_model_present,
    description='Use quantized model',
    disabled=not quantized_model_present,
)

use_quantized_model
Checkbox(value=True, description='Use quantized model')
import gradio as gr
if use_quantized_model.value:
if not quantized_model_present:
raise RuntimeError("Quantized model not found.")
text2image_pipe = create_int8_pipe(model_dir, UNET_INT8_OV_PATH, device.value, core)
else:
text2image_pipe = OVStableDiffusionXLPipeline.from_pretrained(model_dir, device=device.value)
def generate_from_text(text, seed, num_steps, height, width):
set_seed(seed)
result = text2image_pipe(text, num_inference_steps=num_steps, guidance_scale=1.0, height=height, width=width).images[0]
return result
with gr.Blocks() as demo:
with gr.Column():
positive_input = gr.Textbox(label="Text prompt")
with gr.Row():
seed_input = gr.Number(precision=0, label="Seed", value=42, minimum=0)
steps_input = gr.Slider(label="Steps", value=4, minimum=2, maximum=8, step=1)
height_input = gr.Slider(label="Height", value=512, minimum=256, maximum=1024, step=32)
width_input = gr.Slider(label="Width", value=512, minimum=256, maximum=1024, step=32)
btn = gr.Button()
out = gr.Image(label="Result (Quantized)" if use_quantized_model.value else "Result (Original)", type="pil", width=512)
btn.click(generate_from_text, [positive_input, seed_input, steps_input, height_input, width_input], out)
gr.Examples([
["cute cat", 999],
["underwater world coral reef, colorful jellyfish, 35mm, cinematic lighting, shallow depth of field, ultra quality, masterpiece, realistic", 89],
["a photo realistic happy white poodle dog playing in the grass, extremely detailed, high res, 8k, masterpiece, dynamic angle", 1569],
["Astronaut on Mars watching sunset, best quality, cinematic effects,", 65245],
["Black and white street photography of a rainy night in New York, reflections on wet pavement", 48199],
["cinematic photo detailed closeup portraid of a Beautiful cyberpunk woman, robotic parts, cables, lights, text; , high quality photography, 3 point lighting, flash with softbox, 4k, Canon EOS R3, hdr, smooth, sharp focus, high resolution, award winning photo, 80mm, f2.8, bokeh . 35mm photograph, film, bokeh, professional, 4k, highly detailed, high quality photography, 3 point lighting, flash with softbox, 4k, Canon EOS R3, hdr, smooth, sharp focus, high resolution, award winning photo, 80mm, f2.8, bokeh", 48199]
], [positive_input, seed_input])
# if you are launching remotely, specify server_name and server_port
# demo.launch(server_name='your server name', server_port='server port in int')
# Read more in the docs: https://gradio.app/docs/
# if you want create public link for sharing demo, please add share=True
try:
demo.launch(debug=False)
except Exception:
demo.launch(share=True, debug=False)