OpenVINO のスループット・モードのパフォーマンスに関するヒント
この Jupyter ノートブックは、ローカルへのインストール後にのみ起動できます。

このノートブックの目的は、スループット・モードでの推論のパフォーマンスを向上させる段階的なチュートリアルを提供することです。リアルタイム・アプリケーションでは、データが表示されてからできるだけ早く結果が必要な場合、高いスループットが望まれます。このノートブックはコンピューター・ビジョン・ワークフローを想定しており、YOLOv5n モデルを使用します。一度にすべてのフレームにアクセスできるビデオ処理アプリケーション (ビデオ編集など) をシミュレートします。
このノートブックで適用されたパフォーマンスのヒントは、次の図に要約できます。以下の手順の一部は、どの段階のどのデバイスにも適用できます (例: バッチサイズ)。特定のデバイスにのみ使用できるものもあります (例: CPU に対する推論スレッド数など)。考えられる構成は膨大であるため、以下の手順を確認してから、試行錯誤のアプローチを適用することをお勧めします。より多くの推論スレッド + 非同期処理など、多くのヒントを同時に組み込むことができます。パフォーマンスはさらに向上するはずですが、とにかくテストすることです。
量子化および前後処理 API は、精度 (量子化) または処理グラフ (前後処理) を変更するため、ここには含まれていません。これらを適用して OpenVINO IR ファイルのパフォーマンスを最適化する例は、118-optimize-preprocessing で見つけることができます。
注: 以下に示す手順は、パフォーマンスを向上させるために役立ちます。ただし、ハードウェアまたはモデルに強く依存している場合は、何も変わらないか、パフォーマンスが悪化するものもあります。使用するモデルをコンピューター上のノートブックで実行して、どちらがケースに適しているかを確認してください。
以下のヒントはすべて OpenVINO 2023.0 で実行されました。OpenVINO の将来のバージョンでは、パフォーマンスが異なるさまざまな最適化が含まれる可能性があります。
レイテンシー・モードに焦点を当てた同様のノートブックは、ここで入手できます。
目次
必要条件
%pip install -q "openvino>=2023.1.0" "ultralytics<=8.0.178" seaborn onnx --extra-index-url https://download.pytorch.org/whl/cpu
Note: you may need to restart the kernel to use updated packages.
import time
from pathlib import Path
from typing import Any, List, Tuple

# Fetch `notebook_utils` module
import urllib.request
urllib.request.urlretrieve(
    url='https://raw.githubusercontent.com/openvinotoolkit/openvino_notebooks/main/notebooks/utils/notebook_utils.py',
    filename='notebook_utils.py'
)
import notebook_utils as utils
データ
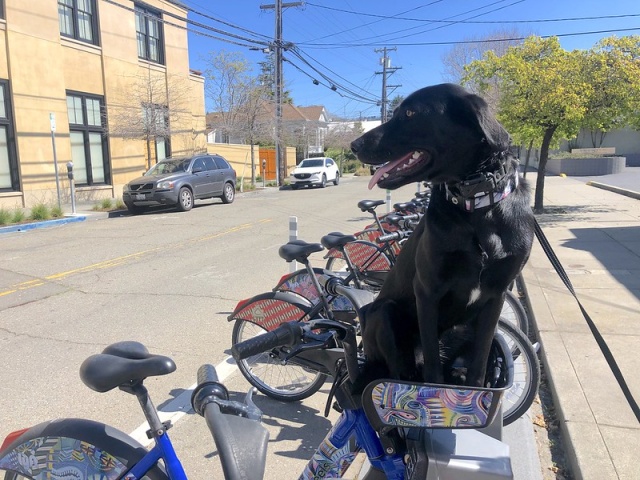
自転車に座っている犬の同じ画像を 1000 回コピーして、1000 フレーム (約 33 秒) のビデオをシミュレートします。この特定のオブジェクト検出モデルの要件を満たすよう、画像のサイズが変更され、前処理されます。
import numpy as np
import cv2

FRAMES_NUMBER = 1024

IMAGE_WIDTH = 640
IMAGE_HEIGHT = 480

# load image
image = utils.load_image("https://storage.openvinotoolkit.org/repositories/openvino_notebooks/data/data/image/coco_bike.jpg")
image = cv2.resize(image, dsize=(IMAGE_WIDTH, IMAGE_HEIGHT), interpolation=cv2.INTER_AREA)

# preprocess it for YOLOv5
input_image = image / 255.0
input_image = np.transpose(input_image, axes=(2, 0, 1))
input_image = np.expand_dims(input_image, axis=0)

# simulate video with many frames
video_frames = np.tile(input_image, (FRAMES_NUMBER, 1, 1, 1, 1))

# show the image
utils.show_array(image)
<DisplayHandle display_id=bbb34b7fd1ad545280d19661bf0bd4c3>
モデル
ここでは、PyTorch Hub から簡単に入手でき、パフォーマンスの違いを確認できるほど小さな最先端のオブジェクト検出モデルの 1 つである YOLOv5n を使用することにしました。
import torch
from IPython.utils import io

# directory for all models
base_model_dir = Path("model")

model_name = "yolov5n"
model_path = base_model_dir / model_name

# load YOLOv5n from PyTorch Hub
pytorch_model = torch.hub.load("ultralytics/yolov5", "custom", path=model_path, device="cpu", skip_validation=True)
# don't print full model architecture
with io.capture_output():
    pytorch_model.eval()
Using cache found in /opt/home/k8sworker/.cache/torch/hub/ultralytics_yolov5_master
YOLOv5 🚀 2023-4-21 Python-3.8.10 torch-2.1.0+cpu CPU
Fusing layers...
YOLOv5n summary: 213 layers, 1867405 parameters, 0 gradients
Adding AutoShape...
requirements: /opt/home/k8sworker/.cache/torch/hub/requirements.txt not found, check failed.
ハードウェア
以下のコードには、ベンチマーク・プロセスで使用する利用可能なハードウェアがリストされています。
注: 皆さんが使用するハードウェアは、おそらくここで使用するものとは全く異なります。つまり、全く異なる結果が見られるということです。
import openvino as ov

# initialize OpenVINO
core = ov.Core()

# print available devices
for device in core.available_devices:
    device_name = core.get_property(device, "FULL_DEVICE_NAME")
    print(f"{device}: {device_name}")
CPU: Intel(R) Core(TM) i9-10920X CPU @ 3.50GHz
ヘルパー関数
以下のすべての最適化に使用するベンチマーク・モデル関数を定義します。1000 フレームの推論を実行し、1 秒あたりの平均フレーム数 (FPS) を出力します。
from openvino.runtime import AsyncInferQueue


def benchmark_model(model: Any, frames: np.ndarray, async_queue: AsyncInferQueue = None, benchmark_name: str = "OpenVINO model", device_name: str = "CPU") -> float:
    """
    Helper function for benchmarking the model. It measures the time and prints results.
    """
    # measure the first inference separately - it may be slower as it contains also initialization
    start = time.perf_counter()
    model(frames[0])
    if async_queue:
        async_queue.wait_all()
    end = time.perf_counter()
    first_infer_time = end - start
    print(f"{benchmark_name} on {device_name}. First inference time: {first_infer_time :.4f} seconds")

    # benchmarking
    start = time.perf_counter()
    for batch in frames:
        model(batch)
    # wait for all threads if async processing
    if async_queue:
        async_queue.wait_all()
    end = time.perf_counter()

    # elapsed time
    infer_time = end - start

    # print second per image and FPS
    mean_infer_time = infer_time / FRAMES_NUMBER
    mean_fps = FRAMES_NUMBER / infer_time
    print(f"{benchmark_name} on {device_name}: {mean_infer_time :.4f} seconds per image ({mean_fps :.2f} FPS)")

    return mean_fps
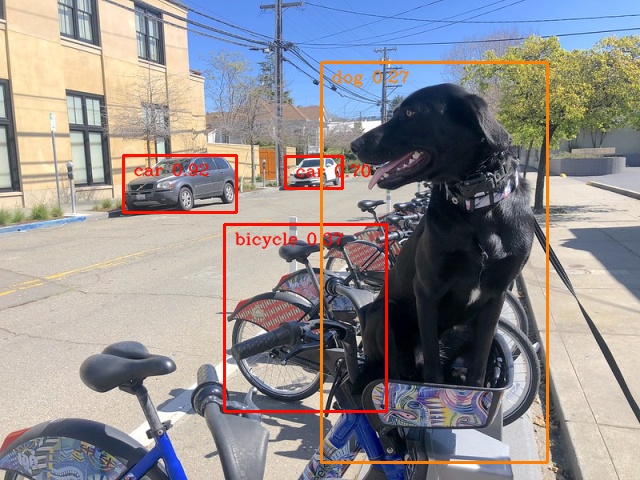
次の関数は、結果を後処理し、画像上にボックスを描画します。
# https://gist.github.com/AruniRC/7b3dadd004da04c80198557db5da4bda
classes = [
    "person", "bicycle", "car", "motorcycle", "airplane", "bus", "train", "truck", "boat", "traffic light", "fire hydrant",
    "stop sign", "parking meter", "bench", "bird", "cat", "dog", "horse", "sheep", "cow", "elephant", "bear", "zebra",
    "giraffe", "backpack", "umbrella", "handbag", "tie", "suitcase", "frisbee", "skis", "snowboard", "sports ball", "kite",
    "baseball bat", "baseball glove", "skateboard", "surfboard", "tennis racket", "bottle", "wine glass", "cup", "fork",
    "knife", "spoon", "bowl", "banana", "apple", "sandwich", "orange", "broccoli", "carrot", "hot dog", "pizza", "donut",
    "cake", "chair", "couch", "potted plant", "bed", "dining table", "toilet", "tv", "laptop", "mouse", "remote", "keyboard",
    "cell phone", "microwave", "oven", "oaster", "sink", "refrigerator", "book", "clock", "vase", "scissors", "teddy bear",
    "hair drier", "toothbrush"
]

# Colors for the classes above (Rainbow Color Map).
colors = cv2.applyColorMap(
    src=np.arange(0, 255, 255 / len(classes), dtype=np.float32).astype(np.uint8),
    colormap=cv2.COLORMAP_RAINBOW,
).squeeze()


def postprocess(detections: np.ndarray) -> List[Tuple]:
    """
    Postprocess the raw results from the model.
    """
    # candidates - probability > 0.25
    detections = detections[detections[..., 4] > 0.25]

    boxes = []
    labels = []
    scores = []
    for obj in detections:
        xmin, ymin, ww, hh = obj[:4]
        score = obj[4]
        label = np.argmax(obj[5:])
        # Create a box with pixels coordinates from the box with normalized coordinates [0,1].
        boxes.append(
            tuple(map(int, (xmin - ww // 2, ymin - hh // 2, ww, hh)))
        )
        labels.append(int(label))
        scores.append(float(score))

    # Apply non-maximum suppression to get rid of many overlapping entities.
    # See https://paperswithcode.com/method/non-maximum-suppression
    # This algorithm returns indices of objects to keep.
    indices = cv2.dnn.NMSBoxes(
        bboxes=boxes, scores=scores, score_threshold=0.25, nms_threshold=0.5
    )

    # If there are no boxes.
    if len(indices) == 0:
        return []

    # Filter detected objects.
    return [(labels[idx], scores[idx], boxes[idx]) for idx in indices.flatten()]


def draw_boxes(img: np.ndarray, boxes):
    """
    Draw detected boxes on the image.
    """
    for label, score, box in boxes:
        # Choose color for the label.
        color = tuple(map(int, colors[label]))
        # Draw a box.
        x2 = box[0] + box[2]
        y2 = box[1] + box[3]
        cv2.rectangle(img=img, pt1=box[:2], pt2=(x2, y2), color=color, thickness=2)

        # Draw a label name inside the box.
        cv2.putText(
            img=img,
            text=f"{classes[label]} {score:.2f}",
            org=(box[0] + 10, box[1] + 20),
            fontFace=cv2.FONT_HERSHEY_COMPLEX,
            fontScale=img.shape[1] / 1200,
            color=color,
            thickness=1,
            lineType=cv2.LINE_AA,
        )


def show_result(results: np.ndarray):
    """
    Postprocess the raw results, draw boxes and show the image.
    """
    output_img = image.copy()

    detections = postprocess(results)
    draw_boxes(output_img, detections)

    utils.show_array(output_img)
最適化
以下に、スループット・モードで推論を高速化するパフォーマンスのヒントを示します。すべての検証で同じ量のリソースが利用可能であることを確認するため、ベンチマークごとにリソースを解放します。
PyTorch モデル
まず、最適化を適用せずに元の PyTorch モデルをベンチマークします。これをベースラインとして扱います。
import torch

with torch.no_grad():
    result = pytorch_model(torch.as_tensor(video_frames[0])).detach().numpy()[0]
    show_result(result)
    pytorch_fps = benchmark_model(pytorch_model, frames=torch.as_tensor(video_frames).float(), benchmark_name="PyTorch model")

PyTorch model on CPU. First inference time: 0.0224 seconds
PyTorch model on CPU: 0.0221 seconds per image (45.32 FPS)
OpenVINO IR モデル
最初の最適化は、PyTorch モデルを OpenVINO 中間表現 (IR) FP16 にエクスポートして実行することです。FP16 や INT8 などの低精度をサポートするハードウェアでは、精度を下げることは推論を高速化する方法の 1 つです。ハードウェアが低精度をサポートしない場合、モデルは自動的に FP32 で推論されます。量子化 (INT8) を使用することもできますが、精度が若干低下します。そのため、このノートブックではこの手順は省略します。
onnx_path = base_model_dir / Path(f"{model_name}_{IMAGE_WIDTH}_{IMAGE_HEIGHT}").with_suffix(".onnx")

# export PyTorch model to ONNX if it doesn't already exist
if not onnx_path.exists():
    dummy_input = torch.randn(1, 3, IMAGE_HEIGHT, IMAGE_WIDTH)
    torch.onnx.export(pytorch_model, dummy_input, onnx_path)

# convert ONNX model to IR, use FP16
ov_model = ov.convert_model(onnx_path)
ov_cpu_model = core.compile_model(ov_model, device_name="CPU")

result = ov_cpu_model(video_frames[0])[ov_cpu_model.output(0)][0]
show_result(result)
ov_cpu_fps = benchmark_model(model=ov_cpu_model, frames=video_frames, benchmark_name="OpenVINO model")

del ov_cpu_model  # release resources

OpenVINO model on CPU. First inference time: 0.0142 seconds
OpenVINO model on CPU: 0.0071 seconds per image (141.49 FPS)
OpenVINO IR モデル + 大きなバッチ
バッチ処理では、一度に処理される入力が増えるため、スループットが向上することがよくあります。より大きなバッチ (1 より多い) を使用するには、新しい入力形状を指定してモデルを再度変換し、入力フレームの形状を変更する必要があります。ここでは、バッチサイズを 4 にするのが最適な選択ですが、最適なバッチサイズはデバイスによって大きく異なり、推論精度など多くの要因に依存します。他のハードウェアやモデルについては、さまざまなサイズを試してみると良いでしょう。
batch_size = 4

onnx_batch_path = base_model_dir / Path(f"{model_name}_{IMAGE_WIDTH}_{IMAGE_HEIGHT}_batch_{batch_size}").with_suffix(".onnx")

if not onnx_batch_path.exists():
    dummy_input = torch.randn(batch_size, 3, IMAGE_HEIGHT, IMAGE_WIDTH)
    torch.onnx.export(pytorch_model, dummy_input, onnx_batch_path)

# export the model with the bigger batch size
ov_batch_model = ov.convert_model(onnx_batch_path)
/opt/home/k8sworker/.cache/torch/hub/ultralytics_yolov5_master/models/common.py:514: TracerWarning: Converting a tensor to a Python boolean might cause the trace to be incorrect. We can't record the data flow of Python values, so this value will be treated as a constant in the future. This means that the trace might not generalize to other inputs!
  y = self.model(im, augment=augment, visualize=visualize) if augment or visualize else self.model(im)
/opt/home/k8sworker/.cache/torch/hub/ultralytics_yolov5_master/models/yolo.py:64: TracerWarning: Converting a tensor to a Python boolean might cause the trace to be incorrect. We can't record the data flow of Python values, so this value will be treated as a constant in the future. This means that the trace might not generalize to other inputs!
  if self.dynamic or self.grid[i].shape[2:4] != x[i].shape[2:4]:
ov_cpu_batch_model = core.compile_model(ov_batch_model, device_name="CPU")

batched_video_frames = video_frames.reshape([-1, batch_size, 3, IMAGE_HEIGHT, IMAGE_WIDTH])

result = ov_cpu_batch_model(batched_video_frames[0])[ov_cpu_batch_model.output(0)][0]
show_result(result)
ov_cpu_batch_fps = benchmark_model(model=ov_cpu_batch_model, frames=batched_video_frames, benchmark_name="OpenVINO model + bigger batch")

del ov_cpu_batch_model  # release resources

OpenVINO model + bigger batch on CPU. First inference time: 0.0486 seconds
OpenVINO model + bigger batch on CPU: 0.0068 seconds per image (146.44 FPS)
非同期処理
非同期モードとは、OpenVINO が推論呼び出しからすぐに戻り、結果を待たないことを意味します。より多くの並行コードを記述する必要がありますが、処理時間の利用率が向上するはずです。例えば、結果を待機する間に前処理または後処理コードを実行できます。非同期処理を直接使用することもできますが (start_async() 関数)、同じ結果を得るにはより簡単な AsyncInferQueue を使用することを推奨します。このクラスは、InferRequest オブジェクト ( “ジョブ” とも呼ばれます) のプールを自動的に生成し、パイプラインのフローを制御する同期メカニズムを提供します。
注: 非同期処理では、出力が入力と同じ順序になることを保証できないため、ビデオなど、フレームの順序が重要なアプリケーションでは注意が必要です。
def benchmark_async_mode(ov_model, benchmark_name, device_name):
    def callback(infer_request, info):
        result = infer_request.get_output_tensor(0).data[0]
        show_result(result)
        pass

    infer_queue = ov.AsyncInferQueue(ov_model)
    infer_queue.set_callback(callback)  # set callback to post-process (show) results

    infer_queue.start_async(video_frames[0])
    infer_queue.wait_all()

    # don't show output for the remaining frames
    infer_queue.set_callback(lambda x, y: {})
    fps = benchmark_model(model=infer_queue.start_async, frames=video_frames, async_queue=infer_queue, benchmark_name=benchmark_name, device_name=device_name)

    del infer_queue  # release resources
    return fps
スループット・モードの OpenVINO IR モデル
OpenVINO では、デバイスの内部構成を変更するパフォーマンス・ヒントを指定できます。ヒントには、LATENCY、THROUGHPUT、CUMULATIVE_THROUGHPUT の 3 つがあります。このノートブックはスループット・モードに重点を置いているため、後者の 2 つを使用します。ヒントは他のデバイスでも使用できます。スループット・モードは、バッチサイズを最適なレベルに設定する自動バッチ機能を使用して暗黙的にトリガーされます。
ov_cpu_through_model = core.compile_model(ov_model, device_name="CPU", config={"PERFORMANCE_HINT": "THROUGHPUT"})

ov_cpu_through_fps = benchmark_async_mode(ov_cpu_through_model, benchmark_name="OpenVINO model", device_name="CPU (THROUGHPUT)")

del ov_cpu_through_model  # release resources

OpenVINO model on CPU (THROUGHPUT). First inference time: 0.0221 seconds
OpenVINO model on CPU (THROUGHPUT): 0.0040 seconds per image (249.65 FPS)
GPU のスループット・モードでの OpenVINO IR モデル
通常、GPU デバイスは CPU よりも 1 秒あたりのフレーム数が多いため、上記のモデルを GPU で実行してみましょう。この手順を実行するには、インテル® GPU が必要であり、ドライバーをインストールする必要があることに注意してください。さらに、GPU へのオフロードにより、CPU の負荷とメモリーの消費が軽減され、他のプロセスにそれらを割り当てることができます。GPU で高いスループットが確認できない場合、モデルが軽量すぎるため大規模な並列実行のメリットが得られていない可能性があります。
ov_gpu_fps = 0.0
if "GPU" in core.available_devices:
    # compile for GPU
    ov_gpu_model = core.compile_model(ov_model, device_name="GPU", config={"PERFORMANCE_HINT": "THROUGHPUT"})

    ov_gpu_fps = benchmark_async_mode(ov_gpu_model, benchmark_name="OpenVINO model", device_name="GPU (THROUGHPUT)")

    del ov_gpu_model  # release resources
AUTO のスループット・モードでの OpenVINO IR モデル
OpenVINO は、前述のパフォーマンスのヒントに基づいて最適なデバイスを選択できる AUTO と呼ばれる仮想デバイスを提供します。
ov_auto_model = core.compile_model(ov_model, device_name="AUTO", config={"PERFORMANCE_HINT": "THROUGHPUT"})

ov_auto_fps = benchmark_async_mode(ov_auto_model, benchmark_name="OpenVINO model", device_name="AUTO (THROUGHPUT)")

del ov_auto_model  # release resources

OpenVINO model on AUTO (THROUGHPUT). First inference time: 0.0235 seconds
OpenVINO model on AUTO (THROUGHPUT): 0.0040 seconds per image (249.90 FPS)
AUTO の累積スループット・モードでの OpenVINO IR モデル
スループット・モードの AUTO デバイスは、最高のスループットを実現するため最適な物理デバイスを 1 つ選択します。ただし、1 台のマシンに CPU、iGPU、dGPU など複数のインテルデバイスが搭載されている場合は、それらすべてのメリットを享受できる可能性があります。それには、累積スループットを使用してすべてのデバイスをアクティブ化する必要があります。
ov_auto_cumulative_model = core.compile_model(ov_model, device_name="AUTO", config={"PERFORMANCE_HINT": "CUMULATIVE_THROUGHPUT"})

ov_auto_cumulative_fps = benchmark_async_mode(ov_auto_cumulative_model, benchmark_name="OpenVINO model", device_name="AUTO (CUMULATIVE THROUGHPUT)")
OpenVINO model on AUTO (CUMULATIVE THROUGHPUT). First inference time: 0.0227 seconds
OpenVINO model on AUTO (CUMULATIVE THROUGHPUT): 0.0040 seconds per image (250.47 FPS)
その他のヒント
高度なオプション、量子化、事前事後処理、レイテンシー・モード専用など、パフォーマンスを向上させる他のヒントもあります。モデルをさらに活用するには、高度なスループット・オプションおよび 118-optimize-preprocessing を参照してください。
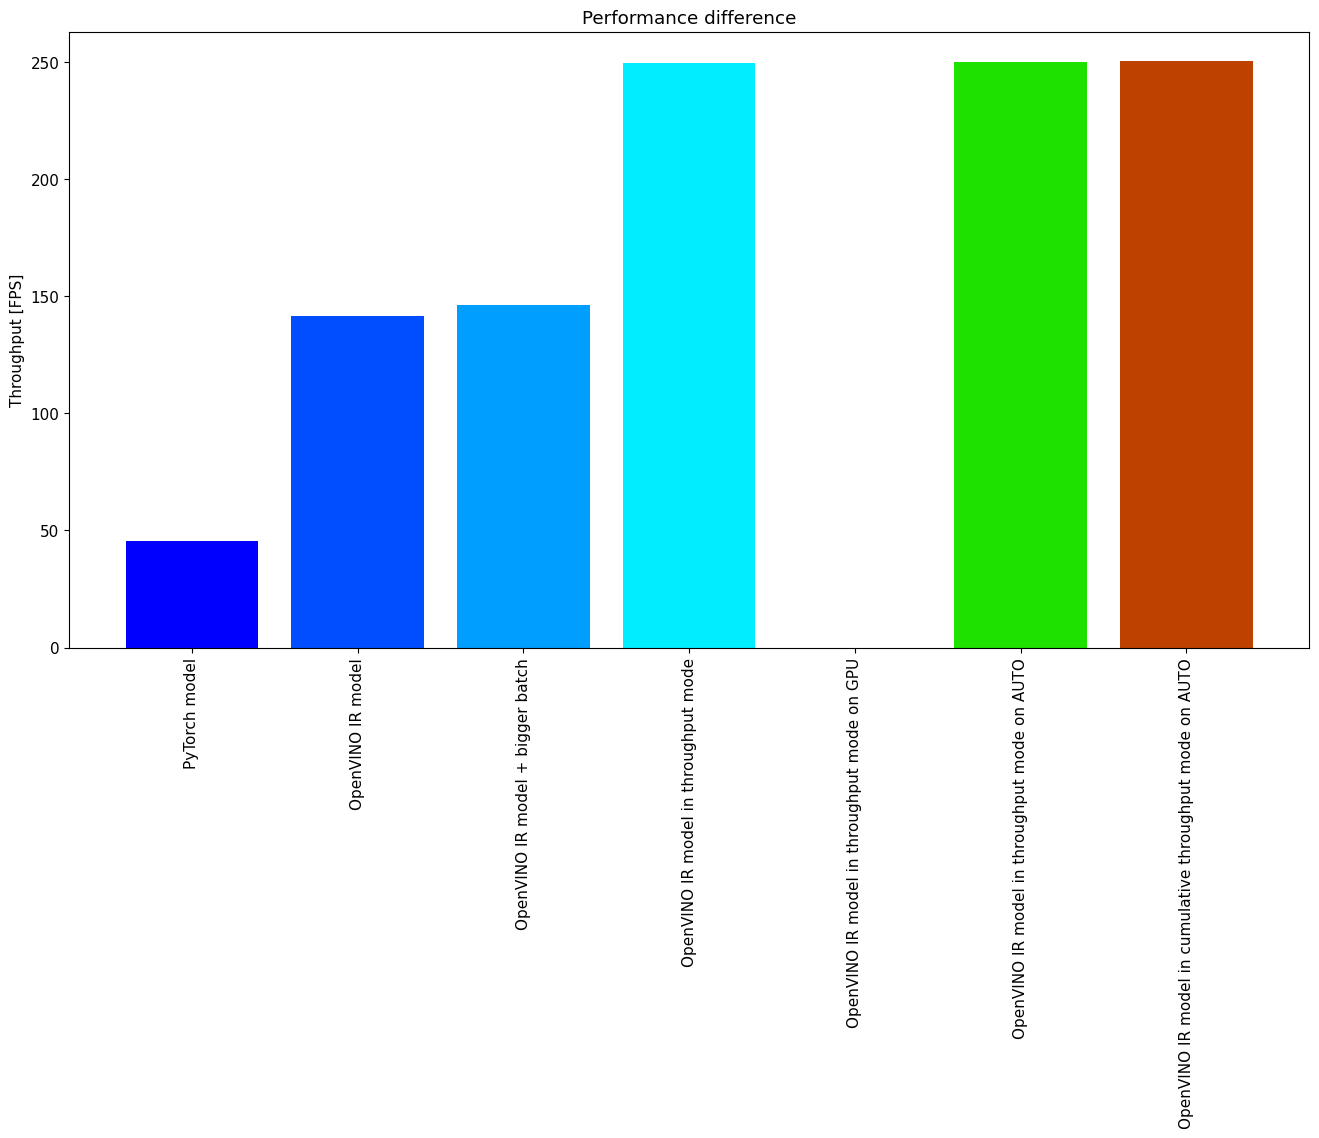
パフォーマンスの比較
次のグラフ比較は、選択したモデルとハードウェアに対して同時に有効です。いくつかのステップ間で改善が見られない場合は、スキップしてください。
%matplotlib inline
from matplotlib import pyplot as plt

labels = ["PyTorch model", "OpenVINO IR model", "OpenVINO IR model + bigger batch", "OpenVINO IR model in throughput mode", "OpenVINO IR model in throughput mode on GPU",
          "OpenVINO IR model in throughput mode on AUTO", "OpenVINO IR model in cumulative throughput mode on AUTO"]

fps = [pytorch_fps, ov_cpu_fps, ov_cpu_batch_fps, ov_cpu_through_fps, ov_gpu_fps, ov_auto_fps, ov_auto_cumulative_fps]

bar_colors = colors[::10] / 255.0

fig, ax = plt.subplots(figsize=(16, 8))
ax.bar(labels, fps, color=bar_colors)

ax.set_ylabel("Throughput [FPS]")
ax.set_title("Performance difference")

plt.xticks(rotation='vertical')
plt.show()
まとめ
物体検出モデルのスループットを向上させるために必要な手順はすでに示しました。このノートブックを実行した後にパフォーマンスが大幅に向上したとしても、これはすべてのハードウェアまたはすべてのモデルに有効であるとは限らないことに注意してください。最も正確な結果を得るには、benchmark_app コマンドラインツールを使用してください。
benchmark_app は、上記のいくつかのヒントの影響を測定できないことに注意してください。