リアルタイムの横書きテキスト検出#
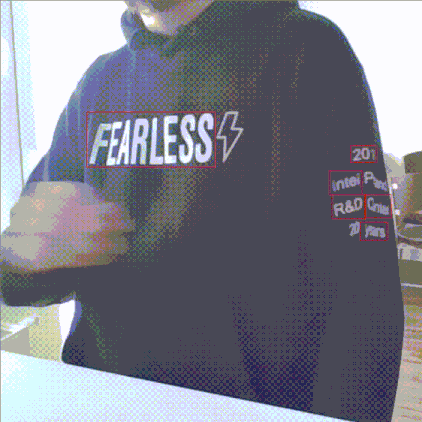
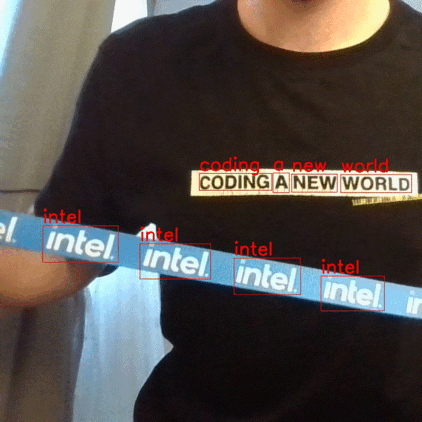
このデモでは、カメラフレームをキャプチャーし、OVMS への gRPC 要求を介してテキスト・スポッティング分析を実行する Python で記述されたクライアントの使用例を示します。クライアントは、OpenCV を使用してリアルタイムで結果を元の画像フレーム上に描画されたボックスとして視覚化します。クライアントは、画像データの圧縮と複数フレームの並列実行によって、レイテンシーが長く、低速なインターネット接続でも効率的に作業できます。
OpenVINO Model Zoo から横書きテキスト検出モデルをダウンロード#
curl -L --create-dir
https://storage.openvinotoolkit.org/repositories/open_model_zoo/2022.1/models_bin/2/horizontal-text-detection-0001/FP32/horizontal-text-detection-0001.bin -o horizontal-text-detection-0001/1/horizontal-text-detection-0001.bin
https://storage.openvinotoolkit.org/repositories/open_model_zoo/2022.1/models_bin/2/horizontal-text-detection-0001/FP32/horizontal-text-detection-0001.xml -o horizontal-text-detection-0001/1/horizontal-text-detection-0001.xml
tree horizontal-text-detection-0001 horizontal-text-detection-0001
└── 1
├── horizontal-text-detection-0001.bin
└── horizontal-text-detection-0001.xmlOVMS コンテナの開始#
docker run -d -u $(id -u):$(id -g) -v $(pwd)/horizontal-text-detection-0001:/model -p 9000:9000 openvino/model_server:latest \ --model_path /model --model_name text --port 9000 --layout NHWC:NCHWクライアントの実行#
リポジトリーのクローンを作成し、horizontal_text_detection ディレクトリーに移動します。
git clone https://github.com/openvinotoolkit/model_server.git
cd model_server/demos/horizontal_text_detection/python
必要なパッケージをインストール:
pip3 install -r requirements.txtクライアントの開始
python3 horizontal_text_detection.py --grpc_address localhost --grpc_port 9000カメラ ID を変更することもできます:
python3 horizontal_text_detection.py --grpc_address localhost --grpc_port 9000 --video_source 0または、ビデオファイルも操作することを選択します:
python3 horizontal_text_detection.py --grpc_address localhost --grpc_port 9000 --video_source ~/video.mp4出力例:
Initializing requesting thread index: 0
Initializing requesting thread index: 1
Initializing requesting thread index: 2
Initializing requesting thread index: 3
Launching requesting thread index: 0
Launching requesting thread index: 1
Launching requesting thread index: 2
Launching requesting thread index: 3
ThreadID: 0; Current FPS: 31.25; Average FPS: 25.64; Average latency: 140.98ms
ThreadID: 1; Current FPS: 31.23; Average FPS: 25.67; Average latency: 136.36ms
ThreadID: 2; Current FPS: 29.41; Average FPS: 25.70; Average latency: 130.88ms
ThreadID: 3; Current FPS: 30.30; Average FPS: 25.73; Average latency: 135.65ms ...注: ビデオソースは、モデルの入力サイズに合わせて 704x704 の解像度にクロップされます。
OCR パイプラインで検出されたテキストを認識#
横書きテキスト検出モデルに基づく光学式文字認識 (OCR) パイプライン、カスタムノード実装と組み合わせたテキスト認識は、以前に使用したのと同じ Python スクリプトで使用できます。OCR パイプラインは、画像上で検出されたテキストボックスの位置と、各ボックスの追加認識されたテキストを提供します。
デモを実行するにはワークスペースを準備します#
OCR パイプラインを正常にデプロイするには、以下を含むワークスペースが必要です:
リポジトリーのクローンを作成し、horizontal_text_detection ディレクトリーに移動します。
git clone https://github.com/openvinotoolkit/model_server.git
cd model_server/demos/horizontal_text_detection/python
make コマンドを実行するだけで、上記のすべてを含むワークスペースを準備できます。このデモで使用されるカスタムノードは OpenVINO モデルサーバーのイメージに含まれているため、イメージからカスタムノードを使用するか、カスタムノードをビルドすることができます。
このデモを実行して、コンパイル済みのカスタムノードを使用する場合、次を実行します:
makeディレクトリー構造 (カスタムノードなし)#
make が完了すると、次の内容を含む workspace ディレクトリーが準備されているはずです。
workspace/
├── config.json
├── horizontal-text-detection-0001
│    └── 1
│        ├── horizontal-text-detection-0001.bin
│        └── horizontal-text-detection-0001.xml
└── text-recognition-0014
     └── 1
         ├── text-recognition-0014.bin
         └── text-recognition-0014.xml
カスタムノードを変更した場合、またはその他の理由で、カスタムノードをコンパイルしてコンテナにアタッチしたい場合は、次を実行します:
make BUILD_CUSTOM_NODE=true BASE_OS=ubuntuディレクトリー構造 (カスタムノードあり)#
make が完了すると、次の内容を含む workspace ディレクトリーが準備されているはずです。
workspace/
├── config.json
├── horizontal-text-detection-0001
│    └── 1
│        ├── horizontal-text-detection-0001.bin
│        └── horizontal-text-detection-0001.xml
├── lib
│         └── libcustom_node_horizontal_ocr.so
└── text-recognition-0014
     └── 1
         ├── text-recognition-0014.bin
         └── text-recognition-0014.xml
OVMS のデプロイ#
次のコマンドで顔分析パイプラインを備えた OVMS をデプロイします:
docker run -p 9000:9000 -d -v ${PWD}/workspace:/workspace openvino/model_server --config_path /workspace/config.json --port 9000サーバーにリクエストを送信#
Python の依存関係をインストールします:
pip3 install -r requirements.txtクライアントの開始
python3 horizontal_text_detection.py --grpc_address localhost --grpc_port 9000 --use_case ocrカメラ ID を変更することもできます:
python3 horizontal_text_detection.py --grpc_address localhost --grpc_port 9000 --use_case ocr --video_source 0または、ビデオファイルも操作することを選択します:
python3 horizontal_text_detection.py --grpc_address localhost --grpc_port 9000 --use_case ocr --video_source ~/video.mp4出力例:
Initializing requesting thread index: 0
Initializing requesting thread index: 1
Initializing requesting thread index: 2
Initializing requesting thread index: 3
Launching requesting thread index: 0
Launching requesting thread index: 1
Launching requesting thread index: 2
Launching requesting thread index: 3
ThreadID: 0; Current FPS: 31.25; Average FPS: 25.64; Average latency: 140.98ms
ThreadID: 1; Current FPS: 31.23; Average FPS: 25.67; Average latency: 136.36ms
ThreadID: 2; Current FPS: 29.41; Average FPS: 25.70; Average latency: 130.88ms
ThreadID: 3; Current FPS: 30.30; Average FPS: 25.73; Average latency: 135.65ms ...
RTSP クライアント#
rtsp クライアントとその依存関係を含む docker イメージを構築する rtsp クライアント・アプリは、読み書きするために RTSP ストリームにアクセスできる必要があります。
rtsp サーバー mediamtx の例
docker run --rm -d -p 8080:8554 -e RTSP_PROTOCOLS=tcp bluenviron/mediamtx:latest次に、ffmpeg を使用してサーバーに書き込みます (例: ビデオまたはカメラを使用)
ffmpeg -stream_loop -1 -i ./video.mp4 -f rtsp -rtsp_transport tcp rtsp://localhost:8080/channel1ffmpeg -f dshow -i video="HP HD Camera" -f rtsp -rtsp_transport tcp rtsp://localhost:8080/channel1リモート分析を読み取るビデオストリーム用の Python クライアントを使用して Docker イメージをビルドします:
docker build ../../common/stream_client/ -t rtsp_clientクライアントの開始#
コマンド
docker run -v $(pwd):/workspace rtsp_client --help
usage: client.py [-h] [--grpc_address GRPC_ADDRESS]
                 [--input_stream INPUT_STREAM] [--output_stream OUTPUT_STREAM]
                 [--model_name MODEL_NAME] [--width WIDTH] [--height HEIGHT]
                 [--input_name INPUT_NAME] [--verbose] [--benchmark] [--limit_stream_duration LIMIT_STREAM_DURATION]
                 [--limit_frames LIMIT_FRAMES]

options:
  -h, --help           show this help message and exit
  --grpc_address GRPC_ADDRESS
                       Specify url to grpc service
  --input_stream INPUT_STREAM
                       Url of input rtsp stream
  --output_stream OUTPUT_STREAM
                       Url of output rtsp stream
  --model_name MODEL_NAME
                       Name of the model
  --width WIDTH
                       Width of model's input image
  --height HEIGHT       Height of model's input image
  --input_name INPUT_NAME
                       Name of the model's input
  --verbose            Should client dump debug information
  --benchmark          Should client collect processing times
  --limit_stream_duration LIMIT_STREAM_DURATION
                       Limit how long client should run
  --limit_frames LIMIT_FRAMES
                       Limit how many frames should be processed
使用例
docker run --network="host" -v $(pwd):/workspace rtsp_client --grpc_address localhost:9000 --input_stream
'rtsp://localhost:8080/channel1' --output_stream
'rtsp://localhost:8080/channel2'
次に、ffplay を使用して rtsp ストリームを読み取ります
ffplay -pixel_format yuv420p -video_size 704x704 -rtsp_transport tcp rtsp://localhost:8080/channel2事前に録画したビデオを使用して、推論用にスケジュールを設定することもできます。horizontal_text.mp4 をビデオファイルに置き換えます。
docker run --network="host" -v $(pwd):/workspace rtsp_client --grpc_address localhost:9000 --input_stream
'workspace/horizontal_text.mp4' --output_stream
'workspace/output.mp4'