Hello モデルサーバー
この Jupyter ノートブックは、ローカルへのインストール後にのみ起動できます。

OpenVINO™ モデルサーバー (OVMS) の紹介。
モデルサービングとは?
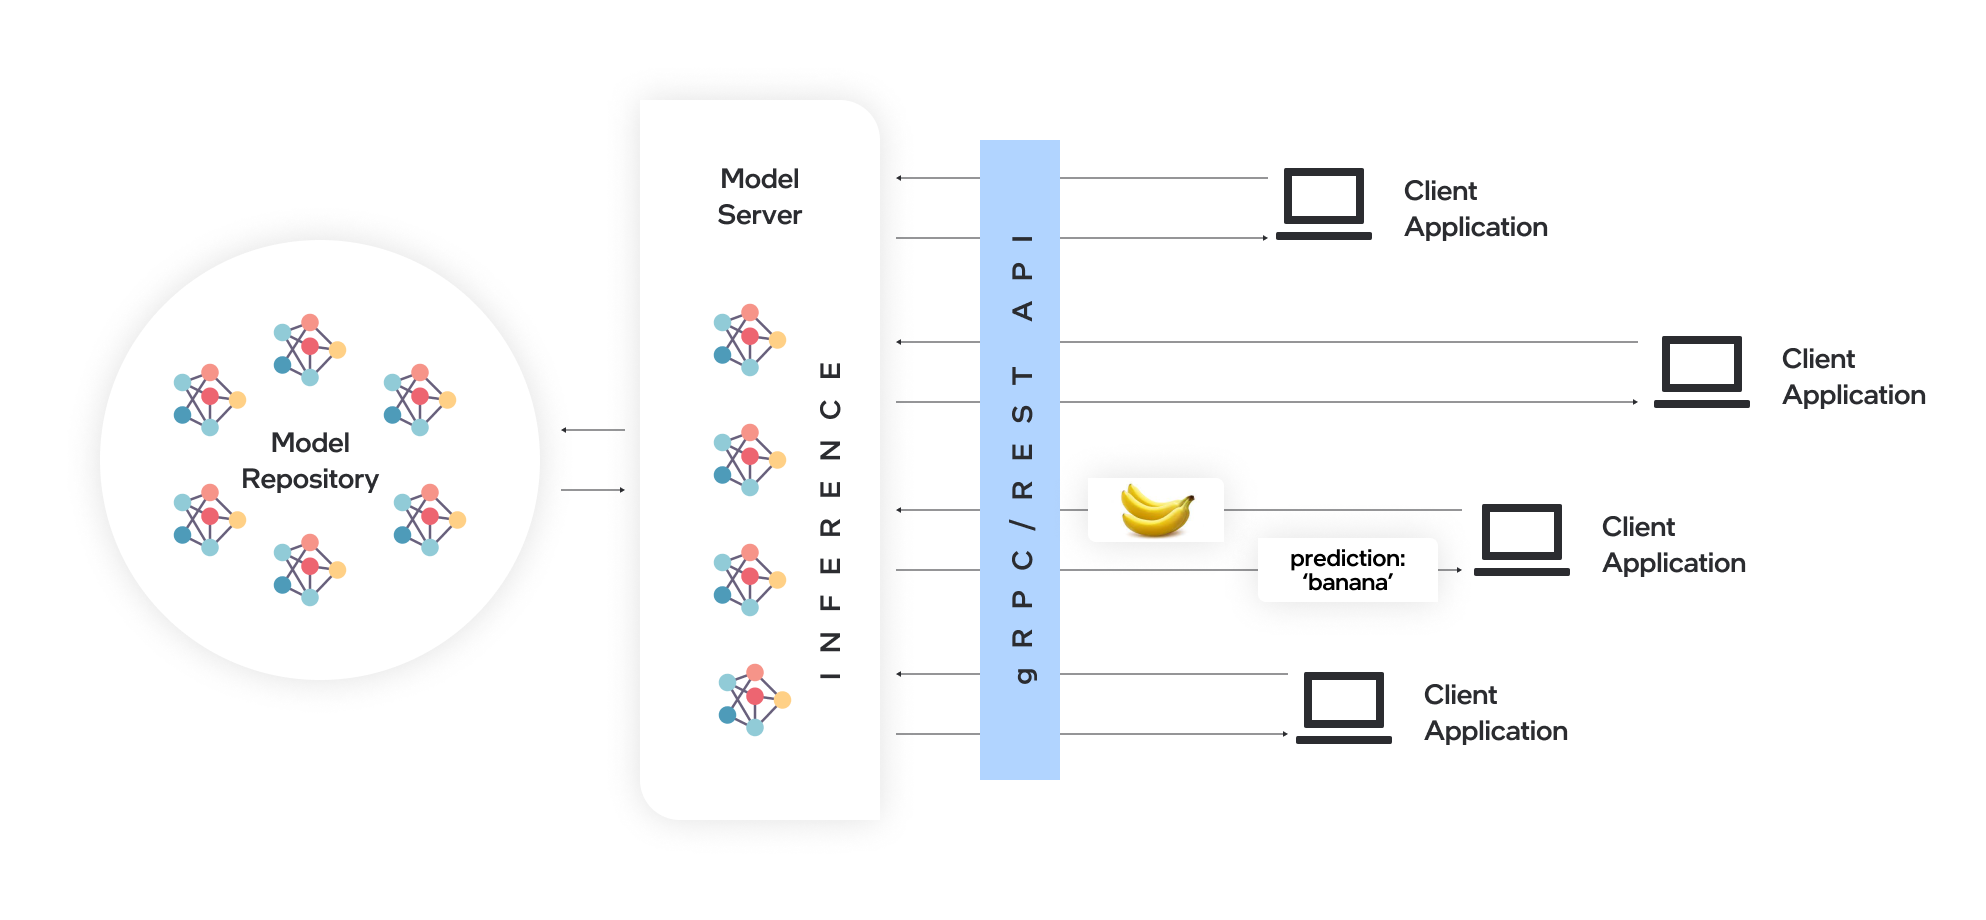
モデルサーバーはモデルをホストし、標準のネットワーク・プロトコルを介してソフトウェア・コンポーネントがモデルにアクセスできるようにします。クライアントはモデルサーバーに要求を送信し、モデルサーバーは推論を実行してクライアントに応答を返します。モデルのサービスには、モデルを効率的にデプロイする多くの利点があります。
リモート推論により、エッジまたはクラウド展開への API 呼び出しを実行するのに必要な機能を備えた軽量クライアントを使用できるようになります。
アプリケーションは、モデル・フレームワーク、ハードウェア・デバイス、およびインフラストラクチャーから独立しています。
REST または gRPC 呼び出しをサポートする任意のプログラミング言語のクライアント・アプリケーションを使用して、モデルサーバー上で推論をリモートで実行できます。
クライアント・ライブラリーはほとんど変更されないため、クライアントの更新は少なくなります。
モデルのトポロジーと重みはクライアント・アプリケーションに直接公開されないため、モデルへのアクセスを制御しやすくなります。
Kubernetes や OpenShift クラスターなどのクラウド環境のマイクロサービスベースのアプリケーションおよびデプロイメントに理想的なアーキテクチャーです。
水平および垂直推論スケーリングによって効率的にリソースを利用します。
ovms_diagram
OpenVINO モデルサーバーのサービス
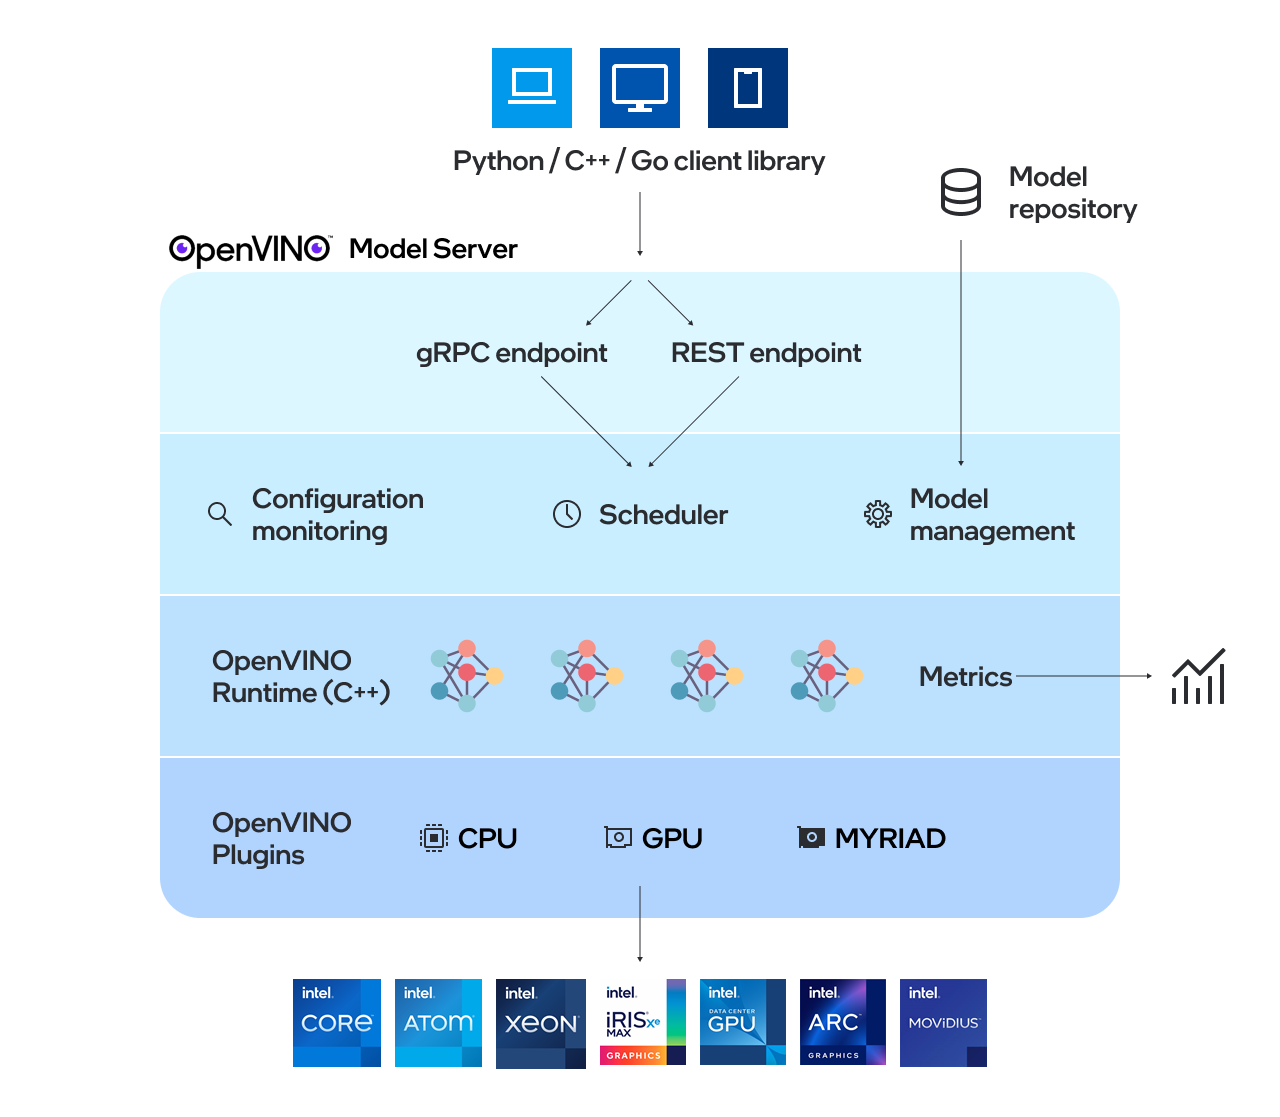
OpenVINO モデルサーバー (OVMS) は、モデルを提供する高性能システムです。スケーラビリティーを実現するため C++ で実装された、インテル® アーキテクチャーでのデプロイに最適化されたモデルサーバーは、推論の実行に OpenVINO を適用しながら、TensorFlow サービスおよび KServe と同じアーキテクチャーと API を使用します。推論サービスは gRPC または REST API を介して提供されるため、新しいアルゴリズムのデプロイや AI 実験が容易です。
ovms_high_level
OpenVINO™ モデルサーバーのクイックスタートには、次の手順に従います。
ステップ 1: Docker の準備
開発システムでインストール後の手順を含む Docker エンジンをインストールします。インストールを確認するには、次のコマンドでテストします。準備が完了すると、テスト画像とメッセージが表示されます。
!docker run hello-world
Hello from Docker!
This message shows that your installation appears to be working correctly.

To generate this message, Docker took the following steps:
 1. The Docker client contacted the Docker daemon.
 2. The Docker daemon pulled the "hello-world" image from the Docker Hub.
    (amd64)
 3. The Docker daemon created a new container from that image which runs the
    executable that produces the output you are currently reading.
 4. The Docker daemon streamed that output to the Docker client, which sent it
    to your terminal.

To try something more ambitious, you can run an Ubuntu container with:
 $ docker run -it ubuntu bash

Share images, automate workflows, and more with a free Docker ID:
 https://hub.docker.com/

For more examples and ideas, visit:
 https://docs.docker.com/get-started/
ステップ 2: モデル・リポジトリーの準備
モデルは、次のルールに従って、特定のディレクトリー構造に配置およびマウントされる必要があります。
tree models/
models/
├── model1
│   ├── 1
│   │   ├── ir_model.bin
│   │   └── ir_model.xml
│   └── 2
│       ├── ir_model.bin
│       └── ir_model.xml
├── model2
│   └── 1
│       ├── ir_model.bin
│       ├── ir_model.xml
│       └── mapping_config.json
├── model3
│    └── 1
│        └── model.onnx
├── model4
│      └── 1
│        ├── model.pdiparams
│        └── model.pdmodel
└── model5
       └── 1
         └── TF_fronzen_model.pb
各モデルは専用のディレクトリーに保存する必要があります。例: model1 と model2 など。
各モデルのディレクトリーには、各バージョン (1、2 など) のサブフォルダーが含まれる必要があります。バージョンのフォルダー名は正の整数値である必要があります。
注: バージョンは事前定義されたバージョンポリシーに従って有効になります。クライアントがパラメーターでバージョン番号を指定しない場合、デフォルトで最新バージョンが設定されます。
すべてのバージョンフォルダーにはモデルファイル (OpenVINO IR の場合は
.binと.xml、ONNX の場合は.onnx、Paddle Paddle の場合は.pdiparamsと.pdmodel、TensorFlow の場合は.pb) が含まれている必要があります。ファイル名は任意です。
%pip install -q "openvino>=2023.1.0"
import os

# Fetch `notebook_utils` module
import urllib.request
urllib.request.urlretrieve(
    url='https://raw.githubusercontent.com/openvinotoolkit/openvino_notebooks/main/notebooks/utils/notebook_utils.py',
    filename='notebook_utils.py'
)
from notebook_utils import download_file

dedicated_dir = "models"
model_name = "detection"
model_version = "1"

MODEL_DIR = f"{dedicated_dir}/{model_name}/{model_version}"
XML_PATH = "horizontal-text-detection-0001.xml"
BIN_PATH = "horizontal-text-detection-0001.bin"
os.makedirs(MODEL_DIR, exist_ok=True)
model_xml_url = "https://storage.openvinotoolkit.org/repositories/open_model_zoo/2022.3/models_bin/1/horizontal-text-detection-0001/FP32/horizontal-text-detection-0001.xml"
model_bin_url = "https://storage.openvinotoolkit.org/repositories/open_model_zoo/2022.3/models_bin/1/horizontal-text-detection-0001/FP32/horizontal-text-detection-0001.bin"

download_file(model_xml_url, XML_PATH, MODEL_DIR)
download_file(model_bin_url, BIN_PATH, MODEL_DIR)
models/detection/1/horizontal-text-detection-0001.xml: 0%| | 0.00/680k [00:00<?, ?B/s]
models/detection/1/horizontal-text-detection-0001.bin: 0%| | 0.00/7.39M [00:00<?, ?B/s]
PosixPath('/home/ethan/intel/openvino_notebooks/notebooks/117-model-server/models/detection/1/horizontal-text-detection-0001.bin')
ステップ 3: モデル・サーバー・コンテナの開始
コンテナを取得して起動します。
ローカルで利用可能なサービスポートを検索します。
import socket

sock = socket.socket(socket.AF_INET, socket.SOCK_STREAM)
sock.bind(('localhost', 0))
sock.listen(1)
port = sock.getsockname()[1]
sock.close()
print(f"Port {port} is available")

os.environ['port'] = str(port)
Port 39801 is available
!docker run -d --rm --name="ovms" -v $(pwd)/models:/models -p $port:9000 openvino/model_server:latest --model_path /models/detection/ --model_name detection --port 9000
64aa9391ba019b3ef26ae3010e5605e38d0a12e3f93bf74b3afb938f39b86ad2
OVMS コンテナが正常に実行されていることを確認します。
!docker ps | grep ovms
64aa9391ba01 openvino/model_server:latest "/ovms/bin/ovms --mo…" 29 seconds ago Up 28 seconds 0.0.0.0:37581->9000/tcp, :::37581->9000/tcp ovms
必要なモデルサーバーのパラメーターを以下に示します。追加の構成オプションについては、モデルサーバーのパラメーターを参照してください。
|
–rm |
Docker コンテナを終了するときにコンテナを削除します。 |
|
-d |
コンテナをバックグラウンドで実行します。 |
|
-v |
Docker コンテナにモデルフォルダーをマウントする方法を定義します。 |
|
-p |
モデルの提供ポートを Docker コンテナ外部に公開します。 |
|
openvino/model_server:latest |
イメージ名を表します。OVMS バイナリーは Docker のエントリーポイントです。 はタグとビルドプロセスによって異なります。完全なタグリストについては、https://hub.docker.com/r/openvino/model_server/tags/ を参照してください。 |
|
–model_path |
モデルの場所は次のようになります。 起動時にマウントされる Docker コンテナのパス Google Cloud Storage のパス gs://<bucket>/<model_path> AWS S3 のパス s3://<bucket>/<model_path> Azure blob のパス az://<container>/<model_path> |
|
–model_name |
model_path 内のモデル名を指定します。 |
|
–port |
gRPC サーバーのポートを指定します。 |
|
–rest_port |
REST サーバーのポートを指定します。 |
サービスポートがすでに使用されている場合は、システム上の別のポートに切り替えてください。例:-p 9020:9000。
ステップ 4: サンプル・クライアント・コンポーネントの準備
OpenVINO™ モデルサーバーは 2 つの API セットを公開します。1 つは TensorFlow サービスと互換性があり、もう 1 つは推論で KServe API と互換性があります。どちらの API も gRPC と REST インターフェイスで動作します。2 セットの API をサポートすることで、推論でこれらの API の 1 つをすでに利用している OpenVINO モデルサーバーを既存のシステムに簡単に接続できるようになります。この例では、オブジェクト検出用の TensorFlow サービス API クライアントを作成する方法を示します。
必要なパッケージをインストールします。
%pip install -q ovmsclient
Note: you may need to restart the kernel to use updated packages.
import cv2
import numpy as np
import matplotlib.pyplot as plt
from ovmsclient import make_grpc_client
address = "localhost:" + str(port)

# Bind the grpc address to the client object
client = make_grpc_client(address)
model_status = client.get_model_status(model_name=model_name)
print(model_status)
{1: {'state': 'AVAILABLE', 'error_code': 0, 'error_message': 'OK'}}
model_metadata = client.get_model_metadata(model_name=model_name)
print(model_metadata)
{'model_version': 1, 'inputs': {'image': {'shape': [1, 3, 704, 704], 'dtype': 'DT_FLOAT'}}, 'outputs': {'boxes': {'shape': [-1, 5], 'dtype': 'DT_FLOAT'}, 'labels': {'shape': [-1], 'dtype': 'DT_INT64'}}}
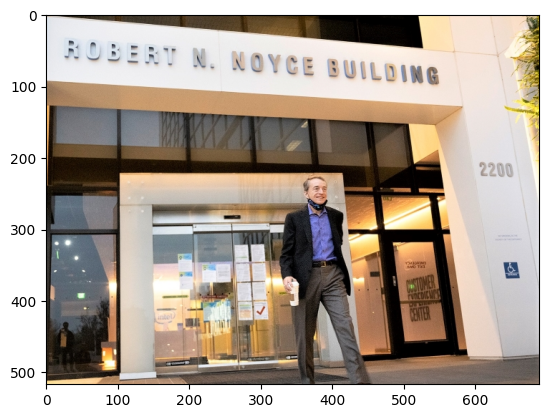
# Download the image from the openvino_notebooks storage
image_filename = download_file(
    "https://storage.openvinotoolkit.org/repositories/openvino_notebooks/data/data/image/intel_rnb.jpg",
    directory="data"
)

# Text detection models expect an image in BGR format.
image = cv2.imread(str(image_filename))
fp_image = image.astype("float32")

# Resize the image to meet network expected input sizes.
input_shape = model_metadata['inputs']['image']['shape']
height, width = input_shape[2], input_shape[3]
resized_image = cv2.resize(fp_image, (height, width))

# Reshape to the network input shape.
input_image = np.expand_dims(resized_image.transpose(2, 0, 1), 0)
plt.imshow(cv2.cvtColor(image, cv2.COLOR_BGR2RGB))
data/intel_rnb.jpg: 0%| | 0.00/288k [00:00<?, ?B/s]
<matplotlib.image.AxesImage at 0x7f254faeec50>
inputs = {"image": input_image}

# Run inference on model server and receive the result data
boxes = client.predict(inputs=inputs, model_name=model_name)['boxes']

# Remove zero only boxes.
boxes = boxes[~np.all(boxes == 0, axis=1)]
print(boxes)
[[4.0075238e+02 8.1240105e+01 5.6262683e+02 1.3609659e+02 5.3646392e-01]
 [2.6150497e+02 6.8225861e+01 3.8433078e+02 1.2111545e+02 4.7504124e-01]
 [6.1611401e+02 2.8000638e+02 6.6605963e+02 3.1116574e+02 4.5030469e-01]
 [2.0762566e+02 6.2619057e+01 2.3446707e+02 1.0711832e+02 3.7426147e-01]
 [5.1753296e+02 5.5611102e+02 5.4918005e+02 5.8740009e+02 3.2477754e-01]
 [2.2038467e+01 4.5390991e+01 1.8856328e+02 1.0215196e+02 2.9959568e-01]]
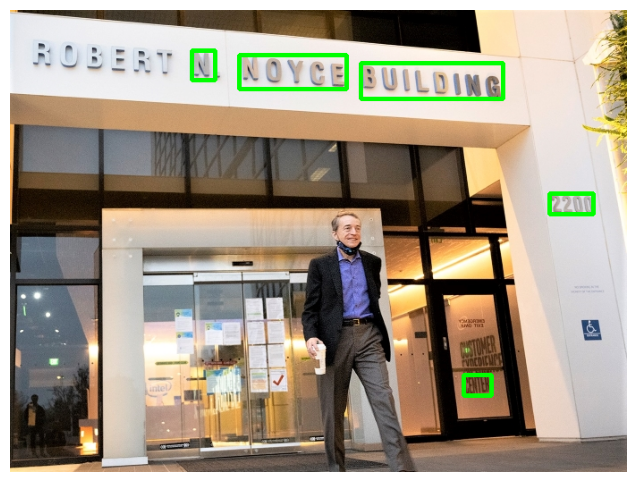
# For each detection, the description is in the [x_min, y_min, x_max, y_max, conf] format:
# The image passed here is in BGR format with changed width and height. To display it in colors expected by matplotlib, use cvtColor function
def convert_result_to_image(bgr_image, resized_image, boxes, threshold=0.3, conf_labels=True):
    # Define colors for boxes and descriptions.
    colors = {"red": (255, 0, 0), "green": (0, 255, 0)}

    # Fetch the image shapes to calculate a ratio.
    (real_y, real_x), (resized_y, resized_x) = bgr_image.shape[:2], resized_image.shape[:2]
    ratio_x, ratio_y = real_x / resized_x, real_y / resized_y

    # Convert the base image from BGR to RGB format.
    rgb_image = cv2.cvtColor(bgr_image, cv2.COLOR_BGR2RGB)

    # Iterate through non-zero boxes.
    for box in boxes:
        # Pick a confidence factor from the last place in an array.
        conf = box[-1]
        if conf > threshold:
            # Convert float to int and multiply corner position of each box by x and y ratio.
            # If the bounding box is found at the top of the image,
            # position the upper box bar little lower to make it visible on the image.
            (x_min, y_min, x_max, y_max) = [
                int(max(corner_position * ratio_y, 10)) if idx % 2
                else int(corner_position * ratio_x)
                for idx, corner_position in enumerate(box[:-1])
            ]

            # Draw a box based on the position, parameters in rectangle function are: image, start_point, end_point, color, thickness.
            rgb_image = cv2.rectangle(rgb_image, (x_min, y_min), (x_max, y_max), colors["green"], 3)

            # Add text to the image based on position and confidence.
            # Parameters in text function are: image, text, bottom-left_corner_textfield, font, font_scale, color, thickness, line_type.
            if conf_labels:
                rgb_image = cv2.putText(
                    rgb_image,
                    f"{conf:.2f}",
                    (x_min, y_min - 10),
                    cv2.FONT_HERSHEY_SIMPLEX,
                    0.8,
                    colors["red"],
                    1,
                    cv2.LINE_AA,
                )

    return rgb_image
plt.figure(figsize=(10, 6))
plt.axis("off")
plt.imshow(convert_result_to_image(image, resized_image, boxes, conf_labels=False))
<matplotlib.image.AxesImage at 0x7f25490829b0>
モデル・サーバー・コンテナを停止して削除するには、次のコマンドを使用します。
!docker stop ovms
ovms