OpenVINO™ によるリアルタイムの人間の姿勢推定
この Jupyter ノートブックはオンラインで起動でき、ブラウザーのウィンドウで対話型環境を開きます。ローカルにインストールすることもできます。次のオプションのいずれかを選択します。


このノートブックは、Open Model Zoo の OpenPose human-pose-estimation-0001 モデルを使用して、OpenVINO によるリアルタイムの姿勢推定について説明します。このノートブックの最後では、ウェブカメラからのリアルタイムの推論結果が表示されます。 さらに、ビデオファイルをアップロードすることもできます。
注:ウェブカメラを使用するには、ウェブカメラを備えたコンピューター上でこの Jupyter ノートブックを実行する必要があります。サーバー上で実行すると、ウェブカメラは機能しなくなります。ただし、最終ステップではビデオに対して推論を行うことができます。
目次
%pip install -q "openvino>=2023.1.0"
DEPRECATION: pytorch-lightning 1.6.5 has a non-standard dependency specifier torch>=1.8.*. pip 24.1 will enforce this behaviour change. A possible replacement is to upgrade to a newer version of pytorch-lightning or contact the author to suggest that they release a version with a conforming dependency specifiers. Discussion can be found at https://github.com/pypa/pip/issues/12063
Note: you may need to restart the kernel to use updated packages.
インポート
import collections
import sys
import time
from pathlib import Path

import cv2
import numpy as np
from IPython import display
from numpy.lib.stride_tricks import as_strided
import openvino as ov

from decoder import OpenPoseDecoder

sys.path.append("../utils")
import notebook_utils as utils
モデル
モデルのダウンロード
notebook_utils ファイルの関数である download_file を使用します。ディレクトリー構造が自動的に作成され、選択したモデルがダウンロードされます。
別のモデルをダウンロードする場合は、以下のコード内のモデルの名前と精度を置き換えます。
注: これには、別のポーズデコーダーが必要になることがあります。
# A directory where the model will be downloaded.
base_model_dir = Path("model")

# The name of the model from Open Model Zoo.
model_name = "human-pose-estimation-0001"
# Selected precision (FP32, FP16, FP16-INT8).
precision = "FP16-INT8"

model_path = base_model_dir / "intel" / model_name / precision / f"{model_name}.xml"

if not model_path.exists():
    model_url_dir = f"https://storage.openvinotoolkit.org/repositories/open_model_zoo/2022.1/models_bin/3/{model_name}/{precision}/"
    utils.download_file(model_url_dir + model_name + '.xml', model_path.name, model_path.parent)
    utils.download_file(model_url_dir + model_name + '.bin', model_path.with_suffix('.bin').name, model_path.parent)
model/intel/human-pose-estimation-0001/FP16-INT8/human-pose-estimation-0001.xml: 0%| | 0.00/474k [0…
model/intel/human-pose-estimation-0001/FP16-INT8/human-pose-estimation-0001.bin: 0%| | 0.00/4.03M […
モデルのロード
ダウンロードされたモデルは、ベンダー、モデル名、精度を示す固定構造内にあります。
モデルを実行するには、数行のコードで済みます。まず、OpenVINO ランタイムを初期化します。次に、.bin および .xml ファイルからネットワーク・アーキテクチャーとモデルの重みを読み取り、目的のデバイス用にコンパイルします。OpenVINO を使用して推論を実行するデバイスをドロップダウン・リストから選択します。
import ipywidgets as widgets

core = ov.Core()

device = widgets.Dropdown(
    options=core.available_devices + ["AUTO"],
    value='AUTO',
    description='Device:',
    disabled=False,
)

device
Dropdown(description='Device:', index=1, options=('CPU', 'AUTO'), value='AUTO')
# Initialize OpenVINO Runtime
core = ov.Core()
# Read the network from a file.
model = core.read_model(model_path)
# Let the AUTO device decide where to load the model (you can use CPU, GPU as well).
compiled_model = core.compile_model(model=model, device_name=device.value, config={"PERFORMANCE_HINT": "LATENCY"})

# Get the input and output names of nodes.
input_layer = compiled_model.input(0)
output_layers = compiled_model.outputs

# Get the input size.
height, width = list(input_layer.shape)[2:]
入力レイヤーには入力ノードの名前が含まれ、出力レイヤーにはネットワークの出力ノードの名前が含まれます。OpenPose モデルの場合、1 つの入力と 2 つの出力 (PAF とキーポイントのヒートマップ) があります。
input_layer.any_name, [o.any_name for o in output_layers]
('data', ['Mconv7_stage2_L1', 'Mconv7_stage2_L2'])
処理
OpenPose デコーダー
ニューラル・ネットワークからの生の結果を姿勢推定に変換するには、OpenPose デコーダーが必要です。Open Model Zoo で提供されており、human-pose-estimation-0001 モデルと互換性があります。
human-pose-estimation-0001 以外のモデルを選択する場合は、別のデコーダー (AssociativeEmbeddingDecoder など) が必要になります。これは、Open Model Zoo のデモセクションで入手できます。
decoder = OpenPoseDecoder()
処理結果
結果をポーズに変換するいくつかの関数が用意されています。
まず、ヒートマップをプールします。numpy ではプーリングが利用できないため、numpy で直接行う方法を使用してください。次に、非最大抑制を使用してヒートマップからキーポイントを取得します。その後、デコーダーを使用してポーズをデコードします。入力イメージはネットワーク出力よりも大きいため、すべてのポーズ座標にスケール係数を乗算する必要があります。
# 2D pooling in numpy (from: https://stackoverflow.com/a/54966908/1624463)
def pool2d(A, kernel_size, stride, padding, pool_mode="max"):
    """
    2D Pooling

    Parameters:
        A: input 2D array
        kernel_size: int, the size of the window
        stride: int, the stride of the window
        padding: int, implicit zero paddings on both sides of the input
        pool_mode: string, 'max' or 'avg'
    """
    # Padding
    A = np.pad(A, padding, mode="constant")

    # Window view of A
    output_shape = (
        (A.shape[0] - kernel_size) // stride + 1,
        (A.shape[1] - kernel_size) // stride + 1,
    )
    kernel_size = (kernel_size, kernel_size)
    A_w = as_strided(
        A,
        shape=output_shape + kernel_size,
        strides=(stride * A.strides[0], stride * A.strides[1]) + A.strides
    )
    A_w = A_w.reshape(-1, *kernel_size)

    # Return the result of pooling.
    if pool_mode == "max":
        return A_w.max(axis=(1, 2)).reshape(output_shape)
    elif pool_mode == "avg":
        return A_w.mean(axis=(1, 2)).reshape(output_shape)


# non maximum suppression
def heatmap_nms(heatmaps, pooled_heatmaps):
    return heatmaps * (heatmaps == pooled_heatmaps)


# Get poses from results.
def process_results(img, pafs, heatmaps):
    # This processing comes from
    # https://github.com/openvinotoolkit/open_model_zoo/blob/master/demos/common/python/models/open_pose.py
    pooled_heatmaps = np.array(
        [[pool2d(h, kernel_size=3, stride=1, padding=1, pool_mode="max") for h in heatmaps[0]]]
    )
    nms_heatmaps = heatmap_nms(heatmaps, pooled_heatmaps)

    # Decode poses.
    poses, scores = decoder(heatmaps, nms_heatmaps, pafs)
    output_shape = list(compiled_model.output(index=0).partial_shape)
    output_scale = img.shape[1] / output_shape[3].get_length(), img.shape[0] / output_shape[2].get_length()
    # Multiply coordinates by a scaling factor.
    poses[:, :, :2] *= output_scale
    return poses, scores
ポーズオーバーレイの描画
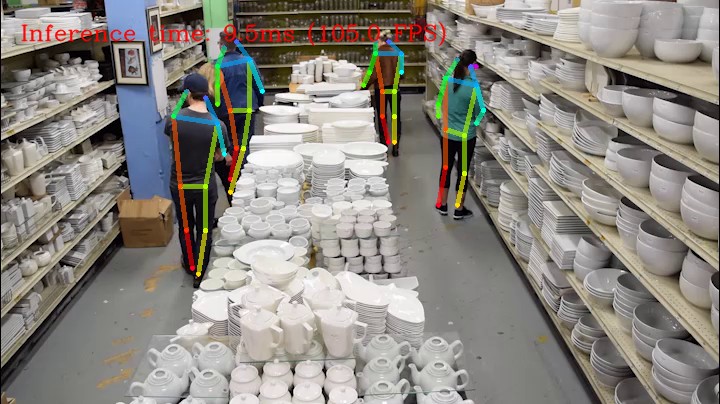
画像上にポーズ・オーバーレイを描画して、推定されたポーズを視覚化します。関節は円として描画され、手足は線で描画されます。このコードは、Open Model Zoo の Human Pose Estimation Demo をベースにしています。
colors = ((255, 0, 0), (255, 0, 255), (170, 0, 255), (255, 0, 85), (255, 0, 170), (85, 255, 0),
          (255, 170, 0), (0, 255, 0), (255, 255, 0), (0, 255, 85), (170, 255, 0), (0, 85, 255),
          (0, 255, 170), (0, 0, 255), (0, 255, 255), (85, 0, 255), (0, 170, 255))

default_skeleton = ((15, 13), (13, 11), (16, 14), (14, 12), (11, 12), (5, 11), (6, 12), (5, 6), (5, 7),
                    (6, 8), (7, 9), (8, 10), (1, 2), (0, 1), (0, 2), (1, 3), (2, 4), (3, 5), (4, 6))


def draw_poses(img, poses, point_score_threshold, skeleton=default_skeleton):
    if poses.size == 0:
        return img

    img_limbs = np.copy(img)
    for pose in poses:
        points = pose[:, :2].astype(np.int32)
        points_scores = pose[:, 2]
        # Draw joints.
        for i, (p, v) in enumerate(zip(points, points_scores)):
            if v > point_score_threshold:
                cv2.circle(img, tuple(p), 1, colors[i], 2)
        # Draw limbs.
        for i, j in skeleton:
            if points_scores[i] > point_score_threshold and points_scores[j] > point_score_threshold:
                cv2.line(img_limbs, tuple(points[i]), tuple(points[j]), color=colors[j], thickness=4)
    cv2.addWeighted(img, 0.4, img_limbs, 0.6, 0, dst=img)
    return img
メイン処理関数
指定されたソースで姿勢推定を実行します。ウェブカメラまたはビデオファイルのいずれか。
# Main processing function to run pose estimation.
def run_pose_estimation(source=0, flip=False, use_popup=False, skip_first_frames=0):
    pafs_output_key = compiled_model.output("Mconv7_stage2_L1")
    heatmaps_output_key = compiled_model.output("Mconv7_stage2_L2")
    player = None
    try:
        # Create a video player to play with target fps.
        player = utils.VideoPlayer(source, flip=flip, fps=30, skip_first_frames=skip_first_frames)
        # Start capturing.
        player.start()
        if use_popup:
            title = "Press ESC to Exit"
            cv2.namedWindow(title, cv2.WINDOW_GUI_NORMAL | cv2.WINDOW_AUTOSIZE)

        processing_times = collections.deque()

        while True:
            # Grab the frame.
            frame = player.next()
            if frame is None:
                print("Source ended")
                break
            # If the frame is larger than full HD, reduce size to improve the performance.
            scale = 1280 / max(frame.shape)
            if scale < 1:
                frame = cv2.resize(frame, None, fx=scale, fy=scale, interpolation=cv2.INTER_AREA)

            # Resize the image and change dims to fit neural network input.
            # (see https://github.com/openvinotoolkit/open_model_zoo/tree/master/models/intel/human-pose-estimation-0001)
            input_img = cv2.resize(frame, (width, height), interpolation=cv2.INTER_AREA)
            # Create a batch of images (size = 1).
            input_img = input_img.transpose((2,0,1))[np.newaxis, ...]

            # Measure processing time.
            start_time = time.time()
            # Get results.
            results = compiled_model([input_img])
            stop_time = time.time()

            pafs = results[pafs_output_key]
            heatmaps = results[heatmaps_output_key]
            # Get poses from network results.
            poses, scores = process_results(frame, pafs, heatmaps)

            # Draw poses on a frame.
            frame = draw_poses(frame, poses, 0.1)

            processing_times.append(stop_time - start_time)
            # Use processing times from last 200 frames.
            if len(processing_times) > 200:
                processing_times.popleft()

            _, f_width = frame.shape[:2]
            # mean processing time [ms]
            processing_time = np.mean(processing_times) * 1000
            fps = 1000 / processing_time
            cv2.putText(frame, f"Inference time: {processing_time:.1f}ms ({fps:.1f} FPS)", (20, 40),
                        cv2.FONT_HERSHEY_COMPLEX, f_width / 1000, (0, 0, 255), 1, cv2.LINE_AA)

            # Use this workaround if there is flickering.
            if use_popup:
                cv2.imshow(title, frame)
                key = cv2.waitKey(1)
                # escape = 27
                if key == 27:
                    break
            else:
                # Encode numpy array to jpg.
                _, encoded_img = cv2.imencode(".jpg", frame, params=[cv2.IMWRITE_JPEG_QUALITY, 90])
                # Create an IPython image.
                i = display.Image(data=encoded_img)
                # Display the image in this notebook.
                display.clear_output(wait=True)
                display.display(i)
    # ctrl-c
    except KeyboardInterrupt:
        print("Interrupted")
    # any different error
    except RuntimeError as e:
        print(e)
    finally:
        if player is not None:
            # Stop capturing.
            player.stop()
        if use_popup:
            cv2.destroyAllWindows()
実行
リアルタイムの姿勢推定の実行
ウェブカメラをビデオ入力として使用します。デフォルトでは、プライマリー・ウェブカメラは source=0 に設定されます。複数のウェブカメラがある場合、0 から始まる連続した番号が割り当てられます。前面カメラを使用する場合は、flip=True を設定します。一部のウェブブラウザー、特に Mozilla Firefox ではちらつきが発生する場合があります。ちらつきが発生する場合は、use_popup=True を設定してください。
注: このノートブックをウェブカメラで使用するには、ウェブカメラを備えたコンピューター上でノートブックを実行する必要があります。ノートブックをサーバー (Binder など) 上で実行する場合、ウェブカメラは機能しません。このノートブックをリモート・コンピューター (Binder など) で実行する場合、ポップアップ・モードは機能しない可能性があります。
ウェブカメラがない場合でも、ビデオファイルを使用してこのデモを実行できます。OpenCV でサポートされている形式であればどれでも機能します。最初の N フレームをスキップしてビデオを早送りできます。
姿勢推定を実行します。
USE_WEBCAM = False
cam_id = 0
video_file = "https://github.com/intel-iot-devkit/sample-videos/blob/master/store-aisle-detection.mp4?raw=true"
source = cam_id if USE_WEBCAM else video_file

additional_options = {"skip_first_frames": 500} if not USE_WEBCAM else {}
run_pose_estimation(source=source, flip=isinstance(source, int), use_popup=False, **additional_options)
Source ended