OpenVINO™ による音声からテキストへの変換
この Jupyter ノートブックはオンラインで起動でき、ブラウザーのウィンドウで対話型環境を開きます。ローカルにインストールすることもできます。次のオプションのいずれかを選択します。


このチュートリアルでは、OpenVINO を使用した音声テキスト認識について説明します。
このチュートリアルでは、QuartzNet 15x5 モデルを使用します。QuartzNet は自動音声認識を実行します。その設計は、コネクショニスト時間分類 (CTC) 損失を使用してトレーニングされた畳み込みモデルである Jasper アーキテクチャーに基づいています。このモデルは Open Model Zoo から入手できます。
目次
インポート
%pip install -q "librosa>=0.8.1" "matplotlib<3.8" "openvino-dev>=2023.1.0" "numpy<1.24"
from pathlib import Path
import sys

import torch
import torch.nn as nn
import IPython.display as ipd
import matplotlib.pyplot as plt
import librosa
import librosa.display
import numpy as np
import scipy
import openvino as ov
# Fetch `notebook_utils` module
import urllib.request
urllib.request.urlretrieve(
    url='https://raw.githubusercontent.com/openvinotoolkit/openvino_notebooks/main/notebooks/utils/notebook_utils.py',
    filename='notebook_utils.py'
)
from notebook_utils import download_file
設定
ここは、ノートブック内で使用されるすべての変数が設定されます。
model_folder = "model"
download_folder = "output"
data_folder = "data"

precision = "FP16"
model_name = "quartznet-15x5-en"
パブリックモデルのダウンロードと変換
初めて実行する場合は、ここでモデルがダウンロードされ、変換されます。これには、数分かかる場合があります。openvino-dev パッケージのコマンドライン・ツールである omz_downloader と omz_converter を使用します。
モデルのダウンロード
omz_downloader ツールは、ディレクトリー構造を自動的に作成し、選択したモデルをダウンロードします。モデルがすでにダウンロードされている場合、この手順はスキップされます。選択されたモデルはパブリック・ディレクトリーから取得されます。つまり、OpenVINO 中間表現 (OpenVINO IR) に変換する必要があります。
# Check if a model is already downloaded (to the download directory).
path_to_model_weights = Path(f'{download_folder}/public/{model_name}/models')
downloaded_model_file = list(path_to_model_weights.glob('*.pth'))

if not path_to_model_weights.is_dir() or len(downloaded_model_file) == 0:
    download_command = f"omz_downloader --name {model_name} --output_dir {download_folder} --precision {precision}"
    ! $download_command

sys.path.insert(0, str(path_to_model_weights))
def convert_model(model_path:Path, converted_model_path:Path):
    """
    helper function for converting QuartzNet model to IR
    The function accepts path to directory with dowloaded packages, weights and configs using OMZ downloader,
    initialize model and convert to OpenVINO model and serialize it to IR.
    Params:
      model_path: path to model modules, weights and configs downloaded via omz_downloader
      converted_model_path: path for saving converted model
    Returns:
      None
    """
    # add model path to PYTHONPATH for access to downloaded modules
    sys.path.append(str(model_path))

    # import necessary classes
    from ruamel.yaml import YAML

    from nemo.collections.asr import JasperEncoder, JasperDecoderForCTC
    from nemo.core import NeuralModuleFactory, DeviceType

    YAML = YAML(typ='safe')

    # utility fornction fr replacing 1d convolutions to 2d for better efficiency
    def convert_to_2d(model):
        for name, l in model.named_children():
            layer_type = l.__class__.__name__
            if layer_type == 'Conv1d':
                new_layer = nn.Conv2d(l.in_channels, l.out_channels,
                                      (1, l.kernel_size[0]), (1, l.stride[0]),
                                      (0, l.padding[0]), (1, l.dilation[0]),
                                      l.groups, False if l.bias is None else True, l.padding_mode)
                params = l.state_dict()
                params['weight'] = params['weight'].unsqueeze(2)
                new_layer.load_state_dict(params)
                setattr(model, name, new_layer)
            elif layer_type == 'BatchNorm1d':
                new_layer = nn.BatchNorm2d(l.num_features, l.eps)
                new_layer.load_state_dict(l.state_dict())
                new_layer.eval()
                setattr(model, name, new_layer)
            else:
                convert_to_2d(l)

    # model class
    class QuartzNet(torch.nn.Module):
        def __init__(self, model_config, encoder_weights, decoder_weights):
            super().__init__()
            with open(model_config, 'r') as config:
                model_args = YAML.load(config)
            _ = NeuralModuleFactory(placement=DeviceType.CPU)

            encoder_params = model_args['init_params']['encoder_params']['init_params']
            self.encoder = JasperEncoder(**encoder_params)
            self.encoder.load_state_dict(torch.load(encoder_weights, map_location='cpu'))

            decoder_params = model_args['init_params']['decoder_params']['init_params']
            self.decoder = JasperDecoderForCTC(**decoder_params)
            self.decoder.load_state_dict(torch.load(decoder_weights, map_location='cpu'))

            self.encoder._prepare_for_deployment()
            self.decoder._prepare_for_deployment()
            convert_to_2d(self.encoder)
            convert_to_2d(self.decoder)

        def forward(self, input_signal):
            input_signal = input_signal.unsqueeze(axis=2)
            i_encoded = self.encoder(input_signal)
            i_log_probs = self.decoder(i_encoded)

            shape = i_log_probs.shape
            return i_log_probs.reshape(shape[0], shape[1], shape[3])

    # path to configs and weights for creating model instane
    model_config = model_path / ".nemo_tmp/module.yaml"
    encoder_weights = model_path / ".nemo_tmp/JasperEncoder.pt"
    decoder_weights = model_path / ".nemo_tmp/JasperDecoderForCTC.pt"
    # create model instance
    model = QuartzNet(model_config, encoder_weights, decoder_weights)
    # turn model to inference mode
    model.eval()
    # convert model to OpenVINO Model using model conversion API
    ov_model = ov.convert_model(model, example_input=torch.zeros([1, 64, 128]))
    # save model in IR format for next usage
    ov.save_model(ov_model, converted_model_path)
# Check if a model is already converted (in the model directory).
path_to_converted_weights = Path(f'{model_folder}/public/{model_name}/{precision}/{model_name}.bin')
path_to_converted_model = Path(f'{model_folder}/public/{model_name}/{precision}/{model_name}.xml')

if not path_to_converted_weights.is_file():
    downloaded_model_path = Path("output/public/quartznet-15x5-en/models")
    convert_model(downloaded_model_path, path_to_converted_model)
[NeMo W 2023-09-11 15:01:17 jasper:148] Turned off 170 masked convolutions
INFO:nncf:NNCF initialized successfully. Supported frameworks detected: torch, tensorflow, onnx, openvino
[NeMo W 2023-09-11 15:01:18 deprecated:66] Function local_parameters is deprecated. It is going to be removed in the 0.11 version.
オーディオ処理
モデルが変換されたので、オーディオファイルを読み込みます。
定数を定義
まず、オーディオファイルを見つけて、モデルで使用するアルファベットを定義します。このチュートリアルでは、スペース記号で始まり空白記号で終わるラテン・アルファベットを使用します。この場合は ~ になりますが、他の文字でもかまいません。
audio_file_name = "edge_to_cloud.ogg"
alphabet = " abcdefghijklmnopqrstuvwxyz'~"
利用可能なオーディオ形式
モデルで使用できるサポートされているオーディオ形式は複数あります。
AIFF、AU、AVR、CAF、FLAC、HTK、SVX、MAT4、MAT5、MPC2K、OGG、PAF、PVF、RAW、RF64、SD2、SDS、IRCAM、VOC、W64、WAV、NIST、WAVEX、WVE、 XI
オーディオファイルを読み込み
ファイル拡張子を確認した後、ファイルを読み込みます。sr (サンプリング・レートの略) を追加パラメーターとして渡します。このモデルは、サンプリング・レートが 16 kHz のファイルをサポートします。
# Download the audio from the openvino_notebooks storage
file_name = download_file(
    "https://storage.openvinotoolkit.org/repositories/openvino_notebooks/data/data/audio/" + audio_file_name,
    directory=data_folder
)

audio, sampling_rate = librosa.load(path=str(file_name), sr=16000)
これで、オーディオファイルを再生できます。
ipd.Audio(audio, rate=sampling_rate)
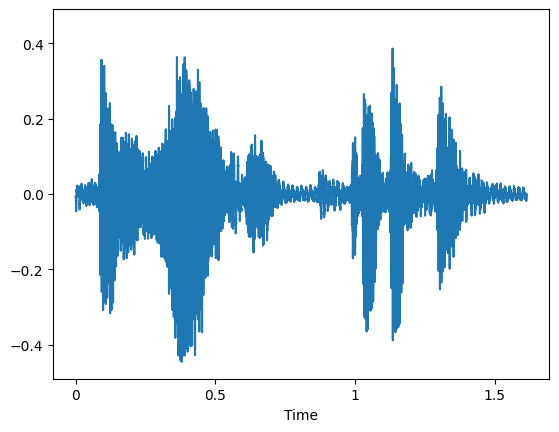
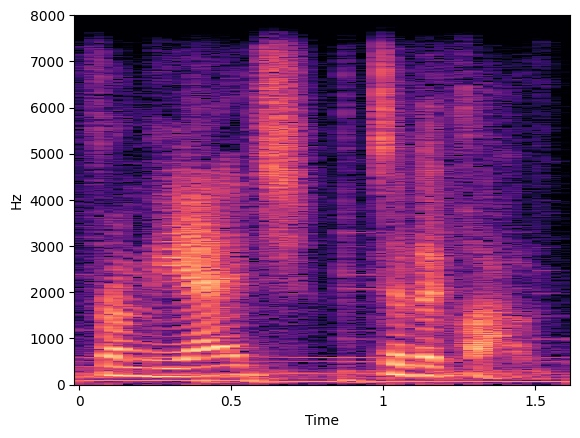
オーディオファイルを視覚化
オーディオファイルが波形プロットとスペクトログラムでどのように表示されるか視覚化できます。
plt.figure()
librosa.display.waveshow(y=audio, sr=sampling_rate, max_points=50000, x_axis='time', offset=0.0);
plt.show()
specto_audio = librosa.stft(audio)
specto_audio = librosa.amplitude_to_db(np.abs(specto_audio), ref=np.max)
print(specto_audio.shape)
librosa.display.specshow(specto_audio, sr=sampling_rate, x_axis='time', y_axis='hz');
(1025, 51)
データのタイプを変更
前の手順で読み込まれたファイルには、-1 から 1 までの範囲の値を持つ float タイプのデータが含まれている可能性があります。実行可能な入力を生成するには、各値に int16 の最大値を掛けて、int16 タイプに変換します。
if max(np.abs(audio)) <= 1:
    audio = (audio * (2**15 - 1))
audio = audio.astype(np.int16)
オーディオをメル・スペクトラムに変換
次に、事前に処理されたオーディオをメル・スペクトラムに変換します。なぜこれを行う必要があるかについては、この記事を参照してください。
def audio_to_mel(audio, sampling_rate):
    assert sampling_rate == 16000, "Only 16 KHz audio supported"
    preemph = 0.97
    preemphased = np.concatenate([audio[:1], audio[1:] - preemph * audio[:-1].astype(np.float32)])

    # Calculate the window length.
    win_length = round(sampling_rate * 0.02)

    # Based on the previously calculated window length, run short-time Fourier transform.
    spec = np.abs(librosa.core.spectrum.stft(preemphased, n_fft=512, hop_length=round(sampling_rate * 0.01),
                  win_length=win_length, center=True, window=scipy.signal.windows.hann(win_length), pad_mode='reflect'))

    # Create mel filter-bank, produce transformation matrix to project current values onto Mel-frequency bins.
    mel_basis = librosa.filters.mel(sr=sampling_rate, n_fft=512, n_mels=64, fmin=0.0, fmax=8000.0, htk=False)
    return mel_basis, spec


def mel_to_input(mel_basis, spec, padding=16):
    # Convert to a logarithmic scale.
    log_melspectrum = np.log(np.dot(mel_basis, np.power(spec, 2)) + 2 ** -24)

    # Normalize the output.
    normalized = (log_melspectrum - log_melspectrum.mean(1)[:, None]) / (log_melspectrum.std(1)[:, None] + 1e-5)

    # Calculate padding.
    remainder = normalized.shape[1] % padding
    if remainder != 0:
        return np.pad(normalized, ((0, 0), (0, padding - remainder)))[None]
    return normalized[None]
オーディオからメル形式への変換を実行
このステップでは、現在のオーディオファイルをメルスケールに変換します。
mel_basis, spec = audio_to_mel(audio=audio.flatten(), sampling_rate=sampling_rate)
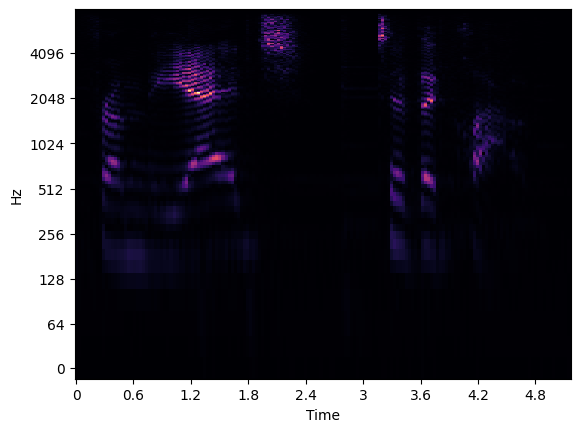
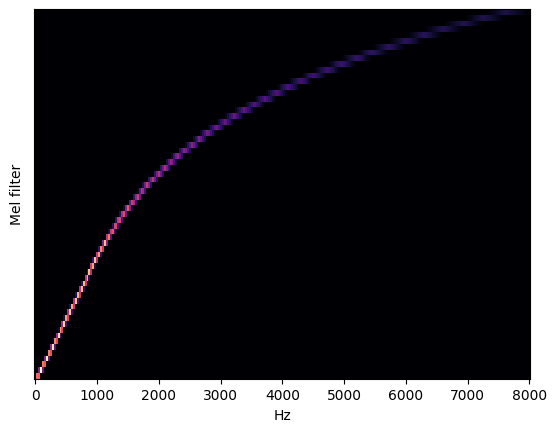
メルスペクトログラムを視覚化
メルスペクトログラムの詳細については、こちらの記事を参照してください。最初の画像はメル周波数スペクトログラムを視覚化し、2 番目の画像は Hz をメルに変換するフィルターバンクを示しています。
librosa.display.specshow(data=spec, sr=sampling_rate, x_axis='time', y_axis='log');
plt.show();
librosa.display.specshow(data=mel_basis, sr=sampling_rate, x_axis='linear');
plt.ylabel('Mel filter');
メルスケールを入力に合わせて調整
ネットワークを読み取る前に、入力の準備ができていることを確認してください。
audio = mel_to_input(mel_basis=mel_basis, spec=spec)
モデルのロード
これで、ネットワークを読み取ってロードすることができます。
core = ov.Core()
モデルを複数のデバイスで実行できます。デフォルトでは、CPU にモデルをロードするか (CPU、GPU などを手動で選択できます)、エンジンが利用可能な最適なデバイスを選択できるようにします (AUTO)。
使用可能なすべてのデバイスを一覧表示するには、print(core.available_devices) コマンドを実行します。
print(core.available_devices)
['CPU', 'GPU']
ドロップダウン・リストからデバイスを選択します。
import ipywidgets as widgets

device = widgets.Dropdown(
    options=core.available_devices + ["AUTO"],
    value='AUTO',
    description='Device:',
    disabled=False,
)

device
Dropdown(description='Device:', index=2, options=('CPU', 'GPU', 'AUTO'), value='AUTO')
model = core.read_model(
    model=f"{model_folder}/public/{model_name}/{precision}/{model_name}.xml"
)
model_input_layer = model.input(0)
shape = model_input_layer.partial_shape
shape[2] = -1
model.reshape({model_input_layer: shape})
compiled_model = core.compile_model(model=model, device_name=device.value)
推論の実行
すべて準備完了です。これで、残っているのは、以前にロードしたネットワークに入力を渡して推論を実行することだけです。
character_probabilities = compiled_model([ov.Tensor(audio)])[0]
出力の読み取り
推論後、出力に到達する必要があります。QuartzNet 15x5 のデフォルトの出力形式は、アルファベットのすべてのシンボルのフレームごとの確率 (LogSoftmax 後)、名前 - 出力、形状 - 1x64x29、出力データ形式は BxNxC です。
説明:
B - バッチサイズ
N - オーディオフレームの数
C - アルファベットのサイズ、コネクショニスト時間分類 (CTC) の空白記号を含む
より人間が読みやすい形式で作成する必要があります。これを行うには、最も確率の高いシンボルを使用します。最も高い確率を持つと予測されるインデックスのリストを保持する場合、コネクショニスト時間分類デコードによって与えられた制限により、同時シンボルを削除し、すべての空白を削除します。
最後のステップは、charlist 内の対応するインデックスからシンボルを取得することです。
# Remove unnececery dimension
character_probabilities = np.squeeze(character_probabilities)

# Run argmax to pick most possible symbols
character_probabilities = np.argmax(character_probabilities, axis=1)
デコードの実装
前述の出力をデコードするには、コネクショニスト時間分類 (CTC) デコード関数が必要です。このソリューションは、出力から連続する文字を削除します。
def ctc_greedy_decode(predictions):
    previous_letter_id = blank_id = len(alphabet) - 1
    transcription = list()
    for letter_index in predictions:
        if previous_letter_id != letter_index != blank_id:
            transcription.append(alphabet[letter_index])
        previous_letter_id = letter_index
    return ''.join(transcription)
デコードを実行して出力を印刷
transcription = ctc_greedy_decode(character_probabilities)
print(transcription)
from the edge to the cloud