LCM LoRA および ControlNet コンディショニングによるテキストからの画像生成
この Jupyter ノートブックは、ローカルへのインストール後にのみ起動できます。

拡散モデルは、AI によって生成されたアートに革命をもたらします。この技術により、テキストプロンプトを記述するだけで高品質な画像を作成できます。このテクノロジーは非常に有望な結果をもたらしますが、拡散プロセスは、第一に、ランダムなノイズとテキストの状態から画像を生成するプロセスであり、望ましいコンテンツがどのように見えるべきか、どのような形式であるべきか、どこに配置されるべきかを必ずしも明確にするわけではありません。 画像上の他のオブジェクトとの関係で配置されます。研究者は、生成プロセスの結果をより詳細に制御する方法を模索してきました。ControlNet は、生成プロセスを大幅にカスタマイズできる最小限のインターフェイスを提供します。
ControlNet は、論文「テキストから画像への拡散モデルへの条件付き制御の追加」で紹介されました。これは、深度マップ、セグメント化マップ、スクリブル、安定拡散などの拡散モデルへの追加条件として機能するキーポイントなど、さまざまな空間コンテキストのサポートを可能にするフレームワークを提供します。
潜在整合性モデル (LCM) は、元のモデルを少ないステップ (元の 25 ~ 50 ステップではなく 4 ~ 8 ステップ) を必要とする別のバージョンに蒸留することにより、安定拡散 (または SDXL) でイメージを生成するために必要なステップ数を減らす方法です。蒸留は、新しいモデルを使用してソースモデルから出力を複製するトレーニング手順の一種です。抽出されたモデルを小さくするように設計される場合があります。この場合、実行に必要なステップは少なくなります。これは通常、膨大な量のデータ、忍耐力、強力なトレーニング・ハードウェアを必要とする、時間と費用がかかるプロセスです。
潜在的コンシステンシー蒸留 (latent consistency distillation) の場合、各モデルを個別に蒸留する必要があります。LCM LoRA を使用すると、完全なモデルではなく、LoRA レイヤーと呼ばれる少数のアダプターのみをトレーニングできます。結果として得られる LoRA は、個別に抽出することなく、モデルの微調整されたバージョンに適用できます。この LCM LoRA 蒸留プロセスの利点は、メインコードを変更することなく、既存の推論パイプライン (例えば、ControlNet ガイドの安定拡散パイプライン) に統合できることです。LCM LoRA の詳細については、技術レポートとブログの投稿を参照してください。
このノートブックでは、LCM LoRA、OpenVINO、および NNCF による量子化により ControlNet パイプラインを高速化する方法を検討します。“コントロール” を習得しましょう!
目次
背景
Stable Diffusion
Stable Diffusion (安定拡散) は、CompVis、Stability AI、LAION の研究者とエンジニアによって作成されたテキストから画像への潜在拡散モデルです。このような拡散モデルを使用すると、高品質の画像を生成できます。安定拡散は、「潜在拡散モデルによる高解像度画像合成」論文で提案されている、潜在拡散と呼ばれるタイプの拡散モデルに基づいています。一般に、拡散モデルは、画像などの対象サンプルを取得するために、ランダムなガウスノイズを段階的に除去するようにトレーニングされたマシンラーニング・システムです。拡散モデルは、画像データを生成するため最先端の結果を達成することが示されています。ただし、拡散モデルの欠点は、逆ノイズ除去プロセスが反復的かつ逐次的に行われるため、処理が遅くなることです。さらに、これらのモデルはピクセル空間で動作するため大量のメモリーを消費し、高解像度の画像を生成すると巨大なメモリーを消費します。潜在拡散では、実際のピクセル空間を使用する代わりに、低次元の潜在空間で拡散プロセスを適用することで、メモリーを削減し、複雑な計算を軽減できます。これが、標準拡散モデルと潜在拡散モデルの主な違いです。潜在拡散では、画像の潜在 (圧縮) 表現を生成するようにモデルがトレーニングされます。
潜在的な拡散には 3 つの主要コンポーネントがあります。
テキスト・エンコーダー、例えば、テキストプロンプトから画像を生成するための作成条件用の CLIP のテキスト・エンコーダー。
段階的にノイズを除去する潜像表現のための U-Net。
入力イメージを潜在空間にエンコードし (必要な場合)、生成後に潜在空間を画像にデコードするオートエンコーダー (VAE)。
安定拡散作業の詳細については、プロジェクトのウェブサイトを参照してください。OpenVINO を使用した安定拡散テキストから画像への生成に関するチュートリアルがあります。次のノートブックを参照してください。
ControlNet
ControlNet は、条件を追加することで拡散モデルを制御するニューラル・ネットワーク構造です。この新しいフレームワークを使用すると、入力画像からシーン、構造、オブジェクト、または被写体のポーズをキャプチャーし、その品質を生成プロセスに転送できます。実際には、これによりモデルは元の入力形状を完全に保持し、入力されたプロンプトからの新しい特徴を使用しながら、形状、ポーズ、輪郭を保存する新しい画像を作成できます。
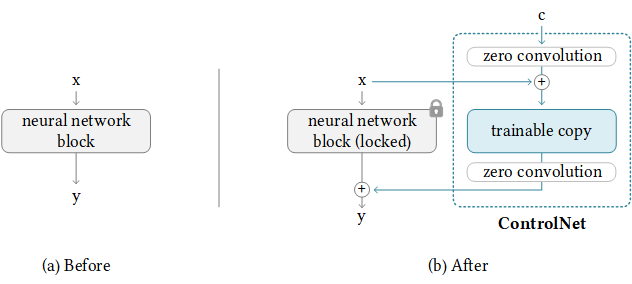
controlnet ブロック
機能的には、ControlNet は画像合成プロセスをラップアラウンドして動作し、組み込みの予測または多数の追加アノテーター・モデルの 1 つを使用してモデルを操作するのに必要な形状に注目します。上の図では、ControlNet が元のネットワークと組み合わせてトレーニング可能なコピーを使用して、入力制御ソースの形状に関して最終出力を変更する方法の基本が分かります。
上記の単純な構造を 14 回繰り返すことで、次のように安定拡散を制御できます。
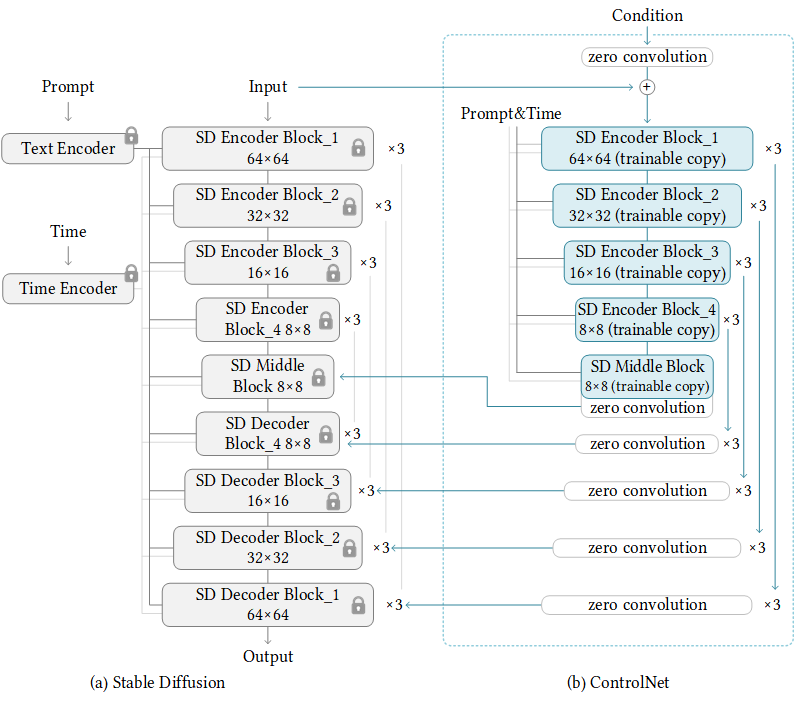
sd + controlnet
入力は、左側に示されている SD ブロックを同時に通過し、同時に右側の ControlNet ブロックによって処理されます。このプロセスはエンコード時とほぼ同じです。画像のノイズを除去する際に、SD デコーダーブロックは各ステップで ControlNet の並列処理パスから制御調整を受け取ります。
最終的には、最終画像の出力特徴の形状に対して追加の制御が追加された、非常によく似た画像合成パイプラインが残ります。
大規模言語モデルの低ランク適応 (LoRA)
大規模言語モデルの低ランク適応 (LoRA) は、メモリー消費量を抑えながら大規模モデルのトレーニングを高速化するトレーニング方法です。ランク分解重み行列のペア (更新行列と呼ばれる) を既存の重みに追加し、新しく追加された重みのみをトレーニングします。これにはいくつかの利点があります。
LoRA は、トレーニング可能なパラメーター数を大幅に減らすことで、微調整をより効率的にします。
元の事前トレーニングされた重みは凍結されたままになります。つまり、さまざまな下流タスク向けに軽量でポータブルな複数の LoRA モデルをその上に構築できることになります。
LoRA は他の多くのパラメーター効率良い手法と直交しており、それらと組み合わせることができます。
LoRA を使用して微調整されたモデルのパフォーマンスは、完全に微調整されたモデルのパフォーマンスと同等です。
LoRA では、アダプターの重みを基本モデルとマージできるため、推論レイテンシーがありません。
原則として、LoRA はニューラル・ネットワーク内の重み行列の任意のサブセットに適用して、トレーニング可能なパラメーター数を減らすことができます。ただし、簡素性とパラメーター効率をさらに向上するため、Transformer モデルでは通常、LoRA はアテンション・ブロックにのみ適用されます。LoRA モデルで得られるトレーニング可能なパラメーター数は、低ランクの更新行列のサイズに依存します。これは主にランク r と元の重み行列の形状によって決まります。LoRA の詳細については、Hugging Face の概念ガイド、Diffusers のドキュメント、およびブログの投稿を参照してください。
必要条件
必要なパッケージをインストール
%pip install -q "torch" transformers "diffusers>=0.22.0" "controlnet-aux>=0.0.6" accelerate --extra-index-url https://download.pytorch.org/whl/cpu
%pip install -q "openvino>=2023.2.0" pillow gradio datasets "nncf>=2.7.0"
PyTorch モデルの準備
from pathlib import Path

controlnet_id = "lllyasviel/control_v11p_sd15_normalbae"
adapter_id = "latent-consistency/lcm-lora-sdv1-5"
stable_diffusion_id = "runwayml/stable-diffusion-v1-5"

TEXT_ENCODER_OV_PATH = Path('model/text_encoder.xml')
UNET_OV_PATH = Path('model/unet_controlnet.xml')
CONTROLNET_OV_PATH = Path('model/controlnet-normalbae.xml')
VAE_DECODER_OV_PATH = Path('model/vae_decoder.xml')
TOKENIZER_PATH = Path('model/tokenizer')
SCHEDULER_PATH = Path('model/scheduler')

skip_models = TEXT_ENCODER_OV_PATH.exists() and UNET_OV_PATH.exists() and CONTROLNET_OV_PATH.exists() and VAE_DECODER_OV_PATH.exists()
オリジナルのディフューザー・パイプラインをロードし、変換用のモデルを準備
安定拡散モデルと ControlNet モデルを操作するには、Hugging Face Diffusers ライブラリーを使用します。ControlNet を実験するため、Diffuser は他の Diffuser パイプラインと同様に StableDiffusionControlNetPipeline を公開します。StableDiffusionControlNetPipeline の中核となるのは、事前トレーニングされた拡散モデルの重みを同じに保ちながら、独自にトレーニングされた ControlNetModel インスタンスを提供できるようにする controlnet 引数です。
以下のコードは、StableDiffusionControlNetPipeline を作成する方法を示しています。このプロセスは次のステップで構成されます。
from_pretrainedメソッドを使用してパイプラインに渡すためControlNetModelを作成します。- Stable Diffusion と ControlNet モデルを使用して
StableDiffusionControlNetPipelineを作成します。 load_lora_weightsメソッドを使用して、LoRA 重みをパイプラインにロードします。
from diffusers import StableDiffusionControlNetPipeline, ControlNetModel
import gc


def load_original_pytorch_pipeline_components(controlnet_id:str, stable_diffusion_id:str, adapter_id:str):
    """
    Helper function for loading Stable Diffusion ControlNet pipeline and applying LCM LoRA

    Parameters:
      controlnet_id: model id from Hugging Face hub or local path for loading ControlNet model
      stable_diffusion_id: model id from Hugging Face hub or local path for loading Stable Diffusion model
      adapter_id: LCM LoRA id from Hugging Face hub or local path
    Returns:
      controlnet: ControlNet model
      text_encoder: Stable Diffusion Text Encoder
      unet: Stable Diffusion U-Net
      vae: Stable Diffusion Variational Autoencoder (VAE)
    """

    # load controlnet model
    controlnet = ControlNetModel.from_pretrained(controlnet_id)
    # load stable diffusion pipeline
    pipe = StableDiffusionControlNetPipeline.from_pretrained(stable_diffusion_id, controlnet=controlnet)
    # load LCM LoRA weights
    pipe.load_lora_weights(adapter_id)
    # fuse LoRA weights with UNet
    pipe.fuse_lora()
    text_encoder = pipe.text_encoder
    text_encoder.eval()
    unet = pipe.unet
    unet.eval()
    vae = pipe.vae
    vae.eval()
    del pipe
    gc.collect()
    return controlnet, text_encoder, unet, vae
controlnet, text_encoder, unet, vae = None, None, None, None
if not skip_models:
    controlnet, text_encoder, unet, vae = load_original_pytorch_pipeline_components(controlnet_id, stable_diffusion_id, adapter_id)
状態画像
入力画像から特定の情報を抽出する処理をアノテーションと呼びます。ControlNet は、画像内のターゲットの形状を識別するのに役立つアノテーター・モデルとの互換性を備えてあらかじめパッケージ化されています。
キャニーエッジ検出
M-LSD ライン
HED 境界
スクリブル
法線マップ
人間の姿勢推定
セマンティックのセグメント化。
深度推定
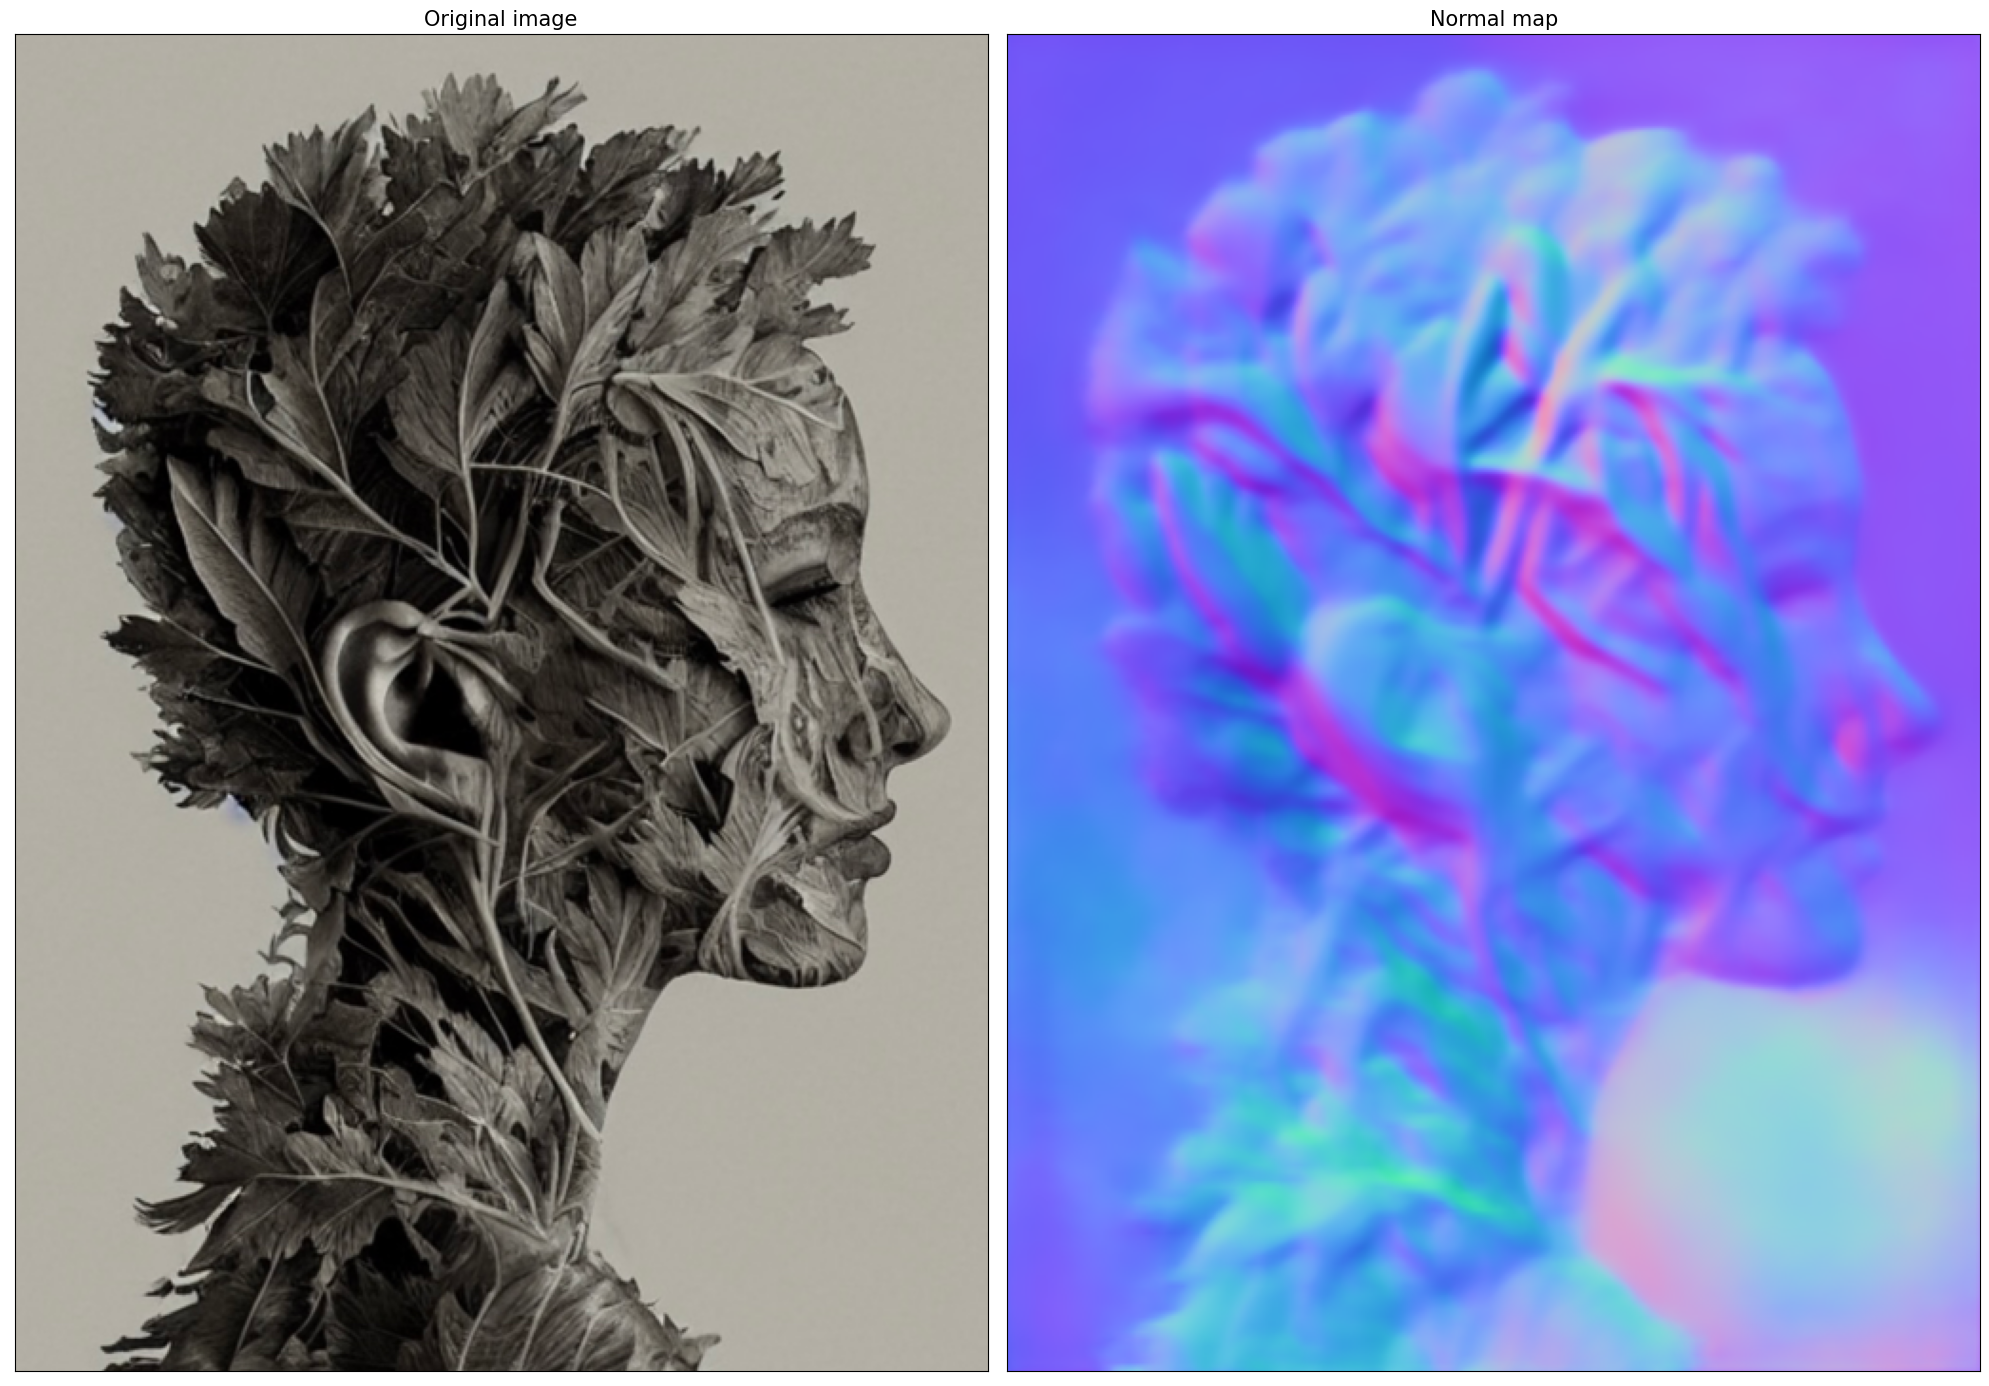
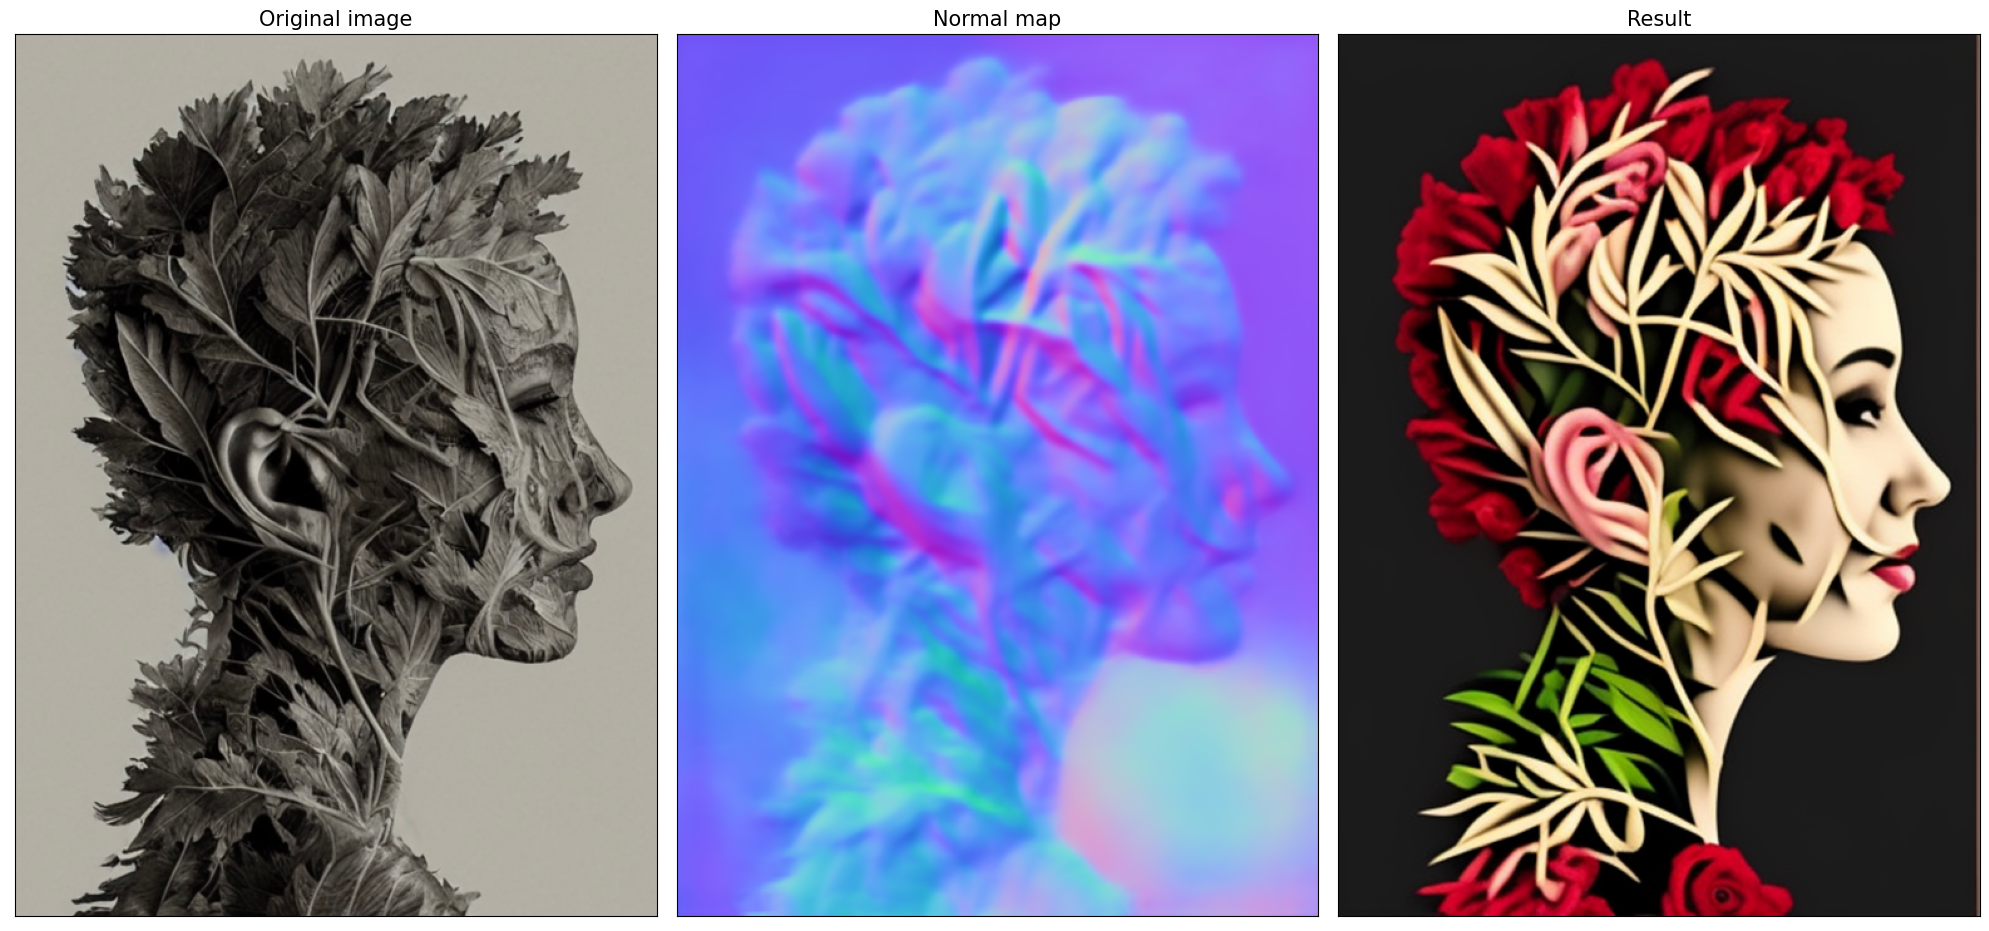
このチュートリアルでは、法線マッピングを使用して拡散プロセスを制御します。この場合、ControlNet 条件画像は表面法線情報を含む画像であり、通常は色分けされた画像で表されます。
from controlnet_aux import NormalBaeDetector
from diffusers.utils import load_image
from urllib.request import urlretrieve
import matplotlib.pyplot as plt
from PIL import Image
import numpy as np

example_image_url = "https://huggingface.co/lllyasviel/control_v11p_sd15_normalbae/resolve/main/images/input.png"
urlretrieve(example_image_url, "example.png")

processor = NormalBaeDetector.from_pretrained("lllyasviel/Annotators")

image = load_image("example.png")
control_image = processor(image)


def visualize_results(orig_img:Image.Image, normal_img:Image.Image, result_img:Image.Image = None, save_fig:bool = False):
    """
    Helper function for results visualization

    Parameters:
       orig_img (Image.Image): original image
       normal_img (Image.Image): image with bwith surface normal information
       result_img (Image.Image, optional, default None): generated image
       safe_fig (bool, optional, default False): allow saving visualization result on disk
    Returns:
       fig (matplotlib.pyplot.Figure): matplotlib generated figure contains drawing result
    """
    orig_title = "Original image"
    control_title = "Normal map"
    orig_img = orig_img.resize(normal_img.size if result_img is None else result_img.size)
    im_w, im_h = orig_img.size
    is_horizontal = im_h <= im_w
    figsize = (20, 20)
    num_images = 3 if result_img is not None else 2
    fig, axs = plt.subplots(num_images if is_horizontal else 1, 1 if is_horizontal else num_images, figsize=figsize, sharex='all', sharey='all')
    fig.patch.set_facecolor('white')
    list_axes = list(axs.flat)
    for a in list_axes:
        a.set_xticklabels([])
        a.set_yticklabels([])
        a.get_xaxis().set_visible(False)
        a.get_yaxis().set_visible(False)
        a.grid(False)
    list_axes[0].imshow(np.array(orig_img))
    list_axes[1].imshow(np.array(normal_img))
    list_axes[0].set_title(orig_title, fontsize=15)
    list_axes[1].set_title(control_title, fontsize=15)
    if result_img is not None:
        list_axes[2].imshow(np.array(result_img))
        list_axes[2].set_title("Result", fontsize=15)

    fig.subplots_adjust(wspace=0.01 if is_horizontal else 0.00 , hspace=0.01 if is_horizontal else 0.1)
    fig.tight_layout()
    if save_fig:
        fig.savefig("result.png", bbox_inches='tight')
    return fig


fig = visualize_results(image, control_image)
Loading base model ()...Done.
Removing last two layers (global_pool & classifier).
モデルを OpenVINO 中間表現 (IR) 形式に変換
2023.0 リリース以降、OpenVINO は PyTorch モデルの変換を直接サポートするようになりました。OpenVINO ov.Model オブジェクト・インスタンスを取得するには、モデル・オブジェクト、モデルトレース用の入力データを ov.convert_model 関数に提供する必要があります。ov.save_model 関数を使用して、次回のデプロイのためにモデルをディスクに保存できます。
パイプラインは 4 つの重要なパーツで構成されます。
画像アノテーションによる調整のための ControlNet。
テキストプロンプトから画像を生成する作成条件のテキスト・エンコーダー。
段階的にノイズを除去する潜像表現のための Unet。
潜在空間を画像にデコードするオートエンコーダー (VAE)。
各パーツを変換してみましょう。
ControlNet 変換
ControlNet モデルは、安定拡散パイプラインの UNet と同じ入力、および追加の条件サンプル (姿勢推定器によって予測されたスケルトン・キー・ポイント・マップ) を受け入れます。
sample- 前のステップの潜像サンプル。生成プロセスがまだ開始されていないため、ランダムノイズを使用します。timestep- 現在のスケジューラー・ステップ。encoder_hidden_state- テキスト・エンコーダーの非表示状態。controlnet_cond- 条件入力アノテーション。
モデルの出力は、下および中央のブロックからのアテンションの隠れ状態であり、UNet モデルの追加コンテキストとして機能します。
import torch
import openvino as ov
from functools import partial

def cleanup_torchscript_cache():
    """
    Helper for removing cached model representation
    """
    torch._C._jit_clear_class_registry()
    torch.jit._recursive.concrete_type_store = torch.jit._recursive.ConcreteTypeStore()
    torch.jit._state._clear_class_state()


def flattenize_inputs(inputs):
    """
    Helper function for resolve nested input structure (e.g. lists or tuples of tensors)
    """
    flatten_inputs = []
    for input_data in inputs:
        if input_data is None:
            continue
        if isinstance(input_data, (list, tuple)):
            flatten_inputs.extend(flattenize_inputs(input_data))
        else:
            flatten_inputs.append(input_data)
    return flatten_inputs


dtype_mapping = {
    torch.float32: ov.Type.f32,
    torch.float64: ov.Type.f64,
    torch.int32: ov.Type.i32,
    torch.int64: ov.Type.i64
}


def prepare_input_info(input_dict):
    """
    Helper function for preparing input info (shapes and data types) for conversion based on example inputs
    """
    flatten_inputs = flattenize_inputs(inputs.values())
    input_info = []
    for input_data in flatten_inputs:
        updated_shape = list(input_data.shape)
        if updated_shape:
            updated_shape[0] = -1
        if input_data.ndim == 4:
            updated_shape[2] = -1
            updated_shape[3] = -1

        input_info.append((dtype_mapping[input_data.dtype], updated_shape))
    return input_info


inputs = {
    "sample": torch.randn((1, 4, 64, 64)),
    "timestep": torch.tensor(1, dtype=torch.float32),
    "encoder_hidden_states": torch.randn((1,77,768)),
    "controlnet_cond": torch.randn((1,3,512,512))
}


# Prepare conditional inputs for U-Net
if not UNET_OV_PATH.exists():
    controlnet.eval()
    with torch.no_grad():
        down_block_res_samples, mid_block_res_sample = controlnet(**inputs, return_dict=False)

if not CONTROLNET_OV_PATH.exists():
    input_info = prepare_input_info(inputs)
    with torch.no_grad():
        controlnet.forward = partial(controlnet.forward, return_dict=False)
        ov_model = ov.convert_model(controlnet, example_input=inputs, input=input_info)
        ov.save_model(ov_model, CONTROLNET_OV_PATH)
        del ov_model
        cleanup_torchscript_cache()
    print('ControlNet successfully converted to IR')
else:
    print(f"ControlNet will be loaded from {CONTROLNET_OV_PATH}")

del controlnet
gc.collect()
ControlNet will be loaded from model/controlnet-normalbae.xml
9
U-Net
U-Net モデル変換のプロセスは、元の安定拡散モデルと同じですが、ControlNet によって生成された新しい入力を尊重します。
from typing import Tuple

class UnetWrapper(torch.nn.Module):
    def __init__(
        self,
        unet,
        sample_dtype=torch.float32,
        timestep_dtype=torch.int64,
        encoder_hidden_states=torch.float32,
        down_block_additional_residuals=torch.float32,
        mid_block_additional_residual=torch.float32
    ):
        super().__init__()
        self.unet = unet
        self.sample_dtype = sample_dtype
        self.timestep_dtype = timestep_dtype
        self.encoder_hidden_states_dtype = encoder_hidden_states
        self.down_block_additional_residuals_dtype = down_block_additional_residuals
        self.mid_block_additional_residual_dtype = mid_block_additional_residual

    def forward(
        self,
        sample:torch.Tensor,
        timestep:torch.Tensor,
        encoder_hidden_states:torch.Tensor,
        down_block_additional_residuals:Tuple[torch.Tensor],
        mid_block_additional_residual:torch.Tensor
    ):
        sample.to(self.sample_dtype)
        timestep.to(self.timestep_dtype)
        encoder_hidden_states.to(self.encoder_hidden_states_dtype)
        down_block_additional_residuals = [res.to(self.down_block_additional_residuals_dtype) for res in down_block_additional_residuals]
        mid_block_additional_residual.to(self.mid_block_additional_residual_dtype)
        return self.unet(
            sample,
            timestep,
            encoder_hidden_states,
            down_block_additional_residuals=down_block_additional_residuals,
            mid_block_additional_residual=mid_block_additional_residual
        )


if not UNET_OV_PATH.exists():
    inputs.pop("controlnet_cond", None)
    inputs["down_block_additional_residuals"] = down_block_res_samples
    inputs["mid_block_additional_residual"] = mid_block_res_sample
    input_info = prepare_input_info(inputs)

    wrapped_unet = UnetWrapper(unet)
    wrapped_unet.eval()

    with torch.no_grad():
        ov_model = ov.convert_model(wrapped_unet, example_input=inputs)

    for (input_dtype, input_shape), input_tensor in zip(input_info, ov_model.inputs):
        input_tensor.get_node().set_partial_shape(ov.PartialShape(input_shape))
        input_tensor.get_node().set_element_type(input_dtype)
    ov_model.validate_nodes_and_infer_types()
    ov.save_model(ov_model, UNET_OV_PATH)
    del ov_model
    cleanup_torchscript_cache()
    del wrapped_unet
    del unet
    gc.collect()
    print('Unet successfully converted to IR')
else:
    del unet
    print(f"Unet will be loaded from {UNET_OV_PATH}")
gc.collect()
Unet will be loaded from model/unet_controlnet.xml
0
テキスト・エンコーダー
テキスト・エンコーダーは、入力プロンプト (例えば、“馬に乗った宇宙飛行士の写真”) を、U-Net が理解できる埋め込みスペースに変換する役割を果たします。これは通常、入力トークンのシーケンスを潜在テキスト埋め込みのシーケンスにマッピングする単純なトランスフォーマー・ベースのエンコーダーです。
テキスト・エンコーダーの入力はテンソル input_ids です。これには、トークナイザーによって処理され、モデルによって受け入れられる最大長までパディングされたテキストからのトークン・インデックスが含まれます。モデルの出力は 2 つのテンソルです。
last_hidden_state- モデル内の最後の MultiHeadtention レイヤーからの非表示状態。pooler_out- モデル全体の非表示状態のプールされた出力。
def convert_encoder(text_encoder:torch.nn.Module, ir_path:Path):
    """
    Convert Text Encoder model to OpenVINO IR.
    Function accepts text encoder model, prepares example inputs for conversion, and convert it to OpenVINO Model
    Parameters:
        text_encoder (torch.nn.Module): text_encoder model
        ir_path (Path): File for storing model
    Returns:
        None
    """
    if not ir_path.exists():
        input_ids = torch.ones((1, 77), dtype=torch.long)
        # switch model to inference mode
        text_encoder.eval()

        # disable gradients calculation for reducing memory consumption
        with torch.no_grad():
            ov_model = ov.convert_model(
                text_encoder,  # model instance
                example_input=input_ids,  # inputs for model tracing
                input=([1,77],)
            )
            ov.save_model(ov_model, ir_path)
            del ov_model
        cleanup_torchscript_cache()
        print('Text Encoder successfully converted to IR')


if not TEXT_ENCODER_OV_PATH.exists():
    convert_encoder(text_encoder, TEXT_ENCODER_OV_PATH)
else:
    print(f"Text encoder will be loaded from {TEXT_ENCODER_OV_PATH}")
del text_encoder
gc.collect()
Text encoder will be loaded from model/text_encoder.xml
0
VAE デコーダー変換
VAE モデルには、エンコーダーとデコーダーの 2 つのパーツがあります。エンコーダーは、画像を低次元の潜在表現に変換するのに使用され、これが U-Net モデルの入力となります。逆に、デコーダーは潜在表現を変換して画像に戻します。
潜在拡散トレーニング中、エンコーダーは、順拡散プロセス用の画像の潜在表現 (潜在) を取得するために使用され、各ステップでより多くのノイズが適用されます。推論中、逆拡散プロセスによって生成されたノイズ除去された潜在は、VAE デコーダーによって画像に変換されます。推論中に、VAE デコーダーのみが必要であることが分かります。エンコーダー部分を変換する方法については、安定拡散のノートブックに記載されています。
def convert_vae_decoder(vae: torch.nn.Module, ir_path: Path):
    """
    Convert VAE model to IR format.
    Function accepts pipeline, creates wrapper class for export only necessary for inference part,
    prepares example inputs for convert,
    Parameters:
        vae (torch.nn.Module): VAE model
        ir_path (Path): File for storing model
    Returns:
        None
    """
    class VAEDecoderWrapper(torch.nn.Module):
        def __init__(self, vae):
            super().__init__()
            self.vae = vae

        def forward(self, latents):
            return self.vae.decode(latents)

    if not ir_path.exists():
        vae_decoder = VAEDecoderWrapper(vae)
        latents = torch.zeros((1, 4, 64, 64))

        vae_decoder.eval()
        with torch.no_grad():
            ov_model = ov.convert_model(vae_decoder, example_input=latents, input=[-1, 4, -1, -1])
            ov.save_model(ov_model, ir_path)
        del ov_model
        cleanup_torchscript_cache()
        print('VAE decoder successfully converted to IR')


if not VAE_DECODER_OV_PATH.exists():
    convert_vae_decoder(vae, VAE_DECODER_OV_PATH)
else:
    print(f"VAE decoder will be loaded from {VAE_DECODER_OV_PATH}")

del vae
VAE decoder will be loaded from model/vae_decoder.xml
推論パイプラインの準備
ControlNet ノートブックのサンプルのポーズ制御生成で ControlNet ガイド付きパイプラインがどのように機能するかについては、すでに詳しく説明しました。現在の例では、パイプラインは変更されずに残ります。Diffusers の StableDiffusionControlNetPipeline と同様に、OpenVINO に基づいて独自の OVControlNetStableDiffusionPipeline 推論パイプラインを定義します。
from diffusers import DiffusionPipeline
from transformers import CLIPTokenizer
from typing import Union, List, Optional, Tuple
import cv2


def scale_fit_to_window(dst_width:int, dst_height:int, image_width:int, image_height:int):
    """
    Preprocessing helper function for calculating image size for resize with peserving original aspect ratio
    and fitting image to specific window size

    Parameters:
      dst_width (int): destination window width
      dst_height (int): destination window height
      image_width (int): source image width
      image_height (int): source image height
    Returns:
      result_width (int): calculated width for resize
      result_height (int): calculated height for resize
    """
    im_scale = min(dst_height / image_height, dst_width / image_width)
    return int(im_scale * image_width), int(im_scale * image_height)


def preprocess(image: Image.Image, dst_height:int = 512, dst_width:int = 512):
    """
    Image preprocessing function. Takes image in PIL.Image format, resizes it to keep aspect ration and fits to model input window 512x512,
    then converts it to np.ndarray and adds padding with zeros on right or bottom side of image (depends from aspect ratio), after that
    converts data to float32 data type and change range of values from [0, 255] to [-1, 1], finally, converts data layout from planar NHWC to NCHW.
    The function returns preprocessed input tensor and padding size, which can be used in postprocessing.

    Parameters:
      image (Image.Image): input image
      dst_width: destination image width
      dst_height: destination image height
    Returns:
       image (np.ndarray): preprocessed image tensor
       pad (Tuple[int]): pading size for each dimension for restoring image size in postprocessing
    """
    src_width, src_height = image.size
    res_width, res_height = scale_fit_to_window(dst_width, dst_height, src_width, src_height)
    image = np.array(image.resize((res_width, res_height), resample=Image.Resampling.LANCZOS))[None, :]
    pad_width = dst_width - res_width
    pad_height = dst_height - res_height
    pad = ((0, 0), (0, pad_height), (0, pad_width), (0, 0))
    image = np.pad(image, pad, mode="constant")
    image = image.astype(np.float32) / 255.0
    image = image.transpose(0, 3, 1, 2)
    return image, pad


def randn_tensor(
    shape: Union[Tuple, List],
    dtype: Optional[torch.dtype] = torch.float32,
):
    """
    Helper function for generation random values tensor with given shape and data type

    Parameters:
      shape (Union[Tuple, List]): shape for filling random values
      dtype (torch.dtype, *optiona*, torch.float32): data type for result
    Returns:
      latents (np.ndarray): tensor with random values with given data type and shape (usually represents noise in latent space)
    """
    latents = torch.randn(shape, dtype=dtype)
    return latents.numpy()


class OVControlNetStableDiffusionPipeline(DiffusionPipeline):
    """
    OpenVINO inference pipeline for Stable Diffusion with ControlNet guidence
    """
    def __init__(
        self,
        tokenizer: CLIPTokenizer,
        scheduler,
        core: ov.Core,
        controlnet: ov.Model,
        text_encoder: ov.Model,
        unet: ov.Model,
        vae_decoder: ov.Model,
        device:str = "AUTO"
    ):
        super().__init__()
        self.tokenizer = tokenizer
        self.vae_scale_factor = 8
        self.scheduler = scheduler
        self.load_models(core, device, controlnet, text_encoder, unet, vae_decoder)

    def load_models(self, core: ov.Core, device: str, controlnet:ov.Model, text_encoder: ov.Model, unet: ov.Model, vae_decoder: ov.Model):
        """
        Function for loading models on device using OpenVINO

        Parameters:
          core (Core): OpenVINO runtime Core class instance
          device (str): inference device
          controlnet (Model): OpenVINO Model object represents ControlNet
          text_encoder (Model): OpenVINO Model object represents text encoder
          unet (Model): OpenVINO Model object represents UNet
          vae_decoder (Model): OpenVINO Model object represents vae decoder
        Returns
          None
        """
        self.text_encoder = core.compile_model(text_encoder, device)
        self.register_to_config(controlnet=core.compile_model(controlnet, device))
        self.register_to_config(unet=core.compile_model(unet, device))
        ov_config = {"INFERENCE_PRECISION_HINT": "f32"} if device != "CPU" else {}
        self.vae_decoder = core.compile_model(vae_decoder, device, ov_config)

    def __call__(
        self,
        prompt: Union[str, List[str]],
        image: Image.Image,
        num_inference_steps: int = 4,
        height:int = 512,
        width:int = 512,
        negative_prompt: Union[str, List[str]] = None,
        guidance_scale: float = 0.5,
        controlnet_conditioning_scale: float = 1.0,
        latents: Optional[np.array] = None,
        output_type: Optional[str] = "pil",
    ):
        """
        Function invoked when calling the pipeline for generation.

        Parameters:
            prompt (`str` or `List[str]`):
                The prompt or prompts to guide the image generation.
            image (`Image.Image`):
                `Image`, or tensor representing an image batch which will be repainted according to `prompt`.
            num_inference_steps (`int`, *optional*, defaults to 100):
                The number of denoising steps. More denoising steps usually lead to a higher quality image at the
                expense of slower inference.
            height (int, *optional*, defaults to 512): generated image height
            width (int, *optional*, defaults to 512): generated image width
            negative_prompt (`str` or `List[str]`):
                negative prompt or prompts for generation
            guidance_scale (`float`, *optional*, defaults to 0.5):
                Guidance scale as defined in [Classifier-Free Diffusion Guidance](https://arxiv.org/abs/2207.12598).
                `guidance_scale` is defined as `w` of equation 2. of [Imagen
                Paper](https://arxiv.org/pdf/2205.11487.pdf). Guidance scale is enabled by setting `guidance_scale >
                1`. Higher guidance scale encourages to generate images that are closely linked to the text `prompt`,
                usually at the expense of lower image quality. This pipeline requires a value of at least `1`.
            latents (`np.ndarray`, *optional*):
                Pre-generated noisy latents, sampled from a Gaussian distribution, to be used as inputs for image
                generation. Can be used to tweak the same generation with different prompts. If not provided, a latents
                tensor will ge generated by sampling using the supplied random `generator`.
            output_type (`str`, *optional*, defaults to `"pil"`):
                The output format of the generate image. Choose between
                [PIL](https://pillow.readthedocs.io/en/stable/): `Image.Image` or `np.array`.
        Returns:
            image ([List[Union[np.ndarray, Image.Image]]): generaited images

        """

        # 1. Define call parameters
        batch_size = 1 if isinstance(prompt, str) else len(prompt)
        if guidance_scale < 1 and negative_prompt:
            guidance_scale += 1
        # here `guidance_scale` is defined analog to the guidance weight `w` of equation (2)
        # of the Imagen paper: https://arxiv.org/pdf/2205.11487.pdf . `guidance_scale = 1`
        # corresponds to doing no classifier free guidance.
        do_classifier_free_guidance = guidance_scale > 1.0
        # 2. Encode input prompt
        text_embeddings = self._encode_prompt(prompt, do_classifier_free_guidance=do_classifier_free_guidance, negative_prompt=negative_prompt)

        # 3. Preprocess image
        orig_width, orig_height = image.size
        image, pad = preprocess(image, height, width)
        if do_classifier_free_guidance:
            image = np.concatenate(([image] * 2))

        # 4. set timesteps
        self.scheduler.set_timesteps(num_inference_steps)
        timesteps = self.scheduler.timesteps

        # 5. Prepare latent variables
        num_channels_latents = 4
        latents = self.prepare_latents(
            batch_size,
            num_channels_latents,
            height,
            width,
            latents=latents,
        )

        # 6. Denoising loop
        with self.progress_bar(total=num_inference_steps) as progress_bar:
            for i, t in enumerate(timesteps):
                # Expand the latents if we are doing classifier free guidance.
                # The latents are expanded 3 times because for pix2pix the guidance\
                # is applied for both the text and the input image.
                latent_model_input = np.concatenate(
                    [latents] * 2) if do_classifier_free_guidance else latents
                latent_model_input = self.scheduler.scale_model_input(latent_model_input, t)

                result = self.controlnet([latent_model_input, t, text_embeddings, image], share_inputs=True, share_outputs=True)
                down_and_mid_blok_samples = [sample * controlnet_conditioning_scale for _, sample in result.items()]

                # predict the noise residual
                noise_pred = self.unet([latent_model_input, t, text_embeddings, *down_and_mid_blok_samples], share_inputs=True, share_outputs=True)[0]

                # perform guidance
                if do_classifier_free_guidance:
                    noise_pred_uncond, noise_pred_text = noise_pred[0], noise_pred[1]
                    noise_pred = noise_pred_uncond + guidance_scale * (noise_pred_text - noise_pred_uncond)

                # compute the previous noisy sample x_t -> x_t-1
                latents = self.scheduler.step(torch.from_numpy(noise_pred), t, torch.from_numpy(latents)).prev_sample.numpy()
                progress_bar.update()

        # 7. Post-processing
        image = self.decode_latents(latents, pad)

        # 8. Convert to PIL
        if output_type == "pil":
            image = self.numpy_to_pil(image)
            image = [img.resize((orig_width, orig_height), Image.Resampling.LANCZOS) for img in image]
        else:
            image = [cv2.resize(img, (orig_width, orig_width))
                     for img in image]

        return image

    def _encode_prompt(self, prompt:Union[str, List[str]], num_images_per_prompt:int = 1, do_classifier_free_guidance:bool = True, negative_prompt:Union[str, List[str]] = None):
        """
        Encodes the prompt into text encoder hidden states.

        Parameters:
            prompt (str or list(str)): prompt to be encoded
            num_images_per_prompt (int): number of images that should be generated per prompt
            do_classifier_free_guidance (bool): whether to use classifier free guidance or not
            negative_prompt (str or list(str)): negative prompt to be encoded
        Returns:
            text_embeddings (np.ndarray): text encoder hidden states
        """
        batch_size = len(prompt) if isinstance(prompt, list) else 1

        # tokenize input prompts
        text_inputs = self.tokenizer(
            prompt,
            padding="max_length",
            max_length=self.tokenizer.model_max_length,
            truncation=True,
            return_tensors="np",
        )
        text_input_ids = text_inputs.input_ids

        text_embeddings = self.text_encoder(text_input_ids, share_inputs=True, share_outputs=True)[0]

        # duplicate text embeddings for each generation per prompt
        if num_images_per_prompt != 1:
            bs_embed, seq_len, _ = text_embeddings.shape
            text_embeddings = np.tile(
                text_embeddings, (1, num_images_per_prompt, 1))
            text_embeddings = np.reshape(
                text_embeddings, (bs_embed * num_images_per_prompt, seq_len, -1))

        # get unconditional embeddings for classifier free guidance
        if do_classifier_free_guidance:
            uncond_tokens: List[str]
            max_length = text_input_ids.shape[-1]
            if negative_prompt is None:
                uncond_tokens = [""] * batch_size
            elif isinstance(negative_prompt, str):
                uncond_tokens = [negative_prompt]
            else:
                uncond_tokens = negative_prompt
            uncond_input = self.tokenizer(
                uncond_tokens,
                padding="max_length",
                max_length=max_length,
                truncation=True,
                return_tensors="np",
            )

            uncond_embeddings = self.text_encoder(uncond_input.input_ids, share_inputs=True, share_outputs=True)[0]

            # duplicate unconditional embeddings for each generation per prompt, using mps friendly method
            seq_len = uncond_embeddings.shape[1]
            uncond_embeddings = np.tile(uncond_embeddings, (1, num_images_per_prompt, 1))
            uncond_embeddings = np.reshape(uncond_embeddings, (batch_size * num_images_per_prompt, seq_len, -1))

            # For classifier free guidance, we need to do two forward passes.
            # Here we concatenate the unconditional and text embeddings into a single batch
            # to avoid doing two forward passes
            text_embeddings = np.concatenate([uncond_embeddings, text_embeddings])

        return text_embeddings

    def prepare_latents(self, batch_size:int, num_channels_latents:int, height:int, width:int, dtype:np.dtype = torch.float32, latents:np.ndarray = None):
        """
        Preparing noise to image generation. If initial latents are not provided, they will be generated randomly,
        then prepared latents scaled by the standard deviation required by the scheduler

        Parameters:
           batch_size (int): input batch size
           num_channels_latents (int): number of channels for noise generation
           height (int): image height
           width (int): image width
           dtype (np.dtype, *optional*, np.float32): dtype for latents generation
           latents (np.ndarray, *optional*, None): initial latent noise tensor, if not provided will be generated
        Returns:
           latents (np.ndarray): scaled initial noise for diffusion
        """
        shape = (batch_size, num_channels_latents, height // self.vae_scale_factor, width // self.vae_scale_factor)
        if latents is None:
            latents = randn_tensor(shape, dtype=dtype)
        else:
            latents = latents

        # scale the initial noise by the standard deviation required by the scheduler
        latents = latents * self.scheduler.init_noise_sigma
        return latents

    def decode_latents(self, latents:np.array, pad:Tuple[int]):
        """
        Decode predicted image from latent space using VAE Decoder and unpad image result

        Parameters:
           latents (np.ndarray): image encoded in diffusion latent space
           pad (Tuple[int]): each side padding sizes obtained on preprocessing step
        Returns:
           image: decoded by VAE decoder image
        """
        latents = 1 / 0.18215 * latents
        image = self.vae_decoder(latents)[0]
        (_, end_h), (_, end_w) = pad[1:3]
        h, w = image.shape[2:]
        unpad_h = h - end_h
        unpad_w = w - end_w
        image = image[:, :, :unpad_h, :unpad_w]
        image = np.clip(image / 2 + 0.5, 0, 1)
        image = np.transpose(image, (0, 2, 3, 1))
        return image
トークナイザーと LCMScheduler を準備
トークナイザーとスケジューラーも拡散パイプラインの重要なパーツです。トークナイザーは、ユーザー指定のプロンプトを前処理して、テキスト・エンコーダーで使用されるトークン ID を生成する役割を果たします。
ケジューラーはモデルの出力 (拡散プロセスが反復されるサンプル) とタイムステップを取得して、ノイズ除去されたサンプルを返します。タイムステップは拡散プロセスのどこにステップがあるかを決定するのに重要です。 データは n タイムステップを順方向に反復することによって生成され、推論はタイムステップを逆方向に伝播することによって行われます。Diffusers ライブラリー内には多くのスケジューラーが実装されており、LCM パイプラインでは、LCMScheduler を使用して元のパイプライン・スケジューラーを変更する必要がありました。
from diffusers import LCMScheduler
from transformers import AutoTokenizer

if not TOKENIZER_PATH.exists():
    tokenizer = AutoTokenizer.from_pretrained(stable_diffusion_id, subfolder="tokenizer")
    tokenizer.save_pretrained(TOKENIZER_PATH)
else:
    tokenizer = AutoTokenizer.from_pretrained(TOKENIZER_PATH)
if not SCHEDULER_PATH.exists():
    scheduler = LCMScheduler.from_pretrained(stable_diffusion_id, subfolder="scheduler")
    scheduler.save_pretrained(SCHEDULER_PATH)
else:
    scheduler = LCMScheduler.from_config(SCHEDULER_PATH)
Stable Diffusion パイプライン用の推論デバイスの選択
OpenVINO を使用して推論を実行するためにドロップダウン・リストからデバイスを選択します。
import ipywidgets as widgets

core = ov.Core()

device = widgets.Dropdown(
    options=core.available_devices + ["AUTO"],
    value='CPU',
    description='Device:',
    disabled=False,
)

device
Dropdown(description='Device:', options=('CPU', 'GPU.0', 'GPU.1', 'GPU.2', 'AUTO'), value='CPU')
ov_pipe = OVControlNetStableDiffusionPipeline(tokenizer, scheduler, core, CONTROLNET_OV_PATH, TEXT_ENCODER_OV_PATH, UNET_OV_PATH, VAE_DECODER_OV_PATH, device=device.value)
ControlNet コンディショニングと OpenVINO を使用したテキストから画像の生成実行
これで、生成の準備が整いました。生成プロセスを改善するために、否定的なプロンプトを提供する可能性も導入します。技術的には、ポジティブなプロンプトはそれに関連付けられた画像に向かって拡散を誘導し、ネガティブなプロンプトは拡散をそこから遠ざけるように誘導します。仕組みの詳細については、この記事を参照してください。否定的なプロンプトを表示せずに画像を生成したい場合は、このフィールドを空のままにすることができます。
分類子なしガイダンス (CFG) またはガイダンススケールは、画像生成プロセスがテキストプロンプトにどの程度従うかを制御するパラメーターです。値が大きいほど、画像は特定のテキスト入力に密接します。ただし、ガイダンスが多いと多様性と品質が低下するため、値を常に最大に設定する必要があるという意味ではありません。実証によると、LCM モデルの最適なガイダンス値は 0 ~ 2 の範囲にあります。
> 否定プロンプトはガイダンススケールが 1 未満の場合にのみ適用されることに注意してください。
実際のモデルを見てみましょう。
prompt = "A head full of roses"
torch.manual_seed(4257)

result = ov_pipe(prompt, control_image, 4)
result[0]
0%| | 0/4 [00:00<?, ?it/s]
/home/ltalamanova/omz/lib/python3.8/site-packages/diffusers/configuration_utils.py:135: FutureWarning: Accessing config attribute controlnet directly via 'OVControlNetStableDiffusionPipeline' object attribute is deprecated. Please access 'controlnet' over 'OVControlNetStableDiffusionPipeline's config object instead, e.g. 'scheduler.config.controlnet'.
  deprecate("direct config name access", "1.0.0", deprecation_message, standard_warn=False)
/home/ltalamanova/omz/lib/python3.8/site-packages/diffusers/configuration_utils.py:135: FutureWarning: Accessing config attribute unet directly via 'OVControlNetStableDiffusionPipeline' object attribute is deprecated. Please access 'unet' over 'OVControlNetStableDiffusionPipeline's config object instead, e.g. 'scheduler.config.unet'.
  deprecate("direct config name access", "1.0.0", deprecation_message, standard_warn=False)
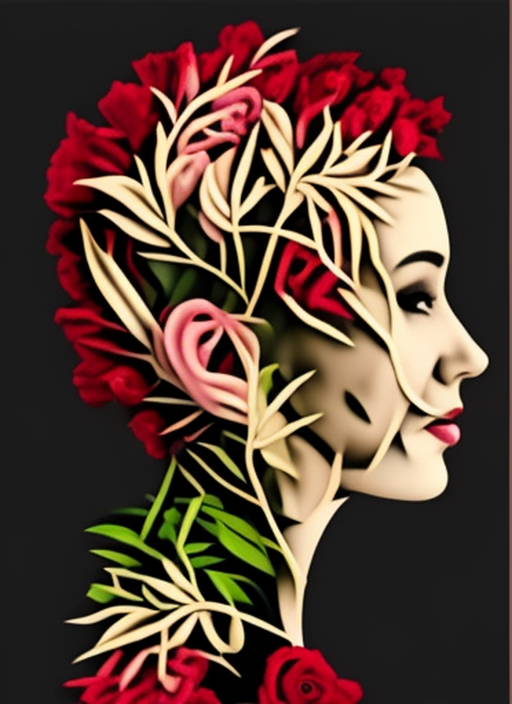
fig = visualize_results(image, control_image, result[0])
量子化
NNCF は、量子化レイヤーをモデルグラフに追加し、トレーニング・データセットのサブセットを使用してこれらの追加の量子化レイヤーのパラメーターを初期化することで、トレーニング後の量子化を可能にします。量子化操作は FP32/FP16 ではなく INT8 で実行されるため、モデル推論が高速化されます。
OVControlNetStableDiffusionPipeline 構造によれば、ControlNet と UNet は各拡散ステップで推論を繰り返すサイクルで使用されますが、パイプラインの他のパーツは 1 回だけ参加します。そのため、ControlNet と UNet の計算コストと速度がパイプラインのクリティカル・パスになります。SD パイプラインの残りのパーツを量子化しても、推論パフォーマンスは大幅に向上せず、精度が大幅に低下する可能性があります。
最適化プロセスには次の手順が含まれます。
量子化用のキャリブレーション・データセットを作成します。
nncf.quantize()を実行して、量子化されたモデルを取得します。openvino.save_model()関数を使用してINT8モデルを保存します。
モデルの推論速度を向上させるため量子化を実行するかどうかを以下で選択してください。
is_gpu_device = "GPU" in device.value
to_quantize = widgets.Checkbox(
    value=not is_gpu_device,
    description='Quantization',
    disabled=is_gpu_device,
)

to_quantize
to_quantize が選択されていない場合に量子化をスキップする skip magic 拡張機能をロードします。
import sys
sys.path.append("../utils")

int8_pipe = None

%load_ext skip_kernel_extension
キャリブレーション・データセットの準備
Hugging Face の fusing/instructpix2pix-1000-samples データセットの一部を ControlNet および UNet のキャリブレーション・データとして使用します。
キャリブレーション用の中間モデル入力を収集するには、CompiledModel をカスタマイズする必要があります。
%%skip not $to_quantize.value

import datasets
from tqdm.notebook import tqdm
from transformers import set_seed
from typing import Any, Dict, List

set_seed(1)

class CompiledModelDecorator(ov.CompiledModel):
    def __init__(self, compiled_model, prob: float):
        super().__init__(compiled_model)
        self.data_cache = []
        self.prob = np.clip(prob, 0, 1)

    def __call__(self, *args, **kwargs):
        if np.random.rand() >= self.prob:
            self.data_cache.append(*args)
        return super().__call__(*args, **kwargs)

def collect_calibration_data(pipeline: OVControlNetStableDiffusionPipeline, subset_size: int) -> List[Dict]:
    original_unet = pipeline.unet
    pipeline.unet = CompiledModelDecorator(original_unet, prob=0.3)

    dataset = datasets.load_dataset("fusing/instructpix2pix-1000-samples", split="train", streaming=True).shuffle(seed=42)
    pipeline.set_progress_bar_config(disable=True)

    # Run inference for data collection
    pbar = tqdm(total=subset_size)
    diff = 0
    control_images = []
    for batch in dataset:
        prompt = batch["edit_prompt"]
        if len(prompt) > tokenizer.model_max_length:
            continue
        image = batch["input_image"]
        control_image = processor(image)

        _ = pipeline(prompt, image=control_image, num_inference_steps=4)
        collected_subset_size = len(pipeline.unet.data_cache)
        control_images.append((min(collected_subset_size, subset_size), control_image))
        if collected_subset_size >= subset_size:
            pbar.update(subset_size - pbar.n)
            break
        pbar.update(collected_subset_size - diff)
        diff = collected_subset_size

    control_calibration_dataset = pipeline.unet.data_cache
    pipeline.set_progress_bar_config(disable=False)
    pipeline.unet = original_unet
    return control_calibration_dataset, control_images
%%skip not $to_quantize.value

CONTROLNET_INT8_OV_PATH = Path("model/controlnet-normalbae_int8.xml")
UNET_INT8_OV_PATH = Path("model/unet_controlnet_int8.xml")
if not (CONTROLNET_INT8_OV_PATH.exists() and UNET_INT8_OV_PATH.exists()):
    subset_size = 200
    unet_calibration_data, control_images = collect_calibration_data(ov_pipe, subset_size=subset_size)
0%| | 0/200 [00:00<?, ?it/s]
ControlNet の最初の 3 つの入力は UNet の入力と同じで、最後の ControlNet 入力は前処理された control_image です。
%%skip not $to_quantize.value

if not CONTROLNET_INT8_OV_PATH.exists():
    control_calibration_data = []
    prev_idx = 0
    for upper_bound, image in control_images:
        preprocessed_image, _ = preprocess(image)
        for i in range(prev_idx, upper_bound):
            control_calibration_data.append(unet_calibration_data[i][:3] + [preprocessed_image])
            prev_idx = upper_bound
量子化を実行
事前トレーニング済みの変換済み OpenVINO モデルから量子化モデルを作成します。FastBiasCorrectionSD モデルの精度向上が最小限であり、量子化時間が増加したため、アルゴリズムは無効になっています。
注: 量子化は時間とメモリーを消費する操作です。以下の量子化コードの実行には時間がかかる場合があります。
%%skip not $to_quantize.value

import nncf

if not UNET_INT8_OV_PATH.exists():
    unet = core.read_model(UNET_OV_PATH)
    quantized_unet = nncf.quantize(
        model=unet,
        calibration_dataset=nncf.Dataset(unet_calibration_data),
        model_type=nncf.ModelType.TRANSFORMER,
        advanced_parameters=nncf.AdvancedQuantizationParameters(
            disable_bias_correction=True
        )
    )
    ov.save_model(quantized_unet, UNET_INT8_OV_PATH)
%%skip not $to_quantize.value

if not CONTROLNET_INT8_OV_PATH.exists():
    controlnet = core.read_model(CONTROLNET_OV_PATH)
    quantized_controlnet = nncf.quantize(
        model=controlnet,
        calibration_dataset=nncf.Dataset(control_calibration_data),
        model_type=nncf.ModelType.TRANSFORMER,
        advanced_parameters=nncf.AdvancedQuantizationParameters(
            disable_bias_correction=True
        )
    )
    ov.save_model(quantized_controlnet, CONTROLNET_INT8_OV_PATH)
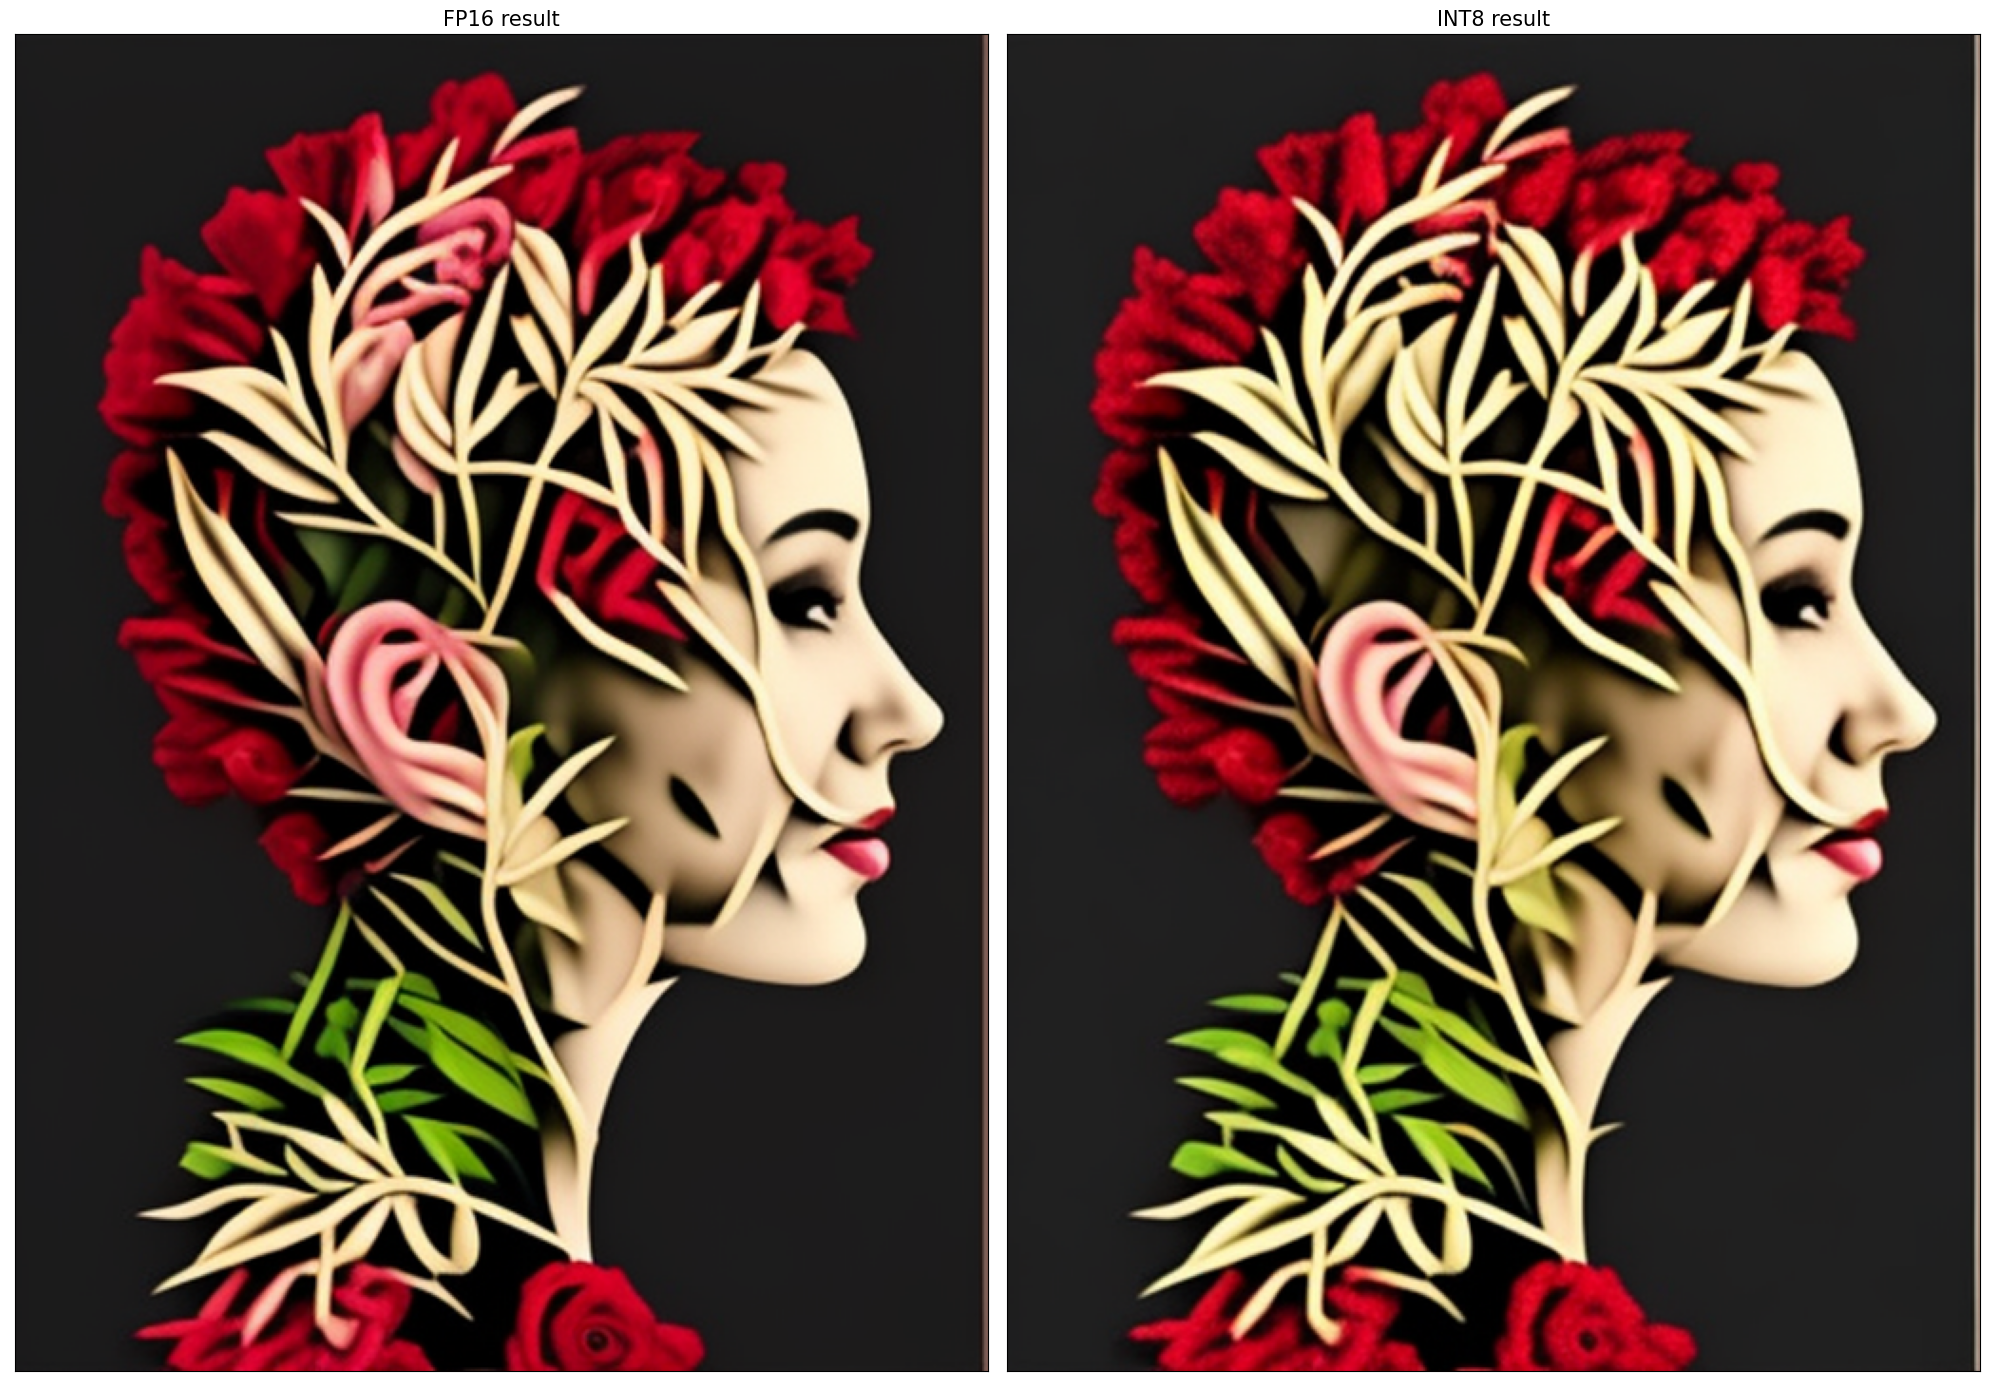
同じ入力データを使用して、量子化された ControlNet と UNet で予測を確認してみましょう。
%%skip not $to_quantize.value

from IPython.display import display

int8_pipe = OVControlNetStableDiffusionPipeline(
    tokenizer,
    scheduler,
    core,
    CONTROLNET_INT8_OV_PATH,
    TEXT_ENCODER_OV_PATH,
    UNET_INT8_OV_PATH,
    VAE_DECODER_OV_PATH,
    device=device.value
)

prompt = "A head full of roses"
torch.manual_seed(4257)

int8_result = int8_pipe(prompt, control_image, 4)

fig = visualize_results(result[0], int8_result[0])
fig.axes[0].set_title('FP16 result', fontsize=15)
fig.axes[1].set_title('INT8 result', fontsize=15)
0%| | 0/4 [00:00<?, ?it/s]
FP16 モデルと INT8 モデルの推論時間を比較
FP16 および INT8 パイプラインの推論パフォーマンスを測定するには、キャリブレーション・サブセットの推論時間の中央値を使用します。
注: 最も正確なパフォーマンス推定を行うには、他のアプリケーションを閉じた後、ターミナル/コマンドプロンプトで
benchmark_appを実行することを推奨します。
%%skip not $to_quantize.value

import time

validation_size = 10
calibration_dataset = datasets.load_dataset("fusing/instructpix2pix-1000-samples", split="train", streaming=True).take(validation_size)
validation_data = []
for batch in calibration_dataset:
    prompt = batch["edit_prompt"]
    image = batch["input_image"]
    control_image = processor(image)
    validation_data.append((prompt, control_image))

def calculate_inference_time(pipeline, calibration_dataset):
    inference_time = []
    pipeline.set_progress_bar_config(disable=True)
    for prompt, control_image in calibration_dataset:
        start = time.perf_counter()
        _ = pipeline(prompt, control_image, num_inference_steps=4)
        end = time.perf_counter()
        delta = end - start
        inference_time.append(delta)
    return np.median(inference_time)
%%skip not $to_quantize.value

fp_latency = calculate_inference_time(ov_pipe, validation_data)
int8_latency = calculate_inference_time(int8_pipe, validation_data)
print(f"Performance speed up: {fp_latency / int8_latency:.3f}")
Performance speed up: 1.257
モデルのファイルサイズを比較
%%skip not $to_quantize.value

fp16_ir_model_size = UNET_OV_PATH.with_suffix(".bin").stat().st_size / 2**20
quantized_model_size = UNET_INT8_OV_PATH.with_suffix(".bin").stat().st_size / 2**20

print(f"FP16 UNet size: {fp16_ir_model_size:.2f} MB")
print(f"INT8 UNet size: {quantized_model_size:.2f} MB")
print(f"UNet compression rate: {fp16_ir_model_size / quantized_model_size:.3f}")
FP16 UNet size: 1639.41 MB
INT8 UNet size: 820.96 MB
UNet compression rate: 1.997
%%skip not $to_quantize.value

fp16_ir_model_size = CONTROLNET_OV_PATH.with_suffix(".bin").stat().st_size / 2**20
quantized_model_size = CONTROLNET_INT8_OV_PATH.with_suffix(".bin").stat().st_size / 2**20

print(f"FP16 ControlNet size: {fp16_ir_model_size:.2f} MB")
print(f"INT8 ControlNet size: {quantized_model_size:.2f} MB")
print(f"ControlNet compression rate: {fp16_ir_model_size / quantized_model_size:.3f}")
FP16 ControlNet size: 689.07 MB
INT8 ControlNet size: 345.12 MB
ControlNet compression rate: 1.997
インタラクティブなデモ
これで、独自のイメージでモデルをテストできるようになりました。[Input Image] ウィンドウに画像を入力し、生成を求めるプロンプトが表示されたら、[Run] ボタンをクリックしてください。最良の結果を達成するため、生成用の追加オプション (ガイダンススケール、シード、ステップ) を選択することもできます。
import gradio as gr
MAX_SEED = np.iinfo(np.int32).max

quantized_model_present = int8_pipe is not None

gr.close_all()
with gr.Blocks() as demo:
    with gr.Row():
        with gr.Column():
            inp_img = gr.Image(label="Input image")
        with gr.Column(visible=True) as step1:
            out_normal = gr.Image(label="Normal Map", type='pil', interactive=False)
            btn = gr.Button()
            inp_prompt = gr.Textbox(label="Prompt")
            inp_neg_prompt = gr.Textbox(
                "",
                label="Negative prompt",
            )
            with gr.Accordion("Advanced options", open=False):
                guidance_scale = gr.Slider(
                    label="Guidance scale",
                    minimum=0.1,
                    maximum=2,
                    step=0.1,
                    value=0.5,
                )
                inp_seed = gr.Slider(label="Seed", value=42, maximum=MAX_SEED)
                inp_steps = gr.Slider(label="Steps", value=4, minimum=1, maximum=50, step=1)
        with gr.Column(visible=True) as step2:
            out_result = gr.Image(label="Result (Original)")
        with gr.Column(visible=quantized_model_present) as quantization_step:
            int_result = gr.Image(label="Result (Quantized)")
    examples = gr.Examples([["example.png", "a head full of roses"]], [inp_img, inp_prompt])

    def extract_normal_map(img):
        if img is None:
            raise gr.Error("Please upload the image or use one from the examples list")
        return processor(img)

    def generate(img, prompt, negative_prompt, seed, num_steps, guidance_scale):
        torch.manual_seed(seed)
        control_img = extract_normal_map(img)

        result = ov_pipe(prompt, control_img, num_steps, guidance_scale=guidance_scale, negative_prompt=negative_prompt)[0]
        if int8_pipe is not None:
            torch.manual_seed(seed)
            int8_result = int8_pipe(prompt, control_img, num_steps, guidance_scale=guidance_scale, negative_prompt=negative_prompt)[0]
            return control_img, result, int8_result
        return control_img, result

    output_images = [out_normal, out_result]
    if quantized_model_present:
        output_images.append(int_result)
    btn.click(generate, [inp_img, inp_prompt, inp_neg_prompt, inp_seed, inp_steps, guidance_scale], output_images)


try:
    demo.queue().launch(debug=False)
except Exception:
    demo.queue().launch(share=True, debug=False, height=800)
# if you are launching remotely, specify server_name and server_port
# demo.launch(server_name='your server name', server_port='server port in int')
# Read more in the docs: https://gradio.app/docs/