OpenVINO™ による車両の検出と認識
この Jupyter ノートブックはオンラインで起動でき、ブラウザーのウィンドウで対話型環境を開きます。ローカルにインストールすることもできます。次のオプションのいずれかを選択します。


このチュートリアルでは、Open Model Zoo の 2 つの事前トレーニング済みモデル、物体検出用の vehicle-detection-0200 と画像分類用の vehicle-attributes-recognition-barrier-0039 の使用方法を説明します。これらのモデルを使用して、生の画像から車両を検出し、検出された車両の属性を認識します。
その結果、次が得られます。
結果
目次
インポート
必要なモジュールをインポートします。
%pip install -q "openvino>=2023.1.0"
DEPRECATION: pytorch-lightning 1.6.5 has a non-standard dependency specifier torch>=1.8.*. pip 24.1 will enforce this behaviour change. A possible replacement is to upgrade to a newer version of pytorch-lightning or contact the author to suggest that they release a version with a conforming dependency specifiers. Discussion can be found at https://github.com/pypa/pip/issues/12063
Note: you may need to restart the kernel to use updated packages.
import os
import sys
from pathlib import Path
from typing import Tuple

import cv2
import numpy as np
import matplotlib.pyplot as plt
import openvino as ov

sys.path.append("../utils")
import notebook_utils as utils
モデルのダウンロード
事前トレーニング済みモデルを https://storage.openvinotoolkit.org/repositories/open_model_zoo からダウンロードします。モデルがすでにダウンロードされている場合、この手順はスキップされます。
注: モデルを変更するには、以下のコード内のモデル名を
"vehicle-detection-0201"または"vehicle-detection-0202"などに置き換えます。検出ではさまざまな画像入力サイズがサポートされます。また、認識モデルを"vehicle-attributes-recognition-barrier-0042"に変更することもできます。これらは、さまざまなディープラーニング・フレームからトレーニングされます。精度を変更したい場合は、"FP32"、"FP16"、または"FP16-INT8"の精度値を変更する必要があります。タイプが異なると、モデルのサイズと精度値が異なります。
# A directory where the model will be downloaded.
base_model_dir = Path("model")
# The name of the model from Open Model Zoo.
detection_model_name = "vehicle-detection-0200"
recognition_model_name = "vehicle-attributes-recognition-barrier-0039"
# Selected precision (FP32, FP16, FP16-INT8)
precision = "FP32"

base_model_url = "https://storage.openvinotoolkit.org/repositories/open_model_zoo/2023.0/models_bin/1"

# Check if the model exists.
detection_model_url = (
    f"{base_model_url}/{detection_model_name}/{precision}/{detection_model_name}.xml"
)
recognition_model_url = (
    f"{base_model_url}/{recognition_model_name}/{precision}/{recognition_model_name}.xml"
)
detection_model_path = (base_model_dir / detection_model_name).with_suffix('.xml')
recognition_model_path = (base_model_dir / recognition_model_name).with_suffix('.xml')

# Download the detection model.
if not detection_model_path.exists():
    utils.download_file(detection_model_url, detection_model_name + '.xml', base_model_dir)
    utils.download_file(detection_model_url.replace('.xml', '.bin'), detection_model_name + '.bin', base_model_dir)
# Download the recognition model.
if not os.path.exists(recognition_model_path):
    utils.download_file(recognition_model_url, recognition_model_name + '.xml', base_model_dir)
    utils.download_file(recognition_model_url.replace('.xml', '.bin'), recognition_model_name + '.bin', base_model_dir)
model/vehicle-detection-0200.xml: 0%| | 0.00/181k [00:00<?, ?B/s]
model/vehicle-detection-0200.bin: 0%| | 0.00/6.93M [00:00<?, ?B/s]
model/vehicle-attributes-recognition-barrier-0039.xml: 0%| | 0.00/33.7k [00:00<?, ?B/s]
model/vehicle-attributes-recognition-barrier-0039.bin: 0%| | 0.00/2.39M [00:00<?, ?B/s]
モデルのロード
このチュートリアルでは、検出モデルと認識モデルが必要です。モデルをダウンロードした後、OpenVINO ランタイムを初期化し、read_model() を使用して *.xml および *.bin ファイルからネットワーク・アーキテクチャーと重みを読み取ります。次に、compile_model() を使用して指定するデバイスにコンパイルします。
import ipywidgets as widgets

core = ov.Core()

device = widgets.Dropdown(
    options=core.available_devices + ["AUTO"],
    value='AUTO',
    description='Device:',
    disabled=False,
)

device
Dropdown(description='Device:', index=1, options=('CPU', 'AUTO'), value='AUTO')
# Initialize OpenVINO Runtime runtime.
core = ov.Core()


def model_init(model_path: str) -> Tuple:
    """
    Read the network and weights from file, load the
    model on the CPU and get input and output names of nodes

    :param: model: model architecture path *.xml
    :retuns:
            input_key: Input node network
            output_key: Output node network
            exec_net: Encoder model network
            net: Model network
    """

    # Read the network and corresponding weights from a file.
    model = core.read_model(model=model_path)
    compiled_model = core.compile_model(model=model, device_name=device.value)
    # Get input and output names of nodes.
    input_keys = compiled_model.input(0)
    output_keys = compiled_model.output(0)
    return input_keys, output_keys, compiled_model
モデルから属性を取得
input_keys.shape を使用してデータ形状を取得します。
# de -> detection
# re -> recognition
# Detection model initialization.
input_key_de, output_keys_de, compiled_model_de = model_init(detection_model_path)
# Recognition model initialization.
input_key_re, output_keys_re, compiled_model_re = model_init(recognition_model_path)

# Get input size - Detection.
height_de, width_de = list(input_key_de.shape)[2:]
# Get input size - Recognition.
height_re, width_re = list(input_key_re.shape)[2:]
ヘルパー関数
画像を表示するには plt_show() 関数を使用します。
def plt_show(raw_image):
    """
    Use matplot to show image inline
    raw_image: input image

    :param: raw_image:image array
    """
    plt.figure(figsize=(10, 6))
    plt.axis("off")
    plt.imshow(raw_image)
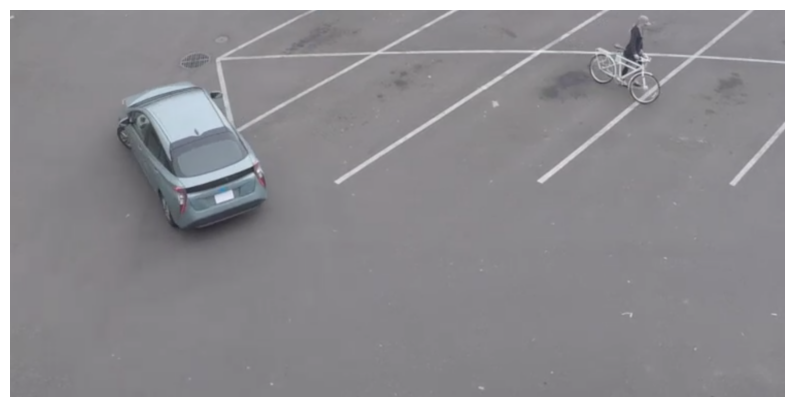
テスト画像を読み取って表示
検出モデルの入力形状は [1, 3, 256, 256] です。したがって、画像のサイズを 256 x 256 に変更し、expand_dims 関数を使用してバッチチャネルを拡張する必要があります。
# Load an image.
url = "https://storage.openvinotoolkit.org/data/test_data/images/person-bicycle-car-detection.bmp"
filename = "cars.jpg"
directory = "data"
image_file = utils.download_file(
    url, filename=filename, directory=directory, show_progress=False, silent=True,timeout=30
)
assert Path(image_file).exists()

# Read the image.
image_de = cv2.imread("data/cars.jpg")
# Resize it to [3, 256, 256].
resized_image_de = cv2.resize(image_de, (width_de, height_de))
# Expand the batch channel to [1, 3, 256, 256].
input_image_de = np.expand_dims(resized_image_de.transpose(2, 0, 1), 0)
# Show the image.
plt_show(cv2.cvtColor(image_de, cv2.COLOR_BGR2RGB))
検出モデルを使用して車両を検出
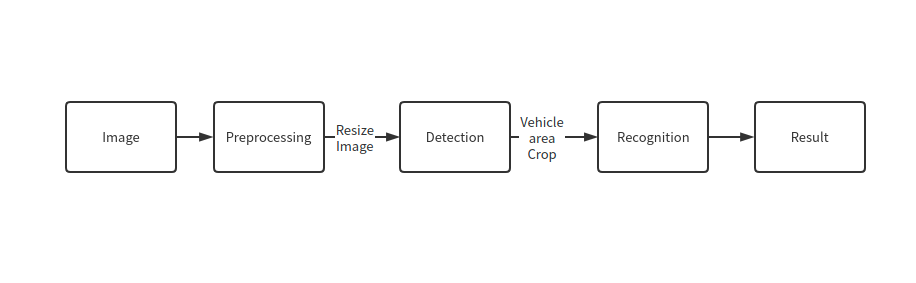
パイプライン
フローチャートに示すように、個々の車両の画像が認識モデルに送信されます。まず、infer 関数を使用して結果を取得します。
検出モデルの出力の形式は [image_id, label, conf, x_min, y_min, x_max, y_max] です。
説明:
image_id- バッチ内の画像の IDlabel- 予測されたクラス ID (0 - 車両)conf- 予測されたクラスの信頼度(x_min, y_min)- 境界ボックスの左上隅の座標(x_max, y_max)- 境界ボックスの右下隅の座標
未使用の次元を削除し、使用されていない結果をフィルターで除外します。
# Run inference.
boxes = compiled_model_de([input_image_de])[output_keys_de]
# Delete the dim of 0, 1.
boxes = np.squeeze(boxes, (0, 1))
# Remove zero only boxes.
boxes = boxes[~np.all(boxes == 0, axis=1)]
検出処理
以下の関数を使用して、画像内の実際の位置に対する比率を変更し、信頼性の低い結果を除外します。
def crop_images(bgr_image, resized_image, boxes, threshold=0.6) -> np.ndarray:
    """
    Use bounding boxes from detection model to find the absolute car position

    :param: bgr_image: raw image
    :param: resized_image: resized image
    :param: boxes: detection model returns rectangle position
    :param: threshold: confidence threshold
    :returns: car_position: car's absolute position
    """
    # Fetch image shapes to calculate ratio
    (real_y, real_x), (resized_y, resized_x) = bgr_image.shape[:2], resized_image.shape[:2]
    ratio_x, ratio_y = real_x / resized_x, real_y / resized_y

    # Find the boxes ratio
    boxes = boxes[:, 2:]
    # Store the vehicle's position
    car_position = []
    # Iterate through non-zero boxes
    for box in boxes:
        # Pick confidence factor from last place in array
        conf = box[0]
        if conf > threshold:
            # Convert float to int and multiply corner position of each box by x and y ratio
            # In case that bounding box is found at the top of the image,
            # upper box  bar should be positioned a little bit lower to make it visible on image
            (x_min, y_min, x_max, y_max) = [
                int(max(corner_position * ratio_y * resized_y, 10)) if idx % 2
                else int(corner_position * ratio_x * resized_x)
                for idx, corner_position in enumerate(box[1:])
            ]

            car_position.append([x_min, y_min, x_max, y_max])

    return car_position
# Find the position of a car.
car_position = crop_images(image_de, resized_image_de, boxes)
車両の属性を認識
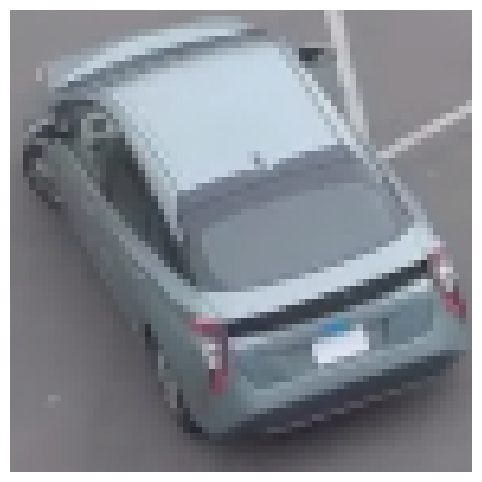
検出されたボックスのいずれかを選択します。次に、車両が含まれるエリアを切り取って、認識モデルをテストします。ここでも、入力画像のサイズを変更して推論を行う必要があります。
# Select a vehicle to recognize.
pos = car_position[0]
# Crop the image with [y_min:y_max, x_min:x_max].
test_car = image_de[pos[1]:pos[3], pos[0]:pos[2]]
# Resize the image to input_size.
resized_image_re = cv2.resize(test_car, (width_re, height_re))
input_image_re = np.expand_dims(resized_image_re.transpose(2, 0, 1), 0)
plt_show(cv2.cvtColor(resized_image_re, cv2.COLOR_BGR2RGB))
認識処理
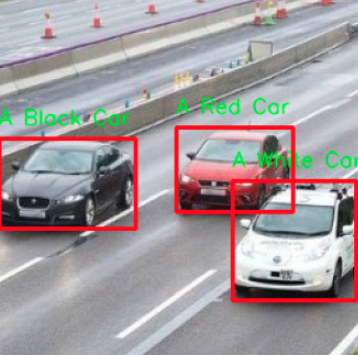
結果には、車両の色 (白、グレー、黄、赤、緑、青、黒) と車両の種類 (乗用車、バス、トラック、バン) が含まれます。次に、各属性の確率を計算する必要があります。次に、結果として最大確率を決定します。
def vehicle_recognition(compiled_model_re, input_size, raw_image):
    """
    Vehicle attributes recognition, input a single vehicle, return attributes
    :param: compiled_model_re: recognition net
    :param: input_size: recognition input size
    :param: raw_image: single vehicle image
    :returns: attr_color: predicted color
                       attr_type: predicted type
    """
    # An attribute of a vehicle.
    colors = ['White', 'Gray', 'Yellow', 'Red', 'Green', 'Blue', 'Black']
    types = ['Car', 'Bus', 'Truck', 'Van']

    # Resize the image to input size.
    resized_image_re = cv2.resize(raw_image, input_size)
    input_image_re = np.expand_dims(resized_image_re.transpose(2, 0, 1), 0)

    # Run inference.
    # Predict result.
    predict_colors = compiled_model_re([input_image_re])[compiled_model_re.output(1)]
    # Delete the dim of 2, 3.
    predict_colors = np.squeeze(predict_colors, (2, 3))
    predict_types = compiled_model_re([input_image_re])[compiled_model_re.output(0)]
    predict_types = np.squeeze(predict_types, (2, 3))

    attr_color, attr_type = (colors[np.argmax(predict_colors)],
                             types[np.argmax(predict_types)])
    return attr_color, attr_type
print(f"Attributes:{vehicle_recognition(compiled_model_re, (72, 72), test_car)}")
Attributes:('Gray', 'Car')
2 つのモデルを組み合わせ
これで完了です。検出モデルを使用して、車両が含まれる画像をトリミングし、車両の属性を認識することに成功しました。
def convert_result_to_image(compiled_model_re, bgr_image, resized_image, boxes, threshold=0.6):
    """
    Use Detection model boxes to draw rectangles and plot the result

    :param: compiled_model_re: recognition net
    :param: input_key_re: recognition input key
    :param: bgr_image: raw image
    :param: resized_image: resized image
    :param: boxes: detection model returns rectangle position
    :param: threshold: confidence threshold
    :returns: rgb_image: processed image
    """
    # Define colors for boxes and descriptions.
    colors = {"red": (255, 0, 0), "green": (0, 255, 0)}

    # Convert the base image from BGR to RGB format.
    rgb_image = cv2.cvtColor(bgr_image, cv2.COLOR_BGR2RGB)

    # Find positions of cars.
    car_position = crop_images(image_de, resized_image, boxes)

    for x_min, y_min, x_max, y_max in car_position:
        # Run vehicle recognition inference.
        attr_color, attr_type = vehicle_recognition(compiled_model_re, (72, 72),
                                                    image_de[y_min:y_max, x_min:x_max])

        # Close the window with a vehicle.
        plt.close()

        # Draw a bounding box based on position.
        # Parameters in the `rectangle` function are: image, start_point, end_point, color, thickness.
        rgb_image = cv2.rectangle(rgb_image, (x_min, y_min), (x_max, y_max), colors["red"], 2)

        # Print the attributes of a vehicle.
        # Parameters in the `putText` function are: img, text, org, fontFace, fontScale, color, thickness, lineType.
        rgb_image = cv2.putText(
            rgb_image,
            f"{attr_color} {attr_type}",
            (x_min, y_min - 10),
            cv2.FONT_HERSHEY_SIMPLEX,
            2,
            colors["green"],
            10,
            cv2.LINE_AA
        )

    return rgb_image
plt_show(convert_result_to_image(compiled_model_re, image_de, resized_image_de, boxes))
