OpenVINO™ を使用した YOLOv8 キーポイント検出モデルの変換と最適化
この Jupyter ノートブックはオンラインで起動でき、ブラウザーのウィンドウで対話型環境を開きます。ローカルにインストールすることもできます。次のオプションのいずれかを選択します。


キーポイント検出/ポーズは、画像またはビデオフレーム内の特定のポイントを検出するタスクです。これらのポイントはキーポイントと呼ばれ、動きを追跡したり姿勢を推定したりするのに使用されます。YOLOv8 は、画像またはビデオフレーム内のキーポイントを高精度かつ高速に検出できます。
このチュートリアルでは、OpenVINO を使用して PyTorch PyTorch YOLOv8 ポーズモデルを実行および最適化する手順を段階的に説明します。キーポイント検出シナリオに必要な手順を検討します。
チュートリアルは次の手順で構成されています。
- PyTorch モデルを準備します。
- データセットをダウンロードして準備します。
- 元のモデルを検証します。
- PyTorch モデルを OpenVINO IR に変換します。
- 変換されたモデルを検証します。
- 最適化パイプラインを準備して実行します。
- FP32 モデルと量子化モデルのパフォーマンスを比較します。
- FP32 モデルと量子化モデルの精度を比較します。
- ライブデモ
目次
PyTorch モデルの取得
一般に、PyTorch モデルは、モデルの重みを含む状態辞書によって初期化された torch.nn.Module クラスのインスタンスを表します。このリポジトリーで入手可能な、COCO データセットで事前トレーニングされた YOLOv8 nano モデル (yolov8n とも呼ばれる) を使用します。この手順は他の YOLOv8 モデルにも適用できます。事前トレーニングされたモデルを取得する一般的な手順は次のとおりです。
- クラスのインスタンスを作成します。
- 事前トレーニングされたモデルの重みを含むチェックポイント状態辞書をロードします。
- 一部の操作を推論モードに切り替えるためモデルを評価に切り替えます。
この場合、モデルの作成者は、YOLOv8 モデルを ONNX に変換してから OpenVINO IR に変換できる API を提供します。したがって、これらの手順を手動で実行する必要はありません。
必要条件
必要なパッケージをインストールします。
%pip install -q "openvino>=2023.1.0" "nncf>=2.5.0" "protobuf==3.20.*" "torch>=2.1" "torchvision>=0.16" "ultralytics==8.0.159" "onnx" --extra-index-url https://download.pytorch.org/whl/cpu
必要なユーティリティー関数をインポートします。下のセルは、GitHub から notebook_utils Python モジュールをダウンロードします。
from pathlib import Path

# Fetch the notebook utils script from the openvino_notebooks repo
import urllib.request
urllib.request.urlretrieve(
    url='https://raw.githubusercontent.com/openvinotoolkit/openvino_notebooks/main/notebooks/utils/notebook_utils.py',
    filename='notebook_utils.py'
)

from notebook_utils import download_file, VideoPlayer
描画結果のユーティリティー関数を定義します。
from typing import Tuple, Dict
import cv2
import numpy as np
from PIL import Image
from ultralytics.utils.plotting import colors


def plot_one_box(box:np.ndarray, img:np.ndarray, color:Tuple[int, int, int] = None, keypoints:np.ndarray = None, label:str = None, line_thickness:int = 5):
    """
    Helper function for drawing single bounding box on image
    Parameters:
        box (np.ndarray): bounding box coordinates in format [x1, y1, x2, y2]
        img (no.ndarray): input image
        color (Tuple[int, int, int], *optional*, None): color in BGR format for drawing box, if not specified will be selected randomly
        keypoints (np.ndarray, *optional*, None): keypoints in format [x1, y1, s], x1, y1 - keypoint coordinates, s - the confidence scores,
                                                  if not provided, only box will be drawn
        label (str, *optonal*, None): box label string, if not provided will not be provided as drowing result
        line_thickness (int, *optional*, 5): thickness for box drawing lines
    """
    # Plots one bounding box on image img
    tl = line_thickness or round(0.002 * (img.shape[0] + img.shape[1]) / 2) + 1  # line/font thickness
    color = color or [random.randint(0, 255) for _ in range(3)]
    c1, c2 = (int(box[0]), int(box[1])), (int(box[2]), int(box[3]))
    cv2.rectangle(img, c1, c2, color, thickness=tl, lineType=cv2.LINE_AA)
    if label:
        tf = max(tl - 1, 1)  # font thickness
        t_size = cv2.getTextSize(label, 0, fontScale=tl / 3, thickness=tf)[0]
        c2 = c1[0] + t_size[0], c1[1] - t_size[1] - 3
        cv2.rectangle(img, c1, c2, color, -1, cv2.LINE_AA)  # filled
        cv2.putText(img, label, (c1[0], c1[1] - 2), 0, tl / 3, [225, 255, 255], thickness=tf, lineType=cv2.LINE_AA)
    if keypoints is not None:
        kpt_color = colors.pose_palette[[16, 16, 16, 16, 16, 0, 0, 0, 0, 0, 0, 9, 9, 9, 9, 9, 9]]
        skeleton = [[16, 14], [14, 12], [17, 15], [15, 13], [12, 13], [6, 12], [7, 13], [6, 7], [6, 8],
                    [7, 9], [8, 10], [9, 11], [2, 3], [1, 2], [1, 3], [2, 4], [3, 5], [4, 6], [5, 7]]
        limb_color = colors.pose_palette[[9, 9, 9, 9, 7, 7, 7, 0, 0, 0, 0, 0, 16, 16, 16, 16, 16, 16, 16]]
        shape = img.shape[:2]
        for i, k in enumerate(keypoints):
            color_k = [int(x) for x in kpt_color[i]]
            x_coord, y_coord = k[0], k[1]
            if x_coord % shape[1] != 0 and y_coord % shape[0] != 0:
                if len(k) == 3:
                    if k[2] < 0.5:
                        continue
                cv2.circle(img, (int(x_coord), int(y_coord)), 5, color_k, -1, lineType=cv2.LINE_AA)

        ndim = keypoints.shape[-1]
        for i, sk in enumerate(skeleton):
            pos1 = (int(keypoints[(sk[0] - 1), 0]), int(keypoints[(sk[0] - 1), 1]))
            pos2 = (int(keypoints[(sk[1] - 1), 0]), int(keypoints[(sk[1] - 1), 1]))
            if ndim == 3:
                conf1 = keypoints[(sk[0] - 1), 2]
                conf2 = keypoints[(sk[1] - 1), 2]
                if conf1 < 0.5 or conf2 < 0.5:
                    continue
            if pos1[0] % shape[1] == 0 or pos1[1] % shape[0] == 0 or pos1[0] < 0 or pos1[1] < 0:
                continue
            if pos2[0] % shape[1] == 0 or pos2[1] % shape[0] == 0 or pos2[0] < 0 or pos2[1] < 0:
                continue
            cv2.line(img, pos1, pos2, [int(x) for x in limb_color[i]], thickness=2, lineType=cv2.LINE_AA)

    return img


def draw_results(results:Dict, source_image:np.ndarray, label_map:Dict):
    """
    Helper function for drawing bounding boxes on image
    Parameters:
        image_res (np.ndarray): detection predictions in format [x1, y1, x2, y2, score, label_id]
        source_image (np.ndarray): input image for drawing
        label_map; (Dict[int, str]): label_id to class name mapping
    """
    boxes = results["box"]
    keypoints = results.get("kpt")
    h, w = source_image.shape[:2]
    for idx, (*xyxy, conf, lbl) in enumerate(boxes):
        if conf < 0.4:
            continue
        label = f'{label_map[0]} {conf:.2f}'
        kp = keypoints[idx] if keypoints is not None else None
        source_image = plot_one_box(xyxy, source_image, keypoints=kp, label=label, color=colors(int(lbl)), line_thickness=1)
    return source_image
# Download a test sample
IMAGE_PATH = Path('./data/intel_rnb.jpg')
download_file(
    url='https://storage.openvinotoolkit.org/repositories/openvino_notebooks/data/data/image/intel_rnb.jpg',
    filename=IMAGE_PATH.name,
    directory=IMAGE_PATH.parent
)
'data/intel_rnb.jpg' already exists.
PosixPath('/home/ea/work/openvino_notebooks/notebooks/230-yolov8-optimization/data/intel_rnb.jpg')
モデルのインスタンス化
モデルをロードするには、モデル・チェックポイントへのパスを指定する必要があります。モデルハブで使用可能なローカルパスまたは名前にすることができます (この場合、モデル・チェックポイントは自動的にダウンロードされます)。
予測を行う際、モデルは入力画像へのパスを受け入れ、Results クラス・オブジェクトを含むリストを返します。結果にはボックスと重要なポイントが含まれます。また、描画用の plot() メソッドなど、結果を処理するユーティリティーも含まれています。
例を考えてみましょう。
models_dir = Path('./models')
models_dir.mkdir(exist_ok=True)
from ultralytics import YOLO
POSE_MODEL_NAME = "yolov8n-pose"
pose_model = YOLO(models_dir / f'{POSE_MODEL_NAME}.pt')
label_map = pose_model.model.names
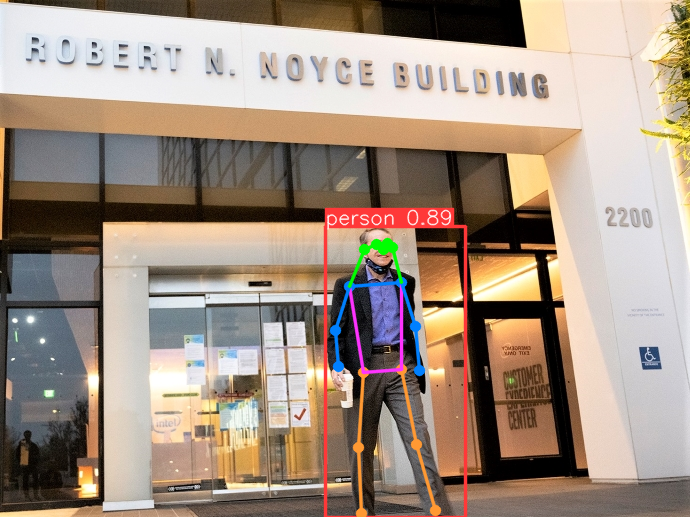
res = pose_model(IMAGE_PATH)
Image.fromarray(res[0].plot()[:, :, ::-1])
image 1/1 /home/ea/work/openvino_notebooks/notebooks/230-yolov8-optimization/data/intel_rnb.jpg: 480x640 1 person, 52.6ms
Speed: 2.1ms preprocess, 52.6ms inference, 1.3ms postprocess per image at shape (1, 3, 480, 640)
モデルを OpenVINO IR に変換
YOLOv8 は、OpenVINO IR を含むさまざまな形式にモデルをエクスポートする便利な API を提供します。model.export はモデルの変換を担当します。形式を指定する必要があり、さらにモデル内の動的な形状を保持することもできます。
# object detection model
pose_model_path = models_dir / f"{POSE_MODEL_NAME}_openvino_model/{POSE_MODEL_NAME}.xml"
if not pose_model_path.exists():
    pose_model.export(format="openvino", dynamic=True, half=False)
モデルの推論を検証
モデルの動作をテストするため、model.predict メソッドに似た推論パイプラインを作成します。パイプラインは、前処理ステップ、OpenVINO モデルの推論、および結果を取得する後処理で構成されます。
前処理
モデル入力は、[-1, 3, -1, -1] の形状を持つテンソルで、N, C, H, W 形式です。
説明:
N- バッチ内の画像数 (バッチサイズ)C- 画像チャネルH- 画像の高さW- 画像の幅
モデルは、RGB チャネル形式で [0, 1] の範囲で正規化された画像を想定しています。モデルは入力の割り切れる数を 32 に維持しながら動的な入力形状をサポートしますが、効率を高めるには 640x640 などの静的な形状を使用することをお勧めします。モデルのサイズに合わせて画像のサイズを変更するには、幅と高さのアスペクト比が維持されるレターボックスのサイズ変更アプローチが使用されます。
特定の形状を維持するため、前処理によってパディングが自動的に有効になります。
from typing import Tuple
import torch
import numpy as np


def letterbox(img: np.ndarray, new_shape:Tuple[int, int] = (640, 640), color:Tuple[int, int, int] = (114, 114, 114), auto:bool = False, scale_fill:bool = False, scaleup:bool = False, stride:int = 32):
    """
    Resize image and padding for detection. Takes image as input,
    resizes image to fit into new shape with saving original aspect ratio and pads it to meet stride-multiple constraints

    Parameters:
      img (np.ndarray): image for preprocessing
      new_shape (Tuple(int, int)): image size after preprocessing in format [height, width]
      color (Tuple(int, int, int)): color for filling padded area
      auto (bool): use dynamic input size, only padding for stride constrins applied
      scale_fill (bool): scale image to fill new_shape
      scaleup (bool): allow scale image if it is lower then desired input size, can affect model accuracy
      stride (int): input padding stride
    Returns:
      img (np.ndarray): image after preprocessing
      ratio (Tuple(float, float)): hight and width scaling ratio
      padding_size (Tuple(int, int)): height and width padding size


    """
    # Resize and pad image while meeting stride-multiple constraints
    shape = img.shape[:2]  # current shape [height, width]
    if isinstance(new_shape, int):
        new_shape = (new_shape, new_shape)

    # Scale ratio (new / old)
    r = min(new_shape[0] / shape[0], new_shape[1] / shape[1])
    if not scaleup:  # only scale down, do not scale up (for better test mAP)
        r = min(r, 1.0)

    # Compute padding
    ratio = r, r  # width, height ratios
    new_unpad = int(round(shape[1] * r)), int(round(shape[0] * r))
    dw, dh = new_shape[1] - new_unpad[0], new_shape[0] - new_unpad[1]  # wh padding
    if auto:  # minimum rectangle
        dw, dh = np.mod(dw, stride), np.mod(dh, stride)  # wh padding
    elif scale_fill:  # stretch
        dw, dh = 0.0, 0.0
        new_unpad = (new_shape[1], new_shape[0])
        ratio = new_shape[1] / shape[1], new_shape[0] / shape[0]  # width, height ratios

    dw /= 2  # divide padding into 2 sides
    dh /= 2

    if shape[::-1] != new_unpad:  # resize
        img = cv2.resize(img, new_unpad, interpolation=cv2.INTER_LINEAR)
    top, bottom = int(round(dh - 0.1)), int(round(dh + 0.1))
    left, right = int(round(dw - 0.1)), int(round(dw + 0.1))
    img = cv2.copyMakeBorder(img, top, bottom, left, right, cv2.BORDER_CONSTANT, value=color)  # add border
    return img, ratio, (dw, dh)


def preprocess_image(img0: np.ndarray):
    """
    Preprocess image according to YOLOv8 input requirements.
    Takes image in np.array format, resizes it to specific size using letterbox resize and changes data layout from HWC to CHW.

    Parameters:
      img0 (np.ndarray): image for preprocessing
    Returns:
      img (np.ndarray): image after preprocessing
    """
    # resize
    img = letterbox(img0)[0]

    # Convert HWC to CHW
    img = img.transpose(2, 0, 1)
    img = np.ascontiguousarray(img)
    return img


def image_to_tensor(image:np.ndarray):
    """
    Preprocess image according to YOLOv8 input requirements.
    Takes image in np.array format, resizes it to specific size using letterbox resize and changes data layout from HWC to CHW.

    Parameters:
      img (np.ndarray): image for preprocessing
    Returns:
      input_tensor (np.ndarray): input tensor in NCHW format with float32 values in [0, 1] range
    """
    input_tensor = image.astype(np.float32)  # uint8 to fp32
    input_tensor /= 255.0  # 0 - 255 to 0.0 - 1.0

    # add batch dimension
    if input_tensor.ndim == 3:
        input_tensor = np.expand_dims(input_tensor, 0)
    return input_tensor
後処理
モデル出力には検出ボックス候補が含まれており、B,56,N 形式の [-1,56,-1] 形状のテンソルです。
説明:
B- バッチサイズN- 検出ボックスの数
最終的な予測を得るには、非最大抑制アルゴリズムを適用して、ボックス座標を元の画像サイズに再スケーリングする必要があります。
予測後の検出ボックスの形式は [x, y, h, w, detection_precision, class_id, keypoint_1_x, keypoint_1_y, keypoint_1_score, …, keypoint_17_x, keypoint_17_y, keypoint_17_score] です。
説明:
(
x,y) - ボックス中心の生座標h,w- ボックスの生の高さと幅detection_precision- クラス上の確率分布class_id- この場合クラスは 1 つだけ (person)(
keypoint_1_x,keypoint_1_y) - 17 個のキーポイントのうちの 1 つの生の座標keypoint_1_score- 信頼スコア
from ultralytics.utils import ops

def postprocess(
    pred_boxes:np.ndarray,
    input_hw:Tuple[int, int],
    orig_img:np.ndarray,
    min_conf_threshold:float = 0.25,
    nms_iou_threshold:float = 0.45,
    agnosting_nms:bool = False,
    max_detections:int = 80,
):
    """
    YOLOv8 model postprocessing function. Applied non maximum supression algorithm to detections and rescale boxes to original image size
    Parameters:
        pred_boxes (np.ndarray): model output prediction boxes
        input_hw (np.ndarray): preprocessed image
        orig_image (np.ndarray): image before preprocessing
        min_conf_threshold (float, *optional*, 0.25): minimal accepted confidence for object filtering
        nms_iou_threshold (float, *optional*, 0.45): minimal overlap score for removing objects duplicates in NMS
        agnostic_nms (bool, *optiona*, False): apply class agnostinc NMS approach or not
        max_detections (int, *optional*, 300):  maximum detections after NMS
    Returns:
       pred (List[Dict[str, np.ndarray]]): list of dictionary with det - detected boxes in format [x1, y1, x2, y2, score, label] and
                                           kpt - 17 keypoints in format [x1, y1, score1]
    """
    nms_kwargs = {"agnostic": agnosting_nms, "max_det":max_detections}
    preds = ops.non_max_suppression(
        torch.from_numpy(pred_boxes),
        min_conf_threshold,
        nms_iou_threshold,
        nc=1,
        **nms_kwargs
    )

    results = []

    kpt_shape = [17, 3]
    for i, pred in enumerate(preds):
        shape = orig_img[i].shape if isinstance(orig_img, list) else orig_img.shape
        pred[:, :4] = ops.scale_boxes(input_hw, pred[:, :4], shape).round()
        pred_kpts = pred[:, 6:].view(len(pred), *kpt_shape) if len(pred) else pred[:, 6:]
        pred_kpts = ops.scale_coords(input_hw, pred_kpts, shape)
        results.append({"box": pred[:, :6].numpy(), 'kpt': pred_kpts.numpy()})

    return results
推論デバイスの選択
OpenVINO を使用して推論を実行するデバイスをドロップダウン・リストから選択します。
import ipywidgets as widgets
import openvino as ov

core = ov.Core()

device = widgets.Dropdown(
    options=core.available_devices + ["AUTO"],
    value='AUTO',
    description='Device:',
    disabled=False,
)

device
Dropdown(description='Device:', index=2, options=('CPU', 'GPU', 'AUTO'), value='AUTO')
単一の画像でテスト
前処理と後処理の手順を定義したら、モデルの予測を確認する準備が整いました。
core = ov.Core()
pose_ov_model = core.read_model(pose_model_path)
if device.value != "CPU":
    pose_ov_model.reshape({0: [1, 3, 640, 640]})
pose_compiled_model = core.compile_model(pose_ov_model, device.value)


def detect(image:np.ndarray, model:ov.Model):
    """
    OpenVINO YOLOv8 model inference function. Preprocess image, runs model inference and postprocess results using NMS.
    Parameters:
        image (np.ndarray): input image.
        model (Model): OpenVINO compiled model.
    Returns:
        detections (np.ndarray): list of dictionary with det - detected boxes in format [x1, y1, x2, y2, score, label] and
                                 kpt - 17 keypoints in format [x1, y1, score1]
    """
    preprocessed_image = preprocess_image(image)
    input_tensor = image_to_tensor(preprocessed_image)
    result = model(input_tensor)
    boxes = result[model.output(0)]
    input_hw = input_tensor.shape[2:]
    detections = postprocess(pred_boxes=boxes, input_hw=input_hw, orig_img=image)
    return detections

input_image = np.array(Image.open(IMAGE_PATH))
detections = detect(input_image, pose_compiled_model)[0]
image_with_boxes = draw_results(detections, input_image, label_map)

Image.fromarray(image_with_boxes)
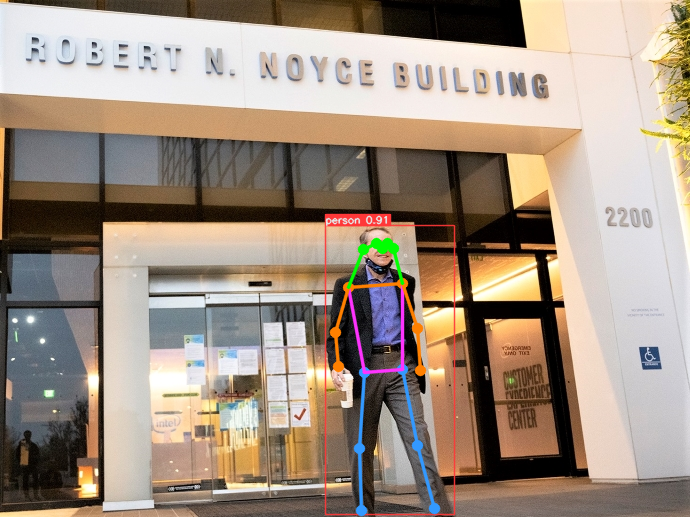
これで完了です! 結果は、元のモデルで生成されたものと同じです。
データセット上のモデルの精度をチェック
最適化されたモデルの結果を元のモデルと比較するには、検証データセットでのモデルの精度に関する測定可能な結果をいくつか知っておくとよいでしょう。
検証データセットをダウンロード
YOLOv8 は COCO データセットで事前トレーニングされているため、モデルの精度を評価するにはそれをダウンロードする必要があります。YOLOv8 リポジトリーで提供されている指示に従って、元のモデル評価関数で使用するため、モデルの作成者が使用した形式でアノテーションをダウンロードする必要もあります。
注: 最初のデータセットのダウンロードが完了するまでに数分かかる場合があります。ダウンロード速度はインターネット接続の品質によって異なります。
from zipfile import ZipFile

DATA_URL = "http://images.cocodataset.org/zips/val2017.zip"
LABELS_URL = "https://github.com/ultralytics/yolov5/releases/download/v1.0/coco2017labels-segments.zip"
CFG_URL = "https://raw.githubusercontent.com/ultralytics/ultralytics/8ebe94d1e928687feaa1fee6d5668987df5e43be/ultralytics/datasets/coco-pose.yaml"

OUT_DIR = Path('./datasets')

DATA_PATH = OUT_DIR / "val2017.zip"
LABELS_PATH = OUT_DIR / "coco2017labels-segments.zip"
CFG_PATH = OUT_DIR / "coco-pose.yaml"

download_file(DATA_URL, DATA_PATH.name, DATA_PATH.parent)
download_file(LABELS_URL, LABELS_PATH.name, LABELS_PATH.parent)
download_file(CFG_URL, CFG_PATH.name, CFG_PATH.parent)

if not (OUT_DIR / "coco/labels").exists():
    with ZipFile(LABELS_PATH , "r") as zip_ref:
        zip_ref.extractall(OUT_DIR)
    with ZipFile(DATA_PATH , "r") as zip_ref:
        zip_ref.extractall(OUT_DIR / 'coco/images')
'datasets/val2017.zip' already exists.
'datasets/coco2017labels-segments.zip' already exists.
datasets/coco-pose.yaml: 0%| | 0.00/781 [00:00<?, ?B/s]
評価関数を定義
from tqdm.notebook import tqdm
from ultralytics.utils.metrics import ConfusionMatrix


def test(model:ov.Model, core:ov.Core, data_loader:torch.utils.data.DataLoader, validator, num_samples:int = None):
    """
    OpenVINO YOLOv8 model accuracy validation function. Runs model validation on dataset and returns metrics
    Parameters:
        model (Model): OpenVINO model
        data_loader (torch.utils.data.DataLoader): dataset loader
        validator: instance of validator class
        num_samples (int, *optional*, None): validate model only on specified number samples, if provided
    Returns:
        stats: (Dict[str, float]) - dictionary with aggregated accuracy metrics statistics, key is metric name, value is metric value
    """
    validator.seen = 0
    validator.jdict = []
    validator.stats = []
    validator.batch_i = 1
    validator.confusion_matrix = ConfusionMatrix(nc=validator.nc)
    model.reshape({0: [1, 3, -1, -1]})
    compiled_model = core.compile_model(model)
    for batch_i, batch in enumerate(tqdm(data_loader, total=num_samples)):
        if num_samples is not None and batch_i == num_samples:
            break
        batch = validator.preprocess(batch)
        results = compiled_model(batch["img"])
        preds = torch.from_numpy(results[compiled_model.output(0)])
        preds = validator.postprocess(preds)
        validator.update_metrics(preds, batch)
    stats = validator.get_stats()
    return stats


def print_stats(stats:np.ndarray, total_images:int, total_objects:int):
    """
    Helper function for printing accuracy statistic
    Parameters:
        stats: (Dict[str, float]) - dictionary with aggregated accuracy metrics statistics, key is metric name, value is metric value
        total_images (int) -  number of evaluated images
        total objects (int)
    Returns:
        None
    """
    print("Boxes:")
    mp, mr, map50, mean_ap = stats['metrics/precision(B)'], stats['metrics/recall(B)'], stats['metrics/mAP50(B)'], stats['metrics/mAP50-95(B)']
    # Print results
    s = ('%20s' + '%12s' * 6) % ('Class', 'Images', 'Labels', 'Precision', 'Recall', 'mAP@.5', 'mAP@.5:.95')
    print(s)
    pf = '%20s' + '%12i' * 2 + '%12.3g' * 4  # print format
    print(pf % ('all', total_images, total_objects, mp, mr, map50, mean_ap))
    if 'metrics/precision(M)' in stats:
        s_mp, s_mr, s_map50, s_mean_ap = stats['metrics/precision(M)'], stats['metrics/recall(M)'], stats['metrics/mAP50(M)'], stats['metrics/mAP50-95(M)']
        # Print results
        s = ('%20s' + '%12s' * 6) % ('Class', 'Images', 'Labels', 'Precision', 'Recall', 'mAP@.5', 'mAP@.5:.95')
        print(s)
        pf = '%20s' + '%12i' * 2 + '%12.3g' * 4  # print format
        print(pf % ('all', total_images, total_objects, s_mp, s_mr, s_map50, s_mean_ap))
Validator ヘルパーを構成し、DataLoader を作成
元のモデル・リポジトリーは、精度検証パイプラインを表す Validator ラッパーを使用します。データローダーと評価メトリックを作成し、データローダーによって生成される各データバッチのメトリックを更新します。加えて、データの前処理と結果の後処理も担当します。クラスの初期化では、構成を提供する必要があります。デフォルトの設定を使用しますが、カスタムデータでテストするにはオーバーライドするいくつかのパラメーターに置き換えることができます。モデルは ValidatorClass メソッドに接続しており、これによりバリデーター・クラスのインスタンスが作成されます。
from ultralytics.utils import DEFAULT_CFG
from ultralytics.cfg import get_cfg
from ultralytics.data.utils import check_det_dataset

args = get_cfg(cfg=DEFAULT_CFG)
args.data = 'coco8-pose.yaml'
args.model = 'yolov8n-pose.pt'
from ultralytics.models.yolo.pose import PoseValidator

pose_validator = PoseValidator(args=args)
pose_validator.data = check_det_dataset(args.data)
pose_data_loader = pose_validator.get_dataloader("datasets/coco8-pose", 1)
val: Scanning datasets/coco8-pose/labels/train.cache... 8 images, 0 backgrounds, 0 corrupt: 100%|██████████| 8/8 [00:00<?, ?it/s]
from ultralytics.utils.metrics import OKS_SIGMA

pose_validator.is_coco = True
pose_validator.names = pose_model.model.names
pose_validator.metrics.names = pose_validator.names
pose_validator.nc = pose_model.model.model[-1].nc
pose_validator.sigma = OKS_SIGMA
テスト関数の定義と評価器の作成が完了したら、精度メトリックを取得する準備が整います。
注: モデル評価は時間のかかるプロセスであり、ハードウェアによっては数分かかる場合があります。計算時間を短縮するために、評価サブセットのサイズで
num_samplesパラメーターを定義しますが、この場合、検証サブセットの違いにより、モデルの作成者が最初に報告した精度と比較できない可能性があります。完全なデータセットでモデルを検証するには、``NUM_TEST_SAMPLES = None`` を設定します。
NUM_TEST_SAMPLES = 300
fp_pose_stats = test(pose_ov_model, core, pose_data_loader, pose_validator, num_samples=NUM_TEST_SAMPLES)
0%| | 0/300 [00:00<?, ?it/s]
print_stats(fp_pose_stats, pose_validator.seen, pose_validator.nt_per_class.sum())
Boxes:
               Class      Images      Labels   Precision      Recall      mAP@.5  mAP@.5:.95
                 all           8          21           1         0.9       0.955       0.736
print_stats 次の精度メトリックのリストを報告します。
Precisionは、関連するオブジェクトのみを識別するモデルの正確さの度合いです。Recallは、モデルがすべてのグラウンド・トゥルース・オブジェクトを検出する能力を測定します。mAP@t- 平均精度は、データセット内のすべてのクラスにわたって集計された適合率と再現率曲線下の領域として表されます。ここで、tは 交差ユニオン (IOU) しきい値、つまり、グラウンドトゥルースと予測されたオブジェクト間の重複の度合いです。したがって、mAP@.5は、平均精度が 0.5 IOU しきい値で計算されたことを示します。mAP@.5:.95は、ステップ 0.05 で 0.5 から 0.95 までの範囲の IOU しきい値で計算されます。
NNCF トレーニング後の量子化 API を使用してモデルを最適化
NNCF は、精度の低下を最小限に抑えながら、OpenVINO でニューラル・ネットワーク推論を最適化する一連の高度なアルゴリズムを提供します。YOLOv8 を最適化するため、ポストトレーニング・モード (微調整パイプラインなし) で 8 ビット量子化を使用します。
最適化プロセスには次の手順が含まれます。
量子化用のデータセットを作成します。
nncf.quantizeを実行して、最適化されたモデルを取得します。openvino.runtime.serialize関数を使用して、OpenVINO IR モデルをシリアル化します。
量子化の精度テストで検証データローダーを再利用します。そのため、nncf.Dataset オブジェクトにラップし、入力テンソルのみを取得する変換関数を定義する必要があります。
import nncf  # noqa: F811
from typing import Dict


def transform_fn(data_item:Dict):
    """
    Quantization transform function. Extracts and preprocess input data from dataloader item for quantization.
    Parameters:
       data_item: Dict with data item produced by DataLoader during iteration
    Returns:
        input_tensor: Input data for quantization
    """
    input_tensor = pose_validator.preprocess(data_item)['img'].numpy()
    return input_tensor


quantization_dataset = nncf.Dataset(pose_data_loader, transform_fn)
INFO:nncf:NNCF initialized successfully. Supported frameworks detected: torch, tensorflow, onnx, openvino
nncf.quantize 関数は、モデルの量子化のインターフェイスを提供します。OpenVINO モデルのインスタンスと量子化データセットが必要です。オプションで、量子化プロセスの追加パラメーター (量子化のサンプル数、プリセット、無視される範囲など) を提供できます。YOLOv8 モデルには、活性化の非対称量子化を必要とする非 ReLU 活性化関数が含まれています。さらに良い結果を得るため、mixed 量子化プリセットを使用します。これは、重みの対称量子化とアクティベーションの非対称量子化を提供します。より正確な結果を得るには、ignored_scope パラメーターを使用して、後処理サブグラフの操作を浮動小数点精度に保つ必要があります。
注: モデルのトレーニング後の量子化は時間のかかるプロセスです。ハードウェアによっては数分かかる場合があります。
ignored_scope = nncf.IgnoredScope(
    types=["Multiply", "Subtract", "Sigmoid"],  # ignore operations
    names=[
        "/model.22/dfl/conv/Conv",           # in the post-processing subgraph
        "/model.22/Add",
        "/model.22/Add_1",
        "/model.22/Add_2",
        "/model.22/Add_3",
        "/model.22/Add_4",
        "/model.22/Add_5",
        "/model.22/Add_6",
        "/model.22/Add_7",
        "/model.22/Add_8",
        "/model.22/Add_9",
        "/model.22/Add_10"
    ]
)


# Detection model
quantized_pose_model = nncf.quantize(
    pose_ov_model,
    quantization_dataset,
    preset=nncf.QuantizationPreset.MIXED,
    ignored_scope=ignored_scope
)
INFO:nncf:12 ignored nodes was found by name in the NNCFGraph
INFO:nncf:12 ignored nodes was found by types in the NNCFGraph
INFO:nncf:Not adding activation input quantizer for operation: 134 /model.22/Mul_6
145 /model.22/Add_12

INFO:nncf:Not adding activation input quantizer for operation: 135 /model.22/Sigmoid_1
INFO:nncf:Not adding activation input quantizer for operation: 156 /model.22/Mul_7
INFO:nncf:Not adding activation input quantizer for operation: 144 /model.22/Sigmoid
INFO:nncf:Not adding activation input quantizer for operation: 174 /model.22/dfl/conv/Conv
INFO:nncf:Not adding activation input quantizer for operation: 196 /model.22/Sub
INFO:nncf:Not adding activation input quantizer for operation: 197 /model.22/Add_10
INFO:nncf:Not adding activation input quantizer for operation: 212 /model.22/Sub_1
INFO:nncf:Not adding activation input quantizer for operation: 239 /model.22/Mul_5
Statistics collection:   3%|███▉                                                                                                                                              | 8/300 [00:01<00:38,  7.55it/s]
Applying Fast Bias correction: 100%|██████████████████████████████████████████████████████████████████████████████████████████████████████████████████████████████████████████| 72/72 [00:03<00:00, 19.73it/s]
from openvino.runtime import serialize
int8_model_pose_path = models_dir / f'{POSE_MODEL_NAME}_openvino_int8_model/{POSE_MODEL_NAME}.xml'
print(f"Quantized keypoint detection model will be saved to {int8_model_pose_path}")
serialize(quantized_pose_model, str(int8_model_pose_path))
Quantized keypoint detection model will be saved to models/yolov8n-pose_openvino_int8_model/yolov8n-pose.xml
量子化モデルの推論を検証
nncf.quantize 予測を行うためデバイスにロードするのに適した OpenVINO モデル・クラス・インスタンスを返します。INT8 モデルの入力データと出力結果の形式は、浮動小数点モデルの表現と違いはありません。したがって、画像上の INT8 モデル結果を取得するために、上で定義した同じ検出関数を再利用できます。
device
Dropdown(description='Device:', index=2, options=('CPU', 'GPU', 'AUTO'), value='AUTO')
if device.value != "CPU":
quantized_pose_model.reshape({0: [1, 3, 640, 640]})
quantized_pose_compiled_model = core.compile_model(quantized_pose_model, device.value)
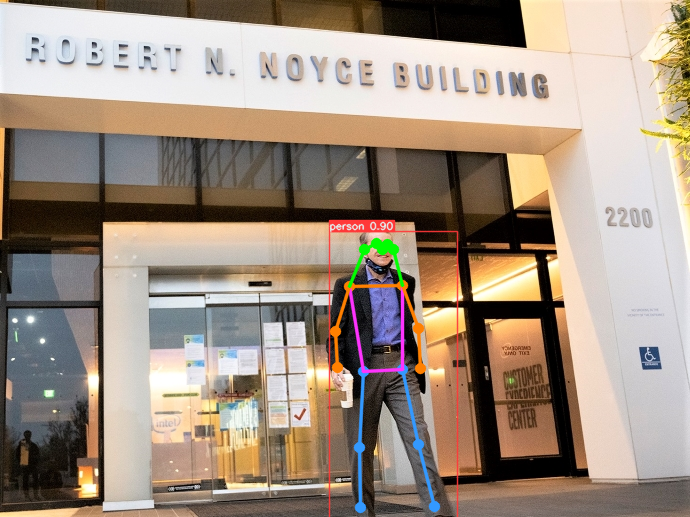
input_image = np.array(Image.open(IMAGE_PATH))
detections = detect(input_image, quantized_pose_compiled_model)[0]
image_with_boxes = draw_results(detections, input_image, label_map)
Image.fromarray(image_with_boxes)
元のモデルと量子化モデルを比較
元のモデルと量子化モデルのパフォーマンスを比較
最後に、OpenVINO Benchmark ツールを使用して、FP32 と INT8 モデルの推論パフォーマンスを測定します。
注: より正確なパフォーマンスを得るには、他のアプリケーションを閉じて、ターミナル/コマンドプロンプトで
benchmark_appを実行することを推奨します。benchmark_app -m <model_path> -d CPU -shape "<input_shape>"を実行して、CPU で非同期推論のベンチマークを 1 分間実行します。GPU でベンチマークを行うには、CPUをGPUに変更します。benchmark_app --helpを実行すると、すべてのコマンドライン・オプションの概要が表示されます。
device
Dropdown(description='Device:', index=2, options=('CPU', 'GPU', 'AUTO'), value='AUTO')
# Inference FP32 model (OpenVINO IR)
!benchmark_app -m $pose_model_path -d $device.value -api async -shape "[1,3,640,640]"
[Step 1/11] Parsing and validating input arguments
[ INFO ] Parsing input parameters
[Step 2/11] Loading OpenVINO Runtime
[ WARNING ] Default duration 120 seconds is used for unknown device AUTO
[ INFO ] OpenVINO:
[ INFO ] Build ................................. 2023.2.0-12690-0ee0b4d9561
[ INFO ]
[ INFO ] Device info:
[ INFO ] AUTO
[ INFO ] Build ................................. 2023.2.0-12690-0ee0b4d9561
[ INFO ]
[ INFO ]
[Step 3/11] Setting device configuration
[ WARNING ] Performance hint was not explicitly specified in command line. Device(AUTO) performance hint will be set to PerformanceMode.THROUGHPUT.
[Step 4/11] Reading model files
[ INFO ] Loading model files
[ INFO ] Read model took 17.85 ms
[ INFO ] Original model I/O parameters:
[ INFO ] Model inputs:
[ INFO ]     images (node: images) : f32 / [...] / [?,3,?,?]
[ INFO ] Model outputs:
[ INFO ]     output0 (node: output0) : f32 / [...] / [?,56,?]
[Step 5/11] Resizing model to match image sizes and given batch
[ INFO ] Model batch size: 1
[ INFO ] Reshaping model: 'images': [1,3,640,640]
[ INFO ] Reshape model took 11.94 ms
[Step 6/11] Configuring input of the model
[ INFO ] Model inputs:
[ INFO ]     images (node: images) : u8 / [N,C,H,W] / [1,3,640,640]
[ INFO ] Model outputs:
[ INFO ]     output0 (node: output0) : f32 / [...] / [1,56,8400]
[Step 7/11] Loading the model to the device
[ INFO ] Compile model took 410.27 ms
[Step 8/11] Querying optimal runtime parameters
[ INFO ] Model:
[ INFO ]   NETWORK_NAME: torch_jit
[ INFO ]   EXECUTION_DEVICES: ['CPU']
[ INFO ]   PERFORMANCE_HINT: PerformanceMode.THROUGHPUT
[ INFO ]   OPTIMAL_NUMBER_OF_INFER_REQUESTS: 12
[ INFO ]   MULTI_DEVICE_PRIORITIES: CPU
[ INFO ]   CPU:
[ INFO ]     AFFINITY: Affinity.CORE
[ INFO ]     CPU_DENORMALS_OPTIMIZATION: False
[ INFO ]     CPU_SPARSE_WEIGHTS_DECOMPRESSION_RATE: 1.0
[ INFO ]     ENABLE_CPU_PINNING: True
[ INFO ]     ENABLE_HYPER_THREADING: True
[ INFO ]     EXECUTION_DEVICES: ['CPU']
[ INFO ]     EXECUTION_MODE_HINT: ExecutionMode.PERFORMANCE
[ INFO ]     INFERENCE_NUM_THREADS: 36
[ INFO ]     INFERENCE_PRECISION_HINT: <Type: 'float32'>
[ INFO ]     NETWORK_NAME: torch_jit
[ INFO ]     NUM_STREAMS: 12
[ INFO ]     OPTIMAL_NUMBER_OF_INFER_REQUESTS: 12
[ INFO ]     PERFORMANCE_HINT: PerformanceMode.THROUGHPUT
[ INFO ]     PERFORMANCE_HINT_NUM_REQUESTS: 0
[ INFO ]     PERF_COUNT: False
[ INFO ]     SCHEDULING_CORE_TYPE: SchedulingCoreType.ANY_CORE
[ INFO ]   MODEL_PRIORITY: Priority.MEDIUM
[ INFO ]   LOADED_FROM_CACHE: False
[Step 9/11] Creating infer requests and preparing input tensors
[ WARNING ] No input files were given for input 'images'!. This input will be filled with random values!
[ INFO ] Fill input 'images' with random values
[Step 10/11] Measuring performance (Start inference asynchronously, 12 inference requests, limits: 120000 ms duration)
[ INFO ] Benchmarking in inference only mode (inputs filling are not included in measurement loop).
[ INFO ] First inference took 33.91 ms
[Step 11/11] Dumping statistics report
[ INFO ] Execution Devices:['CPU']
[ INFO ] Count:            18420 iterations
[ INFO ] Duration:         120067.97 ms
[ INFO ] Latency:
[ INFO ]    Median:        74.24 ms
[ INFO ]    Average:       78.05 ms
[ INFO ]    Min:           39.74 ms
[ INFO ]    Max:           165.06 ms
[ INFO ] Throughput:   153.41 FPS
# Inference INT8 model (OpenVINO IR)
!benchmark_app -m $int8_model_pose_path -d $device.value -api async -shape "[1,3,640,640]" -t 15
[Step 1/11] Parsing and validating input arguments
[ INFO ] Parsing input parameters
[Step 2/11] Loading OpenVINO Runtime
[ INFO ] OpenVINO:
[ INFO ] Build ................................. 2023.2.0-12690-0ee0b4d9561
[ INFO ]
[ INFO ] Device info:
[ INFO ] AUTO
[ INFO ] Build ................................. 2023.2.0-12690-0ee0b4d9561
[ INFO ]
[ INFO ]
[Step 3/11] Setting device configuration
[ WARNING ] Performance hint was not explicitly specified in command line. Device(AUTO) performance hint will be set to PerformanceMode.THROUGHPUT.
[Step 4/11] Reading model files
[ INFO ] Loading model files
[ INFO ] Read model took 29.51 ms
[ INFO ] Original model I/O parameters:
[ INFO ] Model inputs:
[ INFO ]     images (node: images) : f32 / [...] / [1,3,?,?]
[ INFO ] Model outputs:
[ INFO ]     output0 (node: output0) : f32 / [...] / [1,56,21..]
[Step 5/11] Resizing model to match image sizes and given batch
[ INFO ] Model batch size: 1
[ INFO ] Reshaping model: 'images': [1,3,640,640]
[ INFO ] Reshape model took 16.46 ms
[Step 6/11] Configuring input of the model
[ INFO ] Model inputs:
[ INFO ]     images (node: images) : u8 / [N,C,H,W] / [1,3,640,640]
[ INFO ] Model outputs:
[ INFO ]     output0 (node: output0) : f32 / [...] / [1,56,8400]
[Step 7/11] Loading the model to the device
[ INFO ] Compile model took 732.13 ms
[Step 8/11] Querying optimal runtime parameters
[ INFO ] Model:
[ INFO ]   NETWORK_NAME: torch_jit
[ INFO ]   EXECUTION_DEVICES: ['CPU']
[ INFO ]   PERFORMANCE_HINT: PerformanceMode.THROUGHPUT
[ INFO ]   OPTIMAL_NUMBER_OF_INFER_REQUESTS: 18
[ INFO ]   MULTI_DEVICE_PRIORITIES: CPU
[ INFO ]   CPU:
[ INFO ]     AFFINITY: Affinity.CORE
[ INFO ]     CPU_DENORMALS_OPTIMIZATION: False
[ INFO ]     CPU_SPARSE_WEIGHTS_DECOMPRESSION_RATE: 1.0
[ INFO ]     ENABLE_CPU_PINNING: True
[ INFO ]     ENABLE_HYPER_THREADING: True
[ INFO ]     EXECUTION_DEVICES: ['CPU']
[ INFO ]     EXECUTION_MODE_HINT: ExecutionMode.PERFORMANCE
[ INFO ]     INFERENCE_NUM_THREADS: 36
[ INFO ]     INFERENCE_PRECISION_HINT: <Type: 'float32'>
[ INFO ]     NETWORK_NAME: torch_jit
[ INFO ]     NUM_STREAMS: 18
[ INFO ]     OPTIMAL_NUMBER_OF_INFER_REQUESTS: 18
[ INFO ]     PERFORMANCE_HINT: PerformanceMode.THROUGHPUT
[ INFO ]     PERFORMANCE_HINT_NUM_REQUESTS: 0
[ INFO ]     PERF_COUNT: False
[ INFO ]     SCHEDULING_CORE_TYPE: SchedulingCoreType.ANY_CORE
[ INFO ]   MODEL_PRIORITY: Priority.MEDIUM
[ INFO ]   LOADED_FROM_CACHE: False
[Step 9/11] Creating infer requests and preparing input tensors
[ WARNING ] No input files were given for input 'images'!. This input will be filled with random values!
[ INFO ] Fill input 'images' with random values
[Step 10/11] Measuring performance (Start inference asynchronously, 18 inference requests, limits: 15000 ms duration)
[ INFO ] Benchmarking in inference only mode (inputs filling are not included in measurement loop).
[ INFO ] First inference took 26.46 ms
[Step 11/11] Dumping statistics report
[ INFO ] Execution Devices:['CPU']
[ INFO ] Count:            6426 iterations
[ INFO ] Duration:         15072.05 ms
[ INFO ] Latency:
[ INFO ]    Median:        40.12 ms
[ INFO ]    Average:       42.00 ms
[ INFO ]    Min:           27.49 ms
[ INFO ]    Max:           121.32 ms
[ INFO ] Throughput:   426.35 FPS
元のモデルと量子化されたモデルの精度を比較
ご覧のとおり、単一画像テストでは、INT8 モデルと float モデルの結果に大きな違いはありません。量子化がモデル予測の精度にどのように影響するか理解するため、データセット上のモデル精度を比較することができます。
int8_pose_stats = test(quantized_pose_model, core, pose_data_loader, pose_validator, num_samples=NUM_TEST_SAMPLES)
0%| | 0/300 [00:00<?, ?it/s]
print("FP32 model accuracy")
print_stats(fp_pose_stats, pose_validator.seen, pose_validator.nt_per_class.sum())

print("INT8 model accuracy")
print_stats(int8_pose_stats, pose_validator.seen, pose_validator.nt_per_class.sum())
FP32 model accuracy
Boxes:
               Class      Images      Labels   Precision      Recall      mAP@.5  mAP@.5:.95
                 all           8          21           1         0.9       0.955       0.736
INT8 model accuracy
Boxes:
               Class      Images      Labels   Precision      Recall      mAP@.5  mAP@.5:.95
                 all           8          21       0.905       0.909       0.979       0.703
これで完了です! 精度は変更されたようですが、大きな変化はなく、合格基準を満たしています。
モデルを最適化する他の方法
非同期推論パイプラインや前処理 API などの別の OpenVINO メソッドによってパフォーマンスを向上させることもできます。
非同期推論パイプラインは、デバイスをより最適に活用するのに役立ちます。非同期 API の主な利点は、デバイスが推論でビジー状態のときに、アプリケーションが現在の推論が完了するのを待つのではなく、他のタスク (例えば、入力の入力や他の要求のスケジュール設定) を並行して実行できることです。OpenVINO を使用して非同期推論を実行する方法を理解するには、非同期 API のチュートリアルを参照してください。
前処理 API を使用すると、前処理をモデルの一部にすることができ、アプリケーション・コードと追加の画像処理ライブラリーへの依存関係が削減されます。前処理 API の主な利点は、前処理手順が実行グラフに統合され、アプリケーションの一部として常に CPU 上で実行されるのではなく、選択したデバイス (CPU/GPU など) 上で実行されることです。これにより、選択したデバイスの使用率も向上します。詳細については、前処理 API チュートリアルの概要を参照してください。YOLOV8 オブジェクト検出モデルでどのように使用できるかを確認するには、OpenVINO チュートリアルを使用して YOLOv8 リアルタイム・オブジェクト検出を変換および最適化するを参照してください。
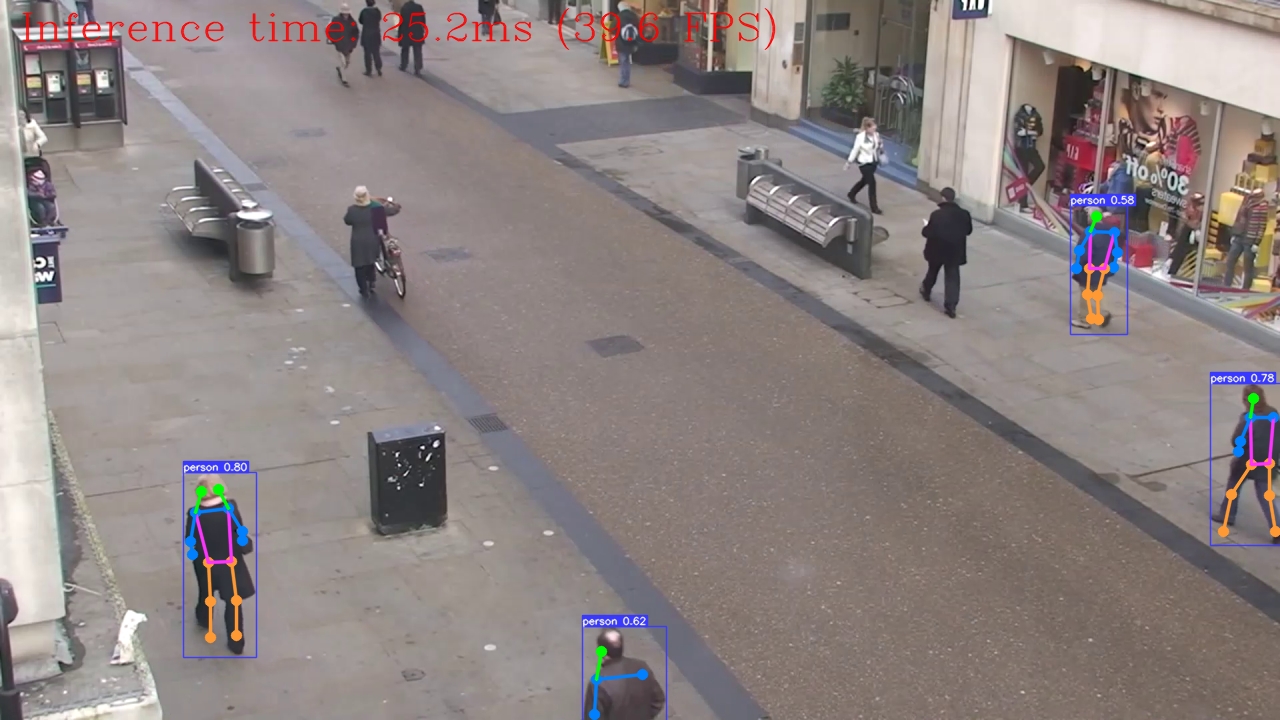
ライブデモ
次のコードは、ビデオに対してモデル推論を実行します。
import collections
import time
from IPython import display


def run_keypoint_detection(source=0, flip=False, use_popup=False, skip_first_frames=0, model=pose_model, device=device.value):
    player = None
    if device != "CPU":
        model.reshape({0: [1, 3, 640, 640]})
    compiled_model = core.compile_model(model, device)
    try:
        # Create a video player to play with target fps.
        player = VideoPlayer(
            source=source, flip=flip, fps=30, skip_first_frames=skip_first_frames
        )
        # Start capturing.
        player.start()
        if use_popup:
            title = "Press ESC to Exit"
            cv2.namedWindow(
                winname=title, flags=cv2.WINDOW_GUI_NORMAL | cv2.WINDOW_AUTOSIZE
            )

        processing_times = collections.deque()
        while True:
            # Grab the frame.
            frame = player.next()
            if frame is None:
                print("Source ended")
                break
            # If the frame is larger than full HD, reduce size to improve the performance.
            scale = 1280 / max(frame.shape)
            if scale < 1:
                frame = cv2.resize(
                    src=frame,
                    dsize=None,
                    fx=scale,
                    fy=scale,
                    interpolation=cv2.INTER_AREA,
                )
            # Get the results.
            input_image = np.array(frame)

            start_time = time.time()
            # model expects RGB image, while video capturing in BGR
            detections = detect(input_image[:, :, ::-1], compiled_model)[0]
            stop_time = time.time()

            image_with_boxes = draw_results(detections, input_image, label_map)
            frame = image_with_boxes

            processing_times.append(stop_time - start_time)
            # Use processing times from last 200 frames.
            if len(processing_times) > 200:
                processing_times.popleft()

            _, f_width = frame.shape[:2]
            # Mean processing time [ms].
            processing_time = np.mean(processing_times) * 1000
            fps = 1000 / processing_time
            cv2.putText(
                img=frame,
                text=f"Inference time: {processing_time:.1f}ms ({fps:.1f} FPS)",
                org=(20, 40),
                fontFace=cv2.FONT_HERSHEY_COMPLEX,
                fontScale=f_width / 1000,
                color=(0, 0, 255),
                thickness=1,
                lineType=cv2.LINE_AA,
            )
            # Use this workaround if there is flickering.
            if use_popup:
                cv2.imshow(winname=title, mat=frame)
                key = cv2.waitKey(1)
                # escape = 27
                if key == 27:
                    break
            else:
                # Encode numpy array to jpg.
                _, encoded_img = cv2.imencode(
                    ext=".jpg", img=frame, params=[cv2.IMWRITE_JPEG_QUALITY, 100]
                )
                # Create an IPython image.
                i = display.Image(data=encoded_img)
                # Display the image in this notebook.
                display.clear_output(wait=True)
                display.display(i)
    # ctrl-c
    except KeyboardInterrupt:
        print("Interrupted")
    # any different error
    except RuntimeError as e:
        print(e)
    finally:
        if player is not None:
            # Stop capturing.
            player.stop()
        if use_popup:
            cv2.destroyAllWindows()
ビデオでキーポイント検出を実行
VIDEO_SOURCE = 'https://storage.openvinotoolkit.org/repositories/openvino_notebooks/data/data/video/people.mp4'
device
Dropdown(description='Device:', index=2, options=('CPU', 'GPU', 'AUTO'), value='AUTO')
run_keypoint_detection(source=VIDEO_SOURCE, flip=True, use_popup=False, model=pose_ov_model, device=device.value)
Source ended