CLIP と OpenVINO™ による言語と視覚の顕著性
この Jupyter ノートブックはオンラインで起動でき、ブラウザーのウィンドウで対話型環境を開きます。ローカルにインストールすることもできます。次のオプションのいずれかを選択します。
このノートブックでは、次のトピックをカバーします。
顕著性マップと使用方法の説明。
CLIP ニューラル・ネットワークの概要と、顕著性マップの生成方法。
ニューラル・ネットワークを個別の推論用に複数の部分に分割する方法。
OpenVINO™ と非同期実行を使用して推論を高速化する方法。
顕著性マップ
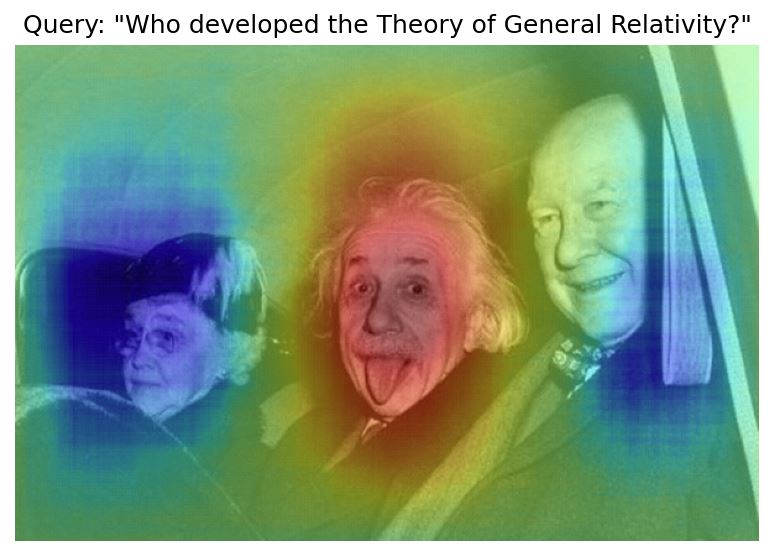
顕著性マップは、画像内の注目する領域を強調表示する視覚化手法です。例えば、特定のラベルの画像分類予測を説明するのに使用できます。このノートブックで得られる顕著性マップの例を次に示します。
CLIP
CLIP とは?
CLIP (Contrastive Language–Image Pre-training) は、画像とテキストの両方を処理できるニューラル・ネットワークです。ランダムにサンプリングされたテキストスニペットのうち、どのテキストが特定の画像に近いか予測するようにトレーニングされています。つまり、テキストが画像をより適切に表すことになります。事前トレーニング・プロセスを視覚化したものを以下に示します。
このタスクを解決するため、CLIP はイメージ・エンコーダーとテキスト・エンコーダーを使用します。両方の部分は、それぞれ画像とテキストの浮動小数点数のベクトルである埋め込みを生成するために使用されます。2 つのベクトルが与えられた場合、それらの類似性を定義して測定することができます。これを行う一般的な方法は、2 つのベクトルのドット積をそれらのノルムの積で割ったものとして定義される cosine_similarity です。

cs
結果は \(-1\) から \(1\) の範囲になります。値 \(1\) はベクトルが類似していることを意味し、\(0\) はベクトルが全く “接続” されていないことを意味し、\(-1\) は何らかの形で反対の “意味” を持つベクトルを表します。CLIP をトレーニングするため、OpenAI はテキストと画像のサンプルを使用し、最初のテキストがバッチ内の最初の画像に対応し、2 番目のテキストが 2 番目の画像に対応するように整理します。次に、すべてのテキストとすべての画像間のコサイン類似度が測定され、その結果が行列に配置されます。行列の対角線上の数字が \(1\) に近く、他の部分が \(0\) に近い場合、ネットワークが適切にトレーニングされていることを示します。
CLIP を使用して顕著性マップを構築するにはどうすればよいですか?
CLIP に画像とテキストを提供すると、2 つのベクトルが返されます。これらのベクトル間のコサイン類似度が計算され、テキストが画像を説明しているかどうかを示す \(-1\) から \(1\) の数値が生成されます。考え方としては、画像の一部の領域が他の領域よりもテキストクエリーに近いという点があり、この違いを利用して顕著性マップを構築できます。やり方は次のとおりです。
クエリーと画像の類似性を計算します。これは、類似性マップ上の中立値 \(s_0\) を表します。
画像をランダムに切り抜きます。
切り抜きとクエリーの類似性を計算します。
そこから \(s_0\) を減算します。値が正の場合、切り抜き部分はクエリーに近くなり、顕著性マップ上で赤い領域になります。負の場合は青色になります。
顕著性マップ上の対応する領域を更新します。
ステップ 2 ~ 5 を複数回 (
n_iters) 繰り返します。
Transformers と Pytorch を使用した初期実装
# Install requirements
%pip install -q "openvino>=2023.1.0"
%pip install -q --extra-index-url https://download.pytorch.org/whl/cpu transformers torch gradio
from pathlib import Path
from typing import Tuple, Union, Optional
from urllib.request import urlretrieve

from matplotlib import colors
import matplotlib.pyplot as plt
import numpy as np
import requests
import torch
import tqdm
from PIL import Image
from transformers import CLIPModel, CLIPProcessor
2023-09-12 14:10:49.435909: I tensorflow/core/util/port.cc:110] oneDNN custom operations are on. You may see slightly different numerical results due to floating-point round-off errors from different computation orders. To turn them off, set the environment variable TF_ENABLE_ONEDNN_OPTS=0.
2023-09-12 14:10:49.470573: I tensorflow/core/platform/cpu_feature_guard.cc:182] This TensorFlow binary is optimized to use available CPU instructions in performance-critical operations.
To enable the following instructions: AVX2 AVX512F AVX512_VNNI FMA, in other operations, rebuild TensorFlow with the appropriate compiler flags.
2023-09-12 14:10:50.130215: W tensorflow/compiler/tf2tensorrt/utils/py_utils.cc:38] TF-TRT Warning: Could not find TensorRT
CLIP モデルを取得するには、Transformers ライブラリーと OpenAI の公式 openai/clip-vit-base-patch16 を使用します。下のセルのモデル・チェックポイントを置き換えるだけで、Hugging Face Hub の任意の CLIP モデルを使用できます。
テキストと画像データをモデルに取り込むには、いくつかの前処理が必要です。画像はサイズ変更、トリミング、正規化を行う必要があり、テキストはトークンに分割され、トークン ID ごとに交換する必要があります。それには、すべての前処理手順をカプセル化する CLIPProcessor を使用します。
model_checkpoint = "openai/clip-vit-base-patch16"

model = CLIPModel.from_pretrained(model_checkpoint).eval()
processor = CLIPProcessor.from_pretrained(model_checkpoint)
まずヘルパー関数を記述します。get_random_crop_params を使用してクロップの座標とサイズを生成し、get_crop_image を使用して実際のクロップを取得します。計算された類似度で顕著性マップを更新するには、update_saliency_map を使用します。cosine_similarity 関数は、上記の式をコードで表現したものにすぎません。
def get_random_crop_params(
    image_height: int, image_width: int, min_crop_size: int
) -> Tuple[int, int, int, int]:
    crop_size = np.random.randint(min_crop_size, min(image_height, image_width))
    x = np.random.randint(image_width - crop_size + 1)
    y = np.random.randint(image_height - crop_size + 1)
    return x, y, crop_size


def get_cropped_image(
    im_tensor: np.array, x: int, y: int, crop_size: int
) -> np.array:
    return im_tensor[
        y : y + crop_size,
        x : x + crop_size,
        ...
    ]


def update_saliency_map(
    saliency_map: np.array, similarity: float, x: int, y: int, crop_size: int
) -> None:
    saliency_map[
        y : y + crop_size,
        x : x + crop_size,
    ] += similarity


def cosine_similarity(
    one: Union[np.ndarray, torch.Tensor], other: Union[np.ndarray, torch.Tensor]
) -> Union[np.ndarray, torch.Tensor]:
    return one @ other.T / (np.linalg.norm(one) * np.linalg.norm(other))
定義するパラメーター:
n_iters- 手順が繰り返される回数。大きいほど優れていますが、推論に時間がかかります。min_crop_size- トリミング・ウィンドウの最小サイズ。サイズが小さいほど、顕著性マップの解像度は上がりますが、反復回数が増える可能性があります。query- 画像を照会するために使用されるテキスト。image- クエリーされる実際の画像。リンクから画像をダウンロードします。
冒頭の画像は、n_iters=2000、min_crop_size=50 で取得されました。結果をより早く得るために、推論の数を少なくして始めます。最適化されたモデルが完成したら、最後にパラメーターを試してみることをお勧めします。
n_iters = 300
min_crop_size = 50

query = "Who developed the Theory of General Relativity?"
image_path = Path("example.jpg")
urlretrieve("https://www.storypick.com/wp-content/uploads/2016/01/AE-2.jpg", image_path)
image = Image.open(image_path)
im_tensor = np.array(image)

x_dim, y_dim = image.size
モデルとプロセッサーが与えられれば、実際の推論は簡単です。テキストと画像を組み合わせた入力に変換し、モデルに渡します。
inputs = processor(text=[query], images=[im_tensor], return_tensors="pt")
with torch.no_grad():
    results = model(**inputs)
results.keys()
odict_keys(['logits_per_image', 'logits_per_text', 'text_embeds', 'image_embeds', 'text_model_output', 'vision_model_output'])
モデルは複数の出力を生成しますが、アプリケーションでは、それぞれテキストと画像のベクトルである text_embeds と image_embeds に注目します。これで、クエリーと画像間の initial_similarity を計算できます。また、顕著性マップも初期化します。コメント内の番号は、上記の “CLIP を使用して顕著性マップを構築する方法” リストの項目に対応しています。
initial_similarity = cosine_similarity(results.text_embeds, results.image_embeds).item()  # 1. Computing query and image similarity
saliency_map = np.zeros((y_dim, x_dim))

for _ in tqdm.notebook.tqdm(range(n_iters)):  # 6. Setting number of the procedure iterations
    x, y, crop_size = get_random_crop_params(y_dim, x_dim, min_crop_size)
    im_crop = get_cropped_image(im_tensor, x, y, crop_size)  # 2. Getting a random crop of the image

    inputs = processor(text=[query], images=[im_crop], return_tensors="pt")
    with torch.no_grad():
        results = model(**inputs)  # 3. Computing crop and query similarity

    similarity = cosine_similarity(results.text_embeds, results.image_embeds).item() - initial_similarity  # 4. Subtracting query and image similarity from crop and query similarity
    update_saliency_map(saliency_map, similarity, x, y, crop_size)  # 5. Updating the region on the saliency map
0%| | 0/300 [00:00<?, ?it/s]
結果の顕著性マップを視覚化するには、matplotlib を使用できます。
plt.figure(dpi=150)
plt.imshow(saliency_map, norm=colors.TwoSlopeNorm(vcenter=0), cmap='jet')
plt.colorbar(location="bottom")
plt.title(f'Query: \"{query}\"')
plt.axis("off")
plt.show()
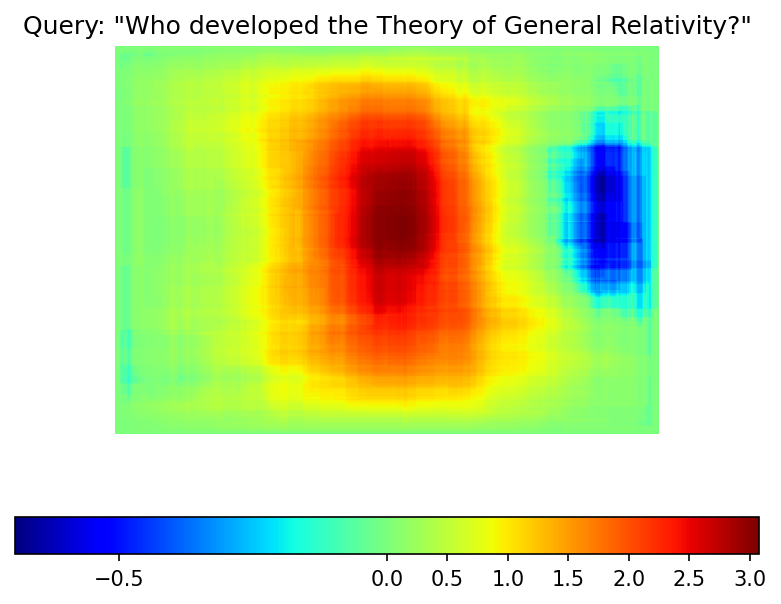
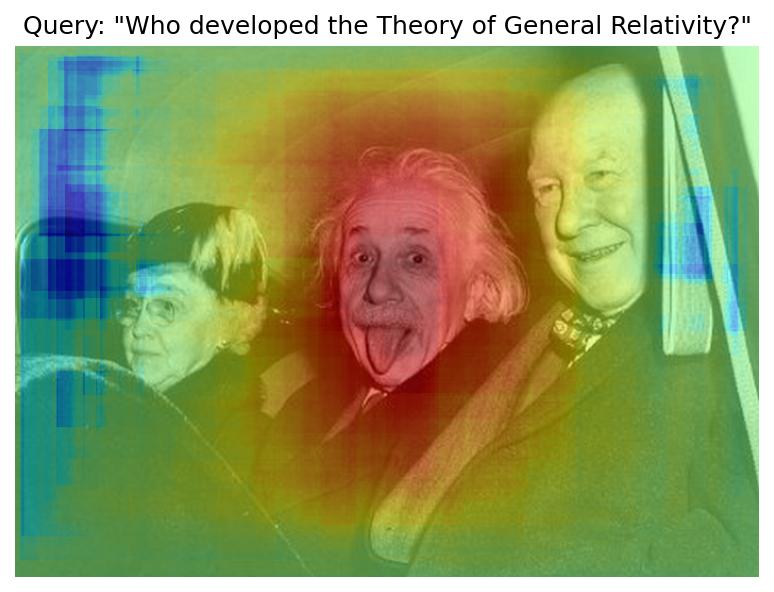
反復回数が少ないため、結果マップは例の画像ほど滑らかではありません。ただし、同じ赤と青の領域がはっきりと見えます。
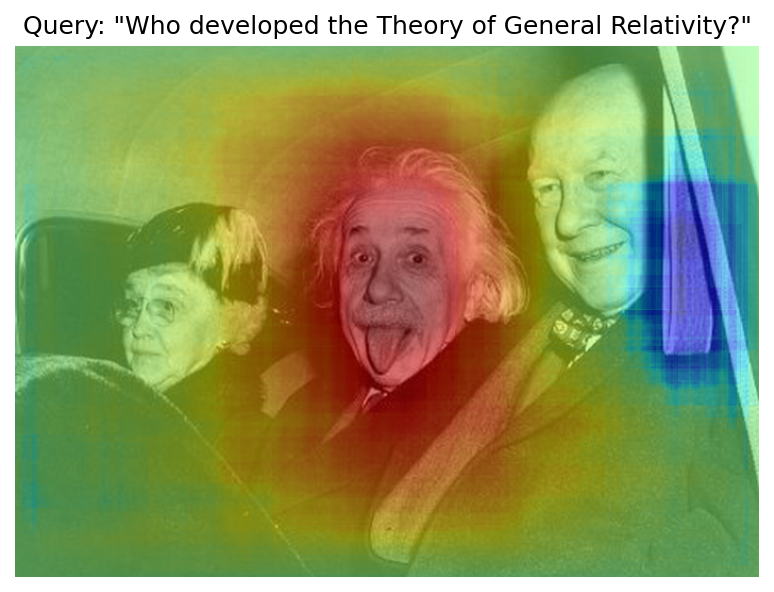
画像に顕著性マップを重ねてみます。
def plot_saliency_map(image_tensor: np.ndarray, saliency_map: np.ndarray, query: Optional[str]) -> None:
    fig = plt.figure(dpi=150)
    plt.imshow(image_tensor)
    plt.imshow(
        saliency_map,
        norm=colors.TwoSlopeNorm(vcenter=0),
        cmap="jet",
        alpha=0.5,  # make saliency map trasparent to see original picture
    )
    if query:
        plt.title(f'Query: "{query}"')
    plt.axis("off")
    return fig


plot_saliency_map(im_tensor, saliency_map, query);
テキストとビジュアル処理の分離
上記のコードは機能しますが、回避できる繰り返し計算がいくつかあります。テキストの埋め込みは入力画像に依存しないため、一度計算すれば済みます。この分離は将来的にも役立ちます。テキストと完全な画像間の類似性を計算する必要があるため、初期の準備は同じままです。その後、get_image_features メソッドを使用して、切り取られた画像の埋め込みを取得できます。
inputs = processor(text=[query], images=[im_tensor], return_tensors="pt")
with torch.no_grad():
    results = model(**inputs)
text_embeds = results.text_embeds  # save text embeddings to use them later

initial_similarity = cosine_similarity(text_embeds, results.image_embeds).item()
saliency_map = np.zeros((y_dim, x_dim))

for _ in tqdm.notebook.tqdm(range(n_iters)):
    x, y, crop_size = get_random_crop_params(y_dim, x_dim, min_crop_size)
    im_crop = get_cropped_image(im_tensor, x, y, crop_size)

    image_inputs = processor(images=[im_crop], return_tensors="pt")  # crop preprocessing
    with torch.no_grad():
        image_embeds = model.get_image_features(**image_inputs)  # calculate image embeddings only

    similarity = cosine_similarity(text_embeds, image_embeds).item() - initial_similarity
    update_saliency_map(saliency_map, similarity, x, y, crop_size)

plot_saliency_map(im_tensor, saliency_map, query);
0%| | 0/300 [00:00<?, ?it/s]
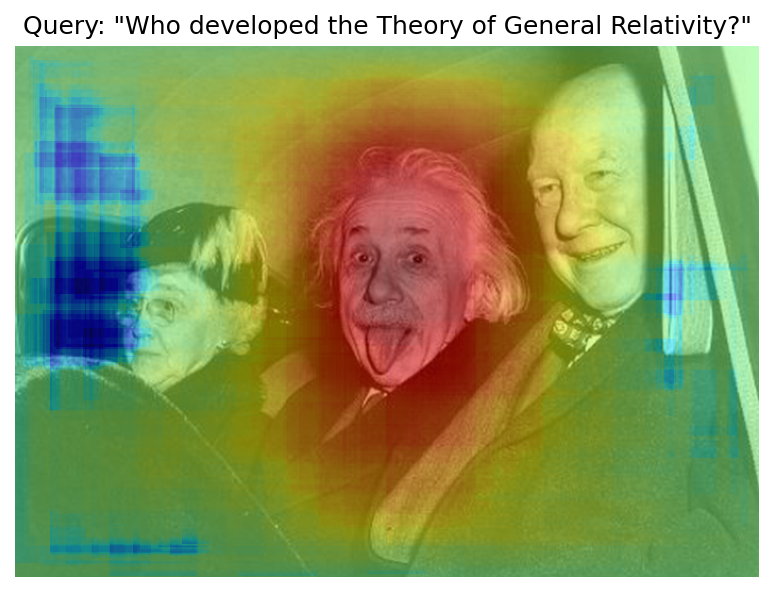
ランダムな切り抜きを使用して顕著性マップを作成するため、結果が若干異なる可能性があります。
OpenVINO™ 中間表現 (IR) 形式に変換
顕著性マップを構築するプロセスには、かなりの時間がかかります。スピードアップするには、OpenVINO を使用します。OpenVINO は、事前トレーニング済みのニューラル・ネットワークを効率的に実行するように設計された推論フレームワークです。これを使用する方法の 1 つは、モデルを元のフレームワーク表現から OpenVINO 中間表現 (IR) 形式に変換し、推論のために読み込むことです。モデルは現在 PyTorch を使用しています。IR を取得するには、モデル変換 API を使用する必要があります。ov.convert_model 関数は、PyTorch モデル・オブジェクトとサンプル入力を受け入れ、それを OpenVINO モデル・インスタンスに変換します。これは、ov.compile_model を使用してデバイスにロードする準備ができており、ov.save_model を使用してディスクに保存することもできます。テキスト部分と画像部分のモデルを分離するため、forward メソッドをそれぞれ get_text_features メソッドと get_image_features メソッドでオーバーロードします。内部的には、PyTorch から OpenVINO への変換には TorchScript トレースが関連します。より良い変換結果を得るには、モデルが正常にトレースできることを保証する必要があります。model.config.torchscript = True パラメーターを使用すると、TorchScript トレース用の Hugging Face モデルを準備できます。詳細については、Hugging Face Transformers のドキュメントをご覧ください。
import openvino as ov

model_name = model_checkpoint.split("/")[-1]

model.config.torchscript = True
model.forward = model.get_text_features
text_ov_model = ov.convert_model(
    model,
    example_input={"input_ids": inputs.input_ids, "attention_mask": inputs.attention_mask}
)

# get image size after preprocessing from the processor
crops_info = processor.image_processor.crop_size.values() if hasattr(processor, "image_processor") else processor.feature_extractor.crop_size.values()
model.forward = model.get_image_features
image_ov_model = ov.convert_model(
    model,
    example_input={"pixel_values": inputs.pixel_values},
    input=[1,3, *crops_info],
)

ov_dir = Path("ir")
ov_dir.mkdir(exist_ok=True)
text_model_path = ov_dir / f"{model_name}_text.xml"
image_model_path = ov_dir / f"{model_name}_image.xml"

# write resulting models on disk
ov.save_model(text_ov_model, text_model_path)
ov.save_model(image_ov_model, image_model_path)
WARNING:tensorflow:Please fix your imports. Module tensorflow.python.training.tracking.base has been moved to tensorflow.python.trackable.base. The old module will be deleted in version 2.11.
[ WARNING ] Please fix your imports. Module %s has been moved to %s. The old module will be deleted in version %s.
INFO:nncf:NNCF initialized successfully. Supported frameworks detected: torch, tensorflow, onnx, openvino
huggingface/tokenizers: The current process just got forked, after parallelism has already been used. Disabling parallelism to avoid deadlocks...
To disable this warning, you can either:
    - Avoid using tokenizers before the fork if possible
    - Explicitly set the environment variable TOKENIZERS_PARALLELISM=(true | false)
huggingface/tokenizers: The current process just got forked, after parallelism has already been used. Disabling parallelism to avoid deadlocks...
To disable this warning, you can either:
    - Avoid using tokenizers before the fork if possible
    - Explicitly set the environment variable TOKENIZERS_PARALLELISM=(true | false)
huggingface/tokenizers: The current process just got forked, after parallelism has already been used. Disabling parallelism to avoid deadlocks...
To disable this warning, you can either:
    - Avoid using tokenizers before the fork if possible
    - Explicitly set the environment variable TOKENIZERS_PARALLELISM=(true | false)
No CUDA runtime is found, using CUDA_HOME='/usr/local/cuda'
/home/ea/work/ov_venv/lib/python3.8/site-packages/transformers/models/clip/modeling_clip.py:287: TracerWarning: Converting a tensor to a Python boolean might cause the trace to be incorrect. We can't record the data flow of Python values, so this value will be treated as a constant in the future. This means that the trace might not generalize to other inputs!
  if attn_weights.size() != (bsz * self.num_heads, tgt_len, src_len):
/home/ea/work/ov_venv/lib/python3.8/site-packages/transformers/models/clip/modeling_clip.py:295: TracerWarning: Converting a tensor to a Python boolean might cause the trace to be incorrect. We can't record the data flow of Python values, so this value will be treated as a constant in the future. This means that the trace might not generalize to other inputs!
  if causal_attention_mask.size() != (bsz, 1, tgt_len, src_len):
/home/ea/work/ov_venv/lib/python3.8/site-packages/transformers/models/clip/modeling_clip.py:304: TracerWarning: Converting a tensor to a Python boolean might cause the trace to be incorrect. We can't record the data flow of Python values, so this value will be treated as a constant in the future. This means that the trace might not generalize to other inputs!
  if attention_mask.size() != (bsz, 1, tgt_len, src_len):
/home/ea/work/ov_venv/lib/python3.8/site-packages/transformers/models/clip/modeling_clip.py:327: TracerWarning: Converting a tensor to a Python boolean might cause the trace to be incorrect. We can't record the data flow of Python values, so this value will be treated as a constant in the future. This means that the trace might not generalize to other inputs!
  if attn_output.size() != (bsz * self.num_heads, tgt_len, self.head_dim):
これで、テキストと画像の 2 つの個別のモデルがディスクに保存され、OpenVINO™ で読み込んで推論する準備が整いました。
OpenVINO™ による推論
OpenVINO ランタイムとのあらゆるやり取りを処理する
Coreオブジェクトのインスタンスを作成します。core.read_modelメソッドを使用してモデルをメモリーに読み込みます。特定のデバイス用の
core.compile_modelメソッドを使用してモデルをコンパイルし、デバイス固有の最適化を適用します。コンパイルされたモデルを推論に使用します。
core = ov.Core()

text_model = core.read_model(text_model_path)
image_model = core.read_model(image_model_path)
推論デバイスの選択
OpenVINO を使用して推論を実行するためにドロップダウン・リストからデバイスを選択します。
import ipywidgets as widgets

device = widgets.Dropdown(
    options=core.available_devices + ["AUTO"],
    value='AUTO',
    description='Device:',
    disabled=False,
)

device
Dropdown(description='Device:', index=2, options=('CPU', 'GPU', 'AUTO'), value='AUTO')
text_model = core.compile_model(model=text_model, device_name=device.value)
image_model = core.compile_model(model=image_model, device_name=device.value)
OpenVINO は入力タイプとして numpy.ndarray をサポートしているため、return_tensors を np に変更します。また、Transformers の BatchEncoding オブジェクトを、入力名をキーとして、入力テンソルを値として持つ Python 辞書に変換します。
コンパイルされたモデルができたら、推論は Pytorch と同様になります - コンパイルされたモデルは呼び出し可能です。入力データを渡すだけです。推論結果は辞書に保存されます。コンパイルされたモデルができたら、推論プロセスはほぼ同じです。
text_inputs = dict(
    processor(text=[query], images=[im_tensor], return_tensors="np")
)
image_inputs = text_inputs.pop("pixel_values")

text_embeds = text_model(text_inputs)[0]
image_embeds = image_model(image_inputs)[0]

initial_similarity = cosine_similarity(text_embeds, image_embeds)
saliency_map = np.zeros((y_dim, x_dim))

for _ in tqdm.notebook.tqdm(range(n_iters)):
    x, y, crop_size = get_random_crop_params(y_dim, x_dim, min_crop_size)
    im_crop = get_cropped_image(im_tensor, x, y, crop_size)

    image_inputs = processor(images=[im_crop], return_tensors="np").pixel_values
    image_embeds = image_model(image_inputs)[image_model.output()]

    similarity = cosine_similarity(text_embeds, image_embeds) - initial_similarity
    update_saliency_map(saliency_map, similarity, x, y, crop_size)

plot_saliency_map(im_tensor, saliency_map, query);
0%| | 0/300 [00:00<?, ?it/s]
AsyncInferQueue による推論の高速化
これまでのパイプラインは同期的であり、つまりデータの準備、モデル入力の作成、モデルの推論、および出力処理が順次行われます。これは単純ですが、このケースでは推論パイプラインを編成する最も効果的な方法ではありません。利用可能なリソースをより効率的に活用するには、AsyncInferQueue を使用します。コンパイルされたモデルと複数のジョブ (並列実行スレッド) を使用してインスタンス化できます。ジョブ数を渡さないか、0 を渡した場合、OpenVINO はデバイスとヒューリスティックに基づいて最適な数を選択します。推論キューを取得したら、次の 2 つの作業を実行する必要があります。
データを前処理し、推論キューにプッシュします。前処理のステップは同じままです。
推論が完了した後にモデル出力をどう処理するか推論キューに指示します。これは、準備された入力データとともに推論キューに渡された推論結果とデータを受け取るコールバックと呼ばれる Python 関数によって表されます。
その他すべては AsyncInferQueue インスタンスによって処理されます。
最適化にはもう一つ簡単な方法があります。画像モデルに対して一度に多数の推論要求が発生することが予想され、モデルがそれらをできるだけ速く処理することが望まれます。言い換えれば、スループットを最大化するということです。それには、パフォーマンスのヒントを指定してモデルを再コンパイルします。
from typing import Dict, Any


image_model = core.read_model(image_model_path)

image_model = core.compile_model(
    model=image_model,
    device_name=device.value,
    config={"PERFORMANCE_HINT":"THROUGHPUT"},
)
text_inputs = dict(
    processor(text=[query], images=[im_tensor], return_tensors="np")
)
image_inputs = text_inputs.pop("pixel_values")

text_embeds = text_model(text_inputs)[text_model.output()]
image_embeds = image_model(image_inputs)[image_model.output()]

initial_similarity = cosine_similarity(text_embeds, image_embeds)
saliency_map = np.zeros((y_dim, x_dim))
コールバックは、同期モードで推論した後に行ったのと同じことを行う必要があります。
推論要求から画像の埋め込みを取得します。
テキストと画像の埋め込み間のコサイン類似度を計算します。
顕著性マップに基づいて更新します。
進行状況バーを変更しない場合、推論キューにデータをプッシュする進行状況が表示されます。実際の進行状況を追跡するには、進行状況バー・オブジェクトを渡し、update_saliency_map の呼び出し後に update メソッドを呼び出す必要があります。
def completion_callback(
    infer_request: ov.InferRequest,  # inferente result
    user_data: Dict[str, Any],  # data that you passed along with input pixel values
) -> None:
    pbar = user_data.pop("pbar")

    image_embeds = infer_request.get_output_tensor().data
    similarity = (
        cosine_similarity(user_data.pop("text_embeds"), image_embeds) - user_data.pop("initial_similarity")
    )
    update_saliency_map(**user_data, similarity=similarity)

    pbar.update(1)  # update the progress bar


infer_queue = ov.AsyncInferQueue(image_model)
infer_queue.set_callback(completion_callback)
def infer(im_tensor, x_dim, y_dim, text_embeds, image_embeds, initial_similarity, saliency_map, query, n_iters, min_crop_size, _tqdm=tqdm.notebook.tqdm, include_query=True):
    with _tqdm(total=n_iters) as pbar:
        for _ in range(n_iters):
            x, y, crop_size = get_random_crop_params(y_dim, x_dim, min_crop_size)
            im_crop = get_cropped_image(im_tensor, x, y, crop_size)

            image_inputs = processor(images=[im_crop], return_tensors="np")

            # push data to the queue
            infer_queue.start_async(
                # pass inference data as usual
                image_inputs.pixel_values,
                # the data that will be passed to the callback after the inference complete
                {
                    "text_embeds": text_embeds,
                    "saliency_map": saliency_map,
                    "initial_similarity": initial_similarity,
                    "x": x,
                    "y": y,
                    "crop_size": crop_size,
                    "pbar": pbar,
                }
            )

        # after you pushed all data to the queue you wait until all callbacks finished
        infer_queue.wait_all()

    return plot_saliency_map(im_tensor, saliency_map, query if include_query else None)
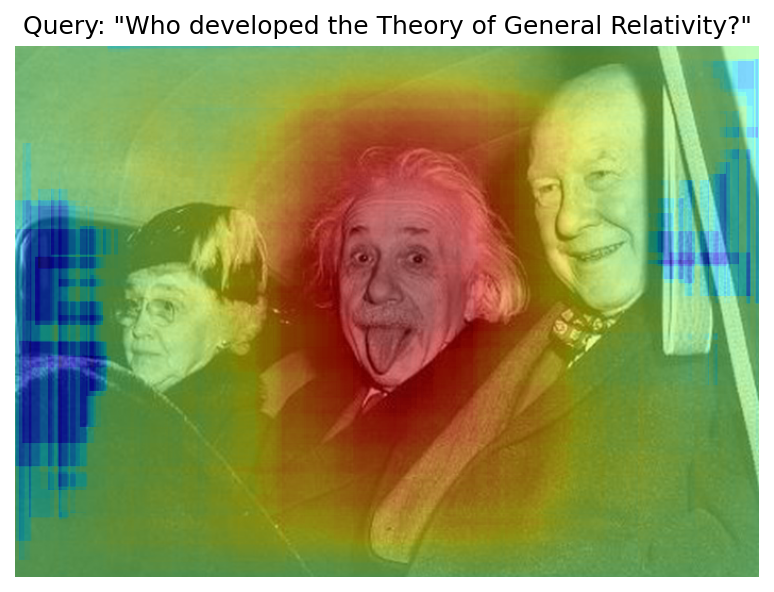
infer(im_tensor, x_dim, y_dim, text_embeds, image_embeds, initial_similarity, saliency_map, query, n_iters, min_crop_size, _tqdm=tqdm.notebook.tqdm, include_query=True);
0%| | 0/300 [00:00<?, ?it/s]
パイプラインを関数にパック
すべてのコードを関数内にラップし、それにユーザー・インターフェイスを追加してみましょう。
import ipywidgets as widgets


def build_saliency_map(image: Image, query: str, n_iters: int = n_iters, min_crop_size=min_crop_size, _tqdm=tqdm.notebook.tqdm, include_query=True):
    x_dim, y_dim = image.size
    im_tensor = np.array(image)

    text_inputs = dict(
        processor(text=[query], images=[im_tensor], return_tensors="np")
    )
    image_inputs = text_inputs.pop("pixel_values")

    text_embeds = text_model(text_inputs)[text_model.output()]
    image_embeds = image_model(image_inputs)[image_model.output()]

    initial_similarity = cosine_similarity(text_embeds, image_embeds)
    saliency_map = np.zeros((y_dim, x_dim))

    return infer(im_tensor, x_dim, y_dim, text_embeds, image_embeds, initial_similarity, saliency_map, query, n_iters, min_crop_size, _tqdm=_tqdm, include_query=include_query)
最初のバージョンでは、ノートブックでこれまで行ってきたように、画像へのリンクを渡すことができるようになります。
n_iters_widget = widgets.BoundedIntText(
    value=n_iters,
    min=1,
    max=10000,
    description="n_iters",
)
min_crop_size_widget = widgets.IntSlider(
    value=min_crop_size,
    min=1,
    max=200,
    description="min_crop_size",
)


@widgets.interact_manual(image_link="", query="", n_iters=n_iters_widget, min_crop_size=min_crop_size_widget)
def build_saliency_map_from_image_link(
    image_link: str,
    query: str,
    n_iters: int,
    min_crop_size: int,
) -> None:
    try:
        image_bytes = requests.get(image_link, stream=True).raw
    except requests.RequestException as e:
        print(f"Cannot load image from link: {image_link}\nException: {e}")
        return

    image = Image.open(image_bytes)
    image = image.convert("RGB")  # remove transparency channel or convert grayscale 1 channel to 3 channels

    build_saliency_map(image, query, n_iters, min_crop_size)
interactive(children=(Text(value='', continuous_update=False, description='image_link'), Text(value='', contin…
2 番目のバージョンでは、コンピューターから画像を読み込むことができます。
import io


load_file_widget = widgets.FileUpload(
    accept="image/*", multiple=False, description="Image file",
)


@widgets.interact_manual(file=load_file_widget, query="", n_iters=n_iters_widget, min_crop_size=min_crop_size_widget)
def build_saliency_map_from_file(
    file: Path,
    query: str = "",
    n_iters: int = 2000,
    min_crop_size: int = 50,
) -> None:
    image_bytes = io.BytesIO(file[0]["content"])
    try:
        image = Image.open(image_bytes)
    except Exception as e:
        print(f"Cannot load the image: {e}")
        return

    image = image.convert("RGB")

    build_saliency_map(image, query, n_iters, min_crop_size)
interactive(children=(FileUpload(value=(), accept='image/*', description='Image file'), Text(value='', continu…
Gradio によるインタラクティブなデモ
import gradio as gr


def _process(image, query, n_iters, min_crop_size, _=gr.Progress(track_tqdm=True)):
    saliency_map = build_saliency_map(image, query, n_iters, min_crop_size, _tqdm=tqdm.tqdm, include_query=False)

    return saliency_map


demo = gr.Interface(
    _process,
    [
        gr.Image(label="Image", type="pil"),
        gr.Textbox(label="Query"),
        gr.Slider(1, 10000, n_iters, label="Number of iterations"),
        gr.Slider(1, 200, min_crop_size, label="Minimum crop size"),
    ],
    gr.Plot(label="Result"),
    examples=[[image_path, query]],
)
try:
    demo.queue().launch(debug=False)
except Exception:
    demo.queue().launch(share=True, debug=False)
# if you are launching remotely, specify server_name and server_port
# demo.launch(server_name='your server name', server_port='server port in int')
# Read more in the docs: https://gradio.app/docs/
Running on local URL:  http://127.0.0.1:7860

To create a public link, set share=True in launch().
次にすべきことは
便利なインターフェースと高速化された推論が利用できるようになったため、CLIP 機能をさらに詳しく調べることができます。例。
CLIP は読み取れますか?画像上の一般的なテキスト領域や特定の単語を検出できますか?
CLIP はどんな有名人や場所を知っていますか?
CLIP は地図上の場所を識別できますか? あるいは惑星、星、星座でしょうか?
Hugging Face Hub のさまざまな CLIP モデルを調べます。これは、ノートブックの先頭にある
model_checkpointを変更するだけです。パイプラインにバッチ処理を追加します。
get_random_crop_params、get_cropped_image、update_saliency_map関数を変更して、複数の切り抜き画像を一度に処理し、パイプラインをさらに高速化します。NNCF を使用してモデルを最適化し、さらなる高速化を実現します。CLIPモデルを量子化する方法の例は、このノートブックで説明されています。