TFLite と OpenVINO を使用したセルフィーのセグメント化
この Jupyter ノートブックはオンラインで起動でき、ブラウザーのウィンドウで対話型環境を開きます。ローカルにインストールすることもできます。次のオプションのいずれかを選択します。


セルフィーセグメント化パイプラインを使用すると、開発者はシーン内の背景とユーザーを簡単に分離し、重要な部分に集中できます。セルフィーにクールなエフェクトを追加したり、ユーザーを興味深い背景環境に挿入したりすることが、これまでになく簡単になりました。写真編集以外にも、この技術はビデオ会議にも重要です。ビデオ通話中に背景をぼかしたり置き換えたりするのに役立ちます。
このチュートリアルでは、OpenVINO を使用してセルフィーセグメント化を実装する方法について説明します。Google MediaPipe ソリューションの一部として提供されるマルチクラス・セルフィー・セグメント化モデルを使用します。
マルチクラス・セルフィー・セグメント化モデルは、マルチクラス・セマンティック・セグメント化モデルであり、各ピクセルを背景、髪、体、顔、衣服、その他 (アクセサリーなど) に分類します。このモデルは、フレーム内の 1 人または複数の人物、自撮り写真、全身画像をサポートします。このモデルは、リアルタイムのパフォーマンスを実現するためにカスタマイズされたボトルネックとデコーダー・アーキテクチャーを備えた Vision Transformer に基づいています。モデルの詳細については、モデルカードをご覧ください。このモデルは Tensorflow Lite 形式で表されます。TensorFlow Lite (TFLite とも呼ばれます) は、マシンラーニング・モデルをエッジデバイスにデプロイするために開発されたオープンソース・ライブラリーです。
このチュートリアルは次のステップで構成されます。
TFLite モデルをダウンロードし、OpenVINO IR 形式に変換します。
画像に対して推論を実行します。
ビデオでインタラクティブな背景ぼかしのデモを実行します。
目次
必要条件
必要な依存関係をインストール
%pip install -q "openvino>=2023.1.0" "matplotlib" "opencv-python"
DEPRECATION: pytorch-lightning 1.6.5 has a non-standard dependency specifier torch>=1.8.*. pip 24.1 will enforce this behaviour change. A possible replacement is to upgrade to a newer version of pytorch-lightning or contact the author to suggest that they release a version with a conforming dependency specifiers. Discussion can be found at https://github.com/pypa/pip/issues/12063
Note: you may need to restart the kernel to use updated packages.
import urllib.request
urllib.request.urlretrieve(
                                            url='https://raw.githubusercontent.com/openvinotoolkit/openvino_notebooks/main/notebooks/utils/notebook_utils.py',
                                            filename='notebook_utils.py'
);
事前学習済みモデルとテスト画像をダウンロード
from pathlib import Path
from notebook_utils import download_file

tflite_model_path = Path("selfie_multiclass_256x256.tflite")
tflite_model_url = "https://storage.googleapis.com/mediapipe-models/image_segmenter/selfie_multiclass_256x256/float32/latest/selfie_multiclass_256x256.tflite"

download_file(tflite_model_url, tflite_model_path)
selfie_multiclass_256x256.tflite: 0%| | 0.00/15.6M [00:00<?, ?B/s]
PosixPath('/opt/home/k8sworker/ci-ai/cibuilds/ov-notebook/OVNotebookOps-609/.workspace/scm/ov-notebook/notebooks/243-tflite-selfie-segmentation/selfie_multiclass_256x256.tflite')
Tensorflow Lite モデルを OpenVINO IR 形式に変換
2023.0.0 リリース以降、OpenVINO は TFLite モデル変換をサポートします。ただし、TFLite モデル形式は read_modelで直接渡すことができます (TFLite でのこの API の使用例は、TFLite から OpenVINO への変換チュートリアルと基本 OpenVINO API 機能のチュートリアルにあります)。追加の最適化 (例: 重みを FP16 形式に圧縮する) を適用するには、モデルを OpenVINO 中間表現形式に変換することを推奨します。TFLite モデルを OpenVINO IR に変換するには、モデル変換 Python API を使用できます。ov.convert_model 関数は、TFLite モデルへのパスを受け取り、このモデルを表す OpenVINO Model クラスのインスタンスを返します。取得したモデルはすぐに使用でき、compile_model を使用してデバイスにロードするか、ov.save_model 関数を使用してディスクに保存して次回の実行時のロード時間を短縮できます。モデル変換の詳細については、このページを参照してください。TensorFlow Lite については、モデルのサポートを参照してください。
import openvino as ov

core = ov.Core()

ir_model_path = tflite_model_path.with_suffix(".xml")

if not ir_model_path.exists():
    ov_model = ov.convert_model(tflite_model_path)
    ov.save_model(ov_model, ir_model_path)
else:
    ov_model = core.read_model(ir_model_path)
print(f"Model input info: {ov_model.inputs}")
Model input info: [<Output: names[input_29] shape[1,256,256,3] type: f32>]
モデル入力は、N, H, W, C 形式の [1、256、256、3] 形状の浮動小数点テンソルです。
説明:
N- バッチサイズ、入力画像の数。H- 入力画像の高さ。W- 入力画像の幅。C- 入力画像のチャネル。
このモデルは、255 で割って [0, 1] の範囲に正規化された RGB 形式の画像を受け入れます。
print(f"Model output info: {ov_model.outputs}")
Model output info: [<Output: names[Identity] shape[1,256,256,6] type: f32>]
モデル出力は、チャネル数 (背景、髪、体の皮膚、顔の皮膚、衣服など、サポートされているセグメント化クラスの数を表す 6) を除いて、同様の形式と形状の浮動小数点テンソルです。出力テンソルの各値は、ピクセルが指定されたクラスに属する確率を表します。argmax 演算を使用すると、各ピクセルの最も高い確率を持つラベルを取得できます。
画像に対して OpenVINO モデル推論を実行
実際のモデルを見てみましょう。OpenVINO で推論モデルを実行するには、まずデバイスにモデルをロードする必要があります。選択する推論デバイスについては、次のドロップダウン・リストを使用してください。
モデルのロード
import ipywidgets as widgets

device = widgets.Dropdown(
    options=core.available_devices + ["AUTO"],
    value='AUTO',
    description='Device:',
    disabled=False,
)

device
Dropdown(description='Device:', index=1, options=('CPU', 'AUTO'), value='AUTO')
compiled_model = core.compile_model(ov_model, device.value)
入力画像を準備
モデルはサイズが 256x256 の画像を受け入れるため、入力画像のサイズを変更してモデルの入力テンソルに収まるようにする必要があります。通常、セグメント化モデルは入力画像の詳細の比率に敏感なので、元のアスペクト比を維持し、パディングを追加するとセグメント化の精度が向上します。これには、前処理アプローチを使用します。さらに、入力画像は UINT8 ([0, 255] データ範囲) の RGB 画像として表されるため、[0, 1] に正規化する必要があります。
import cv2
import numpy as np
from notebook_utils import load_image

# Read input image and convert it to RGB
test_image_url = "https://user-images.githubusercontent.com/29454499/251036317-551a2399-303e-4a4a-a7d6-d7ce973e05c5.png"
img = load_image(test_image_url)
img = cv2.cvtColor(img, cv2.COLOR_BGR2RGB)

# Preprocessing helper function
def resize_and_pad(image:np.ndarray, height:int = 256, width:int = 256):
    """
    Input preprocessing function, takes input image in np.ndarray format,
    resizes it to fit specified height and width with preserving aspect ratio
    and adds padding on bottom or right side to complete target height x width rectangle.

    Parameters:
      image (np.ndarray): input image in np.ndarray format
      height (int, *optional*, 256): target height
      width (int, *optional*, 256): target width
    Returns:
      padded_img (np.ndarray): processed image
      padding_info (Tuple[int, int]): information about padding size, required for postprocessing
    """
    h, w = image.shape[:2]
    if h < w:
        img = cv2.resize(image, (width, np.floor(h / (w / width)).astype(int)))
    else:
        img = cv2.resize(image, (np.floor(w / (h / height)).astype(int), height))

    r_h, r_w = img.shape[:2]
    right_padding = width - r_w
    bottom_padding = height - r_h
    padded_img = cv2.copyMakeBorder(img, 0, bottom_padding, 0, right_padding, cv2.BORDER_CONSTANT)
    return padded_img, (bottom_padding, right_padding)

# Apply preprocessig step - resize and pad input image
padded_img, pad_info = resize_and_pad(np.array(img))

# Convert input data from uint8 [0, 255] to float32 [0, 1] range and add batch dimension
normalized_img = np.expand_dims(padded_img.astype(np.float32) / 255, 0)
モデルの推論を実行
out = compiled_model(normalized_img)[0]
推論結果を後処理して視覚化
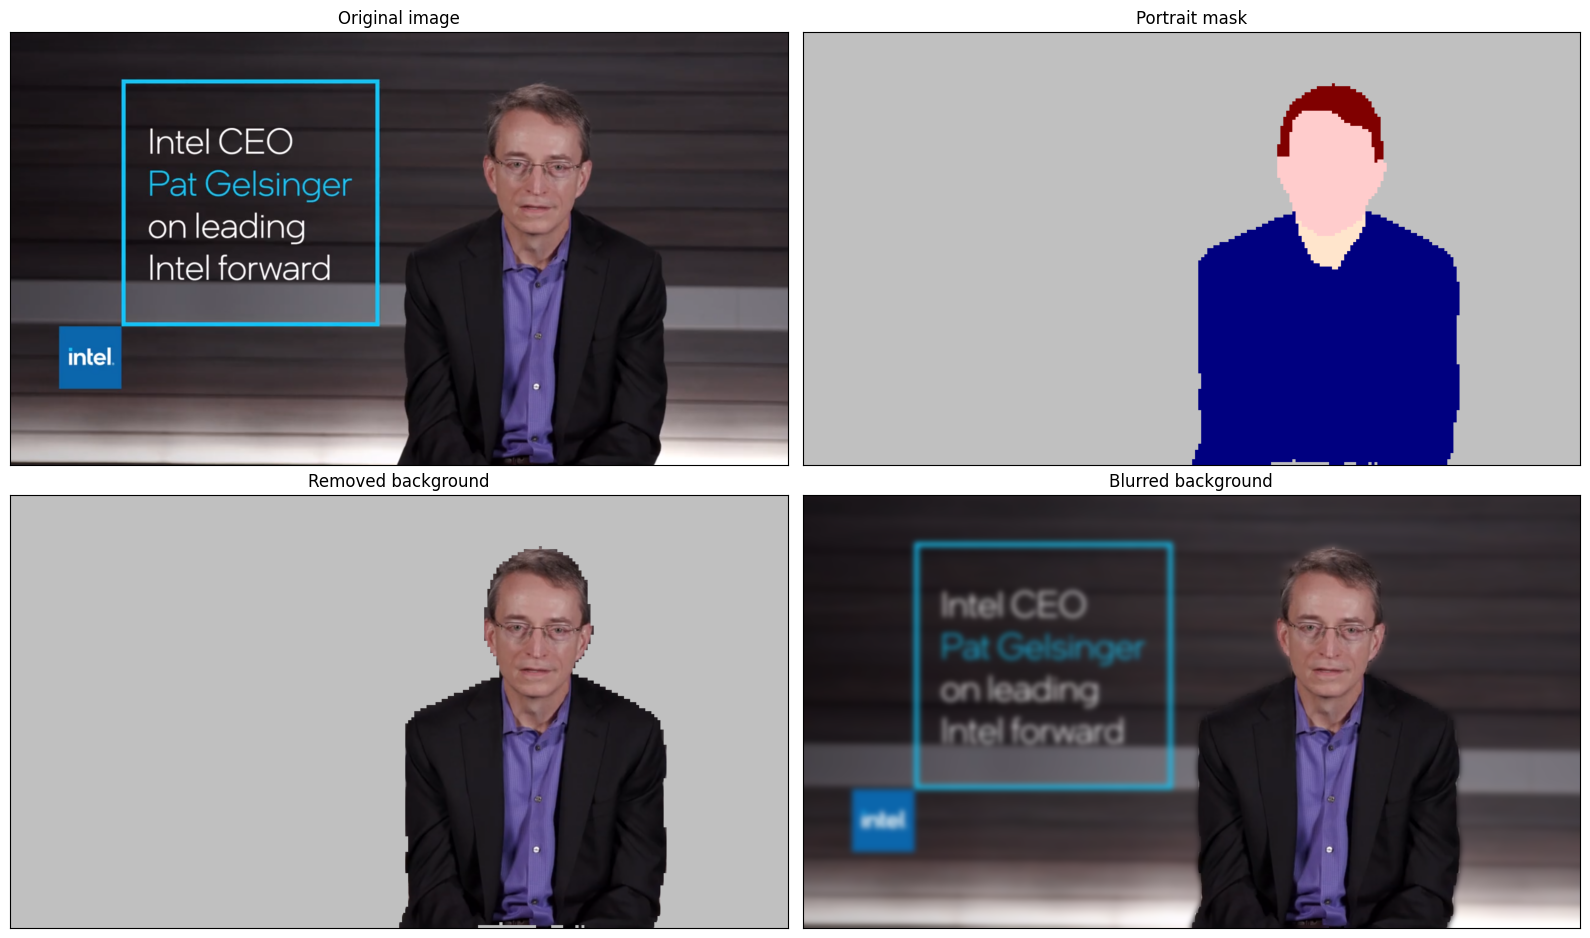
モデルはサイズが 256 x 256 のセグメント化確率マスクを予測します。各ピクセルに対して最も高い確率のラベルを取得し、結果を元の入力画像サイズで復元するには、後処理を適用する必要があります。モデルの結果はさまざまな方法で解釈できます。例えば、セグメント化マスクを視覚化したり、選択した背景 (削除、他の画像との置き換え、ぼかし) や他のクラス (人物の髪の色の変更や化粧の追加など) に視覚効果を適用できます。
from typing import Tuple
from notebook_utils import segmentation_map_to_image, SegmentationMap, Label

# helper for visualization segmentation labels
labels = [
    Label(index=0, color=(192, 192, 192), name="background"),
    Label(index=1, color=(128, 0, 0), name="hair"),
    Label(index=2, color=(255, 229, 204), name="body skin"),
    Label(index=3, color=(255, 204, 204), name="face skin"),
    Label(index=4, color=(0, 0, 128), name="clothes"),
    Label(index=5, color=(128, 0, 128), name="others"),
]
SegmentationLabels = SegmentationMap(labels)

# helper for postprocessing output mask
def postprocess_mask(out:np.ndarray, pad_info:Tuple[int, int], orig_img_size:Tuple[int, int]):
    """
    Posptprocessing function for segmentation mask, accepts model output tensor,
    gets labels for each pixel using argmax,
    unpads segmentation mask and resizes it to original image size.

    Parameters:
      out (np.ndarray): model output tensor
      pad_info (Tuple[int, int]): information about padding size from preprocessing step
      orig_img_size (Tuple[int, int]): original image height and width for resizing
    Returns:
      label_mask_resized (np.ndarray): postprocessed segmentation label mask
    """
    label_mask = np.argmax(out, -1)[0]
    pad_h, pad_w = pad_info
    unpad_h = label_mask.shape[0] - pad_h
    unpad_w = label_mask.shape[1] - pad_w
    label_mask_unpadded = label_mask[:unpad_h, :unpad_w]
    orig_h, orig_w = orig_img_size
    label_mask_resized = cv2.resize(label_mask_unpadded, (orig_w, orig_h), interpolation=cv2.INTER_NEAREST)
    return label_mask_resized

# Get info about original image
image_data = np.array(img)
orig_img_shape = image_data.shape

# Specify background color for replacement
BG_COLOR = (192, 192, 192)

# Blur image for backgraund blurring scenario using Gaussian Blur
blurred_image = cv2.GaussianBlur(image_data, (55, 55), 0)

# Postprocess output
postprocessed_mask = postprocess_mask(out, pad_info, orig_img_shape[:2])

# Get colored segmentation map
output_mask = segmentation_map_to_image(postprocessed_mask, SegmentationLabels.get_colormap())

# Replace background on original image
# fill image with solid background color
bg_image = np.full(orig_img_shape, BG_COLOR, dtype=np.uint8)

# define condition mask for separation background and foreground
condition = np.stack((postprocessed_mask,) * 3, axis=-1) > 0
# replace background with solid color
output_image = np.where(condition, image_data, bg_image)
# replace background with blurred image copy
output_blurred_image = np.where(condition, image_data, blurred_image)
取得した結果を視覚化
import matplotlib.pyplot as plt

titles = ["Original image", "Portrait mask", "Removed background", "Blurred background"]
images = [image_data, output_mask, output_image, output_blurred_image]
figsize = (16, 16)
fig, axs = plt.subplots(2, 2, figsize=figsize, sharex='all', sharey='all')
fig.patch.set_facecolor('white')
list_axes = list(axs.flat)
for i, a in enumerate(list_axes):
    a.set_xticklabels([])
    a.set_yticklabels([])
    a.get_xaxis().set_visible(False)
    a.get_yaxis().set_visible(False)
    a.grid(False)
    a.imshow(images[i].astype(np.uint8))
    a.set_title(titles[i])
fig.subplots_adjust(wspace=0.0, hspace=-0.8)
fig.tight_layout()
インタラクティブな背景ぼかしのデモ動画
次のコードは、ビデオに対してモデル推論を実行します。
import collections
import time
from IPython import display
from typing import Union

from notebook_utils import VideoPlayer


# Main processing function to run background blurring
def run_background_blurring(source:Union[str, int] = 0, flip:bool = False, use_popup:bool = False, skip_first_frames:int = 0, model:ov.Model = ov_model, device:str = "CPU"):
    """
    Function for running background blurring inference on video
    Parameters:
      source (Union[str, int], *optional*, 0): input video source, it can be path or link on video file or web camera id.
      flip (bool, *optional*, False): flip output video, used for front-camera video processing
      use_popup (bool, *optional*, False): use popup window for avoid flickering
      skip_first_frames (int, *optional*, 0): specified number of frames will be skipped in video processing
      model (ov.Model): OpenVINO model for inference
      device (str): inference device
    Returns:
      None
    """
    player = None
    compiled_model = core.compile_model(model, device)
    try:
        # Create a video player to play with target fps.
        player = VideoPlayer(
            source=source, flip=flip, fps=30, skip_first_frames=skip_first_frames
        )
        # Start capturing.
        player.start()
        if use_popup:
            title = "Press ESC to Exit"
            cv2.namedWindow(
                winname=title, flags=cv2.WINDOW_GUI_NORMAL | cv2.WINDOW_AUTOSIZE
            )

        processing_times = collections.deque()
        while True:
            # Grab the frame.
            frame = player.next()
            if frame is None:
                print("Source ended")
                break
            # If the frame is larger than full HD, reduce size to improve the performance.
            scale = 1280 / max(frame.shape)
            if scale < 1:
                frame = cv2.resize(
                    src=frame,
                    dsize=None,
                    fx=scale,
                    fy=scale,
                    interpolation=cv2.INTER_AREA,
                )
            # Get the results.
            input_image, pad_info = resize_and_pad(frame, 256, 256)
            normalized_img = np.expand_dims(input_image.astype(np.float32) / 255, 0)

            start_time = time.time()
            # model expects RGB image, while video capturing in BGR
            segmentation_mask = compiled_model(normalized_img[:, :, :, ::-1])[0]
            stop_time = time.time()
            blurred_image = cv2.GaussianBlur(frame, (55, 55), 0)
            postprocessed_mask = postprocess_mask(segmentation_mask, pad_info, frame.shape[:2])
            condition = np.stack((postprocessed_mask,) * 3, axis=-1) > 0
            frame = np.where(condition, frame, blurred_image)
            processing_times.append(stop_time - start_time)
            # Use processing times from last 200 frames.
            if len(processing_times) > 200:
                processing_times.popleft()

            _, f_width = frame.shape[:2]
            # Mean processing time [ms].
            processing_time = np.mean(processing_times) * 1000
            fps = 1000 / processing_time
            cv2.putText(
                img=frame,
                text=f"Inference time: {processing_time:.1f}ms ({fps:.1f} FPS)",
                org=(20, 40),
                fontFace=cv2.FONT_HERSHEY_COMPLEX,
                fontScale=f_width / 1000,
                color=(255, 0, 0),
                thickness=1,
                lineType=cv2.LINE_AA
            )
            # Use this workaround if there is flickering.
            if use_popup:
                cv2.imshow(winname=title, mat=frame)
                key = cv2.waitKey(1)
                # escape = 27
                if key == 27:
                    break
            else:
                # Encode numpy array to jpg.
                _, encoded_img = cv2.imencode(
                    ext=".jpg", img=frame, params=[cv2.IMWRITE_JPEG_QUALITY, 100]
                )
                # Create an IPython image.
                i = display.Image(data=encoded_img)
                # Display the image in this notebook.
                display.clear_output(wait=True)
                display.display(i)
    # ctrl-c
    except KeyboardInterrupt:
        print("Interrupted")
    # any different error
    except RuntimeError as e:
        print(e)
    finally:
        if player is not None:
            # Stop capturing.
            player.stop()
        if use_popup:
            cv2.destroyAllWindows()
リアルタイムの背景ぼかしを実行
ウェブカメラをビデオ入力として使用します。デフォルトでは、プライマリー・ウェブカメラは source=0 に設定されます。複数のウェブカメラがある場合、0 から始まる連続した番号が割り当てられます。前面カメラを使用する場合は、flip=True を設定します。一部のウェブブラウザー、特に Mozilla Firefox ではちらつきが発生する場合があります。ちらつきが発生する場合、use_popup=True を設定してください。
注: このノートブックをウェブカメラで使用するには、ウェブカメラを備えたコンピューター上でノートブックを実行する必要があります。ノートブックをリモートサーバー (例えば、Binder または Google Colab サービス) で実行する場合、ウェブカメラは動作しません。デフォルトでは、下のセルはビデオファイルに対してモデル推論を実行します。ウェブカメラのセットでリアルタイムの推論を試してみたい場合は、
WEBCAM_INFERENCE = Trueを設定してください。
WEBCAM_INFERENCE = False

if WEBCAM_INFERENCE:
    VIDEO_SOURCE = 0  # Webcam
else:
    VIDEO_SOURCE = "https://storage.openvinotoolkit.org/repositories/openvino_notebooks/data/data/video/CEO%20Pat%20Gelsinger%20on%20Leading%20Intel.mp4"
推論するデバイスを選択します。
device
Dropdown(description='Device:', index=1, options=('CPU', 'AUTO'), value='AUTO')
実行:
run_background_blurring(source=VIDEO_SOURCE, device=device.value)
Source ended