U^2-Net と OpenVINO™ を使用した画像の背景削除
この Jupyter ノートブックはオンラインで起動でき、ブラウザーのウィンドウで対話型環境を開きます。ローカルにインストールすることもできます。次のオプションのいずれかを選択します。


このノートブックでは、U\(^2\)-Net と OpenVINO を使用して画像の背景を除去する方法を示します。
ソースコードやテストデータなど、U\(^2\)-Net の詳細については、GitHub ページと研究論文「U^2-Net: ネストされた U 構造でさらに深く、顕著なオブジェクトを検出」を参照してください。
PyTorch U\(^2\)-Net モデルは OpenVINO IR 形式に変換されます。モデルのソースはこちらから入手可能です。
目次
準備
要件をインストール
%pip install -q "openvino>=2023.1.0"
%pip install -q --extra-index-url https://download.pytorch.org/whl/cpu torch opencv-python matplotlib
%pip install -q "gdown<4.6.4"
Note: you may need to restart the kernel to use updated packages.
Note: you may need to restart the kernel to use updated packages.
Note: you may need to restart the kernel to use updated packages.
PyTorch ライブラリーと U \(^2\)-Net をインポート
import os
import time
import sys
from collections import namedtuple
from pathlib import Path

import cv2
import matplotlib.pyplot as plt
import numpy as np
import openvino as ov
import torch
from IPython.display import HTML, FileLink, display
# Import local modules

utils_file_path = Path("../utils/notebook_utils.py")
notebook_directory_path = Path(".")

if not utils_file_path.exists():
    !git clone --depth 1 https://github.com/openvinotoolkit/openvino_notebooks.git
    utils_file_path = Path("./openvino_notebooks/notebooks/utils/notebook_utils.py")
    notebook_directory_path = Path("./openvino_notebooks/notebooks/205-vision-background-removal/")

sys.path.append(str(utils_file_path.parent))
sys.path.append(str(notebook_directory_path))

from notebook_utils import load_image
from model.u2net import U2NET, U2NETP
設定
このチュートリアルでは、オリジナルの U\(^2\)-Net 顕著物体検出モデルと、より小型の U2NETP バージョンをサポートしています。元のモデルでは、顕著なオブジェクトの検出と人間のセグメント化の 2 つの重みセットがサポートされています。
model_config = namedtuple("ModelConfig", ["name", "url", "model", "model_args"])

u2net_lite = model_config(
    name="u2net_lite",
    url="https://drive.google.com/uc?id=1rbSTGKAE-MTxBYHd-51l2hMOQPT_7EPy",
    model=U2NETP,
    model_args=(),
)
u2net = model_config(
    name="u2net",
    url="https://drive.google.com/uc?id=1ao1ovG1Qtx4b7EoskHXmi2E9rp5CHLcZ",
    model=U2NET,
    model_args=(3, 1),
)
u2net_human_seg = model_config(
    name="u2net_human_seg",
    url="https://drive.google.com/uc?id=1-Yg0cxgrNhHP-016FPdp902BR-kSsA4P",
    model=U2NET,
    model_args=(3, 1),
)

# Set u2net_model to one of the three configurations listed above.
u2net_model = u2net_lite
# The filenames of the downloaded and converted models.
MODEL_DIR = "model"
model_path = Path(MODEL_DIR) / u2net_model.name / Path(u2net_model.name).with_suffix(".pth")
U \(^2\)-Net モデルをロード
U\(^2\)-Net ヒューマンセグメント化モデルの重みは Google ドライブに保存されます。存在しない場合はダウンロードされます。次のセルは、モデルと事前トレーニングされた重みをロードします。
if not model_path.exists():
    import gdown

    os.makedirs(name=model_path.parent, exist_ok=True)
    print("Start downloading model weights file... ")
    with open(model_path, "wb") as model_file:
        gdown.download(url=u2net_model.url, output=model_file)
        print(f"Model weights have been downloaded to {model_path}")
Start downloading model weights file...
Downloading...
From: https://drive.google.com/uc?id=1rbSTGKAE-MTxBYHd-51l2hMOQPT_7EPy
To: <_io.BufferedWriter name='model/u2net_lite/u2net_lite.pth'>
0%| | 0.00/4.68M [00:00<?, ?B/s]
11%|█ | 524k/4.68M [00:00<00:01, 3.35MB/s]
22%|██▏ | 1.05M/4.68M [00:00<00:00, 3.71MB/s]
34%|███▎ | 1.57M/4.68M [00:00<00:00, 3.78MB/s]
45%|████▍ | 2.10M/4.68M [00:00<00:00, 3.88MB/s]
56%|█████▌ | 2.62M/4.68M [00:00<00:00, 3.96MB/s]
67%|██████▋ | 3.15M/4.68M [00:00<00:00, 3.95MB/s]
78%|███████▊ | 3.67M/4.68M [00:00<00:00, 3.97MB/s]
90%|████████▉ | 4.19M/4.68M [00:01<00:00, 4.00MB/s]
100%|██████████| 4.68M/4.68M [00:01<00:00, 4.15MB/s]
100%|██████████| 4.68M/4.68M [00:01<00:00, 3.96MB/s]
Model weights have been downloaded to model/u2net_lite/u2net_lite.pth
# Load the model.
net = u2net_model.model(*u2net_model.model_args)
net.eval()

# Load the weights.
print(f"Loading model weights from: '{model_path}'")
net.load_state_dict(state_dict=torch.load(model_path, map_location="cpu"))
Loading model weights from: 'model/u2net_lite/u2net_lite.pth'
<All keys matched successfully>
PyTorch U \(^2\)-Net モデルを OpenVINO IR に変換
モデル変換 Python API を使用して、Pytorch モデルを OpenVINO IR 形式に変換します。次のコマンドの実行には時間がかかる場合があります。
model_ir = ov.convert_model(net, example_input=torch.zeros((1,3,512,512)), input=([1, 3, 512, 512]))
/opt/home/k8sworker/ci-ai/cibuilds/ov-notebook/OVNotebookOps-609/.workspace/scm/ov-notebook/.venv/lib/python3.8/site-packages/torch/nn/functional.py:3769: UserWarning: nn.functional.upsample is deprecated. Use nn.functional.interpolate instead.
                                        warnings.warn("nn.functional.upsample is deprecated. Use nn.functional.interpolate instead.")
入力画像のロードと前処理
OpenCV は BGR 形式で画像を読み取りますが、OpenVINO IR モデルは RGB の画像を想定しています。したがって、画像を RGB に変換し、サイズを 512 x 512 に変更して、OpenVINO IR モデルが期待する形式に次元を置き換えます。
平均値を画像テンソルに追加し、標準偏差で入力をスケーリングします。これは、ネットワークを通じて伝播する前の入力データの正規化と呼ばれます。平均値と標準偏差の値は、U^2-Net リポジトリーのデータローダー・ファイルにあり、0 ~ 255 のピクセル値を持つ画像をサポートするため 255 倍されます。
IMAGE_URI = "https://storage.openvinotoolkit.org/repositories/openvino_notebooks/data/data/image/coco_hollywood.jpg"

input_mean = np.array([123.675, 116.28 , 103.53]).reshape(1, 3, 1, 1)
input_scale = np.array([58.395, 57.12 , 57.375]).reshape(1, 3, 1, 1)

image = cv2.cvtColor(
    src=load_image(IMAGE_URI),
    code=cv2.COLOR_BGR2RGB,
)
)

resized_image = cv2.resize(src=image, dsize=(512, 512))
# Convert the image shape to a shape and a data type expected by the network
# for OpenVINO IR model: (1, 3, 512, 512).
input_image = np.expand_dims(np.transpose(resized_image, (2, 0, 1)), 0)

input_image = (input_image - input_mean) / input_scale
推論デバイスの選択
OpenVINO を使用して推論を実行するためにドロップダウン・リストからデバイスを選択します。
import ipywidgets as widgets

core = ov.Core()
device = widgets.Dropdown(
    options=core.available_devices + ["AUTO"],
    value='AUTO',
    description='Device:',
    disabled=False,
)


device
Dropdown(description='Device:', index=1, options=('CPU', 'AUTO'), value='AUTO')
OpenVINO IR モデルで推論を行う
OpenVINO IR モデルを OpenVINO ランタイムにロードし、推論を実行します。
core = ov.Core()
# Load the network to OpenVINO Runtime.
compiled_model_ir = core.compile_model(model=model_ir, device_name=device.value)
# Get the names of input and output layers.
input_layer_ir = compiled_model_ir.input(0)
output_layer_ir = compiled_model_ir.output(0)

# Do inference on the input image.
start_time = time.perf_counter()
result = compiled_model_ir([input_image])[output_layer_ir]
end_time = time.perf_counter()
print(
    f"Inference finished. Inference time: {end_time-start_time:.3f} seconds, "
    f"FPS: {1/(end_time-start_time):.2f}."
)
Inference finished. Inference time: 0.110 seconds, FPS: 9.05.
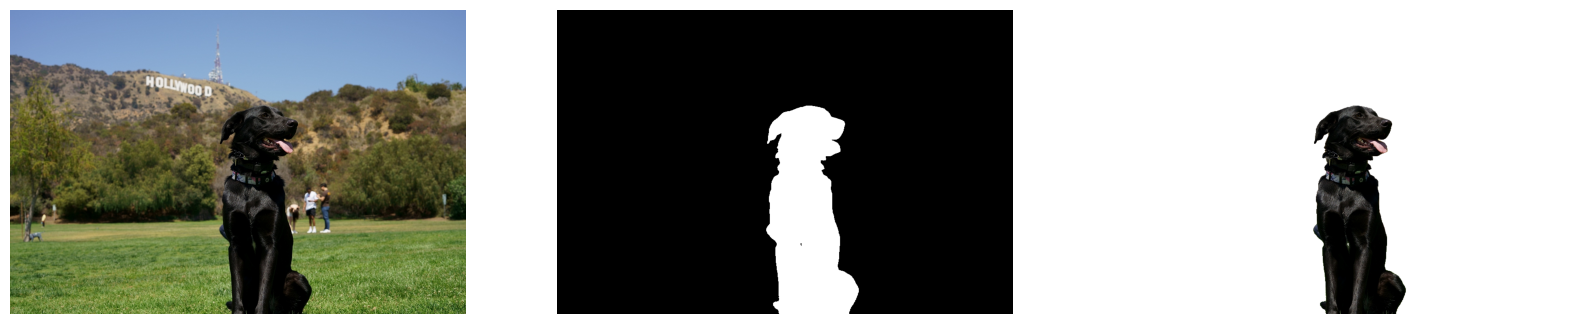
結果を可視化
元の画像、セグメント化の結果、背景を除去した元の画像を表示します。
# Resize the network result to the image shape and round the values
# to 0 (background) and 1 (foreground).
# The network result has (1,1,512,512) shape. The `np.squeeze` function converts this to (512, 512).
resized_result = np.rint(
    cv2.resize(src=np.squeeze(result), dsize=(image.shape[1], image.shape[0]))
).astype(np.uint8)

# Create a copy of the image and set all background values to 255 (white).
bg_removed_result = image.copy()
bg_removed_result[resized_result == 0] = 255

fig, ax = plt.subplots(nrows=1, ncols=3, figsize=(20, 7))
ax[0].imshow(image)
ax[1].imshow(resized_result, cmap="gray")
ax[2].imshow(bg_removed_result)
for a in ax:
    a.axis("off")
背景画像を追加
セグメント化の結果では、すべての前景ピクセルの値は 1、すべての背景ピクセルの値は 0 になります。背景画像を次のように置き換えます。
新しい
background_imageをロードします。元の画像と同じ画像サイズに変更します。
background_imageで、サイズ変更されたセグメント化の結果の値が 1 であるピクセル (元の画像の前景ピクセル) を 0 に設定します。前の手順で作成した
bg_removed_result(元の画像のうち、前景ピクセルのみを含む部分) を、background_imageに追加します。
BACKGROUND_FILE = "https://storage.openvinotoolkit.org/repositories/openvino_notebooks/data/data/image/wall.jpg"
OUTPUT_DIR = "output"

os.makedirs(name=OUTPUT_DIR, exist_ok=True)

background_image = cv2.cvtColor(src=load_image(BACKGROUND_FILE), code=cv2.COLOR_BGR2RGB)
background_image = cv2.resize(src=background_image, dsize=(image.shape[1], image.shape[0]))

# Set all the foreground pixels from the result to 0
# in the background image and add the image with the background removed.
background_image[resized_result == 1] = 0
new_image = background_image + bg_removed_result

# Save the generated image.
new_image_path = Path(f"{OUTPUT_DIR}/{Path(IMAGE_URI).stem}-{Path(BACKGROUND_FILE).stem}.jpg")
cv2.imwrite(filename=str(new_image_path), img=cv2.cvtColor(new_image, cv2.COLOR_RGB2BGR))

# Display the original image and the image with the new background side by side
fig, ax = plt.subplots(nrows=1, ncols=2, figsize=(18, 7))
ax[0].imshow(image)
ax[1].imshow(new_image)
for a in ax:
    a.axis("off")
plt.show()

# Create a link to download the image.
image_link = FileLink(new_image_path)
image_link.html_link_str = "<a href='%s' download>%s</a>"
display(
    HTML(
        f"The generated image <code>{new_image_path.name}</code> is saved in "
        f"the directory <code>{new_image_path.parent}</code>. You can also "
        "download the image by clicking on this link: "
        f"{image_link._repr_html_()}"
    )
)
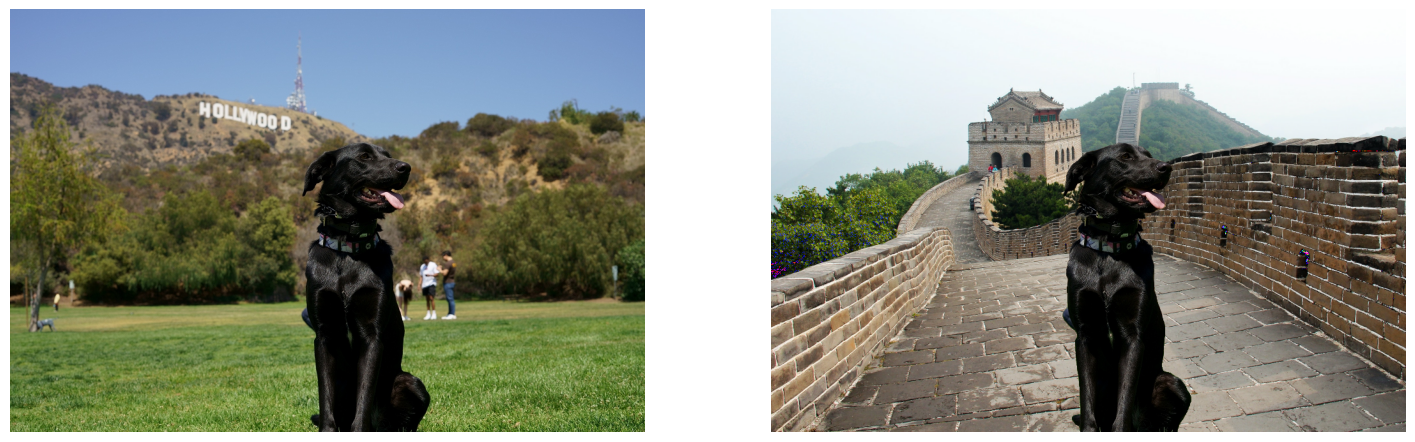 生成されたイメージ
 coco_hollywood-wall.jpg は、ディレクトリー output に保存されます。