マルチフェイス分析パイプラインのデモ#
このドキュメントでは、OpenVINO Model Zoo のオブジェクト検出モデルと認識モデルを使用して複雑なパイプラインを作成する方法を説明します。例として、face-detection-retail-0004 を使用して画像から複数の顔を検出します。次に、検出された顔ごとに、model_zoo_intel_object_detection サンプルのカスタムノードを使用してトリミングします。最後に、各顔画像は age-gender-recognition-retail-0013 モデルと emotion-recognition-retail-0003 モデルに転送されます。
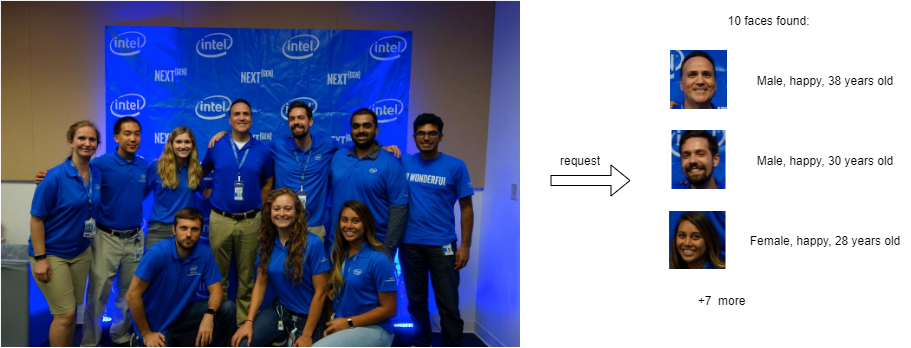
このようなパイプラインを使用すると、OVMS への 1 つの要求で複雑な操作を実行して、すべての顔とそのプロパティーを決定できます。
関連情報#
単一顔分析のより単純な使用例については、single_face_analysis_pipeline デモを参照してください。
パイプライン構成グラフ#
以下に、顔分析パイプラインを実装したグラフを示します。

これには次のノードが含まれます:
モデル
face-detection- ユーザー画像を入力として受け取るディープラーニング・モデル。出力には、顔の座標と信頼レベルに関する情報が含まれています。カスタムノード
model_zoo_intel_object_detection- 一般的なオブジェクト検出モデルの結果を処理する C++ 実装が含まれています。出力を分析することで、構成可能なスコアレベルのしきい値に基づいてトリミングされた顔画像が生成されます。カスタムノードは、ターゲット解像度に合わせてサイズを変更し、動的なバッチサイズの単一の出力に結合します。出力バッチサイズは、設定された基準に従って検出されたボックス数によって決定されます。画像に対するすべての操作には、OVMS にプリインストールされている OpenCV ライブラリーが使用されます。model_zoo_intel_object_detection custom node カスタムノードの詳細については、こちらをご覧ください。demultiplexer - カスタムノード model_zoo_intel_object_detection からの出力には可変のバッチサイズがあります。逐次認識モデルと照合するため、データは各バッチサイズが 1 に等しい個々の画像に分割されます。このような小さな要求は、次のモデルノードと並行して推論するために送信できます。demultiplexing についてさらに詳しく。
age-gender-recognitionモデル - このモデルは、指定された顔画像の年齢と性別を認識しますemotion-recognitionモデル - このモデルは、感情 (中立、幸せ、悲しみ、驚き、怒り) の感情確率を出力します。応答 - パイプライン全体の出力は、認識された顔画像とそのメタデータ (座標、年齢、性別、感情、検出信頼レベル) を組み合わせます。
デモを実行するにはワークスペースを準備します#
顔分析パイプラインを正常にデプロイするには、以下を含むワークスペースが必要です:
face-detection-retail-0004、 age-gender-recognition-retail-0013 および emotion-recognition-retail-0003 モデル
画像処理用のカスタムノード
構成ファイル
リポジトリーのクローンを作成し、multi_faces_analysis_pipeline ディレクトリーに移動します。
git clone https://github.com/openvinotoolkit/model_server.git
cd model_server/demos/multi_faces_analysis_pipeline/python
make コマンドを実行するだけで、上記のすべてを含むワークスペースを準備できます。このデモで使用されるカスタムノードは OpenVINO モデルサーバーのイメージに含まれているため、イメージからカスタムノードを使用するか、カスタムノードをビルドすることができます。
このデモを実行して、コンパイル済みのカスタムノードを使用する場合、次を実行します:
makeディレクトリー構造 (カスタムノードなし)#
make が完了すると、次の内容を含む workspace ディレクトリーが準備されているはずです。
workspace
├── age-gender-recognition-retail-0013
│   └── 1
│       ├── age-gender-recognition-retail-0013.bin
│       └── age-gender-recognition-retail-0013.xml
├── config.json
├── emotion-recognition-retail-0003
│   └── 1
│       ├── emotions-recognition-retail-0003.bin
│       └── emotions-recognition-retail-0003.xml
└── face-detection-retail-0004
    └── 1
        ├── face-detection-retail-0004.bin
        └── face-detection-retail-0004.xml
カスタムノードを変更した場合、またはその他の理由で、カスタムノードをコンパイルしてコンテナにアタッチしたい場合は、次を実行します:
make BUILD_CUSTOM_NODE=true BASE_OS=ubuntuディレクトリー構造 (カスタムノードあり)#
make が完了すると、次の内容を含む workspace ディレクトリーが準備されているはずです。
workspace
├── age-gender-recognition-retail-0013
│   └── 1
│       ├── age-gender-recognition-retail-0013.bin
│       └── age-gender-recognition-retail-0013.xml
├── config.json
├── emotion-recognition-retail-0003
│   └── 1
│       ├── emotions-recognition-retail-0003.bin
│       └── emotions-recognition-retail-0003.xml
├── face-detection-retail-0004
│   └── 1
│       ├── face-detection-retail-0004.bin
│       └── face-detection-retail-0004.xml
└── lib
    └── libcustom_node_model_zoo_intel_object_detection.so
OVMS のデプロイ#
次のコマンドで顔分析パイプラインを備えた OVMS をデプロイします:
docker run -p 9000:9000 -d -v ${PWD}/workspace:/workspace openvino/model_server --config_path /workspace/config.json --port 9000サービスの要求#
例示的なクライアント multi_faces_analysis_pipeline.py を使用して、前の手順でデプロイされたパイプラインを要求できます。
pip3 install -r requirements.txtこれで、テキスト画像用のディレクトリーを作成し、クライアントを実行できるようになりました:
mkdir resultspython3 multi_faces_analysis_pipeline.py --pipeline_name find_face_images --grpc_port 9000 --image_input_path ../../common/static/images/people/people1.jpeg --face_images_output_name face_images --face_images_save_path ./results --image_width 600 --image_height 400 --input_image_layout NHWC Output: name[emotions]
numpy => shape[(10, 1, 5, 1, 1)] data[float32]
Output: name[ages]
numpy => shape[(10, 1, 1, 1, 1)] data[float32]
Output: name[confidence_levels]
numpy => shape[(10, 1, 1)] data[float32]
Output: name[genders]
numpy => shape[(10, 1, 2, 1, 1)] data[float32]
Output: name[face_images]
numpy => shape[(10, 1, 64, 64, 3)] data[float32]
Output: name[face_coordinates]
numpy => shape[(10, 1, 4)] data[float32]
Found 10 faces:
Age: 36 ; Gender: male ; Emotion: happy ; Original image coordinate: [0.5524015 0.30247137 0.5912314 0.39167264]
Age: 24 ; Gender: male ; Emotion: neutral ; Original image coordinate: [0.33651015 0.6238419 0.38452235 0.7109271 ]
Age: 22 ; Gender: male ; Emotion: happy ; Original image coordinate: [0.2273316 0.34603435 0.26951137 0.44243896]
Age: 46 ; Gender: male ; Emotion: happy ; Original image coordinate: [0.44218776 0.29372302 0.48234263 0.37782392]
Age: 41 ; Gender: female ; Emotion: happy ; Original image coordinate: [0.51707435 0.5602793 0.56729674 0.65029866]
Age: 26 ; Gender: male ; Emotion: happy ; Original image coordinate: [0.798531 0.35693872 0.8411773 0.42878723]
Age: 26 ; Gender: female ; Emotion: happy ; Original image coordinate: [0.6506455 0.5917437 0.69963944 0.6924231 ]
Age: 30 ; Gender: male ; Emotion: happy ; Original image coordinate: [0.67255247 0.3240037 0.72031224 0.4141158 ]
Age: 22 ; Gender: female ; Emotion: happy ; Original image coordinate: [0.13879135 0.36219013 0.18784639 0.4526276 ]
Age: 22 ; Gender: female ; Emotion: happy ; Original image coordinate: [0.33016038 0.37727404 0.36954236 0.44583446]追加パラメーター --face_images_save_path を使用すると、クライアント・スクリプトは、検出されたすべてのテキスト画像を jpeg ファイルとしてディレクトリー・パスに保存し、画像が正しく分析されたか確認します。