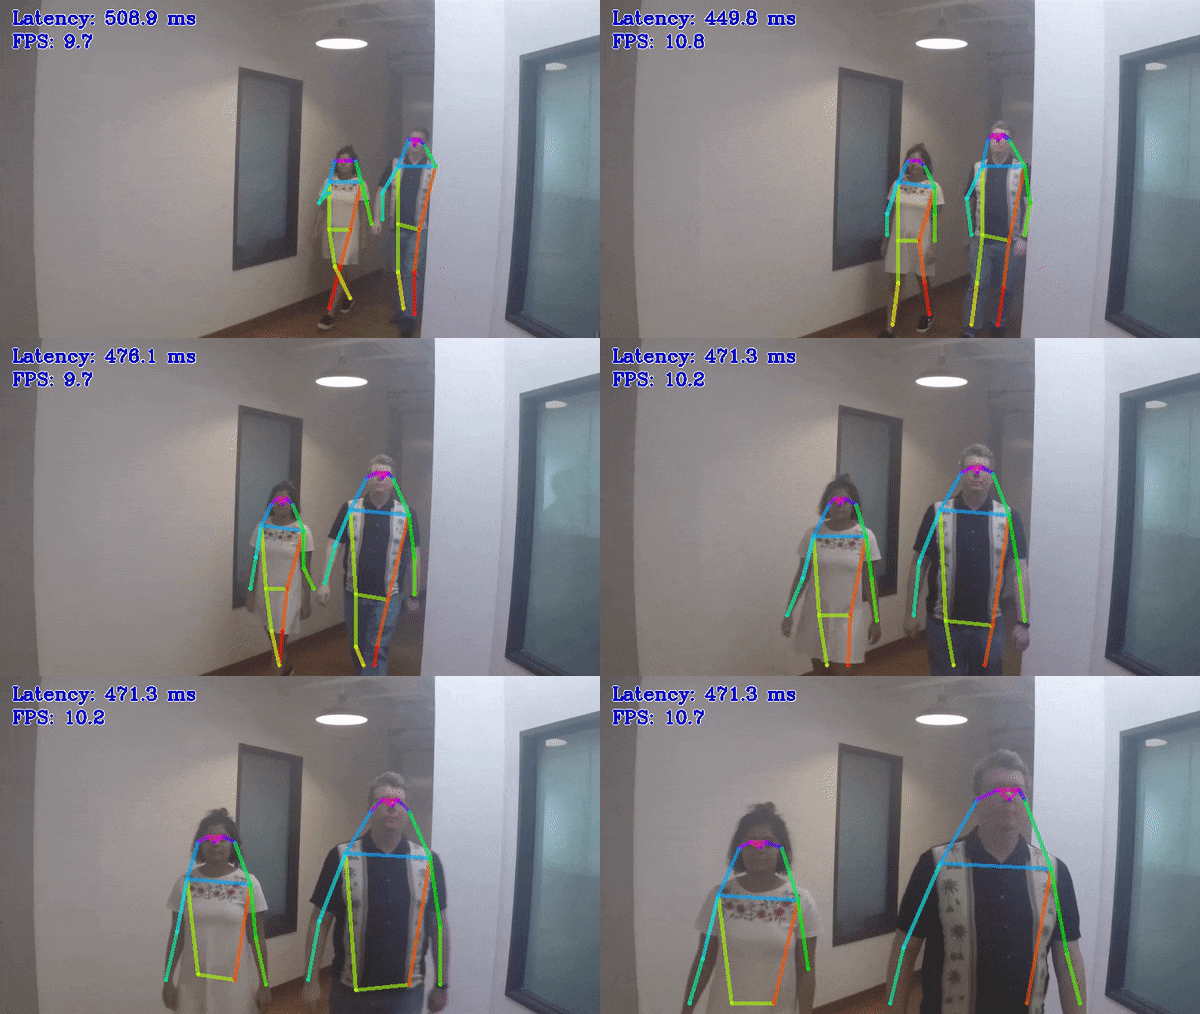
人物姿勢推定 Python* デモ#

このデモでは、複数人の 2D 姿勢推定アルゴリズムの動作を紹介します。タスクは、入力画像/ビデオ内のすべての人物について、事前に定義された一連のキーポイントとそれらの間の接続で構成されるポーズ、つまり体の骨格を予測することです。
どのように動作するか#
起動時に、アプリケーションはコマンドライン・パラメーターを受け取り、モデルを OpenVINO™ ランタイムプラグインにロードします。OpenCV VideoCapture からフレームを取得すると、推論を実行して結果を表示します。
注: デフォルトでは、Open Model Zoo のデモは BGR チャネル順序での入力を期待します。RGB 順序で動作するようにモデルをトレーニングした場合は、サンプルまたはデモ・アプリケーションでデフォルトのチャネル順序を手動で再配置するか、
--reverse_input_channels引数を指定したモデル・オプティマイザー・ツールを使用してモデルを再変換する必要があります。引数の詳細については、[前処理計算の埋め込み](@ref openvino_docs_MO_DG_Additional_Optimization_Use_Cases) の入力チャネルを反転するセクションを参照してください。
モデル API#
このデモでは、Python* モデル API のモデルラッパー、アダプター、パイプラインを利用します。
統一された結果表現を備えたラッパーの汎用インターフェイスは、1 つのデモで複数の異なる人間の姿勢推定モデルトポロジーのサポートを提供します。
実行の準備#
デモの入力画像またはビデオファイルについては、Open Model Zoo デモの概要のデモに使用できるメディアファイルのセクションを参照してください。デモでサポートされるモデルリストは、<omz_dir>/demos/human_pose_estimation_demo/python/models.lst ファイルにあります。このファイルは、モデル・ダウンローダーおよびコンバーターのパラメーターとして使用され、モデルをダウンロードし、必要に応じて OpenVINO IR 形式 (*.xml + *.bin) に変換できます。
モデル・ダウンローダーの使用例:
omz_downloader --list models.lstモデル・コンバーターの使用例:
omz_converter --list models.lstサポートされるモデル#
architecture_type=openpose
human-pose-estimation-0001
architecture_type=ae
human-pose-estimation-0005
human-pose-estimation-0006
human-pose-estimation-0007
architecture_type=higherhrnet
higher-hrnet-w32-human-pose-estimation
注: 各種デバイス向けのモデル推論サポートの詳細については、インテルの事前トレーニング・モデルのデバイスサポートとパブリックの事前トレーニング・モデルのデバイスサポートの表を参照してください。
実行する#
-h オプションを指定してアプリケーションを実行すると、使用方法が表示されます:
usage: human_pose_estimation_demo.py [-h] -m MODEL -at {ae,hrnet,openpose}
                                     -i INPUT [--loop] [-o OUTPUT]
                                     [-limit OUTPUT_LIMIT] [-d DEVICE]
                                     [-t PROB_THRESHOLD] [--tsize TSIZE]
                                     [-nireq NUM_INFER_REQUESTS]
                                     [-nstreams NUM_STREAMS]
                                     [-nthreads NUM_THREADS] [-no_show]
                                     [--output_resolution OUTPUT_RESOLUTION]
                                     [-u UTILIZATION_MONITORS] [-r]

Options:
  -h, --help            Show this help message and exit.
  -m MODEL, --model MODEL
                        Required. Path to an .xml file with a trained model.
  -at {ae,higherhrnet,openpose}, --architecture_type {ae,higherhrnet,openpose}
                        Required. Specify model' architecture type.
  -i INPUT, --input INPUT
                        Required. An input to process.The input must be a
                        single image, a folder of images, video file or camera id.
  --loop
                        Optional. Enable reading the input in a loop.
  -o OUTPUT, --output OUTPUT
                        Optional. Name of the output file(s) to save.Frames of odd width or height can be truncated.See https://github.com/opencv/opencv/pull/24086
  -limit OUTPUT_LIMIT, --output_limit OUTPUT_LIMIT
                        Optional. Number of frames to store in output. If 0 is
                        set, all frames are stored.
  -d DEVICE, --device DEVICE
                        Optional. Specify the target device to infer on; CPU or
                        GPU is acceptable.The demo will look for a suitable
                        plugin for device specified.Default value is CPU.

Common model options:
  -t PROB_THRESHOLD, --prob_threshold PROB_THRESHOLD
                        Optional. Probability threshold for poses filtering.
  --tsize TSIZE
                        Optional. Target input size.This demo implements
                        image pre-processing pipeline that is common to human
                        pose estimation approaches.Image is first resized to
                        some target size and then the network is reshaped to
                        fit the input image shape.By default target image
                        size is determined based on the input shape from IR.
                        Alternatively it can be manually set via this
                        parameter.Note that for OpenPose-like nets image is
                        resized to a predefined height, which is the target
                        size in this case. For Associative Embedding-like nets
                        target size is the length of a short first image side.

Inference options:
  -nireq NUM_INFER_REQUESTS, --num_infer_requests NUM_INFER_REQUESTS
                        Optional. Number of infer requests
  -nstreams NUM_STREAMS, --num_streams NUM_STREAMS
                        Optional. Number of streams to use for inference on
                        the CPU or/and GPU in throughput mode (for HETERO and
                        MULTI device cases use format
                        <device1>:<nstreams1>,<device2>:<nstreams2> or just
                        <nstreams>).
  -nthreads NUM_THREADS, --num_threads NUM_THREADS
                        Optional. Number of threads to use for inference on
                        CPU (including HETERO cases).

Input/output options:
  -no_show, --no_show   Optional.Don't show output.
  --output_resolution OUTPUT_RESOLUTION
                        Optional. Specify the maximum output window resolution
                        in (width x height) format.Example: 1280x720.
                        Input frame used by default.
  -u UTILIZATION_MONITORS, --utilization_monitors UTILIZATION_MONITORS
                        Optional.List of monitors to show initially.

Debug options:
  -r, --raw_output_message
                        Optional. Output inference results raw values showing.
オプションの空のリストを指定してアプリケーションを実行すると、短い使用法メッセージとエラーメッセージが表示されます。
次のコマンドを使用すると、事前トレーニングされた人間の姿勢推定モデルを使用して CPU 上で推論を行うことができます:
python3 human_pose_estimation_demo.py \
    -d CPU \
    -i 0 \
    -m <path_to_model>/human-pose-estimation-0005.xml \
-at ae注: 単一の画像を入力として指定すると、デモはすぐに処理してレンダリングし終了します。推論結果を画面上で継続的に視覚化するには、
loopオプションを適用します。これにより、単一の画像がループで処理されます。
-o オプションを使用すると、処理結果を Motion JPEG AVI ファイル、または別の JPEG または PNG ファイルに保存できます:
処理結果を AVI ファイルに保存するには、
avi拡張子を付けた出力ファイル名を指定します (例:-o output.avi)。処理結果を画像として保存するには、出力画像ファイルのテンプレート名を拡張子
jpgまたはpngで指定します (例:-o output_%03d.jpg)。実際のファイル名は、実行時に正規表現%03dをフレーム番号に置き換えることによってテンプレートから構築され、output_000.jpg、output_001.jpgなどになります。カメラなど連続入力ストリームでディスク領域のオーバーランを避けるため、limitオプションを使用して出力ファイルに保存されるデータの量を制限できます。デフォルト値は 1000 です。これを変更するには、-limit Nオプションを適用します。ここで、Nは保存するフレームの数です。
注: Windows* システムには、デフォルトでは Motion JPEG コーデックがインストールされていない場合があります。この場合、OpenVINO ™ インストール・パッケージに付属する、
<INSTALL_DIR>/opencv/ffmpeg-download.ps1にある PowerShell スクリプトを使用して OpenCV FFMPEG バックエンドをダウンロードできます。OpenVINO ™ がシステムで保護されたフォルダーにインストールされている場合 (一般的なケース)、スクリプトは管理者権限で実行する必要があります。あるいは、結果を画像として保存することもできます。
デモの出力#
デモでは OpenCV を使用して、推定されたポーズを含む結果のフレームを表示します。デモレポート
FPS: ビデオフレーム処理の平均レート (1 秒あたりのフレーム数)。
レイテンシー: 1 フレームの処理 (フレームの読み取りから結果の表示まで) に必要な平均時間。
次の各パイプライン・ステージのレイテンシー:
デコード — 入力データをキャプチャー。
前処理 — 推論のためのデータの準備。
推論 — 入力データ (画像) を推論して結果を取得。
後処理 — 出力用の推論結果を準備。
レンダリング — 出力画像を生成。
これらのメトリックを使用して、アプリケーション・レベルのパフォーマンスを測定できます。