Tiny-SD と OpenVINO™ による画像生成#
この Jupyter ノートブックはオンラインで起動でき、ブラウザーのウィンドウで対話型環境を開きます。ローカルにインストールすることもできます。次のオプションのいずれかを選択します:
近年、AI コミュニティーでは、Falcon 40B、LLaMa-2 70B、Falcon 40B、MPT 30B などのより大規模で高性能な言語モデルの開発や、SD2.1 や SDXL などのイメージング領域でのモデルの開発が著しく増加しています。これらの進歩により、AI が達成できるものの限界が間違いなく押し広げられ、非常に汎用性の高い最先端の画像生成機能と言語理解機能が実現しました。しかし、大規模モデルの進歩には、相当な計算負荷が伴います。この問題を解決するため、効率的な安定拡散 (Stable Diffusion) に関する最近の研究では、サンプリング・ステップ数を減らし、ネットワーク量子化を活用することを優先しています。
画像生成モデルをより高速、小型、安価にするという目標に向かって、Segmind によって Tiny-SD が提案されました。Tiny SD は、Knowledge-Distillation (KD) 技術に基づいてトレーニングされた圧縮された Stable Diffusion (SD) モデルであり、主にこの論文に基づいています。著者らは、UNet レイヤーの一部を削除し、学生モデルの重みをトレーニングするブロック削除知識蒸留法 (Block-removal Knowledge-Distillation) について説明しています。論文で説明されている KD 手法を使用することで、研究者は、🧨 ディフューザー・ライブラリーを使用して、ベースモデルよりもそれぞれ 35% と 55% 少ないパラメーターを持つ Small と Tiny という 2 つの圧縮モデルをトレーニングすることができました。これらのモデルは、ベースモデルと同等の画像忠実度を達成しています。モデルの詳細については、モデルカード、ブログ投稿、トレーニング・リポジトリーをご覧ください。
このノートブックでは、OpenVINO を使用して Tiny-SD モデルを変換および実行する方法を説明します。
これには次の手順が含まれます:
OpenVINO コンバーター・ツール (OVC) を使用して、PyTorch モデルを OpenVINO 中間表現に変換します。
推論パイプラインを準備します。
OpenVINO を使用して推論パイプラインを実行します。
Tiny-SD モデルのインタラクティブなデモを実行します。
目次:
必要条件#
必要な依存関係をインストールします
%pip install -q --extra-index-url https://download.pytorch.org/whl/cpu "torch>=2.1" torchvision "openvino>=2023.3.0" "opencv-python" "pillow" "diffusers>=0.18.0" "transformers>=4.30.2" "gradio>=4.19"Pytorch モデル・パイプラインを作成#
StableDiffusionPipeline は、わずか数行のコードでテキストから画像を生成できるエンドツーエンドの推論パイプラインです。
まず、モデルのすべてのコンポーネントの事前トレーニング済みの重みをロードします。
import gc
from diffusers import StableDiffusionPipeline

model_id = "segmind/tiny-sd"

pipe = StableDiffusionPipeline.from_pretrained(model_id).to("cpu")
text_encoder = pipe.text_encoder
text_encoder.eval()
unet = pipe.unet
unet.eval()
vae = pipe.vae
vae.eval()

del pipe
gc.collect()
2023-09-18 15:58:40.831193: I tensorflow/core/util/port.cc:110] oneDNN custom operations are on.You may see slightly different numerical results due to floating-point round-off errors from different computation orders.To turn them off, set the environment variable TF_ENABLE_ONEDNN_OPTS=0. 2023-09-18 15:58:40.870576: I tensorflow/core/platform/cpu_feature_guard.cc:182] This TensorFlow binary is optimized to use available CPU instructions in performance-critical operations. To enable the following instructions: AVX2 AVX512F AVX512_VNNI FMA, in other operations, rebuild TensorFlow with the appropriate compiler flags. 2023-09-18 15:58:41.537042: W tensorflow/compiler/tf2tensorrt/utils/py_utils.cc:38] TF-TRT Warning: Could not find TensorRT text_encoder/model.safetensors not found
Loading pipeline components...: 0%| | 0/5 [00:00<?, ?it/s]27モデルを OpenVINO 中間表現形式に変換#
OpenVINO は、OpenVINO 中間表現 (IR) 形式への変換により PyTorch をサポートします。OpenVINO 最適化ツールと機能を活用するには、OpenVINO コンバーター・ツール (OVC) を使用してモデルを変換する必要があります。openvino.convert_model 関数は、OVC を使用するための Python API を提供します。この関数は、Python インターフェイスで使用できる OpenVINO Model クラスのインスタンスを返します。ただし、将来の実行に向けて openvino.save_model でディスクに保存することもできます。
OpenVINO 2023.0 リリース以降、OpenVINO は直接変換 PyTorch モデルをサポートします。変換を実行するには、PyTorch モデル・インスタンスとサンプル入力を openvino.convert_model に提供する必要があります。デフォルトでは、モデルは動的形状を保持して変換されますが、入力形状を固定して特定の解像度の画像を生成するために、input パラメーターを追加で指定できます。
このモデルは 3 つの重要な部分で構成されています:
テキストプロンプトから画像を生成する作成条件のテキスト・エンコーダー。
段階的にノイズを除去する潜像表現のための U-Net。
入力イメージを潜在空間にエンコードし (必要な場合)、生成後に潜在空間を画像にデコードするオート・エンコーダー (VAE)。
各パーツを変換してみましょう。
テキスト・エンコーダー#
テキスト・エンコーダーは、入力プロンプト (例えば、“馬に乗った宇宙飛行士の写真”) を、U-Net が理解できる埋め込みスペースに変換する役割を果たします。これは通常、入力トークンのシーケンスを潜在テキスト埋め込みのシーケンスにマッピングする単純なトランスフォーマー・ベースのエンコーダーです。
テキスト・エンコーダーの入力はテンソル input_ids です。これには、トークナイザーによって処理され、モデルによって受け入れられる最大長までパディングされたテキストからのトークン・インデックスが含まれます。モデルの出力は第 2 章テンソルです: モデルの出力は 2 つのテンソルです:
last_hidden_state - モデル内の最後の MultiHeadtention レイヤーからの非表示状態、および pooler_out - モデル全体の非表示状態のプールされた出力。
from pathlib import Path
import torch
import openvino as ov

TEXT_ENCODER_OV_PATH = Path("text_encoder.xml")

def convert_encoder(text_encoder: torch.nn.Module, ir_path: Path):
    """
    Convert Text Encoder mode.Function accepts text encoder model, and prepares example inputs for conversion,
    Parameters:
        text_encoder (torch.nn.Module): text_encoder model from Stable Diffusion pipeline
        ir_path (Path): File for storing model
    Returns:
        None
    """
    input_ids = torch.ones((1, 77), dtype=torch.long)
    # モデルを推論モードに切り替え
    text_encoder.eval()

    # メモリー消費量を減らすため勾配計算を無効化
    with torch.no_grad():
    # モデルを IR 形式にエクスポート
        ov_model = ov.convert_model(
            text_encoder,
            example_input=input_ids,
            input=[
                (1, 77),
            ],
        )
    ov.save_model(ov_model, ir_path)
    del ov_model
    print(f"Text Encoder successfully converted to IR and saved to {ir_path}")

if not TEXT_ENCODER_OV_PATH.exists():
    convert_encoder(text_encoder, TEXT_ENCODER_OV_PATH)
else:
    print(f"Text encoder will be loaded from {TEXT_ENCODER_OV_PATH}")

del text_encoder
gc.collect()
Text encoder will be loaded from text_encoder.xml0U-net#
U-Net モデルには 3 つの入力があります:
sample- 前のステップからの潜在画像サンプル。生成プロセスはまだ開始されていないため、ランダムノイズを使用します。timestep- 現在のスケジューラー・ステップ。encoder_hidden_state- テキスト・エンコーダーの非表示状態。
モデルは次のステップの sample の状態を予測します。
import numpy as np
from openvino import PartialShape, Type

UNET_OV_PATH = Path("unet.xml")

dtype_mapping = {torch.float32: Type.f32, torch.float64: Type.f64}

def convert_unet(unet: torch.nn.Module, ir_path: Path):
    """
    Convert U-net model to IR format.Function accepts unet model, prepares example inputs for conversion,
    Parameters:
        unet (StableDiffusionPipeline): unet from Stable Diffusion pipeline
        ir_path (Path): File for storing model
    Returns:
        None
    """
    # 入力を準備
    encoder_hidden_state = torch.ones((2, 77, 768))
    latents_shape = (2, 4, 512 // 8, 512 // 8)
    latents = torch.randn(latents_shape)
    t = torch.from_numpy(np.array(1, dtype=float))
    dummy_inputs = (latents, t, encoder_hidden_state)
    input_info = []
    for input_tensor in dummy_inputs:
        shape = PartialShape(tuple(input_tensor.shape))
        element_type = dtype_mapping[input_tensor.dtype]
        input_info.append((shape, element_type))

    unet.eval()
    with torch.no_grad():
        ov_model = ov.convert_model(unet, example_input=dummy_inputs, input=input_info)
    ov.save_model(ov_model, ir_path)
    del ov_model
    print(f"Unet successfully converted to IR and saved to {ir_path}")

if not UNET_OV_PATH.exists():
    convert_unet(unet, UNET_OV_PATH)
    gc.collect()
else:
    print(f"Unet will be loaded from {UNET_OV_PATH}")
del unet
gc.collect()
Unet will be loaded from unet.xml0VAE#
VAE モデルには、エンコーダーとデコーダーの 2 つのパーツがあります。エンコーダーは、画像を低次元の潜在表現に変換するのに使用され、これが U-Net モデルの入力となります。逆に、デコーダーは潜在表現を変換して画像に戻します。
潜在拡散トレーニング中、エンコーダーは、順拡散プロセス用の画像の潜在表現 (潜在) を取得するために使用され、各ステップでより多くのノイズが適用されます。論中、逆拡散プロセスによって生成されたノイズ除去された潜在は、VAE デコーダーによって画像に変換されます。テキストから画像への推論を実行する場合、開始点となる初期画像はありません。この手順をスキップして、初期のランダムノイズを直接生成することもできます。
エンコーダーとデコーダーはパイプラインの異なる部分で独立して使用されるため、それらを別々のモデルに変換するほうが適切です。
VAE_ENCODER_OV_PATH = Path("vae_encodr.xml")

def convert_vae_encoder(vae: torch.nn.Module, ir_path: Path):
    """
    Convert VAE model for encoder to IR format.Function accepts vae model, creates wrapper class for export only necessary for inference part,
    prepares example inputs for conversion,
    Parameters:
        vae (torch.nn.Module): VAE model frm StableDiffusion pipeline
        ir_path (Path): File for storing model
    Returns:
        None
    """

    class VAEEncoderWrapper(torch.nn.Module):
        def __init__(self, vae):
            super().__init__()
            self.vae = vae

    def forward(self, image):
        return self.vae.encode(x=image)["latent_dist"].sample()

    vae_encoder = VAEEncoderWrapper(vae)
    vae_encoder.eval()
    image = torch.zeros((1, 3, 512, 512))
    with torch.no_grad():
        ov_model = ov.convert_model(vae_encoder, example_input=image, input=[((1, 3, 512, 512),)])
    ov.save_model(ov_model, ir_path)
    del ov_model
    print(f"VAE encoder successfully converted to IR and saved to {ir_path}")

if not VAE_ENCODER_OV_PATH.exists():
    convert_vae_encoder(vae, VAE_ENCODER_OV_PATH)
else:
    print(f"VAE encoder will be loaded from {VAE_ENCODER_OV_PATH}")

VAE_DECODER_OV_PATH = Path("vae_decoder.xml")

def convert_vae_decoder(vae: torch.nn.Module, ir_path: Path):
    """
    Convert VAE model for decoding to IR format.Function accepts vae model, creates wrapper class for export only necessary for inference part,
    prepares example inputs for conversion,
    Parameters:
        vae (torch.nn.Module): VAE model frm StableDiffusion pipeline
        ir_path (Path): File for storing model
    Returns:
        None
    """

    class VAEDecoderWrapper(torch.nn.Module):
        def __init__(self, vae):
            super().__init__()
            self.vae = vae

    def forward(self, latents):
        return self.vae.decode(latents)

    vae_decoder = VAEDecoderWrapper(vae)
    latents = torch.zeros((1, 4, 64, 64))

    vae_decoder.eval()
    with torch.no_grad():
        ov_model = ov.convert_model(vae_decoder, example_input=latents, input=[((1, 4, 64, 64),)])
    ov.save_model(ov_model, ir_path)
    del ov_model
    print(f"VAE decoder successfully converted to IR and saved to {ir_path}")

if not VAE_DECODER_OV_PATH.exists():
    convert_vae_decoder(vae, VAE_DECODER_OV_PATH)
else:
    print(f"VAE decoder will be loaded from {VAE_DECODER_OV_PATH}")

del vae
gc.collect()
VAE encoder will be loaded from vae_encodr.xml
VAE decoder will be loaded from vae_decoder.xml0推論パイプラインの準備#
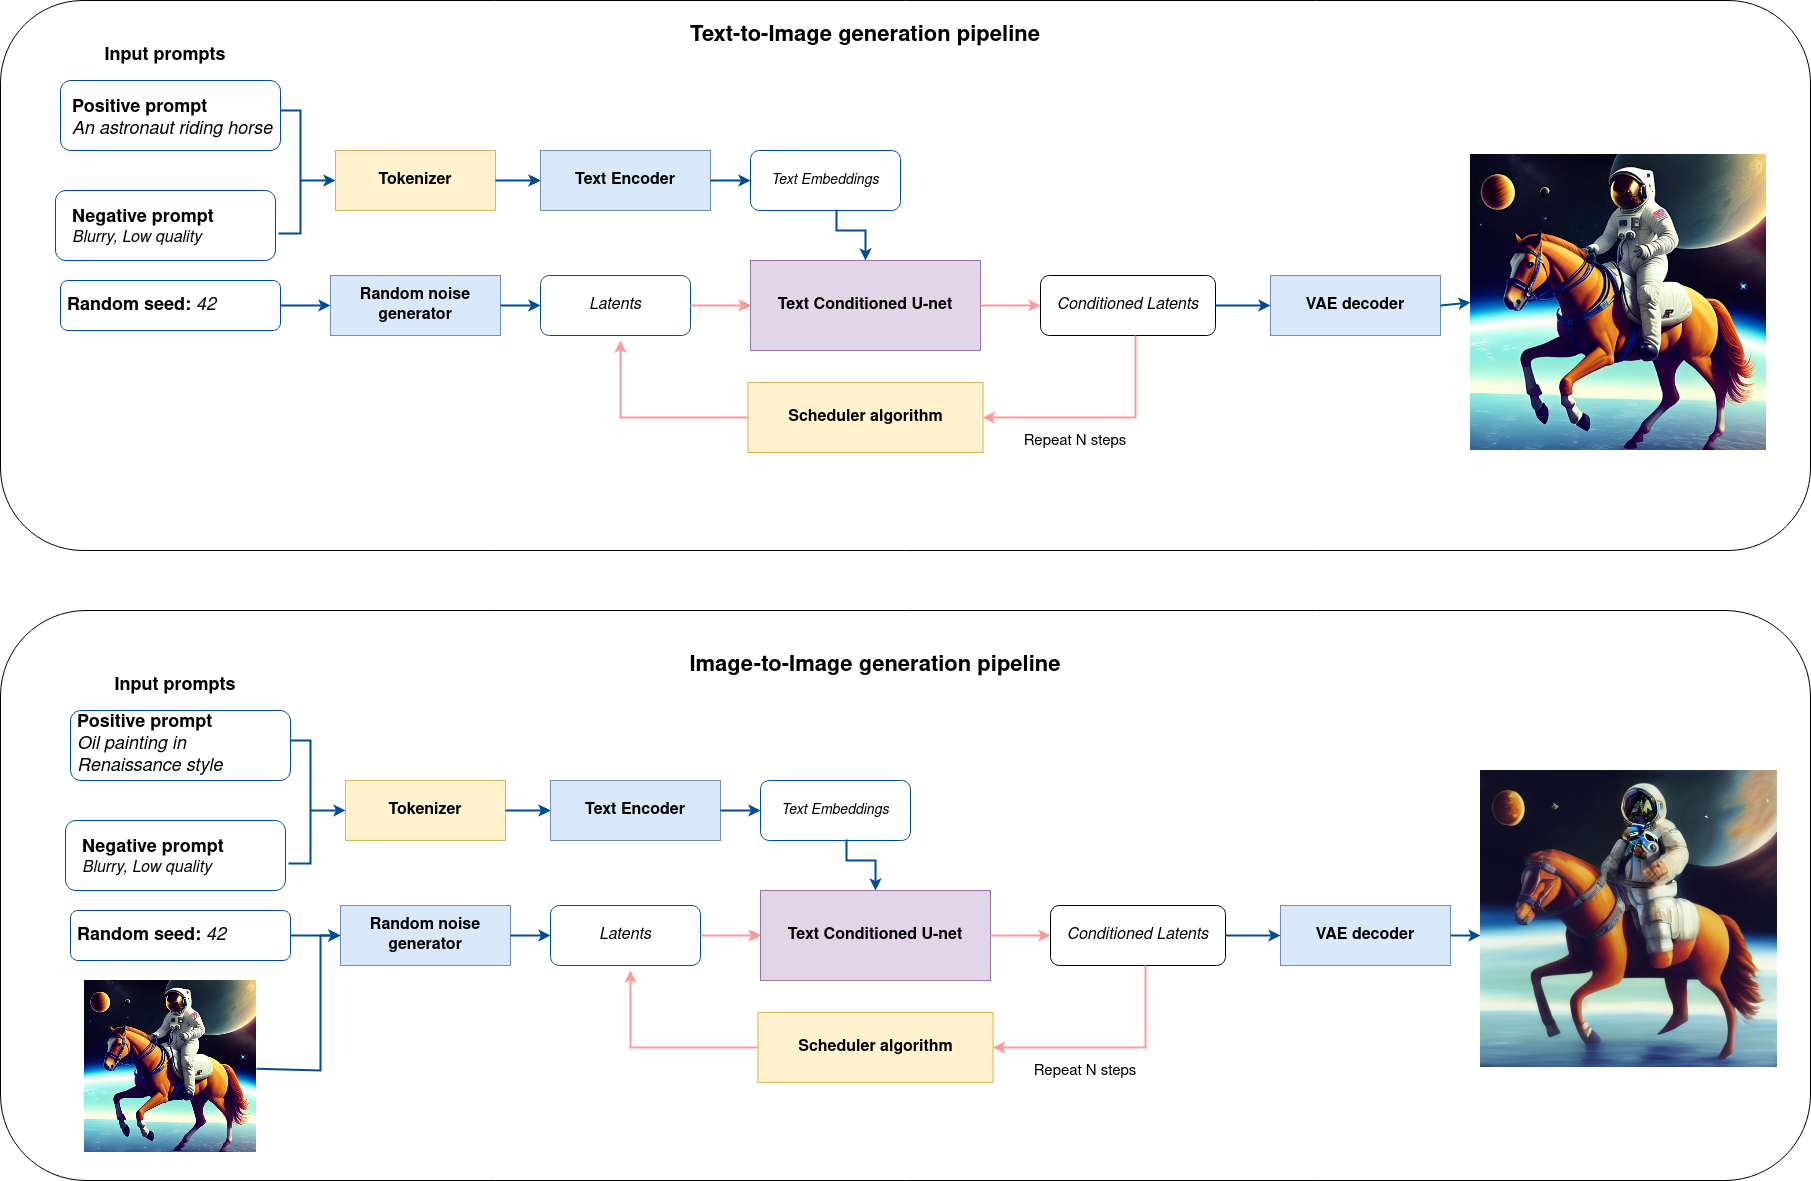
すべてをまとめた論理フローを図から、モデルが推論でどのように機能するかを詳しく見てみましょう。

sd-pipeline#
図からわかるように、テキストから画像への生成とテキスト誘導による画像から画像への生成のアプローチにおける唯一の違いは、初期の潜在状態が生成される方法です。画像から画像への生成の場合、VAE エンコーダーによってエンコードされた画像が、潜在シードを使用して生成されたノイズと混合されますが、テキストから画像への生成では、初期の潜在状態としてノイズのみを使用します。Stable diffusion モデルは、サイズ \(64 \times 64\) の潜在画像表現とテキストプロンプトの両方を入力として受け取り、CLIP のテキスト・エンコーダーを介してサイズ \(77 \times 768\) のテキスト埋め込みに変換されます。
次に、U-Net モデルは、テキスト埋め込みを条件として、ランダムな潜在画像表現を繰り返しノイズ除去します。U-Net の出力はノイズ残差であり、スケジューラー・アルゴリズムを介してノイズ除去された潜在画像表現を計算するために使用されます。この計算にはさまざまなスケジューラー・アルゴリズムを使用できますが、それぞれに長所と短所があります。Stable Diffusion の場合、次のいずれかを使用することを推奨します:
K-LMS スケジューラー (パイプラインで使用します)
スケジューラーのアルゴリズム機能がどのように動作するかに関する理論は、このノートブックの範囲外です。それでも、簡単に言えば、以前のノイズ表現と予測されたノイズ残差から、予測されたノイズ除去画像表現を計算することを覚えておく必要があります。詳細については、推奨されている拡散ベースの生成モデルの設計空間の解明を参照してください。
ノイズ除去プロセスは、指定された回数 (デフォルトでは 50 回) 繰り返され、段階的に潜在画像表現の改善が図られます。完了すると、潜在画像表現は変分オート・エンコーダーのデコーダー部によってデコードされます。
import inspect
from typing import List, Optional, Union, Dict

import PIL
import cv2

from transformers import CLIPTokenizer
from diffusers.pipelines.pipeline_utils import DiffusionPipeline
from diffusers.schedulers import DDIMScheduler, LMSDiscreteScheduler, PNDMScheduler

def scale_fit_to_window(dst_width: int, dst_height: int, image_width: int, image_height: int):
    """
    Preprocessing helper function for calculating image size for resize with peserving original aspect ratio
    and fitting image to specific window size

    Parameters:
        dst_width (int): destination window width
        dst_height (int): destination window height
        image_width (int): source image width
        image_height (int): source image height
    Returns:
        result_width (int): calculated width for resize
        result_height (int): calculated height for resize
    """
    im_scale = min(dst_height / image_height, dst_width / image_width)
    return int(im_scale * image_width), int(im_scale * image_height)

def preprocess(image: PIL.Image.Image):
    """
    Image preprocessing function.Takes image in PIL.Image format, resizes it to keep aspect ration and fits to model input window 512x512,
    then converts it to np.ndarray and adds padding with zeros on right or bottom side of image (depends from aspect ratio), after that
    converts data to float32 data type and change range of values from [0, 255] to [-1, 1], finally, converts data layout from planar NHWC to NCHW.The function returns preprocessed input tensor and padding size, which can be used in postprocessing.

    Parameters:
        image (PIL.Image.Image): input image
    Returns:
        image (np.ndarray): preprocessed image tensor
        meta (Dict): dictionary with preprocessing metadata info
    """
    src_width, src_height = image.size
    dst_width, dst_height = scale_fit_to_window(512, 512, src_width, src_height)
    image = np.array(image.resize((dst_width, dst_height), resample=PIL.Image.Resampling.LANCZOS))[None, :]
    pad_width = 512 - dst_width
    pad_height = 512 - dst_height
    pad = ((0, 0), (0, pad_height), (0, pad_width), (0, 0))
    image = np.pad(image, pad, mode="constant")
    image = image.astype(np.float32) / 255.0
    image = 2.0 * image - 1.0
    image = image.transpose(0, 3, 1, 2)
    return image, {"padding": pad, "src_width": src_width, "src_height": src_height}

class OVStableDiffusionPipeline(DiffusionPipeline):
    def __init__(
        self,
        vae_decoder: ov.Model,
        text_encoder: ov.Model,
        tokenizer: CLIPTokenizer,
        unet: ov.Model,
        scheduler: Union[DDIMScheduler, PNDMScheduler, LMSDiscreteScheduler],
        vae_encoder: ov.Model = None,
    ):
        """
        Pipeline for text-to-image generation using Stable Diffusion.
        Parameters:
            vae (Model):
                Variational Auto-Encoder (VAE) Model to decode images to and from latent representations.
            text_encoder (Model):
                Frozen text-encoder.Stable Diffusion uses the text portion of
                [CLIP](https://huggingface.co/docs/transformers/model_doc/clip#transformers.CLIPTextModel), specifically
                the clip-vit-large-patch14(https://huggingface.co/openai/clip-vit-large-patch14) variant.
            tokenizer (CLIPTokenizer):
                Tokenizer of class CLIPTokenizer(https://huggingface.co/docs/transformers/v4.21.0/en/model_doc/clip#transformers.CLIPTokenizer).
            unet (Model): Conditional U-Net architecture to denoise the encoded image latents.
            scheduler (SchedulerMixin):
                A scheduler to be used in combination with unet to denoise the encoded image latents.Can be one of
                DDIMScheduler, LMSDiscreteScheduler, or PNDMScheduler.
        """
        super().__init__()
        self.scheduler = scheduler
        self.vae_decoder = vae_decoder
        self.vae_encoder = vae_encoder
        self.text_encoder = text_encoder
        self.unet = unet
        self._text_encoder_output = text_encoder.output(0)
        self._unet_output = unet.output(0)
        self._vae_d_output = vae_decoder.output(0)
        self._vae_e_output = vae_encoder.output(0) if vae_encoder is not None else None
        self.height = 512
        self.width = 512
        self.tokenizer = tokenizer

    def __call__(
        self, prompt: Union[str, List[str]],
        image: PIL.Image.Image = None,
        num_inference_steps: Optional[int] = 50,
        negative_prompt: Union[str, List[str]] = None,
        guidance_scale: Optional[float] = 7.5,
        eta: Optional[float] = 0.0,
        output_type: Optional[str] = "pil",
        seed: Optional[int] = None,
        strength: float = 1.0,
        gif: Optional[bool] = False,
        **kwargs, ):
        """
        Function invoked when calling the pipeline for generation.
        Parameters:
            prompt (str or List[str]):
                The prompt or prompts to guide the image generation.
            image (PIL.Image.Image, *optional*, None):
                Intinal image for generation.
            num_inference_steps (int, *optional*, defaults to 50):
                The number of denoising steps.More denoising steps usually lead to a higher quality image at the
                expense of slower inference.
            negative_prompt (str or List[str]):
                The negative prompt or prompts to guide the image generation.
            guidance_scale (float, *optional*, defaults to 7.5): Guidance scale as defined in Classifier-Free Diffusion Guidance(https://arxiv.org/abs/2207.12598).
            guidance_scale is defined as `w` of equation 2.Higher guidance scale encourages to generate images that are closely linked to the text prompt,
                usually at the expense of lower image quality.
            eta (float, *optional*, defaults to 0.0): Corresponds to parameter eta (η) in the DDIM paper: https://arxiv.org/abs/2010.02502.Only applies to
                [DDIMScheduler], will be ignored for others.
            output_type (`str`, *optional*, defaults to "pil"):
                The output format of the generate image.Choose between
                [PIL](https://pillow.readthedocs.io/en/stable/): PIL.Image.Image or np.array.
            seed (int, *optional*, None):
                Seed for random generator state initialization. gif (bool, *optional*, False):
                Flag for storing all steps results or not.
        Returns:
             Dictionary with keys:
                sample - the last generated image PIL.Image.Image or np.array
                iterations - *optional* (if gif=True) images for all diffusion steps, List of PIL.Image.Image or np.array.
        """
        if seed is not None:
            np.random.seed(seed)

        img_buffer = []
        do_classifier_free_guidance = guidance_scale > 1.0
        # プロンプトテキスト埋め込みを取得
        text_embeddings = self._encode_prompt(
            prompt,
            do_classifier_free_guidance=do_classifier_free_guidance,
            negative_prompt=negative_prompt,
        )

        # タイムステップを設定
        accepts_offset = "offset" in set(inspect.signature(self.scheduler.set_timesteps).parameters.keys())
        extra_set_kwargs = {}
        if accepts_offset:
            extra_set_kwargs["offset"] = 1

        self.scheduler.set_timesteps(num_inference_steps, **extra_set_kwargs)
        timesteps, num_inference_steps = self.get_timesteps(num_inference_steps, strength)
        latent_timestep = timesteps[:1]

        # ユーザーが指定しない限り、初期のランダムノイズを取得
        latents, meta = self.prepare_latents(image, latent_timestep)

        # すべてのスケジューラーが同じシグネチャーを持つわけではないので、スケジューラー・ステップに追加の kwargs を準備
        # eta (η) は DDIMScheduler でのみ使用され、他のスケジューラーでは無視されます# eta は DDIM 論文の η に対応します: https://arxiv.org/abs/2010.02502 [0, 1]
        # の範囲にある必要があります
        accepts_eta = "eta" in set(inspect.signature(self.scheduler.step).parameters.keys())
        extra_step_kwargs = {}
        if accepts_eta:
            extra_step_kwargs["eta"] = eta

        for i, t in enumerate(self.progress_bar(timesteps)):
            # 分類器フリーのガイダンスを行う場合は潜在変数を拡張
            latent_model_input = np.concatenate([latents] * 2) if do_classifier_free_guidance else latents
            latent_model_input = self.scheduler.scale_model_input(latent_model_input, t)

            # ノイズ残留を予測
            noise_pred = self.unet([latent_model_input, t, text_embeddings])[self._unet_output]
            # ガイダンスを実行
            if do_classifier_free_guidance:
                noise_pred_uncond, noise_pred_text = noise_pred[0], noise_pred[1]
                noise_pred = noise_pred_uncond + guidance_scale * (noise_pred_text - noise_pred_uncond)

            # 前のノイズサンプルを計算 x_t -> x_t-1
            latents = self.scheduler.step(
                torch.from_numpy(noise_pred),
                t,
                torch.from_numpy(latents),
                **extra_step_kwargs,
            )["prev_sample"].numpy()
            if gif:
                image = self.vae_decoder(latents * (1 / 0.18215))[self._vae_d_output]
                image = self.postprocess_image(image, meta, output_type)
                img_buffer.extend(image)

        # 画像の潜在変数を vae でスケールしてデコード
        image = self.vae_decoder(latents * (1 / 0.18215))[self._vae_d_output]

        image = self.postprocess_image(image, meta, output_type)
        return {"sample": image, "iterations": img_buffer}

    def _encode_prompt(
        self,
        prompt: Union[str, List[str]],
        num_images_per_prompt: int = 1,
        do_classifier_free_guidance: bool = True,
        negative_prompt: Union[str, List[str]] = None,
    ):
        """
        Encodes the prompt into text encoder hidden states.

        Parameters:
            prompt (str or list(str)): prompt to be encoded
            num_images_per_prompt (int): number of images that should be generated per prompt
            do_classifier_free_guidance (bool): whether to use classifier free guidance or not
            negative_prompt (str or list(str)): negative prompt to be encoded
        Returns:
            text_embeddings (np.ndarray): text encoder hidden states
        """
        batch_size = len(prompt) if isinstance(prompt, list) else 1

        # 入力プロンプトをトークン化
        text_inputs = self.tokenizer(
            prompt,
            padding="max_length",
            max_length=self.tokenizer.model_max_length,
            truncation=True,
            return_tensors="np",
        )
        text_input_ids = text_inputs.input_ids

        text_embeddings = self.text_encoder(text_input_ids)[self._text_encoder_output]

        # プロンプトごとに各世代のテキスト埋め込みを複製
        if num_images_per_prompt != 1:
            bs_embed, seq_len, _ = text_embeddings.shape
            text_embeddings = np.tile(text_embeddings, (1, num_images_per_prompt, 1))
            text_embeddings = np.reshape(text_embeddings, (bs_embed * num_images_per_prompt, seq_len, -1))

        # 分類器の無条件埋め込みを取得するフリーガイダンス
        if do_classifier_free_guidance:
            uncond_tokens: List[str]
            max_length = text_input_ids.shape[-1]
            if negative_prompt is None:
                uncond_tokens = [""] * batch_size
            elif isinstance(negative_prompt, str):
                uncond_tokens = [negative_prompt]
            else:
                uncond_tokens = negative_prompt
            uncond_input = self.tokenizer(
                uncond_tokens,
                padding="max_length",
                max_length=max_length,
                truncation=True,
                return_tensors="np",
            )

            uncond_embeddings = self.text_encoder(uncond_input.input_ids)[self.text_encoder_output]

            # mps フレンドリーな方法を使用して、プロンプトごとに各世代の無条件埋め込みを複製
            seq_len = uncond_embeddings.shape[1]
            uncond_embeddings = np.tile(uncond_embeddings, (1, num_images_per_prompt, 1))
            uncond_embeddings = np.reshape(uncond_embeddings, (batch_size * num_images_per_prompt, seq_len, -1))

            # 分類器フリーのガイダンスでは、2 回のフォワードパスを実行する必要がある
            # ここでは、無条件埋め込みとテキスト埋め込みを 1 つのバッチに連結して、
            # 2 回のフォワードパスを回避します
            text_embeddings = np.concatenate([uncond_embeddings, text_embeddings])

        return text_embeddings

    def prepare_latents(self, image: PIL.Image.Image = None, latent_timestep: torch.Tensor = None):
        """
        Function for getting initial latents for starting generation

        Parameters:
            image (PIL.Image.Image, *optional*, None):
                 Input image for generation, if not provided randon noise will be used as starting point
            latent_timestep (torch.Tensor, *optional*, None):
                 Predicted by scheduler initial step for image generation, required for latent image mixing with nosie
        Returns:
            latents (np.ndarray):
                 Image encoded in latent space
        """
        latents_shape = (1, 4, self.height // 8, self.width // 8)
        noise = np.random.randn(*latents_shape).astype(np.float32)
        if image is None:
            # LMSDiscreteScheduler を使用する場合は、潜在変数がシグマで乗算されていることを確認
            if isinstance(self.scheduler, LMSDiscreteScheduler):
                noise = noise * self.scheduler.sigmas[0].numpy()
                return noise, {}
        input_image, meta = preprocess(image)
        latents = self.vae_encoder(input_image)[self._vae_e_output] * 0.18215
        latents = self.scheduler.add_noise(torch.from_numpy(latents), torch.from_numpy(noise), latent_timestep).numpy()
        return latents, meta

    def postprocess_image(self, image: np.ndarray, meta: Dict, output_type: str = "pil"):
        """
        Postprocessing for decoded image.Takes generated image decoded by VAE decoder, unpad it to initila image size (if required),
        normalize and convert to [0, 255] pixels range.Optionally, convertes it from np.ndarray to PIL.Image format

        Parameters:
            image (np.ndarray):
                 Generated image
            meta (Dict):
                 Metadata obtained on latents preparing step, can be empty
            output_type (str, *optional*, pil):
                 Output format for result, can be pil or numpy
        Returns:
            image (List of np.ndarray or PIL.Image.Image):
                Postprocessed images
        """
        if "padding" in meta:
            pad = meta["padding"]
            (_, end_h), (_, end_w) = pad[1:3]
            h, w = image.shape[2:]
            unpad_h = h - end_h
            unpad_w = w - end_w
            image = image[:, :, :unpad_h, :unpad_w]
        image = np.clip(image / 2 + 0.5, 0, 1)
        image = np.transpose(image, (0, 2, 3, 1))
        # 9. PIL へ変換
        if output_type == "pil":
            image = self.numpy_to_pil(image)
            if "src_height" in meta:
                orig_height, orig_width = meta["src_height"], meta["src_width"]
                image = [img.resize((orig_width, orig_height), PIL.Image.Resampling.LANCZOS) for img in image]
        else:
            if "src_height" in meta:
                orig_height, orig_width = meta["src_height"], meta["src_width"]
                image = [cv2.resize(img, (orig_width, orig_width)) for img in image]
        return image

    def get_timesteps(self, num_inference_steps: int, strength: float):
        """
        Helper function for getting scheduler timesteps for generation
        In case of image-to-image generation, it updates number of steps according to strength

        Parameters:
            num_inference_steps (int):
                number of inference steps for generation
            strength (float):
                value between 0.0 and 1.0, that controls the amount of noise that is added to the input image.
                Values that approach 1.0 enable lots of variations but will also produce images that are not semantically consistent with the input.
        """
        # init_timestep を使用して元のタイムステップを取得
        init_timestep = min(int(num_inference_steps * strength), num_inference_steps)

        t_start = max(num_inference_steps - init_timestep, 0)
        timesteps = self.scheduler.timesteps[t_start:]

return timesteps, num_inference_steps - t_start推論パイプラインの構成#
まず、OpenVINO モデルのインスタンスを作成する必要があります。
core = ov.Core()OpenVINO を使用して推論を実行するデバイスをドロップダウン・リストから選択します。
import ipywidgets as widgets

device = widgets.Dropdown(
    options=core.available_devices + ["AUTO"],
    value="AUTO",
    description="Device:",
    disabled=False,
)

deviceDropdown(description='Device:', index=2, options=('CPU', 'GPU', 'AUTO'), value='AUTO')text_enc = core.compile_model(TEXT_ENCODER_OV_PATH, device.value)GPU 推論用に UNet を調整#
GPU デバイスでは、モデルは FP16 精度で実行されます。Tiny-SD UNet モデルの場合、これによって精度の問題が発生することが知られています。したがって、完全な精度で実行される一部の操作を選択的にマークするため、特別なキャリブレーション手順が使用されます。
import pickle
import requests
import os

# GPU で推論するときに精度を回復するのに役立つ `model_upcast_utils` を取得
r =
requests.get("https://raw.githubusercontent.com/openvinotoolkit/openvino_notebooks/latest/utils/model_upcast_utils.py")
with open("model_upcast_utils.py", "w") as f:
    f.write(r.text)

# アップキャスト・キャリブレーション・プロセスに必要な UNet モデルの入力例を取得
r =
requests.get("https://storage.openvinotoolkit.org/repositories/openvino_notebooks/data/data/pkl/unet_calibration_example_input.pkl")
with open("unet_calibration_example_input.pkl", "wb") as f:
    f.write(r.content)

from model_upcast_utils import (
    is_model_partially_upcasted,
    partially_upcast_nodes_to_fp32,
)

unet_model = core.read_model(UNET_OV_PATH)
if "GPU" in core.available_devices and not is_model_partially_upcasted(unet_model):
    with open("unet_calibration_example_input.pkl", "rb") as f:
        example_input = pickle.load(f)
    unet_model = partially_upcast_nodes_to_fp32(unet_model, example_input, upcast_ratio=0.7, operation_types=["Convolution"])

    ov.save_model(unet_model, UNET_OV_PATH.with_suffix("._tmp.xml"))
    del unet_model
    os.remove(UNET_OV_PATH)
    os.remove(str(UNET_OV_PATH).replace(".xml", ".bin"))
    UNET_OV_PATH.with_suffix("._tmp.xml").rename(UNET_OV_PATH)
    UNET_OV_PATH.with_suffix("._tmp.bin").rename(UNET_OV_PATH.with_suffix(".bin"))
unet_model = core.compile_model(UNET_OV_PATH, device.value)ov_config = {"INFERENCE_PRECISION_HINT": "f32"} if device.value != "CPU" else {}
vae_decoder = core.compile_model(VAE_DECODER_OV_PATH, device.value, ov_config)
vae_encoder = core.compile_model(VAE_ENCODER_OV_PATH, device.value, ov_config)モデル・トークナイザーとスケジューラーもパイプラインの重要なパーツです。これらを定義して、すべてのコンポーネントをまとめてみましょう
from transformers import CLIPTokenizer
from diffusers.schedulers import LMSDiscreteScheduler

lms = LMSDiscreteScheduler(beta_start=0.00085, beta_end=0.012, beta_schedule="scaled_linear")
tokenizer = CLIPTokenizer.from_pretrained("openai/clip-vit-large-patch14")

ov_pipe = OVStableDiffusionPipeline(
    tokenizer=tokenizer,
    text_encoder=text_enc,
    unet=unet_model,
    vae_encoder=vae_encoder,
    vae_decoder=vae_decoder,
    scheduler=lms,
)
Text-to-Image 生成#
実際のモデルを見てみましょう
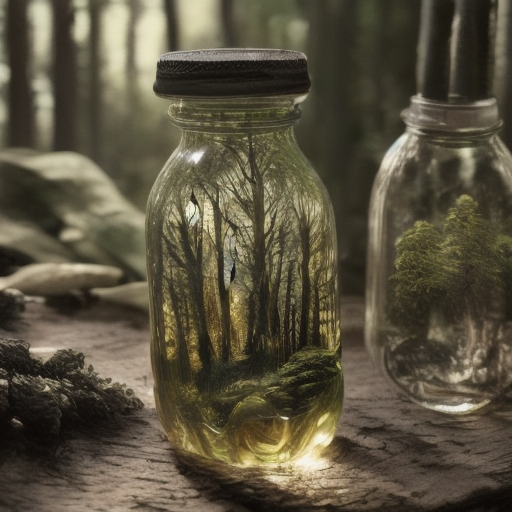
text_prompt = "RAW studio photo of An intricate forest minitown landscape trapped in a bottle, atmospheric oliva lighting, on the table, intricate details, dark shot, soothing tones, muted colors "
seed = 431
num_steps = 20print("Pipeline settings")
print(f"Input text: {text_prompt}")
print(f"Seed: {seed}")
print(f"Number of steps: {num_steps}")Pipeline settings
Input text: RAW studio photo of An intricate forest minitown landscape trapped in a bottle, atmospheric oliva lighting, on the table, intricate details, dark shot, soothing tones, muted colors
Seed: 431
Number of steps: 20result = ov_pipe(text_prompt, num_inference_steps=num_steps, seed=seed)0%| | 0/20 [00:00<?, ?it/s]最後に、生成結果を保存します。パイプラインは複数の結果を返します: パイプラインはいくつかの結果を返します。sample には最終的に生成された画像が含まれ、iterations には各ステップの中間結果のリストが含まれます。
final_image = result["sample"][0]
final_image.save("result.png")
今こそショータイムです!
text = "\n\t".join(text_prompt.split("."))
print("Input text:")
print("\t" + text)
display(final_image)
Input text:
RAW studio photo of An intricate forest minitown landscape trapped in a bottle, atmospheric oliva lighting, on the table, intricate details, dark shot, soothing tones, muted colors
ご覧の通り、画像はかなり高解像度です 🔥。
Image-to-Image 生成#
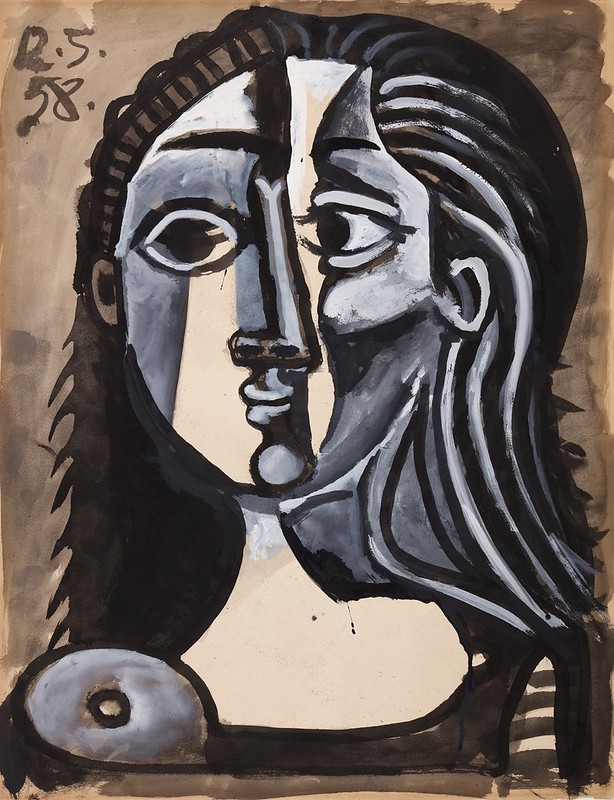
Stable Diffusion モデルの最も素晴らしい機能の 1 つは、既存の画像またはスケッチから画像生成を条件付けできることです。(粗い可能性のある) 画像と適切なテキストプロンプトがあれば、潜在拡散モデルを使用して画像を “強化” できます。
画像から画像への生成では、テキストプロンプトに加えて、初期画像を提供する必要があります。オプションで、入力画像に追加されるノイズの量を制御する 0.0 ~ 1.0 の値を strength パラメーターを変更することもできます。値が 1.0 に近づくと、さまざまなバリエーションが可能になりますが、入力と意味的に一致しない画像も生成されます。画像から画像への生成の興味深い使用例の 1 つは、デペインティング、つまりスケッチや絵画をリアルな写真に変換することです。
さらに、画像生成の品質を向上させるために、モデルは否定プロンプトをサポートします。技術的には、肯定プロンプトは拡散をそれに関連付けられた画像に向けて誘導し、否定プロンプトは拡散をそれから離れるように誘導します。言い換えれば、否定プロンプトは生成画像に対して望ましくない概念を宣言します。例えば、カラフルで明るい画像が必要な場合、グレースケール画像は避けたい結果になりますが、この場合、グレースケールは否定プロンプトとして扱うことができます。肯定プロンプトと否定プロンプトは同等です。どちらか一方だけを常に使用することも、もう一方なしで使用することもできます。動作の仕組みの詳細については、この記事を参照してください。
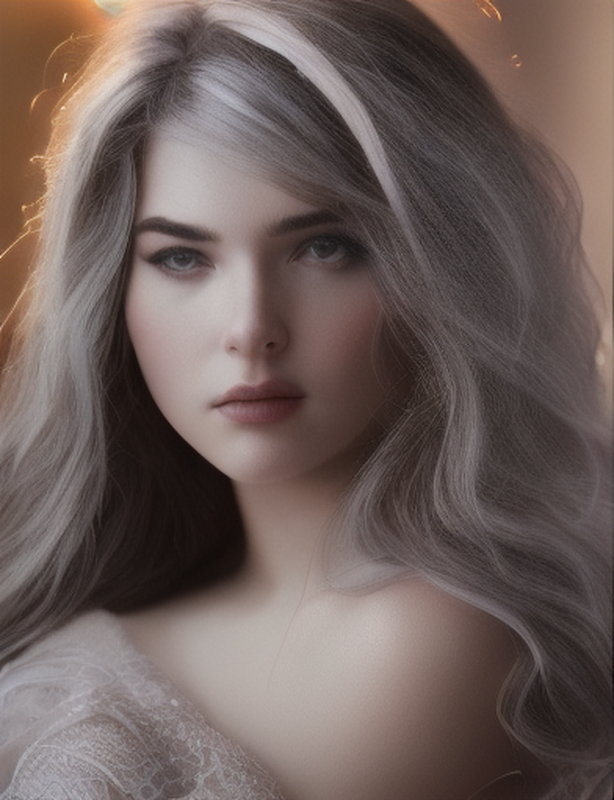
text_prompt_i2i = "professional photo portrait of woman, highly detailed, hyper realistic, cinematic effects, soft lighting"
negative_prompt_i2i = (
    "blurry, poor quality, low res, worst quality, cropped, ugly, poorly drawn face, without eyes, mutation, unreal, animate, poorly drawn eyes"
)
num_steps_i2i = 40
seed_i2i = 82698152
strength = 0.68
from diffusers.utils import load_image
default_image_url = "https://user-images.githubusercontent.com/29454499/260418860-69cc443a-9ee6-493c-a393-3a97af080be7.jpg"
# アップロードされた画像を読む
image = load_image(default_image_url)
print("Pipeline settings")
print(f"Input positive prompt: \n\t{text_prompt_i2i}")
print(f"Input negative prompt: \n\t{negative_prompt_i2i}")
print(f"Seed: {seed_i2i}")
print(f"Number of steps: {num_steps_i2i}")
print(f"Strength: {strength}")
print("Input image:")
display(image)
processed_image = ov_pipe(
text_prompt_i2i,
image,
negative_prompt=negative_prompt_i2i,
num_inference_steps=num_steps_i2i,
seed=seed_i2i,
strength=strength,
)Pipeline settings
Input positive prompt:
professional photo portrait of woman, highly detailed, hyper realistic, cinematic effects, soft lighting
Input negative prompt:
blurry, poor quality, low res, worst quality, cropped, ugly, poorly drawn face, without eyes, mutation, unreal, animate, poorly drawn eyes
Seed: 82698152
Number of steps: 40
Strength: 0.68
Input image:
0%| | 0/27 [00:00<?, ?it/s]final_image_i2i = processed_image["sample"][0]
final_image_i2i.save("result_i2i.png")text_i2i = "\n\t".join(text_prompt_i2i.split("."))
print("Input text:")
print("\t" + text_i2i)
display(final_image_i2i)Input text:
professional photo portrait of woman, highly detailed, hyper realistic, cinematic effects, soft lighting
インタラクティブなデモ#
import gradio as gr

sample_img_url =
"https://storage.openvinotoolkit.org/repositories/openvino_notebooks/data/data/image/tower.jpg"

img = load_image(sample_img_url).save("tower.jpg")

def generate_from_text(text, negative_text, seed, num_steps, _=gr.Progress(track_tqdm=True)):
    result = ov_pipe(text, negative_prompt=negative_text, num_inference_steps=num_steps, seed=seed)
    return result["sample"][0]

def generate_from_image(img, text, negative_text, seed, num_steps, strength, _=gr.Progress(track_tqdm=True)):
    result = ov_pipe(
        text,
        img,
        negative_prompt=negative_text,
        num_inference_steps=num_steps,
        seed=seed,
        strength=strength,
    )
    return result["sample"][0]

with gr.Blocks() as demo:
    with gr.Tab("Text-to-Image generation"):
        with gr.Row():
            with gr.Column():
                text_input = gr.Textbox(lines=3, label="Positive prompt")
                negative_text_input = gr.Textbox(lines=3, label="Negative prompt")
                seed_input = gr.Slider(0, 10000000, value=751, label="Seed")
                steps_input = gr.Slider(1, 50, value=20, step=1, label="Steps")
            out = gr.Image(label="Result", type="pil")
        sample_text = (
            "futuristic synthwave city, retro sunset, crystals, spires, volumetric lighting, studio Ghibli style, rendered in unreal engine with clean details"
        )
        sample_text2 = "RAW studio photo of tiny cute happy cat in a yellow raincoat in the woods, rain, a character portrait, soft lighting, high resolution, photo realistic, extremely detailed"
        negative_sample_text = ""
        negative_sample_text2 = "bad anatomy, blurry, noisy, jpeg artifacts, low quality, geometry, mutation, disgusting. ugly"
        btn = gr.Button()
        btn.click(
            generate_from_text,
            [text_input, negative_text_input, seed_input, steps_input],
            out,
        )
        gr.Examples(
            [
                [sample_text, negative_sample_text, 42, 20],
                [sample_text2, negative_sample_text2, 1561, 25],
            ],
            [text_input, negative_text_input, seed_input, steps_input],
        )
    with gr.Tab("Image-to-Image generation"):
        with gr.Row():
            with gr.Column():
                i2i_input = gr.Image(label="Image", type="pil")
                i2i_text_input = gr.Textbox(lines=3, label="Text")
                i2i_negative_text_input = gr.Textbox(lines=3, label="Negative prompt")
                i2i_seed_input = gr.Slider(0, 10000000, value=42, label="Seed")
                i2i_steps_input = gr.Slider(1, 50, value=10, step=1, label="Steps")
                strength_input = gr.Slider(0, 1, value=0.5, label="Strength")
            i2i_out = gr.Image(label="Result", type="pil")
        i2i_btn = gr.Button()
        sample_i2i_text = "amazing watercolor painting"
        i2i_btn.click(
            generate_from_image,
                [
                    i2i_input,
                    i2i_text_input,
                    i2i_negative_text_input,
                    i2i_seed_input,
                    i2i_steps_input,
                    strength_input,
                ],
                i2i_out,
        )
        gr.Examples(
            [["tower.jpg", sample_i2i_text, "", 6400023, 40, 0.3]],
            [
                i2i_input,
                i2i_text_input,
                i2i_negative_text_input,
                i2i_seed_input,
                i2i_steps_input,
                strength_input,
            ],
        )

try:
    demo.queue().launch(debug=False)
except Exception:
    demo.queue().launch(share=True, debug=False)
# リモートで起動する場合は、server_name と server_port を指定
# demo.launch(server_name='your server name', server_port='server port in int')
# 詳細はドキュメントをご覧ください: https://gradio.app/docs/
ローカル URL で実行中: http://127.0.0.1:7863 パブリックリンクを作成するには、launch() で share=True を設定します。