DepthAnythingV2 と OpenVINO による深度推定#
この Jupyter ノートブックはオンラインで起動でき、ブラウザーのウィンドウで対話型環境を開きます。ローカルにインストールすることもできます。次のオプションのいずれかを選択します:


Depth Anything V2 は、堅牢な相対深度推定ソリューションです。このプロジェクトは、派手な技術を追求することなく、強力な単眼深度推定モデルの構築の重要な発見を明らかにすることを目的としています。このモデルは、Depth Anything V1 の改良版です。特に、V1 と比較して、このバージョンでは、すべてのラベル付き実画像を合成画像に置き換え、教師モデルの容量を拡大し、大規模な疑似ラベル付き実画像のブリッジを介して生徒モデルを教えるという 3 つの主要な実践により、さらに細かく堅牢な深度予測を生成できます。
Depth Anything V2 トレーニング・パイプラインを以下に示します。これは、高品質の合成画像のみで信頼性の高い教師モデルをトレーニングし、大規模なラベルなしの実画像で正確な疑似深度を生成して、堅牢な一般化のため疑似ラベル付き実画像で最終的な生徒モデルをトレーニングする、3 つのステップで構成されます。

image.png#
モデルの詳細については、プロジェクトのウェブページ、論文、公式リポジトリーを参照してください
このチュートリアルでは、OpenVINO を使用して DepthAnythingV2 を変換して実行する方法を検討します。追加部分では、推論を高速化するため NNCF を使用して量子化を実行する方法を示します。
目次:
必要条件#
from pathlib import Path

repo_dir = Path("Depth-Anything-V2")

if not repo_dir.exists():
     !git clone https://huggingface.co/spaces/depth-anything/Depth-Anything-V2
%cd Depth-Anything-V2
Cloning into 'Depth-Anything-V2'...
remote: Enumerating objects: 154, done.[K
remote: Counting objects: 100% (150/150), done.[K
remote: Compressing objects: 100% (147/147), done.[K
remote: Total 154 (delta 43), reused 0 (delta 0), pack-reused 4 (from 1)[K Receiving objects: 100% (154/154), 7.76 MiB | 11.17 MiB/s, done.
Resolving deltas: 100% (43/43), done.
/opt/home/k8sworker/ci-ai/cibuilds/ov-notebook/OVNotebookOps-727/.workspace/scm/ov-notebook/notebooks/depth-anything/Depth-Anything-V2import platform
%pip install -q "openvino>=2024.2.0" "datasets>=2.14.6" "nncf>=2.11.0" "tqdm"
%pip install -q "typing-extensions>=4.9.0" eval-type-backport "gradio>=4.19"
%pip install -q -r requirements.txt --extra-index-url https://download.pytorch.org/whl/cpu
if platform.python_version_tuple()[1] in ["8", "9"]: %pip install -q "gradio-imageslider<=0.0.17" "typing-extensions>=4.9.0"Note: you may need to restart the kernel to use updated packages.
Note: you may need to restart the kernel to use updated packages.
Note: you may need to restart the kernel to use updated packages.
Note: you may need to restart the kernel to use updated packages.PyTorch モデルをロードして実行#
CPU 上で PyTorch モデルを実行できるようにするには、xformers アテンションの最適化を無効にする必要があります。
attention_file_path = Path("./depth_anything_v2/dinov2_layers/attention.py")
orig_attention_path = attention_file_path.parent / ("orig_" + attention_file_path.name)

if not orig_attention_path.exists():
    attention_file_path.rename(orig_attention_path)

    with orig_attention_path.open("r") as f:
        data = f.read()
        data = data.replace("XFORMERS_AVAILABLE = True", "XFORMERS_AVAILABLE = False")
        with attention_file_path.open("w") as out_f:
out_f.write(data)入力データを準備#
from PIL import Image

import requests

r = requests.get(

url="https://raw.githubusercontent.com/openvinotoolkit/openvino_notebooks/latest/utils/notebook_utils.py",
)

open("notebook_utils.py", "w").write(r.text)
from notebook_utils import download_file

download_file(
    "https://github.com/openvinotoolkit/openvino_notebooks/assets/29454499/3f779fc1-c1b2-4dec-915a-64dae510a2bb",
    "furseal.png",
)

Image.open("furseal.png").resize((600, 400))
furseal.png: 0%| | 0.00/2.55M [00:00<?, ?B/s]
モデルの推論を実行#
DepthAnythingV2.from_pretrained メソッドは、PyTorch モデル・クラス・インスタンスを作成し、モデルの重みを読み込みます。リポジトリーには、VIT エンコーダーのサイズに応じて 3 つのモデルが用意されています: * Depth-Anything-V2-Small (24.8M)
* Depth-Anything-V2-Base (97.5M)
* Depth-Anything-V2-Large (335.3M)
ここでは Depth-Anything-V2-Small を使用しますが、モデルを実行して OpenVINO に変換する手順は、DepthAnythingV2 ファミリーの他のモデルにも適用できます。
from huggingface_hub import hf_hub_download

encoder = "vits"
model_type = "Small"
model_id = f"depth_anything_v2_{encoder}"

model_path = hf_hub_download(repo_id=f"depth-anything/Depth-Anything-V2-{model_type}", filename=f"{model_id}.pth", repo_type="model")
前処理された画像がモデルに渡され、モデルは B x H x W 形式の深度マップを返します。ここで、B は入力バッチサイズ、H は前処理された画像の高さ、W は前処理された画像の幅です。
import cv2
import torch
import torch.nn.functional as F

from depth_anything_v2.dpt import DepthAnythingV2

model = DepthAnythingV2(encoder=encoder, features=64, out_channels=[48, 96, 192, 384])
model.load_state_dict(torch.load(model_path, map_location="cpu"))
model.eval()

raw_img = cv2.imread("furseal.png")
image, (h, w) = model.image2tensor(raw_img)
image = image.to("cpu").to(torch.float32)

with torch.no_grad():
    depth = model.forward(image)

depth = F.interpolate(depth[:, None], (h, w), mode="bilinear", align_corners=True)[0, 0]

output = depth.cpu().numpy()
xFormers not available
xFormers not availablefrom matplotlib import pyplot as plt
import numpy as np
import cv2
def get_depth_map(output, w, h):
depth = cv2.resize(output, (w, h))
depth = (depth - depth.min()) / (depth.max() - depth.min()) * 255.0
depth = depth.astype(np.uint8)
depth = cv2.applyColorMap(depth, cv2.COLORMAP_INFERNO)
return depthh, w = raw_img.shape[:-1]
res_depth = get_depth_map(output, w, h)
plt.imshow(res_depth[:, :, ::-1])<matplotlib.image.AxesImage at 0x7f4291d9ce20>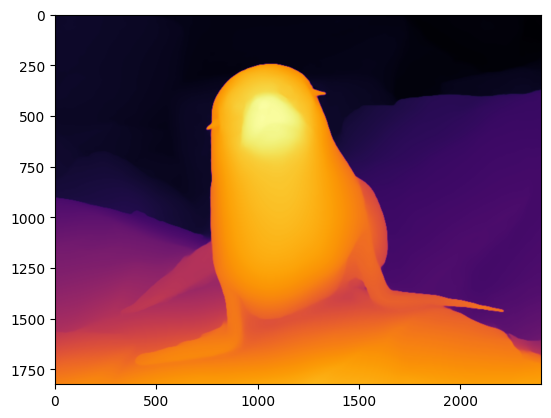
モデルを OpenVINO IR 形式に変換#
OpenVINO は、OpenVINO 中間表現 (IR) への変換により PyTorch モデルをサポートします。これには、OpenVINO モデル・トランスフォーメーション API を使用する必要があります。ov.convert_model 関数は、元の PyTorch モデル・インスタンスとトレース用のサンプル入力を受け取り、OpenVINO フレームワークでこのモデルを表す ov.Model を返します。変換されたモデルは、ov.save_model 関数を使用してディスクに保存するか、core.complie_model を使用してデバイスに直接ロードできます。
import openvino as ov

OV_DEPTH_ANYTHING_PATH = Path(f"{model_id}.xml")

if not OV_DEPTH_ANYTHING_PATH.exists():
    ov_model = ov.convert_model(model, example_input=torch.rand(1, 3, 518, 518), input=[1, 3, 518, 518])
ov.save_model(ov_model, OV_DEPTH_ANYTHING_PATH)/opt/home/k8sworker/ci-ai/cibuilds/ov-notebook/OVNotebookOps-727/.workspace/scm/ov-notebook/notebooks/depth-anything/Depth-Anything-V2/depth_anything_v2/dinov2_layers/patch_embed.py:73: TracerWarning: Converting a tensor to a Python boolean might cause the trace to be incorrect.We can't record the data flow of Python values, so this value will be treated as a constant in the future.This means that the trace might not generalize to other inputs!
assert H % patch_H == 0, f"Input image height {H} is not a multiple of patch height {patch_H}"
/opt/home/k8sworker/ci-ai/cibuilds/ov-notebook/OVNotebookOps-727/.workspace/scm/ov-notebook/notebooks/depth-anything/Depth-Anything-V2/depth_anything_v2/dinov2_layers/patch_embed.py:74: TracerWarning: Converting a tensor to a Python boolean might cause the trace to be incorrect.We can't record the data flow of Python values, so this value will be treated as a constant in the future.This means that the trace might not generalize to other inputs!
assert W % patch_W == 0, f"Input image width {W} is not a multiple of patch width: {patch_W}"
/opt/home/k8sworker/ci-ai/cibuilds/ov-notebook/OVNotebookOps-727/.workspace/scm/ov-notebook/notebooks/depth-anything/Depth-Anything-V2/depth_anything_v2/dinov2.py:183: TracerWarning: Converting a tensor to a Python boolean might cause the trace to be incorrect.We can't record the data flow of Python values, so this value will be treated as a constant in the future.This means that the trace might not generalize to other inputs!
if npatch == N and w == h:
/opt/home/k8sworker/ci-ai/cibuilds/ov-notebook/OVNotebookOps-727/.workspace/scm/ov-notebook/notebooks/depth-anything/Depth-Anything-V2/depth_anything_v2/dpt.py:147: TracerWarning: Converting a tensor to a Python integer might cause the trace to be incorrect.We can't record the data flow of Python values, so this value will be treated as a constant in the future.This means that the trace might not generalize to other inputs!
out = F.interpolate(out, (int(patch_h * 14), int(patch_w * 14)), mode="bilinear", align_corners=True)['x']OpenVINO モデル推論を実行#
OpenVINO モデルを実行する準備が整いました。
推論デバイスの選択#
ワークを開始するには、ドロップダウン・リストから推論デバイスを選択します。
import ipywidgets as widgets

core = ov.Core()
device = widgets.Dropdown(
    options=core.available_devices + ["AUTO"],
    value="AUTO",
    description="Device:",
    disabled=False,
)

deviceDropdown(description='Device:', index=1, options=('CPU', 'AUTO'), value='AUTO')compiled_model = core.compile_model(OV_DEPTH_ANYTHING_PATH, device.value)画像に対して推論を実行#
利用を簡単にするために、モデル作成者は入力画像を前処理するためのヘルパー関数を提供しています。主な条件は、画像サイズが 14 (vit patch サイズ) で割り切れ、[0, 1] の範囲で正規化されていることです。
from depth_anything_v2.util.transform import Resize, NormalizeImage, PrepareForNet
from torchvision.transforms import Compose

transform = Compose(
    [
        Resize(
            width=518,
            height=518,
            resize_target=False,
            ensure_multiple_of=14,
            resize_method="lower_bound",
            image_interpolation_method=cv2.INTER_CUBIC,
        ),
        NormalizeImage(mean=[0.485, 0.456, 0.406], std=[0.229, 0.224, 0.225]),
        PrepareForNet(),
    ]
)h, w = raw_img.shape[:-1]
image = cv2.cvtColor(raw_img, cv2.COLOR_BGR2RGB) / 255.0
image = transform({"image": image})["image"]
image = torch.from_numpy(image).unsqueeze(0)
res = compiled_model(image)[0]depth_color = get_depth_map(res[0], w, h)plt.imshow(depth_color[:, :, ::-1])<matplotlib.image.AxesImage at 0x7f42914acd90>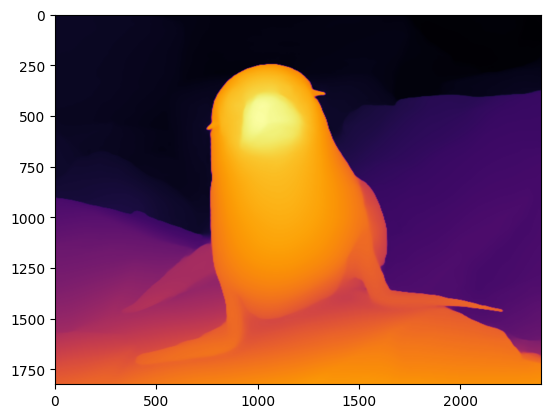
ビデオ上で推論を実行#
download_file(

"https://storage.openvinotoolkit.org/repositories/openvino_notebooks/data/data/video/Coco%20Walking%20in%20Berkeley.mp4",
    "./Coco Walking in Berkeley.mp4",
)

VIDEO_FILE = "./Coco Walking in Berkeley.mp4"
# 処理する入力ビデオの秒数。ビデオ全体を処理するには、
# `NUM_SECONDS` を 0 に設定
NUM_SECONDS = 4
# 入力ビデオのすべてのフレームを処理するには、`ADVANCE_FRAMES` を 1 に設定
# 1 フレームごとに処理するには、`ADVANCE_FRAMES` を 2 に設定。これにより、
# ビデオの処理にかかる時間が短縮されます。
ADVANCE_FRAMES = 2
# 結果のビデオのサイズを縮小するには、`SCALE_OUTPUT` を設定
# `SCALE_OUTPUT` が 0.5 の場合、結果ビデオの幅と高さは
# 入力ビデオの幅と高さの半分になります。
SCALE_OUTPUT = 0.5
# ビデオのエンコードに使用する形式。'vp09` は低速ですが、
# ほとんどのシステムで動作します# FFMPEG がインストールされている場合は、`THEO` エンコードを試してください。
# FOURCC = cv2.VideoWriter_fourcc(*"THEO")
FOURCC = cv2.VideoWriter_fourcc(*"vp09")

# 入力ビデオと結果ビデオの Path オブジェクトを作成
output_directory = Path("output")
output_directory.mkdir(exist_ok=True)
result_video_path = output_directory / f"{Path(VIDEO_FILE).stem}_depth_anything.mp4"
Coco Walking in Berkeley.mp4: 0%| | 0.00/877k [00:00<?, ?B/s]cap = cv2.VideoCapture(str(VIDEO_FILE))
ret, image = cap.read()
if not ret:
raise ValueError(f"The video at {VIDEO_FILE} cannot be read.")
input_fps = cap.get(cv2.CAP_PROP_FPS)
input_video_frame_height, input_video_frame_width = image.shape[:2]
target_fps = input_fps / ADVANCE_FRAMES
target_frame_height = int(input_video_frame_height * SCALE_OUTPUT)
target_frame_width = int(input_video_frame_width * SCALE_OUTPUT)
cap.release()
print(f"The input video has a frame width of {input_video_frame_width}, " f"frame height of {input_video_frame_height} and runs at {input_fps:.2f} fps")
print(
"The output video will be scaled with a factor "
f"{SCALE_OUTPUT}, have width {target_frame_width}, "
f" height {target_frame_height}, and run at {target_fps:.2f} fps"
)The input video has a frame width of 640, frame height of 360 and runs at 30.00 fps
The output video will be scaled with a factor 0.5, have width 320, height 180, and run at 15.00 fpsdef normalize_minmax(data):
"""Normalizes the values in `data` between 0 and 1"""
return (data - data.min()) / (data.max() - data.min())
def convert_result_to_image(result, colormap="viridis"):
"""
Convert network result of floating point numbers to an RGB image with
integer values from 0-255 by applying a colormap.`result` is expected to be a single network result in 1,H,W shape
`colormap` is a matplotlib colormap.See https://matplotlib.org/stable/tutorials/colors/colormaps.html
"""
result = result.squeeze(0)
result = normalize_minmax(result)
result = result * 255
result = result.astype(np.uint8)
result = cv2.applyColorMap(result, cv2.COLORMAP_INFERNO)[:, :, ::-1]
return result
def to_rgb(image_data) -> np.ndarray:
"""
Convert image_data from BGR to RGB
"""
return cv2.cvtColor(image_data, cv2.COLOR_BGR2RGB)import time
from IPython.display import (
HTML,
FileLink,
Pretty,
ProgressBar,
Video,
clear_output,
display,
)
def process_video(compiled_model, video_file, result_video_path):
# 変数を初期化
input_video_frame_nr = 0
start_time = time.perf_counter()
total_inference_duration = 0
# 入力ビデオを開く
cap = cv2.VideoCapture(str(video_file))
# 結果ビデオを作成
out_video = cv2.VideoWriter(
str(result_video_path),
FOURCC,
target_fps,
(target_frame_width * 2, target_frame_height),
)
num_frames = int(NUM_SECONDS * input_fps)
total_frames = cap.get(cv2.CAP_PROP_FRAME_COUNT) if num_frames == 0 else num_frames
progress_bar = ProgressBar(total=total_frames)
progress_bar.display()
try:
while cap.isOpened():
ret, image = cap.read()
if not ret:
cap.release()
break
if input_video_frame_nr >= total_frames:
break
h, w = image.shape[:-1]
input_image = cv2.cvtColor(image, cv2.COLOR_BGR2RGB) / 255.0
input_image = transform({"image": input_image})["image"]
# 画像をネットワーク入力形状 NCHW に合わせて再形成
input_image = np.expand_dims(input_image, 0)
# 推論を実行
inference_start_time = time.perf_counter()
result = compiled_model(input_image)[0]
inference_stop_time = time.perf_counter()
inference_duration = inference_stop_time - inference_start_time
total_inference_duration += inference_duration
if input_video_frame_nr % (10 * ADVANCE_FRAMES) == 0:
clear_output(wait=True)
progress_bar.display()
# input_video_frame_nr // ADVANCE_FRAMES は、
# ネットワークによって処理されたフレームの数を示します
display(
Pretty(
f"Processed frame {input_video_frame_nr // ADVANCE_FRAMES}"
f"/{total_frames // ADVANCE_FRAMES}."
f"Inference time per frame: {inference_duration:.2f} seconds "
f"({1/inference_duration:.2f} FPS)"
)
)
# ネットワーク結果を RGB 画像に変換
result_frame = to_rgb(convert_result_to_image(result))
# 画像と結果をターゲットのフレーム形状に合わせてサイズを変更
result_frame = cv2.resize(result_frame, (target_frame_width, target_frame_height))
image = cv2.resize(image, (target_frame_width, target_frame_height))
# 画像と結果を並べて表示
stacked_frame = np.hstack((image, result_frame))
# ビデオにフレームを保存
out_video.write(stacked_frame)
input_video_frame_nr = input_video_frame_nr + ADVANCE_FRAMES
cap.set(1, input_video_frame_nr)
progress_bar.progress = input_video_frame_nr
progress_bar.update()
except KeyboardInterrupt:
print("Processing interrupted.")
finally:
clear_output()
processed_frames = num_frames // ADVANCE_FRAMES
out_video.release()
cap.release()
end_time = time.perf_counter()
duration = end_time - start_time
print(
f"Processed {processed_frames} frames in {duration:.2f} seconds."
f"Total FPS (including video processing): {processed_frames/duration:.2f}."
f"Inference FPS: {processed_frames/total_inference_duration:.2f} "
)
print(f"Video saved to '{str(result_video_path)}'.")
return stacked_framestacked_frame = process_video(compiled_model, VIDEO_FILE, result_video_path)Processed 60 frames in 13.27 seconds.Total FPS (including video processing): 4.52.Inference FPS: 10.48
Video saved to 'output/Coco Walking in Berkeley_depth_anything.mp4'.def display_video(stacked_frame):
video = Video(result_video_path, width=800, embed=True)
if not result_video_path.exists():
plt.imshow(stacked_frame)
raise ValueError("OpenCV was unable to write the video file.Showing one video frame.")
else:
print(f"Showing video saved at\n{result_video_path.resolve()}")
print("If you cannot see the video in your browser, please click on the " "following link to download the video ")
video_link = FileLink(result_video_path)
video_link.html_link_str = "<a href='%s' download>%s</a>"
display(HTML(video_link._repr_html_()))
display(video)display_video(stacked_frame)Showing video saved at
/opt/home/k8sworker/ci-ai/cibuilds/ov-notebook/OVNotebookOps-727/.workspace/scm/ov-notebook/notebooks/depth-anything/Depth-Anything-V2/output/Coco Walking in Berkeley_depth_anything.mp4
If you cannot see the video in your browser, please click on the following link to download the video量子化#
NNCF は、量子化レイヤーをモデルグラフに追加し、トレーニング・データセットのサブセットを使用してこれらの追加の量子化レイヤーのパラメーターを初期化することで、トレーニング後の量子化を可能にします。量子化操作は FP32/FP16 ではなく INT8 で実行されるため、モデル推論が高速化されます。
最適化プロセスには次の手順が含まれます:
量子化用のキャリブレーション・データセットを作成します。
nncf.quantize()を実行して、量子化されたモデルを取得します。openvino.save_model()関数を使用してINT8モデルを保存します。
モデルの推論速度を向上させるため量子化を実行するかどうかを以下で選択してください。
to_quantize = widgets.Checkbox(
value=True,
description="Quantization",
disabled=False,
)
to_quantizeCheckbox(value=True, description='Quantization')# skip_kernel_extension` モジュールを取得
r = requests.get(
url="https://raw.githubusercontent.com/openvinotoolkit/openvino_notebooks/latest/utils/skip_kernel_extension.py",
)
open("skip_kernel_extension.py", "w").write(r.text)
OV_DEPTH_ANYTHING_INT8_PATH = Path(f"{model_id}_int8.xml")
%load_ext skip_kernel_extensionキャリブレーション・データセットの準備#
Hugging Face の Nahrawy/VIDIT-Depth-ControlNet データセットの一部をキャリブレーション・データとして使用します。
%%skip not $to_quantize.value
import datasets
if not OV_DEPTH_ANYTHING_INT8_PATH.exists():
subset_size = 300
calibration_data = []
dataset = datasets.load_dataset("Nahrawy/VIDIT-Depth-ControlNet", split="train", streaming=True).shuffle(seed=42).take(subset_size)
for batch in dataset:
image = np.array(batch["image"])[...,:3]
image = image / 255.0
image = transform({'image': image})['image']
image = np.expand_dims(image, 0)
calibration_data.append(image)Resolving data files: 0%| | 0/42 [00:00<?, ?it/s]量子化を実行#
事前トレーニング済みの変換済み OpenVINO モデルから量子化モデルを作成します。注: 量子化は時間とメモリーを消費する操作です。以下の量子化コードの実行には時間がかかる場合があります。
%%skip not $to_quantize.value
import nncf
if not OV_DEPTH_ANYTHING_INT8_PATH.exists():
model = core.read_model(OV_DEPTH_ANYTHING_PATH)
quantized_model = nncf.quantize(
model=model,
subset_size=subset_size,
model_type=nncf.ModelType.TRANSFORMER,
calibration_dataset=nncf.Dataset(calibration_data),
)
ov.save_model(quantized_model, OV_DEPTH_ANYTHING_INT8_PATH)INFO:nncf:NNCF initialized successfully.Supported frameworks detected: torch, tensorflow, onnx, openvino2024-07-12 23:59:41.621779: I tensorflow/core/util/port.cc:110] oneDNN custom operations are on.You may see slightly different numerical results due to floating-point round-off errors from different computation orders.To turn them off, set the environment variable TF_ENABLE_ONEDNN_OPTS=0. 2024-07-12 23:59:41.655948: I tensorflow/core/platform/cpu_feature_guard.cc:182] This TensorFlow binary is optimized to use available CPU instructions in performance-critical operations.To enable the following instructions: AVX2 AVX512F AVX512_VNNI FMA, in other operations, rebuild TensorFlow with the appropriate compiler flags. 2024-07-12 23:59:42.255281: W tensorflow/compiler/tf2tensorrt/utils/py_utils.cc:38] TF-TRT Warning: Could not find TensorRT
Output()Output()INFO:nncf:36 ignored nodes were found by name in the NNCFGraph
INFO:nncf:48 ignored nodes were found by name in the NNCFGraphOutput()Output()同じ入力データを使用して、量子化されたモデルで予測を確認してみます。
%%skip not $to_quantize.value
def visualize_results(orig_img:Image.Image, optimized_img:Image.Image):
"""
Helper function for results visualization
Parameters:
orig_img (Image.Image): generated image using FP16 model
optimized_img (Image.Image): generated image using quantized model
Returns:
fig (matplotlib.pyplot.Figure): matplotlib generated figure contains drawing result
"""
orig_title = "FP16 model"
control_title = "INT8 model"
figsize = (20, 20)
fig, axs = plt.subplots(1, 2, figsize=figsize, sharex='all', sharey='all')
list_axes = list(axs.flat)
for a in list_axes:
a.set_xticklabels([])
a.set_yticklabels([])
a.get_xaxis().set_visible(False)
a.get_yaxis().set_visible(False)
a.grid(False)
list_axes[0].imshow(np.array(orig_img))
list_axes[1].imshow(np.array(optimized_img))
list_axes[0].set_title(orig_title, fontsize=15)
list_axes[1].set_title(control_title, fontsize=15)
fig.subplots_adjust(wspace=0.01, hspace=0.01)
fig.tight_layout()
return fig%%skip not $to_quantize.value
image = cv2.cvtColor(cv2.imread('furseal.png'), cv2.COLOR_BGR2RGB) / 255.0
image = transform({'image': image})['image']
image = torch.from_numpy(image).unsqueeze(0)
int8_compiled_model = core.compile_model(OV_DEPTH_ANYTHING_INT8_PATH, device.value)
int8_res = int8_compiled_model(image)[0]
int8_depth_color = get_depth_map(int8_res[0], w, h)%%skip not $to_quantize.value
visualize_results(depth_color[:, :, ::-1], int8_depth_color[:, :, ::-1])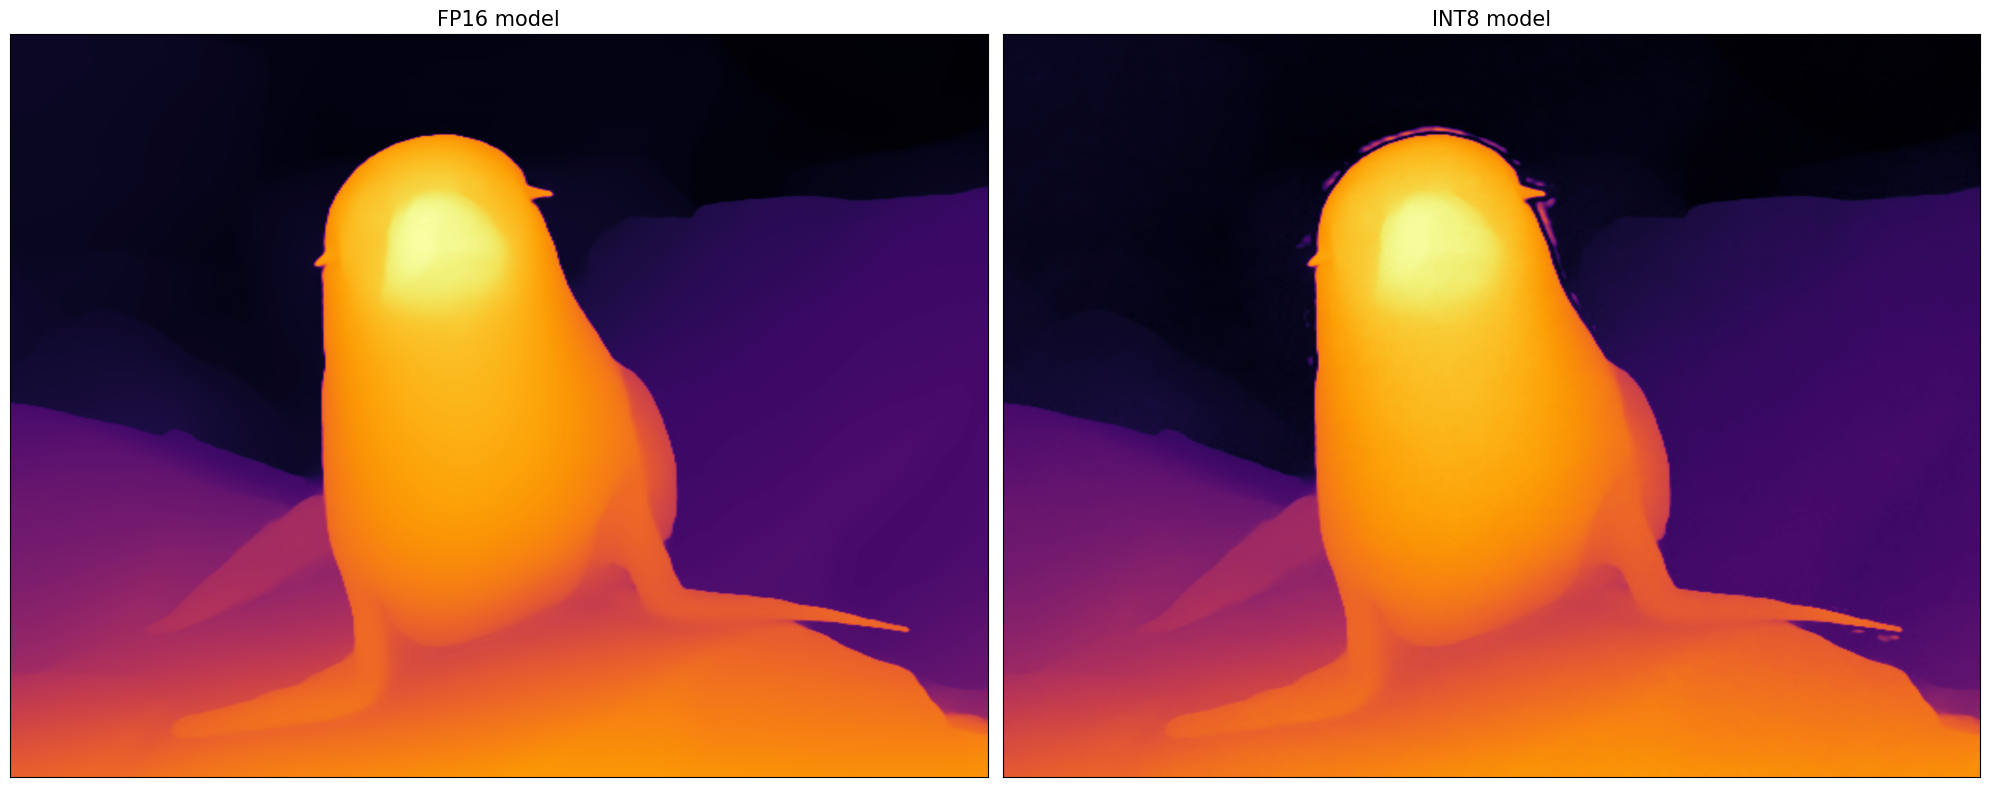
%%skip not $to_quantize.value
int8_result_video_path = output_directory / f"{Path(VIDEO_FILE).stem}_depth_anything_int8.mp4"
stacked_frame = process_video(int8_compiled_model, VIDEO_FILE, int8_result_video_path)
display_video(stacked_frame)Processed 60 frames in 12.78 seconds.Total FPS (including video processing): 4.70.Inference FPS: 12.80
Video saved to 'output/Coco Walking in Berkeley_depth_anything_int8.mp4'.
Showing video saved at
/opt/home/k8sworker/ci-ai/cibuilds/ov-notebook/OVNotebookOps-727/.workspace/scm/ov-notebook/notebooks/depth-anything/Depth-Anything-V2/output/Coco Walking in Berkeley_depth_anything.mp4
If you cannot see the video in your browser, please click on the following link to download the videoモデルのファイルサイズを比較#
%%skip not $to_quantize.value

fp16_ir_model_size = OV_DEPTH_ANYTHING_PATH.with_suffix(".bin").stat().st_size / 2**20
quantized_model_size = OV_DEPTH_ANYTHING_INT8_PATH.with_suffix(".bin").stat().st_size / 2**20

print(f"FP16 model size: {fp16_ir_model_size:.2f} MB")
print(f"INT8 model size: {quantized_model_size:.2f} MB")
print(f"Model compression rate: {fp16_ir_model_size / quantized_model_size:.3f}")
FP16 model size: 47.11 MB
INT8 model size: 24.41 MB
Model compression rate: 1.930FP16 モデルと INT8 モデルの推論時間を比較#
OpenVINO FP16 および INT8 モデルの推論パフォーマンスを測定するには、Benchmark ツールを使用します。
注: 最も正確なパフォーマンス推定を行うには、他のアプリケーションを閉じた後、ターミナル/コマンドプロンプトで
benchmark_appを実行することを推奨します。
import re

def get_fps(benchmark_output: str):
    parsed_output = [line for line in benchmark_output if "Throughput:" in line]
    fps = re.findall(r"\d+\.\d+", parsed_output[0])[0]
    return fps

if OV_DEPTH_ANYTHING_INT8_PATH.exists():
    benchmark_output = !benchmark_app -m $OV_DEPTH_ANYTHING_PATH -d $device.value -api async
    original_fps = get_fps(benchmark_output)
    print(f"FP16 Throughput: {original_fps} FPS")

    benchmark_output = !benchmark_app -m $OV_DEPTH_ANYTHING_INT8_PATH -d $device.value -api async
    optimized_fps = get_fps(benchmark_output)
    print(f"INT8 Throughput: {optimized_fps} FPS")
    print(f"Speed-up: {float(optimized_fps) / float(original_fps):.2f}")
FP16 Throughput: 10.61 FPS
INT8 Throughput: 14.16 FPS
Speed-up: 1.33インタラクティブなデモ#
独自の画像にモデルを適用できます。結果の画像上でスライダーを移動して、元の画像と深度マップビューを切り替えることができます。
インタラクティブなデモを起動するため量子化モデルを使用するかどうか以下で選択してください。
quantized_model_present = OV_DEPTH_ANYTHING_INT8_PATH.exists()

use_quantized_model = widgets.Checkbox(
    value=True if quantized_model_present else False,
    description="Use quantized model",
    disabled=False,
)

use_quantized_modelCheckbox(value=True, description='Use quantized model')import gradio as gr
import cv2
import numpy as np
import os
import tempfile
from gradio_imageslider import ImageSlider
css =
"""
#img-display-container {
max-height: 100vh;
}
#img-display-input {
max-height: 80vh;
}
#img-display-output {
max-height: 80vh; }
"""
title = "# Depth Anything with OpenVINO"
if use_quantized_model.value:
compiled_model = core.compile_model(OV_DEPTH_ANYTHING_INT8_PATH, device.value)
def predict_depth(model, image):
return model(image)[0]
with gr.Blocks(css=css) as demo:
gr.Markdown(title)
gr.Markdown("### Depth Prediction demo")
gr.Markdown("You can slide the output to compare the depth prediction with input image")
with gr.Row():
input_image = gr.Image(label="Input Image", type="numpy", elem_id="img-display-input")
depth_image_slider = ImageSlider(label="Depth Map with Slider View", elem_id="img-display-output", position=0)
raw_file = gr.File(label="16-bit raw depth (can be considered as disparity)")
submit = gr.Button("Submit")
def on_submit(image):
original_image = image.copy()
h, w = image.shape[:2]
image = cv2.cvtColor(image, cv2.COLOR_BGR2RGB) / 255.0
image = transform({"image": image})["image"]
image = np.expand_dims(image, 0)
depth = predict_depth(compiled_model, image)
depth = cv2.resize(depth[0], (w, h), interpolation=cv2.INTER_LINEAR)
raw_depth = Image.fromarray(depth.astype("uint16"))
tmp = tempfile.NamedTemporaryFile(suffix=".png", delete=False)
raw_depth.save(tmp.name)
depth = (depth - depth.min()) / (depth.max() - depth.min()) * 255.0
depth = depth.astype(np.uint8)
colored_depth = cv2.applyColorMap(depth, cv2.COLORMAP_INFERNO)[:, :, ::-1]
return [(original_image, colored_depth), tmp.name]
submit.click(on_submit, inputs=[input_image], outputs=[depth_image_slider, raw_file])
example_files = os.listdir("assets/examples")
example_files.sort()
example_files = [os.path.join("assets/examples", filename) for filename in example_files]
examples = gr.Examples(
examples=example_files,
inputs=[input_image],
outputs=[depth_image_slider, raw_file],
fn=on_submit,
cache_examples=False,
)
if __name__ == "__main__":
try:
demo.queue().launch(debug=False)
except Exception:
demo.queue().launch(share=True, debug=False)
# if you are launching remotely, specify server_name and server_port
# demo.launch(server_name='your server name', server_port='server port in int')
# Read more in the docs: https://gradio.app/docs/ローカル URL で実行中: http://127.0.0.1:7860 パブリックリンクを作成するには、launch() で share=True を設定します。