FastSAM と OpenVINO によるオブジェクトのセグメント化#
この Jupyter ノートブックはオンラインで起動でき、ブラウザーのウィンドウで対話型環境を開きます。ローカルにインストールすることもできます。次のオプションのいずれかを選択します:
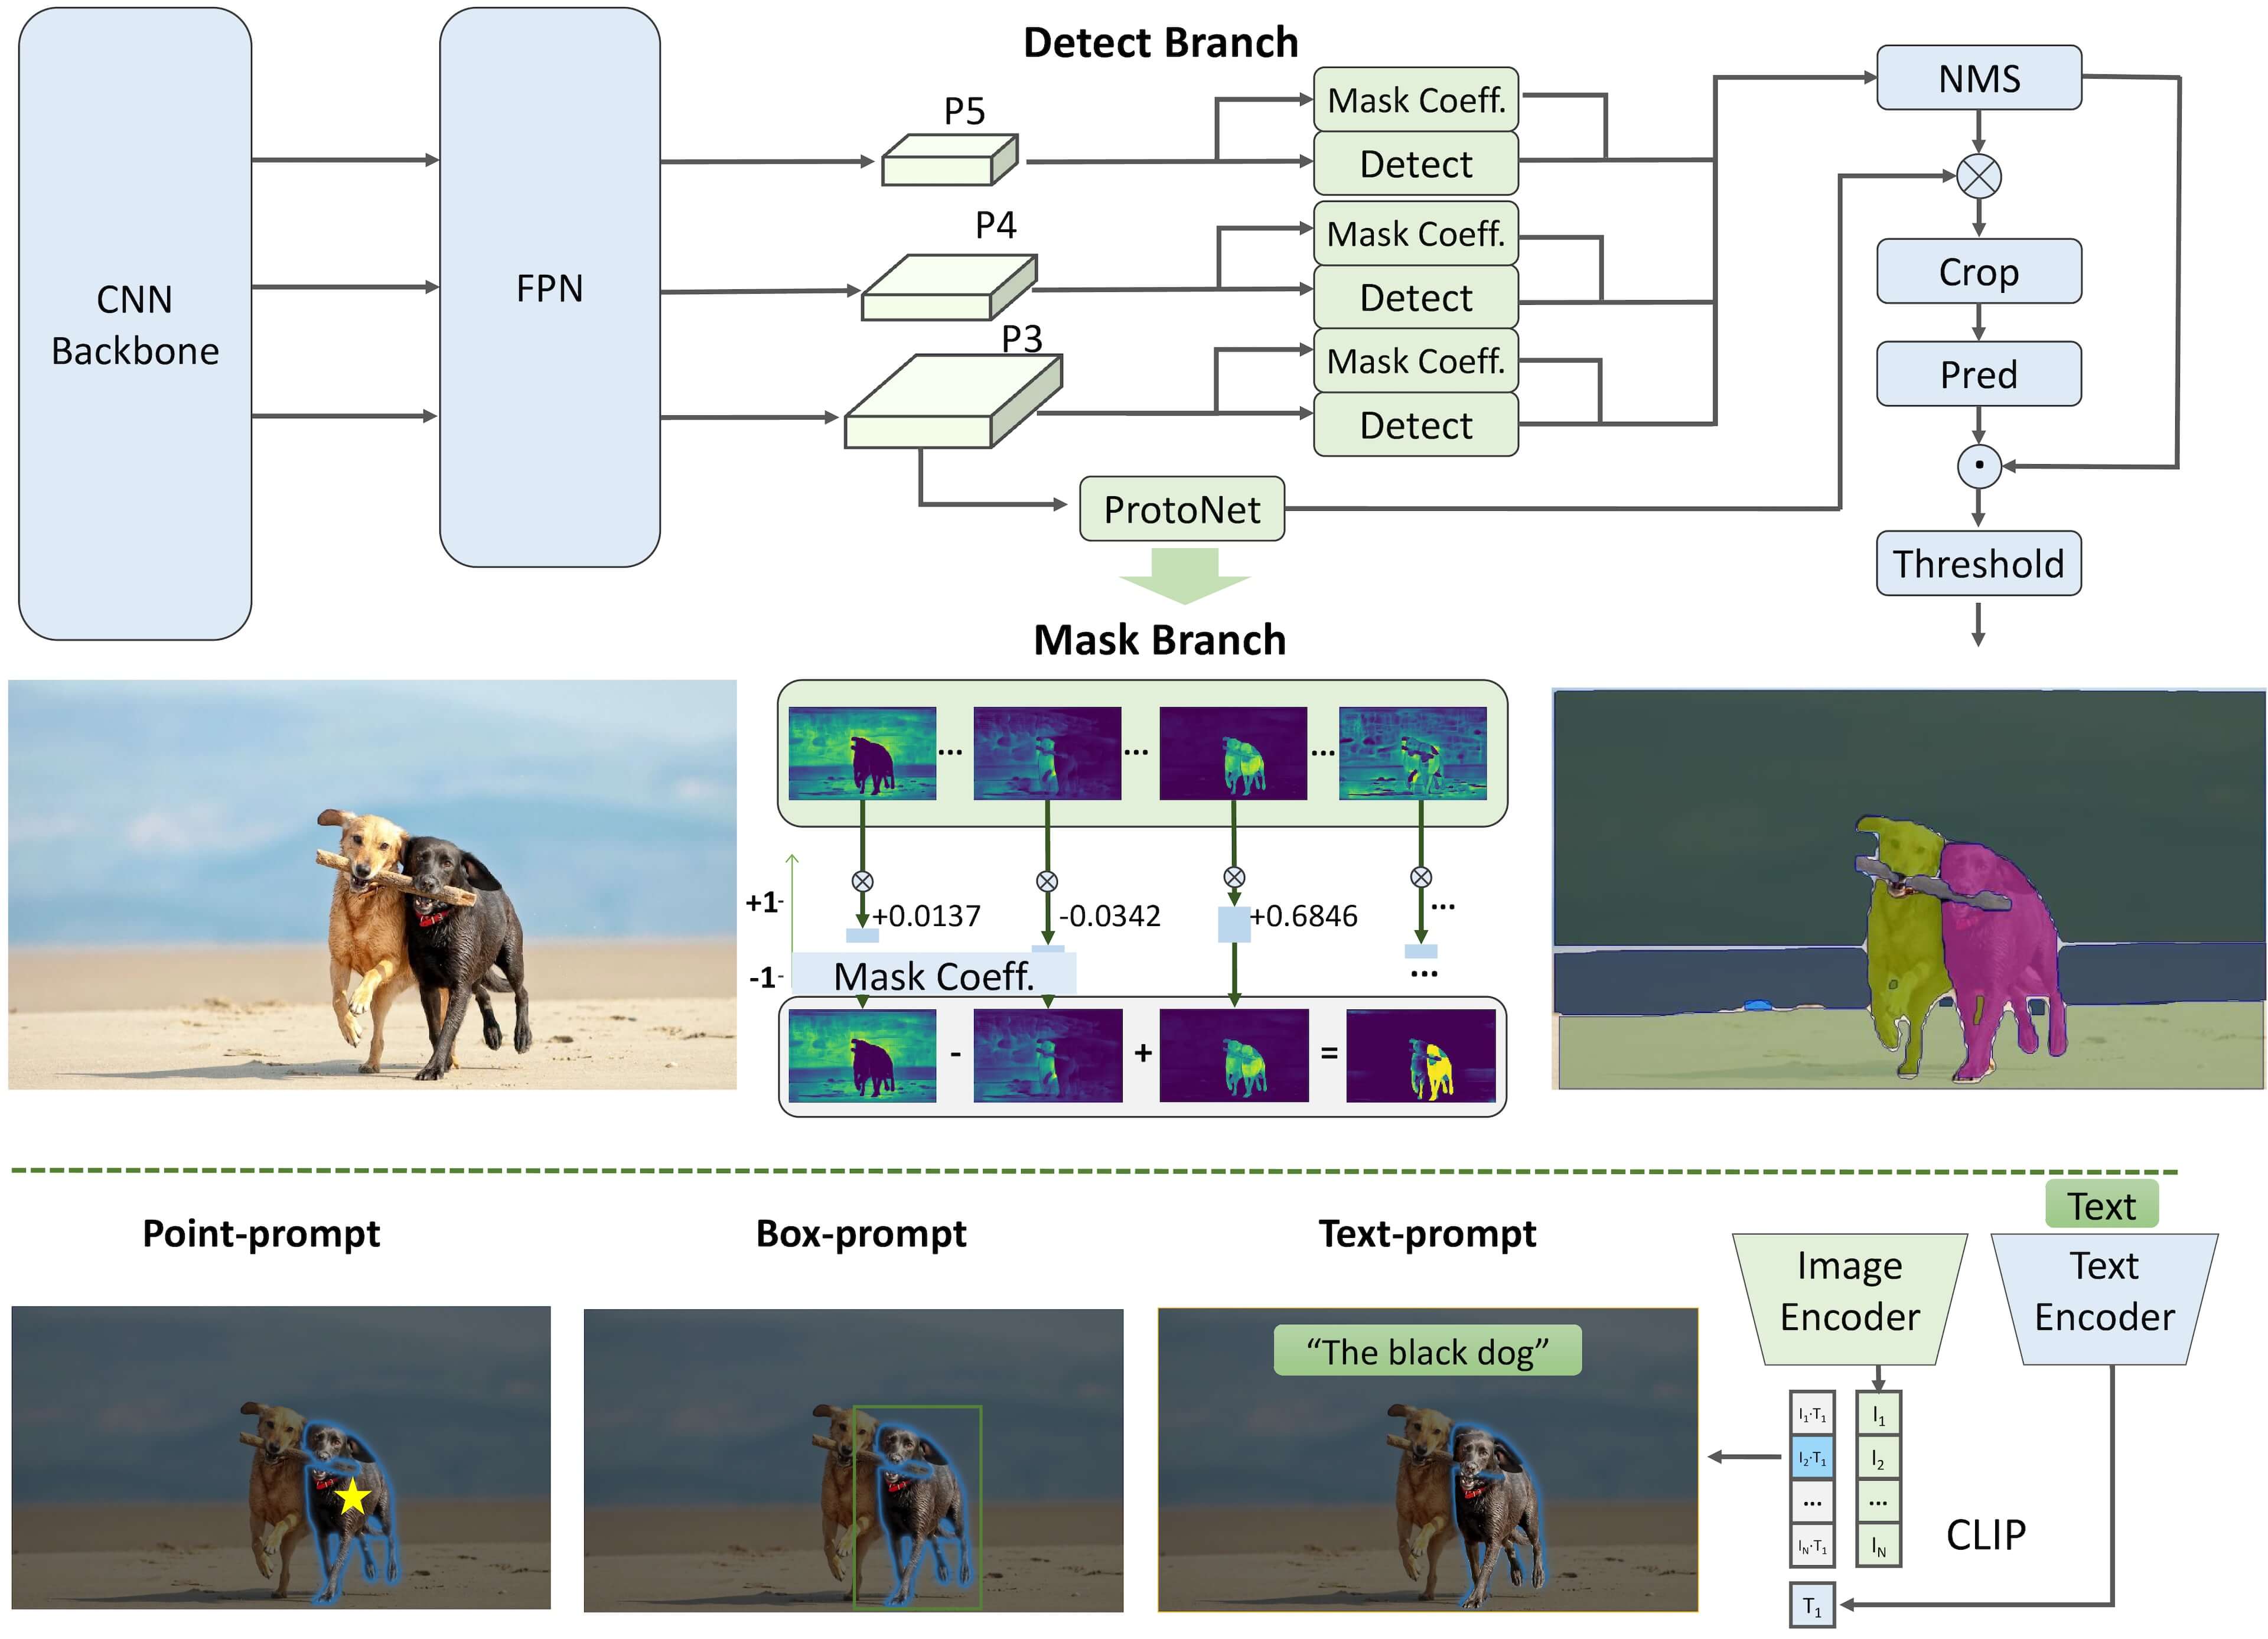
Fast Segment Anything Model (FastSAM) は、さまざまなユーザープロンプトに基づいて画像内の任意のオブジェクトをセグメント化できるリアルタイム CNN ベースのモデルです。Segment Anything タスクは、画像内のオブジェクトを効率的に識別する方法を提供することで、視覚タスクを容易にするように設計されています。FastSAM は、競争力のあるパフォーマンスを維持しながら計算負荷を大幅に削減する、さまざまなビジョンタスクで実用的な選択肢となります。
FastSAM は、膨大な計算リソースを必要とするトランスフォーマー・モデルである Segment Anything Model (SAM) の制限を克服することを目的としたモデルです。FastSAM は、セグメント化タスクを全インスタンスのセグメント化とプロンプトガイドによる選択の 2 つの連続したステージに分けて処理します。
最初のステージでは、YOLOv8-seg を使用して、画像内のすべてのインスタンスのセグメント化マスクを生成します。第 2 ステージでは、FastSAM はプロンプトに対応する関心領域を出力します。

パイプライン#
目次:
必要条件#
要件をインストール#
%pip install -q "ultralytics==8.2.24" onnx tqdm --extra-index-url https://download.pytorch.org/whl/cpu
%pip install -q "openvino-dev>=2024.0.0"
%pip install -q "nncf>=2.9.0"
%pip install -q "gradio>=4.13"Note: you may need to restart the kernel to use updated packages.
Note: you may need to restart the kernel to use updated packages.
Note: you may need to restart the kernel to use updated packages.
Note: you may need to restart the kernel to use updated packages.インポート#
import ipywidgets as widgets
from pathlib import Path

import openvino as ov
import torch
from PIL import Image, ImageDraw
from ultralytics import FastSAM

# skip_kernel_extension モジュールを取得
import requests

r = requests.get(

url="https://raw.githubusercontent.com/openvinotoolkit/openvino_notebooks/latest/utils/skip_kernel_extension.py",
)
open("skip_kernel_extension.py", "w").write(r.text)
# `notebook_utils` モジュールを取得
import requests

r = requests.get(

url="https://raw.githubusercontent.com/openvinotoolkit/openvino_notebooks/latest/utils/notebook_utils.py",
)

open("notebook_utils.py", "w").write(r.text)
from notebook_utils import download_file

%load_ext skip_kernel_extension
Ultralytics の FastSAM#
CASIA-IVA-Lab の Fast Segment Anything Model を使用するには、Ultralytics パッケージを使用します。Ultralytics パッケージは FastSAM クラスを公開し、モデルのインスタンス化と重みの読み込みを簡素化します。以下のコードは、FastSAM モデルを初期化し、セグメント化マップを生成する方法を示しています。
model_name = "FastSAM-x"
model = FastSAM(model_name)

# Run inference on an image
image_uri =
"https://storage.openvinotoolkit.org/repositories/openvino_notebooks/data/data/image/coco_bike.jpg"
image_uri = download_file(image_uri)
results = model(image_uri, device="cpu", retina_masks=True, imgsz=1024, conf=0.6, iou=0.9)
Downloading ultralytics/assets to 'FastSAM-x.pt'...
100%|██████████| 138M/138M [00:03<00:00, 44.4MB/s]coco_bike.jpg: 0%| | 0.00/182k [00:00<?, ?B/s]image 1/1 /opt/home/k8sworker/ci-ai/cibuilds/ov-notebook/OVNotebookOps-727/.workspace/scm/ov-notebook/notebooks/fast-segment-anything/coco_bike.jpg: 768x1024 37 objects, 706.9ms
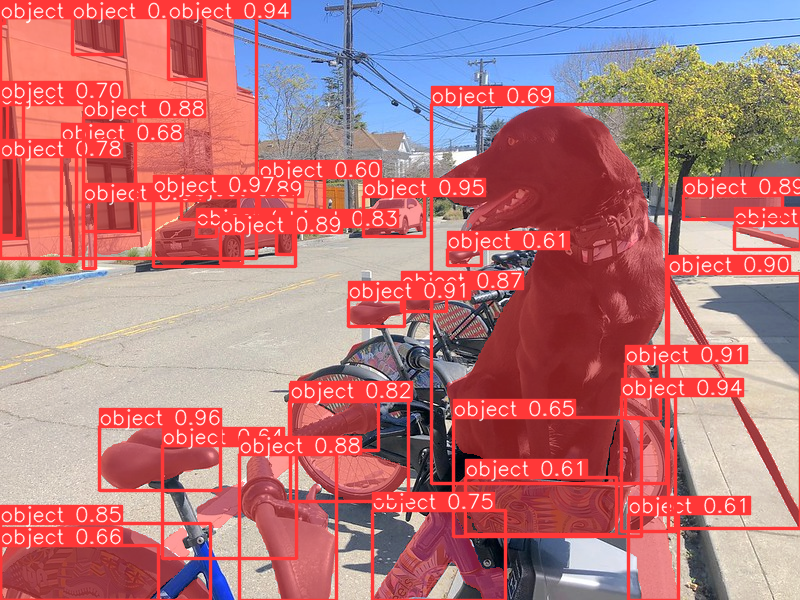
Speed: 3.9ms preprocess, 706.9ms inference, 592.3ms postprocess per image at shape (1, 3, 768, 1024)モデルは、画像上のすべてのオブジェクトのセグメント化マップを返します。以下の結果をご覧ください。
Image.fromarray(results[0].plot()[..., ::-1])
モデルを OpenVINO 中間表現 (IR) 形式に変換#
Ultralytics モデル・エクスポート API を使用すると、PyTorch モデルを OpenVINO IR 形式に変換できます。内部的には、openvino.convert_model メソッドを使用してモデルの OpenVINO IR バージョンを取得します。このメソッドには、モデルトレース用のモデル・オブジェクトとサンプル入力が必要です。FastSAM モデル自体は YOLOv8 モデルに基づいています。
# インスタンス・セグメント化モデル
ov_model_path = Path(f"{model_name}_openvino_model/{model_name}.xml")
if not ov_model_path.exists():
    ov_model = model.export(format="openvino", dynamic=False, half=False)
Ultralytics YOLOv8.2.24 🚀 Python-3.8.10 torch-2.3.1+cpu CPU (Intel Core(TM) i9-10920X 3.50GHz)
PyTorch: starting from 'FastSAM-x.pt' with input shape (1, 3, 1024, 1024) BCHW and output shape(s) ((1, 37, 21504), (1, 32, 256, 256)) (138.3 MB)
OpenVINO: starting export with openvino 2024.2.0-15519-5c0f38f83f6-releases/2024/2...OpenVINO: export success ✅ 6.2s, saved as 'FastSAM-x_openvino_model/' (276.1 MB)
Export complete (9.2s)
Results saved to /opt/home/k8sworker/ci-ai/cibuilds/ov-notebook/OVNotebookOps-727/.workspace/scm/ov-notebook/notebooks/fast-segment-anything
Predict: yolo predict task=segment model=FastSAM-x_openvino_model imgsz=1024
Validate: yolo val task=segment model=FastSAM-x_openvino_model imgsz=1024 data=ultralytics/datasets/sa.yaml
Visualize: https://netron.app変換したモデルを元のパイプラインに埋め込み#
OpenVINO™ ランタイム Python API は、モデルを OpenVINO IR 形式でコンパイルするために使用されます。Core クラスは、OpenVINO ランタイム API へのアクセスを提供します。Core クラスのインスタンスである core オブジェクトは API を表し、モデルをコンパイルするために使用されます。
core = ov.Core()OpenVINO を使用してモデル推論に使用されるデバイスをドロップダウン・リストから選択します:
device = widgets.Dropdown(
    options=core.available_devices + ["AUTO"],
    value="AUTO",
    description="Device:",
    disabled=False,
)

deviceDropdown(description='Device:', index=1, options=('CPU', 'AUTO'), value='AUTO')OpenVINO モデルを元のパイプラインに適合#
ここでは、元の推論パイプラインに埋め込む OpenVINO モデルのラッパークラスを作成します。OV モデルを適応させる際に考慮すべき事項をいくつか示します: - 元のパイプラインから渡されたパラメーターがコンパイルされた OV モデルに適切に転送されることを確認します。OV モデルでは入力引数の一部のみが使用され、一部は無視される場合があり、引数を別のデータタイプに変換したり、タプルや辞書などの一部のデータ構造をアンラップしたりする必要がある場合があります。- ラッパークラスが期待どおりの形式でパイプラインに結果を返すことを保証します。以下の例では、OV モデルの出力を torch テンソルのタプルにパックする方法がわかります。- モデルを呼び出すため元のパイプラインで使用されるモデルメソッドに注意してください。これは forward メソッドではない可能性があります。この例では、モデルは predictor オブジェクトの一部であり、オブジェクトとして呼び出されるため、マジック __call__ メソッドを再定義する必要があります。
class OVWrapper:
    def __init__(self, ov_model, device="CPU", stride=32, ov_config=None) -> None:
        ov_config = ov_config or {}
        self.model = core.compile_model(ov_model, device, ov_config)

        self.stride = stride
        self.pt = False
         self.fp16 = False
        self.names = {0: "object"}

    def __call__(self, im, **_):
        result = self.model(im)
        return torch.from_numpy(result[0]), torch.from_numpy(result[1])
ラッパー・オブジェクトを初期化し、FastSAM パイプラインにロードします。
ov_config = {}
if "GPU" in device.value or ("AUTO" in device.value and "GPU" in core.available_devices):
    ov_config = {"GPU_DISABLE_WINOGRAD_CONVOLUTION": "YES"}

wrapped_model = OVWrapper(
    ov_model_path,
    device=device.value,
    stride=model.predictor.model.stride,
    ov_config=ov_config,
)
model.predictor.model = wrapped_model

ov_results = model(image_uri, device=device.value, retina_masks=True, imgsz=1024, conf=0.6, iou=0.9)
image 1/1 /opt/home/k8sworker/ci-ai/cibuilds/ov-notebook/OVNotebookOps-727/.workspace/scm/ov-notebook/notebooks/fast-segment-anything/coco_bike.jpg: 1024x1024 42 objects, 508.7ms
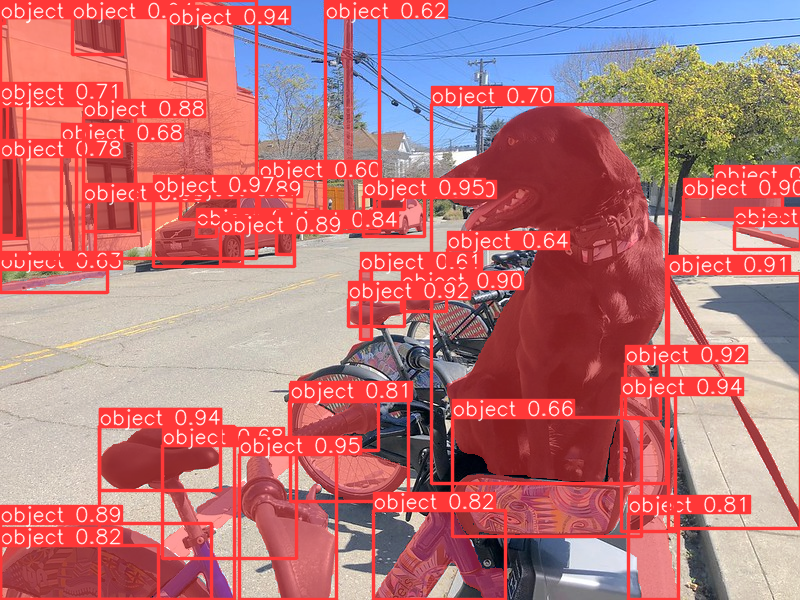
Speed: 7.4ms preprocess, 508.7ms inference, 32.1ms postprocess per image at shape (1, 3, 1024, 1024)次のセルで変換されたモデル出力を確認できます。元のモデルと同じになります。
Image.fromarray(ov_results[0].plot()[..., ::-1])
NNCF トレーニング後量子化 API を使用してモデルを最適化#
NNCF は、精度の低下を最小限に抑えながら、OpenVINO でニューラル・ネットワーク推論を最適化する一連の高度なアルゴリズムを提供します。FastSAM を最適化するため、ポストトレーニング・モード (微調整パイプラインなし) で 8 ビット量子化を使用します。
最適化プロセスには次の手順が含まれます:
量子化用のデータセットを作成します。
nncf.quantizeを実行して、量子化されたモデルを取得します。openvino.save_model()関数を使用して INT8 モデルを保存します。
do_quantize = widgets.Checkbox(
    value=True,
    description="Quantization",
    disabled=False,
)

do_quantizeCheckbox(value=True, description='Quantization')nncf.quantize 関数は、モデル量子化のインターフェイスを提供します。OpenVINO モデルのインスタンスと量子化データセットが必要です。オプションで、量子化プロセスの追加パラメーター (量子化のサンプル数、プリセット、無視される範囲など) を提供できます。FastSAM をサポートする YOLOv8 モデルには、活性化の非対称量子化を必要とする非 ReLU 活性化関数が含まれています。さらに良い結果を得るため、mixed 量子化プリセットを使用します。これは、重みの対称量子化と活性化の非対称量子化を提供します。より正確な結果を得るには、ignored_scope パラメーターを使用して、後処理サブグラフの操作を浮動小数点精度に保つ必要があります。
量子化アルゴリズムは、NNCF リポジトリーの YOLOv8 量子化の例に基づいています。詳細については、そちらを参照してください。さらに、OV ノートブック・リポジトリーで他の量子化チュートリアルを確認することもできます。
注: モデルのトレーニング後の量子化は時間のかかるプロセスです。ハードウェアによっては数分かかる場合があります。
%%skip not $do_quantize.value

import pickle
from contextlib import contextmanager
from zipfile import ZipFile

import cv2
from tqdm.autonotebook import tqdm

import nncf

COLLECT_CALIBRATION_DATA = False
calibration_data = []

@contextmanager
def calibration_data_collection():
    global COLLECT_CALIBRATION_DATA
    try:         COLLECT_CALIBRATION_DATA = True
        yield
    finally:         COLLECT_CALIBRATION_DATA = False

class NNCFWrapper:
    def __init__(self, ov_model, stride=32) -> None:
        self.model = core.read_model(ov_model)
        self.compiled_model = core.compile_model(self.model, device_name="CPU")

        self.stride = stride
        self.pt = False
        self.fp16 = False
        self.names = {0: "object"}

    def __call__(self, im, **_):
        if COLLECT_CALIBRATION_DATA:
            calibration_data.append(im)

        result = self.compiled_model(im)
        return torch.from_numpy(result[0]), torch.from_numpy(result[1])

# ウェブからデータを取得し、データローダーを記述
DATA_URL = "https://ultralytics.com/assets/coco128.zip"
OUT_DIR = Path('.')

download_file(DATA_URL, directory=OUT_DIR, show_progress=True)

if not (OUT_DIR / "coco128/images/train2017").exists():
    with ZipFile('coco128.zip', "r") as zip_ref:
        zip_ref.extractall(OUT_DIR)

class COCOLoader(torch.utils.data.Dataset):
    def __init__(self, images_path):
        self.images = list(Path(images_path).iterdir())

    def __getitem__(self, index):
        if isinstance(index, slice):
            return [self.read_image(image_path) for image_path in self.images[index]]
        return self.read_image(self.images[index])

    def read_image(self, image_path):
        image = cv2.imread(str(image_path))
        image = cv2.cvtColor(image, cv2.COLOR_BGR2RGB)
        return image

    def __len__(self):
        return len(self.images)

def collect_calibration_data_for_decoder(model, calibration_dataset_size: int, calibration_cache_path: Path):
    global calibration_data

    if not calibration_cache_path.exists():
        coco_dataset = COCOLoader(OUT_DIR / 'coco128/images/train2017')
        with calibration_data_collection():
            for image in tqdm(coco_dataset[:calibration_dataset_size], desc="Collecting calibration data"):
                model(image, retina_masks=True, imgsz=1024, conf=0.6, iou=0.9, verbose=False)
        calibration_cache_path.parent.mkdir(parents=True, exist_ok=True)
        with open(calibration_cache_path, "wb") as f:
            pickle.dump(calibration_data, f)
    else:
        with open(calibration_cache_path, "rb") as f:
            calibration_data = pickle.load(f)

    return calibration_data

def quantize(model, save_model_path: Path, calibration_cache_path: Path, calibration_dataset_size: int, preset: nncf.QuantizationPreset):
    calibration_data = collect_calibration_data_for_decoder(
        model, calibration_dataset_size, calibration_cache_path)
    quantized_ov_decoder = nncf.quantize(
        model.predictor.model.model,
        calibration_dataset=nncf.Dataset(calibration_data),
        preset=preset,
        subset_size=len(calibration_data),
        fast_bias_correction=True,
        ignored_scope=nncf.IgnoredScope(
            types=["Multiply", "Subtract", "Sigmoid"], # 操作を無視
            names=[
                "__module.model.22.dfl.conv/aten::_convolution/Convolution", # 後処理サブグラフ
                "__module.model.22/aten::add/Add",
                "__module.model.22/aten::add/Add_1"
             ],
        )
    )
    ov.save_model(quantized_ov_decoder, save_model_path)

wrapped_model = NNCFWrapper(ov_model_path, stride=model.predictor.model.stride)
model.predictor.model = wrapped_model

calibration_dataset_size = 128
quantized_model_path = Path(f"{model_name}_quantized") / "FastSAM-x.xml"
calibration_cache_path = Path(f"calibration_data/coco{calibration_dataset_size}.pkl")
if not quantized_model_path.exists():
    quantize(model, quantized_model_path, calibration_cache_path,
        calibration_dataset_size=calibration_dataset_size,
        preset=nncf.QuantizationPreset.MIXED)
<string>:7: TqdmExperimentalWarning: Using tqdm.autonotebook.tqdm in notebook mode. Use tqdm.tqdm instead to force console mode (e.g. in jupyter console)
INFO:nncf:NNCF initialized successfully.Supported frameworks detected: torch, tensorflow, onnx, openvinococo128.zip: 0%| | 0.00/6.66M [00:00<?, ?B/s]Collecting calibration data: 0%| | 0/128 [00:00<?, ?it/s]INFO:nncf:3 ignored nodes were found by name in the NNCFGraph
INFO:nncf:8 ignored nodes were found by types in the NNCFGraph
INFO:nncf:Not adding activation input quantizer for operation: 271 __module.model.22/aten::sigmoid/Sigmoid
INFO:nncf:Not adding activation input quantizer for operation: 312 __module.model.22.dfl.conv/aten::_convolution/Convolution
INFO:nncf:Not adding activation input quantizer for operation: 349 __module.model.22/aten::sub/Subtract
INFO:nncf:Not adding activation input quantizer for operation: 350 __module.model.22/aten::add/Add
INFO:nncf:Not adding activation input quantizer for operation: 362 __module.model.22/aten::add/Add_1 374 __module.model.22/aten::div/Divide
INFO:nncf:Not adding activation input quantizer for operation: 363 __module.model.22/aten::sub/Subtract_1
INFO:nncf:Not adding activation input quantizer for operation: 386 __module.model.22/aten::mul/MultiplyOutput()Output()元のモデルと量子化モデルのパフォーマンスを比較#
最後に、OV モデルと量子化モデルの両方をキャリブレーション・データセット上で反復して、パフォーマンスを測定します。
%%skip not $do_quantize.value

import datetime

coco_dataset = COCOLoader(OUT_DIR / 'coco128/images/train2017')
calibration_dataset_size = 128

wrapped_model = OVWrapper(ov_model_path, device=device.value, stride=model.predictor.model.stride)
model.predictor.model = wrapped_model

start_time = datetime.datetime.now()
for image in tqdm(coco_dataset, desc="Measuring inference time"):
    model(image, retina_masks=True, imgsz=1024, conf=0.6, iou=0.9, verbose=False)
duration_base = (datetime.datetime.now() - start_time).seconds
print("Segmented in", duration_base, "seconds.")
print("Resulting in", round(calibration_dataset_size / duration_base, 2), "fps")
Measuring inference time: 0%| | 0/128 [00:00<?, ?it/s]Segmented in 69 seconds. Resulting in 1.86 fps%%skip not $do_quantize.value
quantized_wrapped_model = OVWrapper(quantized_model_path, device=device.value,
stride=model.predictor.model.stride)
model.predictor.model = quantized_wrapped_model
start_time = datetime.datetime.now()
for image in tqdm(coco_dataset, desc="Measuring inference time"):
model(image, retina_masks=True, imgsz=1024, conf=0.6, iou=0.9, verbose=False)
duration_quantized = (datetime.datetime.now() - start_time).seconds
print("Segmented in", duration_quantized, "seconds")
print("Resulting in", round(calibration_dataset_size / duration_quantized, 2), "fps")
print("That is", round(duration_base / duration_quantized, 2), "times faster!")Measuring inference time: 0%| | 0/128 [00:00<?, ?it/s]Segmented in 22 seconds
Resulting in 5.82 fps
That is 3.14 times faster!変換されたパイプラインを試す#
以下のデモアプリは Gradio パッケージを使用して作成されています。
このアプリでは、モデルの出力をインタラクティブに変更できます。ピクセル・セレクター・タイプ・スイッチを使用すると、入力画像に前景/背景ポイントまたは境界ボックスを配置できます。
import cv2
import numpy as np
import matplotlib.pyplot as plt

def fast_process(
    annotations,
    image,
    scale,
    better_quality=False,
    mask_random_color=True,
    bbox=None,
    use_retina=True,
    with_contours=True,
):
    original_h = image.height
    original_w = image.width

    if better_quality:
        for i, mask in enumerate(annotations):
            mask = cv2.morphologyEx(mask.astype(np.uint8), cv2.MORPH_CLOSE, np.ones((3, 3), np.uint8))
            annotations[i] = cv2.morphologyEx(mask.astype(np.uint8), cv2.MORPH_OPEN, np.ones((8, 8), np.uint8))

    inner_mask = fast_show_mask(
        annotations,
        plt.gca(),
        random_color=mask_random_color,
        bbox=bbox,
        retinamask=use_retina,
        target_height=original_h,
        target_width=original_w,
    )

    if with_contours:
        contour_all = []
        temp = np.zeros((original_h, original_w, 1))
        for i, mask in enumerate(annotations):
            annotation = mask.astype(np.uint8)
            if not use_retina:
                annotation = cv2.resize(
                    annotation,
                    (original_w, original_h),
                    interpolation=cv2.INTER_NEAREST,
                )
            contours, _ = cv2.findContours(annotation, cv2.RETR_TREE, cv2.CHAIN_APPROX_SIMPLE)
            for contour in contours:
                contour_all.append(contour)
        cv2.drawContours(temp, contour_all, -1, (255, 255, 255), 2 // scale)
        color = np.array([0 / 255, 0 / 255, 255 / 255, 0.9])
        contour_mask = temp / 255 * color.reshape(1, 1, -1)

    image = image.convert("RGBA")
    overlay_inner = Image.fromarray((inner_mask * 255).astype(np.uint8), "RGBA")
    image.paste(overlay_inner, (0, 0), overlay_inner)

    if with_contours:
        overlay_contour = Image.fromarray((contour_mask * 255).astype(np.uint8), "RGBA")
        image.paste(overlay_contour, (0, 0), overlay_contour)

    return image

# CPU 後処理
def fast_show_mask(
    annotation,
    ax,
    random_color=False,
    bbox=None,
    retinamask=True,
    target_height=960,
    target_width=960,
):
    mask_sum = annotation.shape[0]
    height = annotation.shape[1]
    weight = annotation.shape[2]
    #
    areas = np.sum(annotation, axis=(1, 2))
    sorted_indices = np.argsort(areas)[::1]
    annotation = annotation[sorted_indices]

    index = (annotation != 0).argmax(axis=0)
    if random_color:
        color = np.random.random((mask_sum, 1, 1, 3))
    else:
        color = np.ones((mask_sum, 1, 1, 3)) * np.array([30 / 255, 144 / 255, 255 / 255])
    transparency = np.ones((mask_sum, 1, 1, 1)) * 0.6
    visual = np.concatenate([color, transparency], axis=-1)
    mask_image = np.expand_dims(annotation, -1) * visual

    mask = np.zeros((height, weight, 4))

    h_indices, w_indices = np.meshgrid(np.arange(height), np.arange(weight), indexing="ij")
    indices = (index[h_indices, w_indices], h_indices, w_indices, slice(None))

    mask[h_indices, w_indices, :]= mask_image[indices]
    if bbox is not None:
        x1, y1, x2, y2 = bbox
        ax.add_patch(plt.Rectangle((x1, y1), x2 - x1, y2 - y1, fill=False, edgecolor="b", linewidth=1))

    if not retinamask:
        mask = cv2.resize(mask, (target_width, target_height), interpolation=cv2.INTER_NEAREST)

    return mask
import gradio as gr
examples = [
[image_uri], ["https://storage.openvinotoolkit.org/repositories/openvino_notebooks/data/data/image/empty_road_mapillary.jpg"],
["https://storage.openvinotoolkit.org/repositories/openvino_notebooks/data/data/image/wall.jpg"],
]
object_points = []
background_points = []
bbox_points = []
last_image = examples[0][0]これは、ユーザー入力に基づいて画像をセグメント化するのに呼び出されるメインのコールバック関数です。
def segment(
    image,
    model_type,
    input_size=1024,
    iou_threshold=0.75,
    conf_threshold=0.4,
    better_quality=True,
    with_contours=True,
    use_retina=True,
    mask_random_color=True,
):
    if do_quantize.value and model_type == "Quantized model":
        model.predictor.model = quantized_wrapped_model
    else:
        model.predictor.model = wrapped_model

    input_size = int(input_size)
    w, h = image.size
    scale = input_size / max(w, h)
    new_w = int(w * scale)
    new_h = int(h * scale)
    image = image.resize((new_w, new_h))

    results = model(
        image,
        retina_masks=use_retina,
        iou=iou_threshold,
        conf=conf_threshold,
        imgsz=input_size,
    )

    masks = results[0].masks.data
    # アノテーションを計算
    if not (object_points or bbox_points):
        annotations = masks.cpu().numpy()
    else:
        annotations = []

    if object_points:
        all_points = object_points + background_points
        labels = [1] * len(object_points) + [0] * len(background_points)
        scaled_points = [[int(x * scale) for x in point] for point in all_points]
        h, w = masks[0].shape[:2]
        assert max(h, w) == input_size
        onemask = np.zeros((h, w))
        for mask in sorted(masks, key=lambda x: x.sum(), reverse=True):
            mask_np = (mask == 1.0).cpu().numpy()
            for point, label in zip(scaled_points, labels):
                if mask_np[point[1], point[0]] == 1 and label == 1:
                    onemask[mask_np] = 1
                if mask_np[point[1], point[0]] == 1 and label == 0:
                    onemask[mask_np] = 0
        annotations.append(onemask >= 1)
    if len(bbox_points) >= 2:
        scaled_bbox_points = []
        for i, point in enumerate(bbox_points):
            x, y = int(point[0] * scale), int(point[1] * scale)
            x = max(min(x, new_w), 0)
            y = max(min(y, new_h), 0)
            scaled_bbox_points.append((x, y))
        for i in range(0, len(scaled_bbox_points) - 1, 2):
            x0, y0, x1, y1 = *scaled_bbox_points[i], *scaled_bbox_points[i + 1]

            intersection_area = torch.sum(masks[:, y0:y1, x0:x1], dim=(1, 2))
            masks_area = torch.sum(masks, dim=(1, 2))
            bbox_area = (y1 - y0) * (x1 - x0)

            union = bbox_area + masks_area - intersection_area
            iou = intersection_area / union
            max_iou_index = torch.argmax(iou)

            annotations.append(masks[max_iou_index].cpu().numpy())

    return fast_process(
        annotations=np.array(annotations),
        image=image,
        scale=(1024 // input_size),
        better_quality=better_quality,
        mask_random_color=mask_random_color,
        bbox=None,
        use_retina=use_retina,
        with_contours=with_contours,
    )
def select_point(img: Image.Image, point_type: str, evt: gr.SelectData) -> Image.Image:
"""Gradio select callback."""
img = img.convert("RGBA")
x, y = evt.index[0], evt.index[1]
point_radius = np.round(max(img.size) / 100)
if point_type == "Object point":
object_points.append((x, y))
color = (30, 255, 30, 200)
elif point_type == "Background point":
background_points.append((x, y))
color = (255, 30, 30, 200)
elif point_type == "Bounding Box":
bbox_points.append((x, y))
color = (10, 10, 255, 255)
if len(bbox_points) % 2 == 0:
# ポイントの数が偶数の場合は長方形を描画
new_img = Image.new("RGBA", img.size, (255, 255, 255, 0))
_draw = ImageDraw.Draw(new_img)
x0, y0, x1, y1 = *bbox_points[-2], *bbox_points[-1]
x0, x1 = sorted([x0, x1])
y0, y1 = sorted([y0, y1])
# 並べ替え順序を保存
bbox_points[-2] = (x0, y0)
bbox_points[-1] = (x1, y1)
_draw.rectangle((x0, y0, x1, y1), fill=(*color[:-1], 90))
img = Image.alpha_composite(img, new_img)
# ポイントを描画
ImageDraw.Draw(img).ellipse(
[(x - point_radius, y - point_radius), (x + point_radius, y + point_radius)],
fill=color,
)
return img
def clear_points() -> (Image.Image, None):
"""Gradio clear points callback."""
global object_points, background_points, bbox_points
# global object_points; global background_points; global bbox_points
object_points = []
background_points = []
bbox_points = []
return last_image, None
def save_last_picked_image(img: Image.Image) -> None:
"""Gradio callback saves the last used image."""
global last_image
last_image = img
# 入力画像を変更する場合は、
# 以前のポイントをすべてクリアする必要があります
clear_points()
# セグメント化マップ出力を削除
return None
with gr.Blocks(title="Fast SAM") as demo:
with gr.Row(variant="panel"):
original_img = gr.Image(label="Input", value=examples[0][0], type="pil")
segmented_img = gr.Image(label="Segmentation Map", type="pil")
with gr.Row():
point_type = gr.Radio(
["Object point", "Background point", "Bounding Box"],
value="Object point",
label="Pixel selector type",
)
model_type = gr.Radio(
["FP32 model", "Quantized model"] if do_quantize.value else ["FP32 model"],
value="FP32 model",
label="Select model variant",
)
with gr.Row(variant="panel"):
segment_button = gr.Button("Segment", variant="primary")
clear_button = gr.Button("Clear points", variant="secondary")
gr.Examples(
examples,
inputs=original_img,
fn=save_last_picked_image,
run_on_click=True,
outputs=segmented_img,
)
# コールバック
original_img.select(select_point, inputs=[original_img, point_type], outputs=original_img)
original_img.upload(save_last_picked_image, inputs=original_img, outputs=segmented_img)
clear_button.click(clear_points, outputs=[original_img, segmented_img])
segment_button.click(segment, inputs=[original_img, model_type], outputs=segmented_img)
try:
demo.queue().launch(debug=False)
except Exception:
demo.queue().launch(share=True, debug=False)
# リモートで起動する場合は、server_name と server_port を指定
# 例: `demo.launch(server_name="your server name", server_port="server port in int")`
# 詳細については、Gradio のドキュメントを参照してください: https://gradio.app/docs/ローカル URL で実行中: http://127.0.0.1:7860 パブリックリンクを作成するには、launch() で share=True を設定します。