Stable Diffusion と OpenVINO™ によるテキストからの画像生成#
この Jupyter ノートブックは、ローカルへのインストール後にのみ起動できます。
Stable Diffusion (安定拡散) は、CompVis、Stability AI、LAION の研究者とエンジニアによって作成されたテキストから画像への潜在拡散モデルです。これは、LAION-5B データベースのサブセットからの 512x512 画像でトレーニングされます。このモデルは、凍結された CLIP ViT-L/14 テキスト・エンコーダーを使用して、テキストプロンプトに基づいてモデルを調整します。860M UNet と 123M テキスト・エンコーダーを搭載。詳細についてはモデルカードを参照してください。
一般に、拡散モデルは、画像などの対象サンプルを取得するために、ランダムなガウスノイズを段階的に除去するようにトレーニングされたマシン・ラーニング・システムです。拡散モデルは、画像データを生成するため最先端の結果を達成することが示されています。しかし、拡散モデルには、逆ノイズ除去プロセスが遅いという欠点があります。さらに、このモデルはピクセル空間で動作するため大量のメモリーを消費し、高解像度の画像を生成するには高いコストがかかります。そのため、このモデルをトレーニングし、推論に使用するのは困難です。OpenVINO は、インテルのハードウェア上でモデル推論を実行する機能を提供し、誰もが拡散モデルの素晴らしい世界への扉を開くことができます。
モデルの機能はテキストから画像への変換だけに限定されず、テキスト誘導による画像から画像への生成や修復など追加のタスクも解決できます。このチュートリアルでは、Stable Diffusion を使用してテキストガイドによる画像間生成を実行する方法についても説明します。
このノートブックでは、OpenVINO を使用して Stable Diffusion モデルを変換および実行する方法を示します。
目次:
必要条件#
%pip install -q "openvino>=2023.1.0" "git+https://github.com/huggingface/optimum-intel.git"
%pip install -q --extra-index-url https://download.pytorch.org/whl/cpu "diffusers>=0.9.0" "torch>=2.1"
%pip install -q "huggingface-hub>=0.9.1"
%pip install -q "gradio>=4.19"
%pip install -q transformers Pillow opencv-python tqdm
Note: you may need to restart the kernel to use updated packages.
Note: you may need to restart the kernel to use updated packages.
Note: you may need to restart the kernel to use updated packages.
Note: you may need to restart the kernel to use updated packages.
Note: you may need to restart the kernel to use updated packages.推論パイプラインの準備#
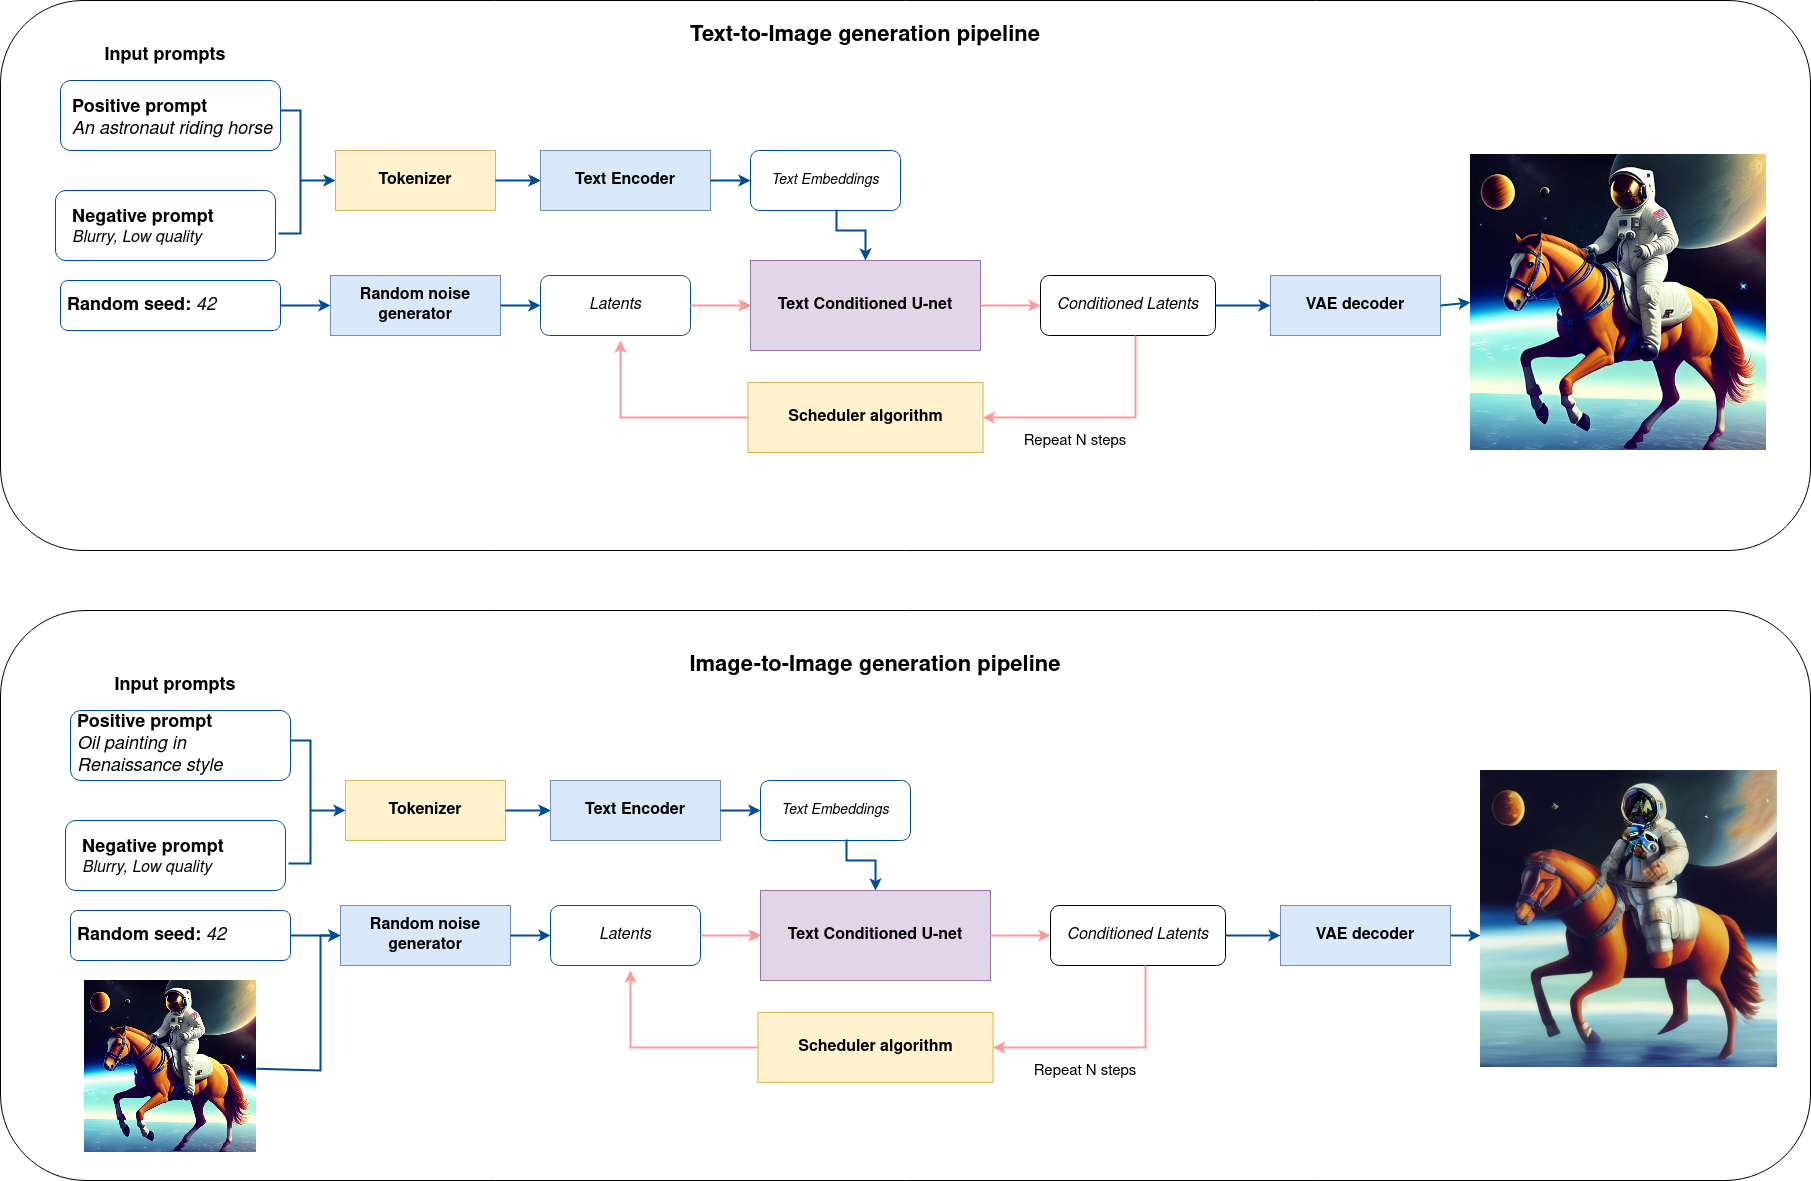
ここでは論理フローを図解して、モデルが推論でどのように機能するかを詳しく見てみます。

sd-pipeline#
図からわかるように、テキストから画像への生成とテキスト誘導による画像から画像への生成のアプローチにおける唯一の違いは、初期の潜在状態が生成される方法です。画像から画像への生成の場合、VAE エンコーダーによってエンコードされた画像が、潜在シードを使用して生成されたノイズと混合されますが、テキストから画像への生成では、初期の潜在状態としてノイズのみを使用します。Stable diffusion モデルは、サイズ \(64 \times 64\) の潜在画像表現とテキストプロンプトの両方を入力として受け取り、CLIP のテキスト・エンコーダーを介してサイズ \(77 \times 768\) のテキスト埋め込みに変換されます。
次に、U-Net モデルは、テキスト埋め込みを条件として、ランダムな潜在画像表現を繰り返しノイズ除去します。U-Net の出力はノイズ残差であり、スケジューラー・アルゴリズムを介してノイズ除去された潜在画像表現を計算するために使用されます。この計算にはさまざまなスケジューラー・アルゴリズムを使用できますが、それぞれに長所と短所があります。Stable Diffusion の場合、次のいずれかを使用することを推奨します:
K-LMS スケジューラー (パイプラインで使用します)
スケジューラーのアルゴリズム機能がどのように動作するかに関する理論は、このノートブックの範囲外です。それでも、簡単に言えば、以前のノイズ表現と予測されたノイズ残差から、予測されたノイズ除去画像表現を計算することを覚えておく必要があります。詳細については、推奨されている拡散ベースの生成モデルの設計空間の解明を参照してください。
ノイズ除去プロセスは、指定された回数 (デフォルトでは 50 回) 繰り返され、段階的に潜在画像表現の改善が図られます。完了すると、潜在画像表現は変分オート・エンコーダーのデコーダー部によってデコードされます。
Text-to-image パイプライン#
Stable Diffusion モデルをロードし、text-to-image パイプラインを作成#
Hugging Face Hub から最適化された Stable Diffusion モデルを読み込み、Optimum Intel の OpenVINO ランタイムを使用して推論を実行するパイプラインを作成します。
Optimum Intel で Stable Diffusion モデルを実行するには、推論パイプラインを表す optimum.intel.OVStableDiffusionPipeline クラスを使用する必要があります。OVStableDiffusionPipeline は、from_pretrained メソッドによって初期化されます。export=True パラメーターを使用して、PyTorch からのオンザフライ変換モデルをサポートします。変換されたモデルは、次回の実行のため save_pretrained メソッドを使用してディスクに保存できます。
Stable Diffusion モデルを OpenVINO 形式にエクスポートすると、パイプラインへの推論中に結合された 4 つのモデルで構成される 3 つのコンポーネントに分解されます:
テキスト・エンコーダー
テキスト・エンコーダーは、入力プロンプト (例えば、“馬に乗った宇宙飛行士の写真”) を、U-Net が理解できる埋め込みスペースに変換する役割を果たします。これは通常、入力トークンのシーケンスを潜在テキスト埋め込みのシーケンスにマッピングする単純なトランスフォーマー・ベースのエンコーダーです。
U-NET
モデルは次のステップのサンプルの状態を予測します。
VAE エンコーダー
エンコーダーは、画像を低次元の潜在表現に変換するのに使用され、これが U-Net モデルの入力となります。
VAE デコーダー
デコーダーは潜在表現をトランスフォームして画像に戻します。
OpenVINO を使用して推論を実行するデバイスをドロップダウン・リストから選択します。
import ipywidgets as widgets
import openvino as ov

core = ov.Core()

device = widgets.Dropdown(
    options=core.available_devices + ["AUTO"],
    value="AUTO",
    description="Device:",
    disabled=False,
)

deviceDropdown(description='Device:', index=1, options=('CPU', 'AUTO'), value='AUTO')from optimum.intel.openvino import OVStableDiffusionPipeline
from pathlib import Path
DEVICE = device.value
MODEL_ID = "prompthero/openjourney"
MODEL_DIR = Path("diffusion_pipeline")
if not MODEL_DIR.exists():
ov_pipe = OVStableDiffusionPipeline.from_pretrained(MODEL_ID, export=True, device=DEVICE, compile=False)
ov_pipe.save_pretrained(MODEL_DIR)
else:
ov_pipe = OVStableDiffusionPipeline.from_pretrained(MODEL_DIR, device=DEVICE, compile=False)
ov_pipe.compile()Compiling the vae_decoder to CPU ...
Compiling the unet to CPU ...
Compiling the text_encoder to CPU ...
Compiling the vae_encoder to CPU ...Text-to-Image 生成#
これで、画像生成用のテキストプロンプトを定義し、推論パイプラインを実行できるようになりました。
注: より正確な結果を得るため、
stepsを増やすことを検討してください。推奨値は50ですが、処理に時間がかかります。
sample_text = (
    "cyberpunk cityscape like Tokyo New York with tall buildings at dusk golden hour cinematic lighting, epic composition.   "
    "A golden daylight, hyper-realistic environment.   "
    "Hyper and intricate detail, photo-realistic.   "
    "Cinematic and volumetric light.   " "Epic concept art."
    "Octane render and Unreal Engine, trending on artstation"
)
text_prompt = widgets.Text(value=sample_text, description="your text")
num_steps = widgets.IntSlider(min=1, max=50, value=20, description="steps:")
seed = widgets.IntSlider(min=0, max=10000000, description="seed: ", value=42)
widgets.VBox([text_prompt, num_steps, seed])VBox(children=(Text(value='cyberpunk cityscape like Tokyo New York with tall buildings at dusk golden hour ci…print("Pipeline settings")
print(f"Input text: {text_prompt.value}")
print(f"Seed: {seed.value}")
print(f"Number of steps: {num_steps.value}")Pipeline settings
Input text: cyberpunk cityscape like Tokyo New York with tall buildings at dusk golden hour cinematic lighting, epic composition. A golden daylight, hyper-realistic environment. Hyper and intricate detail, photo-realistic. Cinematic and volumetric light. Epic concept art. Octane render and Unreal Engine, trending on artstation
Seed: 42
Number of steps: 20画像を生成し、生成結果を保存してみます。パイプラインは 1 つまたは複数の結果を返します: images には最終的に生成された画像が含まれます。複数の結果を取得するには、num_images_per_prompt パラメーターを設定します。
import numpy as np

np.random.seed(seed.value)

result = ov_pipe(text_prompt.value, num_inference_steps=num_steps.value)

final_image = result["images"][0]
final_image.save("result.png")
0%| | 0/21 [00:00<?, ?it/s]今こそショータイムです!
text = "\n\t".join(text_prompt.value.split("."))
print("Input text:")
print("\t" + text)
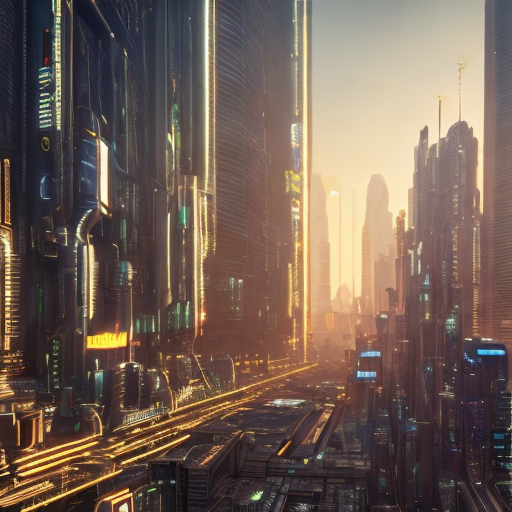
display(final_image)
Input text:
cyberpunk cityscape like Tokyo New York with tall buildings at dusk golden hour cinematic lighting, epic composition
A golden daylight, hyper-realistic environment
Hyper and intricate detail, photo-realistic
Cinematic and volumetric light
Epic concept art
Octane render and Unreal Engine, trending on artstation
ご覧の通り、画像はかなり高解像度です 🔥。
インタラクティブな text-to-image デモ#
import gradio as gr

def generate_from_text(text, seed, num_steps, _=gr.Progress(track_tqdm=True)):
    np.random.seed(seed)
    result = ov_pipe(text, num_inference_steps=num_steps)
    return result["images"][0]

with gr.Blocks() as demo:
    with gr.Tab("Text-to-Image generation"):
        with gr.Row():
            with gr.Column():
                text_input = gr.Textbox(lines=3, label="Text")
                seed_input = gr.Slider(0, 10000000, value=42, step=1, label="Seed")
                steps_input = gr.Slider(1, 50, value=20, step=1, label="Steps")
            out = gr.Image(label="Result", type="pil")
        btn = gr.Button()
        btn.click(generate_from_text, [text_input, seed_input, steps_input], out)
        gr.Examples([[sample_text, 42, 20]], [text_input, seed_input, steps_input])
try:
    demo.queue().launch()
except Exception:
    demo.queue().launch(share=True)
# リモートで起動する場合は、server_name と server_port を指定
# demo.launch(server_name='your server name', server_port='server port in int')
# 詳細はドキュメントをご覧ください: https://gradio.app/docs/demo.close()
del ov_pipe
np.random.seed(None)Image-to-Image パイプライン#
Image-to-Image パイプラインの作成#
Optimum Intel で Stable Diffusion モデルを実行するには、推論パイプラインを表す optimum.intel.OVStableDiffusionImg2ImgPipeline クラスを使用する必要があります。text-to-image パイプラインと同じモデルを使用します。モデルはすでに Hugging Face Hub からダウンロードされており、前の手順で OpenVINO IR 形式に変換されているため、ロードするだけです。
core = ov.Core()

device = widgets.Dropdown(
    options=core.available_devices + ["AUTO"],
    value="AUTO",
    description="Device:",
    disabled=False,
)

deviceDropdown(description='Device:', index=1, options=('CPU', 'AUTO'), value='AUTO')from optimum.intel.openvino import OVStableDiffusionImg2ImgPipeline
from pathlib import Path
DEVICE = device.value
ov_pipe_i2i = OVStableDiffusionImg2ImgPipeline.from_pretrained(MODEL_DIR, device=DEVICE, compile=False)
ov_pipe_i2i.compile()Compiling the vae_decoder to CPU ...
Compiling the unet to CPU ...
Compiling the text_encoder to CPU ...
Compiling the vae_encoder to CPU ...Image-to-Image 生成#
Image-to-Image 生成では、テキストプロンプトに加えて、初期画像を提供する必要があります。オプションで、入力画像に追加されるノイズの量を制御する 0.0 ~ 1.0 の値を strength パラメーターを変更することもできます。値が 1.0 に近づくと、さまざまなバリエーションが可能になりますが、入力と意味的に一致しない画像も生成されます。
text_prompt_i2i = widgets.Text(value="amazing watercolor painting", description="your text")
num_steps_i2i = widgets.IntSlider(min=1, max=50, value=10, description="steps:")
seed_i2i = widgets.IntSlider(min=0, max=1024, description="seed: ", value=42)
image_widget = widgets.FileUpload(
    accept="",
    multiple=False,
    description="Upload image",
)
strength = widgets.FloatSlider(min=0, max=1, description="strength: ", value=0.5)
widgets.VBox([text_prompt_i2i, seed_i2i, num_steps_i2i, image_widget, strength])
VBox(children=(Text(value='amazing watercolor painting', description='your text'), IntSlider(value=42, descrip…# `notebook_utils` モジュールを取得
import requests
r = requests.get(
url="https://raw.githubusercontent.com/openvinotoolkit/openvino_notebooks/latest/utils/notebook_utils.py",
)
open("notebook_utils.py", "w").write(r.text)
from notebook_utils import download_fileimport io
import PIL
default_image_path = download_file(
"https://storage.openvinotoolkit.org/repositories/openvino_notebooks/data/data/image/coco.jpg",
filename="coco.jpg",
)
# アップロードされた画像をリード
image = PIL.Image.open(io.BytesIO(image_widget.value[-1]["content"]) if image_widget.value else str(default_image_path))
print("Pipeline settings")
print(f"Input text: {text_prompt_i2i.value}")
print(f"Seed: {seed_i2i.value}")
print(f"Number of steps: {num_steps_i2i.value}")
print(f"Strength: {strength.value}")
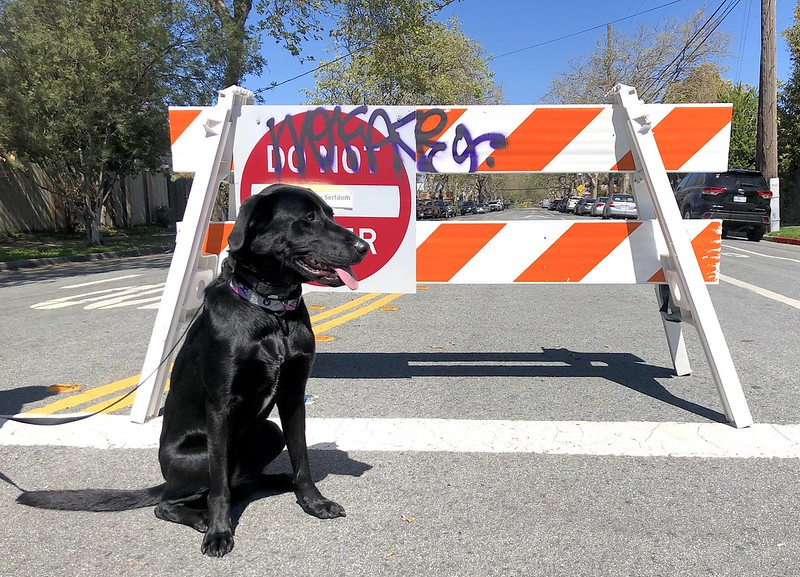
print("Input image:") display(image)'coco.jpg' already exists.Pipeline settings
Input text: amazing watercolor painting
Seed: 42
Number of steps: 20
Strength: 0.4
Input image:
import PIL
import numpy as np

def scale_fit_to_window(dst_width: int, dst_height: int, image_width: int, image_height: int):
    """
    Preprocessing helper function for calculating image size for resize with peserving original aspect ratio
    and fitting image to specific window size

    Parameters:
        dst_width (int): destination window width
        dst_height (int): destination window height
        image_width (int): source image width
        image_height (int): source image height
    Returns:
        result_width (int): calculated width for resize
        result_height (int): calculated height for resize
    """
    im_scale = min(dst_height / image_height, dst_width / image_width)
    return int(im_scale * image_width), int(im_scale * image_height)

def preprocess(image: PIL.Image.Image):
    """
    Image preprocessing function.    Takes image in PIL.Image format, resizes it to keep aspect ration and fits to model input window 512x512,
    then converts it to np.ndarray and adds padding with zeros on right or bottom side of image (depends from aspect ratio), after that
    converts data to float32 data type and change range of values from [0, 255] to [-1, 1]. The function returns preprocessed input tensor and padding size, which can be used in postprocessing.
    Parameters:
        image (PIL.Image.Image): input image
    Returns:
        image (np.ndarray): preprocessed image tensor
        meta (Dict): dictionary with preprocessing metadata info
    """
    src_width, src_height = image.size
    dst_width, dst_height = scale_fit_to_window(512, 512, src_width, src_height)
    image = np.array(image.resize((dst_width, dst_height), resample=PIL.Image.Resampling.LANCZOS))[None, :]
    pad_width = 512 - dst_width
    pad_height = 512 - dst_height
    pad = ((0, 0), (0, pad_height), (0, pad_width), (0, 0))
    image = np.pad(image, pad, mode="constant")
    image = image.astype(np.float32) / 255.0
    image = 2.0 * image - 1.0
    return image, {"padding": pad, "src_width": src_width, "src_height": src_height}

def postprocess(image: PIL.Image.Image, orig_width: int, orig_height: int):
    """
    Image postprocessing function. Takes image in PIL.Image format and metrics of original image. Image is cropped and resized to restore initial size.
    Parameters:
        image (PIL.Image.Image): input image
        orig_width (int): original image width
        orig_height (int): original image height
    Returns:
        image (PIL.Image.Image): postprocess image
    """
    src_width, src_height = image.size
    dst_width, dst_height = scale_fit_to_window(src_width, src_height, orig_width, orig_height)
    image = image.crop((0, 0, dst_width, dst_height))
    image = image.resize((orig_width, orig_height))
return imagepreprocessed_image, meta_data = preprocess(image)
np.random.seed(seed_i2i.value)
processed_image = ov_pipe_i2i(text_prompt_i2i.value, preprocessed_image,
num_inference_steps=num_steps_i2i.value, strength=strength.value)0%| | 0/9 [00:00<?, ?step/s]final_image_i2i = postprocess(processed_image["images"][0], meta_data["src_width"], meta_data["src_height"])
final_image_i2i.save("result_i2i.png")text_i2i = "\n\t".join(text_prompt_i2i.value.split("."))
print("Input text:")
print("\t" + text_i2i)
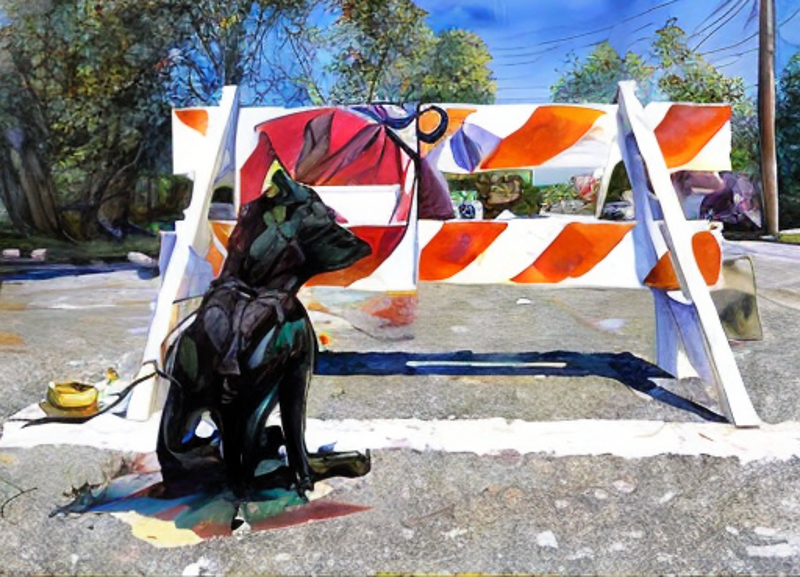
display(final_image_i2i)Input text:
amazing watercolor painting
インタラクティブな image-to-image デモ#
import gradio as gr

def generate_from_image(img, text, seed, num_steps, strength, _=gr.Progress(track_tqdm=True)):
    preprocessed_img, meta_data = preprocess(img)
    np.random.seed(seed)
    result = ov_pipe_i2i(text, preprocessed_img, num_inference_steps=num_steps, strength=strength)
    result_img = postprocess(result["images"][0], meta_data["src_width"], meta_data["src_height"])
    return result_img

with gr.Blocks() as demo:
    with gr.Tab("Image-to-Image generation"):
        with gr.Row():
            with gr.Column():
                i2i_input = gr.Image(label="Image", type="pil")
                i2i_text_input = gr.Textbox(lines=3, label="Text")
                i2i_seed_input = gr.Slider(0, 1024, value=42, step=1, label="Seed")
                i2i_steps_input = gr.Slider(1, 50, value=10, step=1, label="Steps")
                strength_input = gr.Slider(0, 1, value=0.5, label="Strength")
            i2i_out = gr.Image(label="Result")
        i2i_btn = gr.Button()
        sample_i2i_text = "amazing watercolor painting"
        i2i_btn.click(
            generate_from_image,
            [
                i2i_input,
                i2i_text_input,
                i2i_seed_input,
                i2i_steps_input,
                strength_input,
            ],
            i2i_out,
        )
        gr.Examples(
            [[str(default_image_path), sample_i2i_text, 42, 10, 0.5]],
            [
                i2i_input,
                i2i_text_input,
                i2i_seed_input,
                i2i_steps_input,
                strength_input,
            ],
        )

try:
    demo.queue().launch()
except Exception:
    demo.queue().launch(share=True)
# リモートで起動する場合は、server_name と server_port を指定
# demo.launch(server_name='your server name', server_port='server port in int')
# 詳細はドキュメントをご覧ください: https://gradio.app/docs/demo.close()