OpenVINO™ による生物の検出#
この Jupyter ノートブックはオンラインで起動でき、ブラウザーのウィンドウで対話型環境を開きます。ローカルにインストールすることもできます。次のオプションのいずれかを選択します:
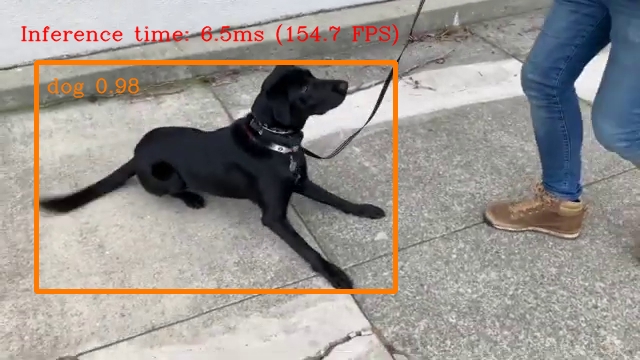
このノートブックは、Open Model Zoo の SSDLite MobileNetV2 を使用して、OpenVINO による生物検出を示します。このノートブックの最後では、ウェブカメラからのライブ推論結果が表示されます。さらに、ビデオファイルをアップロードすることもできます。
注: このノートブックをウェブカメラで使用するには、ウェブカメラを備えたコンピューター上でノートブックを実行する必要があります。サーバー上でノートブックを実行すると、ウェブカメラは機能しなくなります。ただし、ビデオの推論を行うことはできます。
目次:
準備#
要件をインストール#
%pip install -q "openvino-dev>=2024.0.0"
%pip install -q tensorflow
%pip install -q opencv-python requests tqdm

# `notebook_utils` モジュールを取得
import requests

r = requests.get(

url="https://raw.githubusercontent.com/openvinotoolkit/openvino_notebooks/latest/utils/notebook_utils.py",
)

open("notebook_utils.py", "w").write(r.text)エラー: pip の依存関係リゾルバーは現在、インストールされているすべてのパッケージを考慮していません。これが、次の依存関係の競合の原因です。 openvino-tokenizers 2024.3.0.0.dev20240711 には openvino~=2024.3.0.0.dev が必要ですが、 互換性のない openvino 2024.2.0 が使用されています。
Note: you may need to restart the kernel to use updated packages.
エラー: pip の依存関係リゾルバーはインストールされているすべてのパッケージを考慮していません。これが次の依存関係の競合の原因です。
magika 0.5.1 には numpy<2.0>=1.24、python_version >= "3.8" および python_version < "3.9" が必要ですが、互換性のない numpy 1.23.5 を使用しています。
mobileclip 0.1.0 には torch==1.13.1 が必要ですが、互換性のない torch 2.3.1+cpu を使用しています。
mobileclip 0.1.0 には torchvision==0.14.1 が必要ですが、互換性のない torchvision 0.18.1+cpu を使用しています。
openvino-tokenizers 2024.3.0.0.dev20240711 には openvino~=2024.3.0.0.dev が必要ですが、互換性のない openvino 2024.2.0 を使用しています。
Note: you may need to restart the kernel to use updated packages.
Note: you may need to restart the kernel to use updated packages.23215インポート#
import collections
import tarfile
import time
from pathlib import Path

import cv2
import numpy as np
from IPython import display
import openvino as ov
from openvino.tools.mo.front import tf as ov_tf_front
from openvino.tools import mo

import notebook_utils as utilsモデル#
モデルのダウンロード#
notebook_utils ファイルの関数である download_file を使用します。ディレクトリー構造が自動的に作成され、選択したモデルがダウンロードされます。パッケージがすでにダウンロードされ解凍されている場合、この手順はスキップされます。選択したモデルはパブリック・ディレクトリーから取得されます。つまり、OpenVINO 中間表現 (OpenVINO IR) に変換する必要があります。
注:
ssdlite_mobilenet_v2以外のモデルを使用する場合は、前処理および後処理だけでなく、異なる変換パラメーターが必要になる場合があります。
# モデルがダウンロードされるディレクトリー
base_model_dir = Path("model")

# Open Model Zoo のモデルの名前
model_name = "ssdlite_mobilenet_v2"

archive_name = Path(f"{model_name}_coco_2018_05_09.tar.gz")
model_url =
f"https://storage.openvinotoolkit.org/repositories/open_model_zoo/public/2022.1/{model_name}/{archive_name}"

# アーカイブをダウンロード
downloaded_model_path = base_model_dir / archive_name
    if not downloaded_model_path.exists():
        utils.download_file(model_url, downloaded_model_path.name, downloaded_model_path.parent)

# モデルをアンパック
tf_model_path = base_model_dir / archive_name.with_suffix("").stem / "frozen_inference_graph.pb"
if not tf_model_path.exists():
    with tarfile.open(downloaded_model_path) as file:
        file.extractall(base_model_dir)
model/ssdlite_mobilenet_v2_coco_2018_05_09.tar.gz: 0%| | 0.00/48.7M [00:00<?, ?B/s]モデルの変換#
事前トレーニングされたモデルは TensorFlow 形式です。OpenVINO で使用するには、モデル・トランスフォーメーション API (mo.convert_model 関数) を使用して OpenVINO IR 形式に変換します。モデルがすでに変換されている場合、この手順はスキップされます。
precision = "FP16"
# 変換の出力パス
converted_model_path = Path("model") / f"{model_name}_{precision.lower()}.xml"

# 以前に変換されていない場合は IR に変換
trans_config_path = Path(ov_tf_front.__file__).parent / "ssd_v2_support.json"
if not converted_model_path.exists():
    ov_model = mo.convert_model(
        tf_model_path,
        compress_to_fp16=(precision == "FP16"),
        transformations_config=trans_config_path,
        tensorflow_object_detection_api_pipeline_config=tf_model_path.parent / "pipeline.config",
        reverse_input_channels=True,
    )
    ov.save_model(ov_model, converted_model_path)
    del ov_model
[ INFO ] MO コマンドライン・ツールは、OpenVINO 2023.2 リリース以降、レガシートランスフォーメーション API と見なされます。2025.0 では、MO コマンドライン・ツールと openvino.tools.mo.convert_model() が削除されます。OpenVINO モデル・コンバーター (OVC) または openvino.convert_model() を使用してください。OVC は MO の軽量な代替手段であり、簡略化されたモデル・トランスフォーメーション API を提供します。MO から OVC への移行の詳細については、https://docs.openvino.ai/2023.2/openvino_docs_OV_Converter_UG_prepare_model_convert_model_MO_OVC_transition.html をご覧ください。[ 警告 ] プリプロセッサー・ブロックが削除されました。平均値の減算とスケーリング (該当する場合) を実行するノードのみが保持されます。 モデルのロード#
モデルを実行するには、数行のコードで済みます。まず、OpenVINO ランタイムを初期化します。次に、.bin および .xml ファイルからネットワーク・アーキテクチャーとモデルの重みを読み取り、目的のデバイス用にコンパイルします。GPU を選択した場合、CPU に比べて起動時間が非常に長くなるため、しばらく待機する必要があります。
どのハードウェアが最高のパフォーマンスを提供するか OpenVINO に決定をゆだねることもあります。それには、AUTO を使用してください。
import ipywidgets as widgets

core = ov.Core()
device = widgets.Dropdown(
    options=core.available_devices + ["AUTO"],
    value="AUTO",
    description="Device:",
    disabled=False,
)

deviceDropdown(description='Device:', index=1, options=('CPU', 'AUTO'), value='AUTO')# ファイルからネットワークと対応する重みを読み取ります。
model = core.read_model(model=converted_model_path)
# CPU 用にモデルをコンパイルします (CPU、GPU などを手動で選択できます)
# または、エンジンに利用可能な最適なデバイスを選択させます (AUTO)。
compiled_model = core.compile_model(model=model, device_name=device.value)
# 入力ノードと出力ノードを取得
input_layer = compiled_model.input(0)
output_layer = compiled_model.output(0)
# 入力サイズを取得
height, width = list(input_layer.shape)[1:3]入力レイヤーと出力レイヤーには、それぞれ入力ノードと出力ノードの名前があります。SSDLite MobileNetV2 の場合、入力が 1 つ、出力が 1 つあります。
input_layer.any_name, output_layer.any_name('image_tensor:0', 'detection_boxes:0')処理#
処理結果#
最初に、使用可能なクラスをすべてリストし、それらのカラーを作成します。次に、後処理ステージで、正規化された座標 [0, 1] のボックスをピクセル座標 [0, image_size_in_px] のボックスに変換します。その後、非最大抑制を使用して、重複する検出と確率しきい値 (0.5) を下回る検出を拒否します。最後に、ボックスとその中にラベルを描画します。
# https://tech.amikelive.com/node-718/what-object-categories-labels-are-in-coco-dataset/
classes = [
    "background",
    "person",
    "bicycle",
    "car",
    "motorcycle",
    "airplane",
    "bus",
    "train",
    "truck",
    "boat",
    "traffic light",
    "fire hydrant",
    "street sign",
    "stop sign",
    "parking meter",
    "bench",
    "bird",
    "cat",
    "dog",
    "horse",
    "sheep",
    "cow",
    "elephant",
    "bear",
    "zebra",
    "giraffe",
    "hat",
    "backpack",
    "umbrella",
    "shoe",
    "eye glasses",
    "handbag",
    "tie",
    "suitcase",
    "frisbee",
    "skis",
    "snowboard",
    "sports ball",
    "kite",
    "baseball bat",
    "baseball glove",
    "skateboard",
    "surfboard",
    "tennis racket",
    "bottle",
    "plate",
    "wine glass",
    "cup",
    "fork",
    "knife",
    "spoon",
    "bowl",
    "banana",
    "apple",
    "sandwich",
    "orange",
    "broccoli",
    "carrot",
    "hot dog",
    "pizza",
    "donut",
    "cake",
    "chair",
    "couch",
    "potted plant",
    "bed",
    "mirror",
    "dining table",
    "window",
    "desk",
    "toilet",
    "door",
    "tv",
    "laptop",
    "mouse",
    "remote",
    "keyboard",
    "cell phone",
    "microwave",
    "oven",
    "toaster",
    "sink",
    "refrigerator",
    "blender",
    "book",
    "clock",
    "vase",
    "scissors",
    "teddy bear",
    "hair drier",
    "toothbrush",
    "hair brush",
]

# 上記のクラスの色 (レインボー・カラー・マップ)。
colors = cv2.applyColorMap(
    src=np.arange(0, 255, 255 / len(classes), dtype=np.float32).astype(np.uint8),
    colormap=cv2.COLORMAP_RAINBOW,
).squeeze()

def process_results(frame, results, thresh=0.6):
    # 元のフレームのサイズ
    h, w = frame.shape[:2]
    # 'results' 変数は[1, 1, 100, 7] テンソルです。
    results = results.squeeze()
    boxes = []
    labels = []
    scores = []
    for _, label, score, xmin, ymin, xmax, ymax in results:
        # 正規化された座標 [0,1] のボックスからピクセル座標のボックスを作成
        boxes.append(tuple(map(int, (xmin * w, ymin * h, (xmax - xmin) * w, (ymax - ymin) * h))))
        labels.append(int(label))
        scores.append(float(score))

    # 重複する多数のエンティティーを除去するため非最大抑制を適用
    # https://paperswithcode.com/method/non-maximum-suppression を参照
    # このアルゴリズムは、保持するオブジェクトのインデックスを返します
    indices = cv2.dnn.NMSBoxes(bboxes=boxes, scores=scores, score_threshold=thresh, nms_threshold=0.6)

    # ボックスがない場合
    if len(indices) == 0:
        return []

    # 検出されたオブジェクトをフィルタリング
    return [(labels[idx], scores[idx], boxes[idx]) for idx in indices.flatten()]

def draw_boxes(frame, boxes):
    for label, score, box in boxes:
        # ラベルの色を選択
        color = tuple(map(int, colors[label]))
        # ボックスを描画
        x2 = box[0] + box[2]
        y2 = box[1] + box[3]
        cv2.rectangle(img=frame, pt1=box[:2], pt2=(x2, y2), color=color, thickness=3)

        # ボックス内にラベル名を描画
        cv2.putText(
            img=frame,
            text=f"{classes[label]} {score:.2f}",
            org=(box[0] + 10, box[1] + 30),
            fontFace=cv2.FONT_HERSHEY_COMPLEX,
            fontScale=frame.shape[1] / 1000,
            color=color,
            thickness=1,
            lineType=cv2.LINE_AA,
    )

return frameメイン処理関数#
指定されたソースでオブジェクト検出を実行します。ウェブカメラまたはビデオファイルのいずれか。
# 物体検出を実行するメイン処理関数
def run_object_detection(source=0, flip=False, use_popup=False, skip_first_frames=0):
    player = None
    try:
        # ターゲット fps で再生するビデオプレーヤーを作成
        player = utils.VideoPlayer(source=source, flip=flip, fps=30, skip_first_frames=skip_first_frames)
        # キャプチャー開始
        player.start()
        if use_popup:
            title = "Press ESC to Exit"
            cv2.namedWindow(winname=title, flags=cv2.WINDOW_GUI_NORMAL | cv2.WINDOW_AUTOSIZE)

        processing_times = collections.deque()
        while True:
            # フレームをグラブ
            frame = player.next()
            if frame is None:
                print("Source ended")
                break
            # フレームがフル HD より大きい場合は、サイズを縮小してパフォーマンスを向上させます
            scale = 1280 / max(frame.shape)
            if scale < 1:
                frame = cv2.resize(
                    src=frame,
                    dsize=None,
                    fx=scale,
                    fy=scale,
                    interpolation=cv2.INTER_AREA,
                )

            # ニューラル・ネットワークの入力に合わせて画像のサイズを変更し暗さを変更
            input_img = cv2.resize(src=frame, dsize=(width, height), interpolation=cv2.INTER_AREA)
            # 画像のバッチを作成 (size = 1)
            input_img = input_img[np.newaxis, ...]
            # 処理時間を測定

            start_time = time.time()
            # 結果を取得.
            results = compiled_model([input_img])[output_layer]
            stop_time = time.time()
            # ネットワークの結果からポーズを取得
            boxes = process_results(frame=frame, results=results)

            # フレーム上にボックスを描画
            frame = draw_boxes(frame=frame, boxes=boxes)

            processing_times.append(stop_time - start_time)
            # 最後の 200 フレームの処理時間を使用
            if len(processing_times) > 200:
                processing_times.popleft()

            _, f_width = frame.shape[:2]
            # 平均処理時間 [ms].
            processing_time = np.mean(processing_times) * 1000
            fps = 1000 / processing_time
            cv2.putText(
                img=frame,
                text=f"Inference time: {processing_time:.1f}ms ({fps:.1f} FPS)",
                org=(20, 40),
                fontFace=cv2.FONT_HERSHEY_COMPLEX,
                fontScale=f_width / 1000,
                color=(0, 0, 255),
                thickness=1,
                lineType=cv2.LINE_AA,
            )

            # ちらつきがある場合はこの回避策を使用
            if use_popup:
                cv2.imshow(winname=title, mat=frame)
                key = cv2.waitKey(1)
                # escape = 27
                if key == 27:
                    break
                else:
                    # numpy 配列を jpg にエンコード
                    _, encoded_img = cv2.imencode(ext=".jpg", img=frame, params=[cv2.IMWRITE_JPEG_QUALITY, 100])
                    # IPython イメージを作成
                    i = display.Image(data=encoded_img)
                    # このノートブックに画像を表示
                    display.clear_output(wait=True)
                    display.display(i)

# ctrl-c
except KeyboardInterrupt:
    print("Interrupted")
# 異なるエラー
except RuntimeError as e:
    print(e)
finally:
    if player is not None:
        # キャプチャーを停止
        Player.stop().stop()
    if use_popup:
cv2.destroyAllWindows()実行#
生物検出の実行#
ウェブカメラをビデオ入力として使用します。デフォルトでは、プライマリー・ウェブ・カメラは source=0 に設定されます。複数のウェブカメラがある場合、0 から始まる連続した番号が割り当てられます。前面カメラを使用する場合は、flip=True を設定します。一部のウェブブラウザー、特に Mozilla Firefox ではちらつきが発生する場合があります。ちらつきが発生する場合、use_popup=True を設定してください。
注: このノートブックをウェブカメラで使用するには、ウェブカメラを備えたコンピューター上でノートブックを実行する必要があります。ノートブックをサーバー (Binder など) 上で実行する場合、ウェブカメラは機能しません。このノートブックをリモート・コンピューター (Binder など) で実行する場合、ポップアップ・モードは機能しない可能性があります。
ウェブカメラがない場合でも、ビデオファイルを使用してこのデモを実行できます。OpenCV でサポートされている形式であればどれでも機能します。
オブジェクト検出を実行します:
USE_WEBCAM = False

video_file =
"https://storage.openvinotoolkit.org/repositories/openvino_notebooks/data/data/video/Coco%20Walking%20in%20Berkeley.mp4"
cam_id = 0

source = cam_id if USE_WEBCAM else video_file

run_object_detection(source=source, flip=isinstance(source, int), use_popup=False)
ソースの終わり