Detectron2 モデルから OpenVINO™ への変換#
この Jupyter ノートブックはオンラインで起動でき、ブラウザーのウィンドウで対話型環境を開きます。ローカルにインストールすることもできます。次のオプションのいずれかを選択します:
Detectron2 は、最先端の検出およびセグメント化アルゴリズムを提供する Facebook AI リサーチのライブラリーです。Detectron と maskrcnn-benchmark の後継です。多数のコンピューター・ビジョン研究プロジェクトと生産アプリケーションをサポートします。
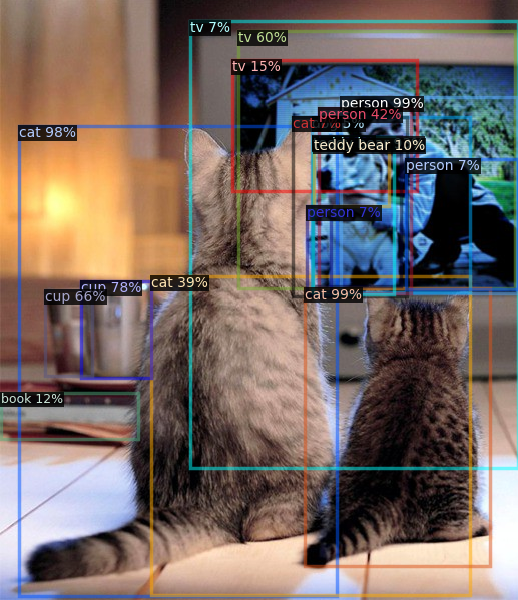
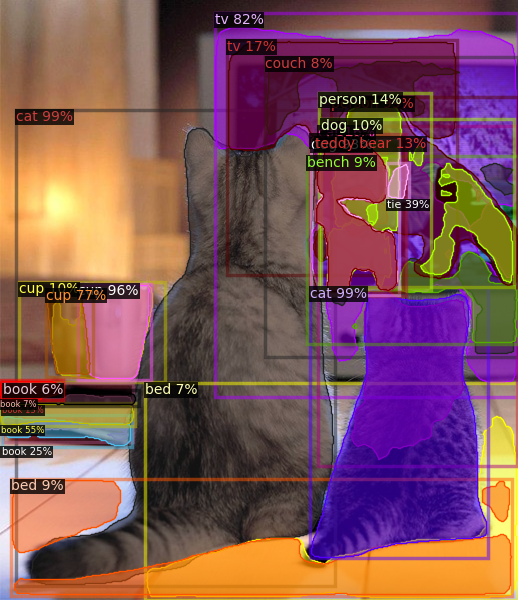
このチュートリアルでは、OpenVINO™ を使用して Detectron2 モデルを変換および実行する方法について説明します。オブジェクト検出とインスタンスのセグメント化の例として、COCO データセットで事前トレーニングされた Faster R-CNN FPN x1 モデルと Mask R-CNN FPN x3 をそれぞれ使用します。
目次:
必要条件#
モデルを実行するために必要なパッケージをインストールします
%pip install -q "torch" "torchvision" "opencv-python" "wheel" --extra-index-url https://download.pytorch.org/whl/cpu
%pip install -q "git+https://github.com/facebookresearch/detectron2.git" --extra-index-url https://download.pytorch.org/whl/cpu
%pip install -q "openvino>=2023.1.0"
Note: you may need to restart the kernel to use updated packages.
Note: you may need to restart the kernel to use updated packages.
Note: you may need to restart the kernel to use updated packages.PyTorch モデルの初期化と変換のヘルパーを定義#
Detectron2 は、モデルを操作するユニバーサルで構成可能な API を提供します。つまり、モデルの作成、変換、推論に必要なすべての手順がすべてのモデルで共通になるため、ヘルパー関数を一度定義して、モデルでは再利用するだけで済みます。モデルを取得するには、Detectron2 Model Zoo API を使用します。detecton_zoo.get 関数は、設定ファイルに基づいてモデルをダウンロードしてインスタンス化できます。構成ファイルは、Detectron2 プロジェクトのモデルとのやり取りで重要な役割を果たし、モデル・アーキテクチャーとトレーニングおよび検証のプロセスを記述します。detectron_zoo.get_config 関数は、モデル構成の検索と読み取りに使用できます。
import detectron2.model_zoo as detectron_zoo

def get_model_and_config(model_name: str):
    """
    Helper function for downloading PyTorch model and its configuration from Detectron2 Model Zoo

    Parameters:
        model_name (str): model_id from Detectron2 Model Zoo
    Returns:
        model (torch.nn.Module): Pretrained model instance
        cfg (Config): Configuration for model
    """
    cfg = detectron_zoo.get_config(model_name + ".yaml", trained=True)
    model = detectron_zoo.get(model_name + ".yaml", trained=True)
    return model, cfg
Detectron2 ライブラリーは PyTorch に基づいています。2023.0 リリース以降、OpenVINO はモデル・トランスフォーメーション API を介して PyTorch モデル変換を直接サポートします。ov.convert_model 関数は、PyTorch モデルを OpenVINO モデル・オブジェクト・インスタンスに変換するのに使用できます。これは、デバイスに読み込んで推論を実行するのにすぐに使用することも、ov.save_model 関数を使用して次のデプロイのためディスクに保存することもできます。
Detectron2 モデルは内部でカスタムされた複雑なデータ構造を使用するため、OpenVINO を含むさまざまな形式やフレームワークでモデルをエクスポートする際にいくつかの問題が生じます。これらの問題を回避するため、detectron2 デプロイメント API の一部として detectron2.export.TracingAdapter が提供されています。TracingAdapter は、モデルの構造を簡素化してエクスポートしやすくするモデルのラッパークラスです。
from detectron2.modeling import GeneralizedRCNN
from detectron2.export import TracingAdapter
import torch
import openvino as ov
import warnings
from typing import List, Dict

def convert_detectron2_model(model: torch.nn.Module, sample_input: List[Dict[str, torch.Tensor]]):
    """
    Function for converting Detectron2 models, creates TracingAdapter for making model tracing-friendly,
    prepares inputs and converts model to OpenVINO Model

    Parameters:
        model (torch.nn.Module): Model object for conversion
    sample_input (List[Dict[str, torch.Tensor]]): sample input for tracing
    Returns:
        ov_model (ov.Model): OpenVINO Model
    """
    # トレースアダプターの入力を準備
    tracing_input = [{"image": sample_input[0]["image"]}]

    # 必要に応じてモデルを上書きし、後処理を無効化
    if isinstance(model, GeneralizedRCNN):

        def inference(model, inputs):
            # do_postprocess=False を使用すると、ROI マスクが返されます
            inst = model.inference(inputs, do_postprocess=False)[0]
            return [{"instances": inst}]

    else:
        inference = None # モデルを直接呼び出すと仮定

    # 追跡可能なモデルを作成
    traceable_model = TracingAdapter(model, tracing_input, inference)
    warnings.filterwarnings("ignore")
    # PyTorch モデルを OpenVINO モデルに変換
    ov_model = ov.convert_model(traceable_model, example_input=sample_input[0]["image"])
return ov_model入力データを準備#
モデル変換と推論を実行するには、サンプル入力を提供する必要があります。以下のセルはサンプル画像をダウンロードし、モデル構成で定義されたモデル固有の変換に基づいて前処理手順を適用します。
import requests
from pathlib import Path
from PIL import Image

MODEL_DIR = Path("model")
DATA_DIR = Path("data")

MODEL_DIR.mkdir(exist_ok=True)
DATA_DIR.mkdir(exist_ok=True)

input_image_url = "https://farm9.staticflickr.com/8040/8017130856_1b46b5f5fc_z.jpg"

image_file = DATA_DIR / "example_image.jpg"

if not image_file.exists():
    image = Image.open(requests.get(input_image_url, stream=True).raw)
    image.save(image_file)
 else:
    image = Image.open(image_file)

image
import detectron2.data.transforms as T
from detectron2.data import detection_utils
import torch

def get_sample_inputs(image_path, cfg):
    # サンプルデータを取得
    original_image = detection_utils.read_image(image_path, format=cfg.INPUT.FORMAT)
    # DefaultPredictor と同じ前処理を行う
    aug = T.ResizeShortestEdge([cfg.INPUT.MIN_SIZE_TEST, cfg.INPUT.MIN_SIZE_TEST], cfg.INPUT.MAX_SIZE_TEST)
    height, width = original_image.shape[:2]
    image = aug.get_transform(original_image).apply_image(original_image)
    image = torch.as_tensor(image.astype("float32").transpose(2, 0, 1))

    inputs = {"image": image, "height": height, "width": width}

    # サンプル準備完了
    sample_inputs = [inputs]
    return sample_inputs
モデル変換に必要なコンポーネントがすべて準備できたら、具体的な例でそれらをどのように使用するか検討することができます。
オブジェクト検出#
PyTorch 検出モデルをダウンロード#
Detectron Model Zoo から faster_rcnn_R_50_FPN_1x をダウンロードします。
model_name = "COCO-Detection/faster_rcnn_R_50_FPN_1x"
model, cfg = get_model_and_config(model_name)
sample_input = get_sample_inputs(image_file, cfg)
検出モデルを OpenVINO 中間表現に変換#
上記で準備した convert_detectron2_model 関数と sample_input を使用してモデルを変換します。変換後、モデルは ov.save_model 関数を使用してディスクに保存され、model ディレクトリーで見つかります。
model_xml_path = MODEL_DIR / (model_name.split("/")[-1] + ".xml")
if not model_xml_path.exists():
    ov_model = convert_detectron2_model(model, sample_input)
    ov.save_model(ov_model, MODEL_DIR / (model_name.split("/")[-1] + ".xml"))
else:
ov_model = model_xml_path['args']推論デバイスの選択#
OpenVINO を使用して推論を実行するためにドロップダウン・リストからデバイスを選択します
import ipywidgets as widgets

core = ov.Core()
device = widgets.Dropdown(
    options=core.available_devices + ["AUTO"],
    value="AUTO",
    description="Device:",
    disabled=False,
)

deviceDropdown(description='Device:', index=1, options=('CPU', 'AUTO'), value='AUTO')検出モデル推論の実行#
変換されたモデルを選択したデバイスに読み込み、サンプル入力に対して推論を実行します。
compiled_model = core.compile_model(ov_model, device.value)results = compiled_model(sample_input[0]["image"])トレースアダプターはモデルの入力と出力の形式を簡素化します。変換後、モデルには次の形式の複数の出力があります: 1. 予測ボックスは [N, 4] 形式の浮動小数点テンソルです。ここで、N は検出されたボックスの数です。2. 予測クラスは [N] 形式の整数テンソルです。ここで、N は各オブジェクトがどのラベルに属するかを定義する予測オブジェクトの数です。予測クラステンソルの値の範囲は [0, num_labels] です。ここで、num_labels はモデルでサポートされるクラスの数です (この場合は 80)。3. 予測スコアは、[N] 形式の浮動小数点テンソルです。ここで、N は各予測の信頼性を定義する予測オブジェクトの数です。4. 入力画像のサイズは、[H, W] の値を持つ整数テンソルです。ここで、H は入力データの高さ、W は入力データの幅であり、後処理ステップで予測を再スケーリングするために使用されます。
Detectron2 API を後処理と視覚化に再利用するために、出力を元の Detectron2 形式でラップするヘルパーを提供します。
from detectron2.structures import Instances, Boxes
from detectron2.modeling.postprocessing import detector_postprocess
from detectron2.utils.visualizer import ColorMode, Visualizer
from detectron2.data import MetadataCatalog
import numpy as np

def postprocess_detection_result(outputs: Dict, orig_height: int, orig_width: int, conf_threshold: float = 0.0):
    """
    Helper function for postprocessing prediction results

    Parameters:
        outputs (Dict): OpenVINO model output dictionary
        orig_height (int): original image height before preprocessing
        orig_width (int): original image width before preprocessing
        conf_threshold (float, optional, defaults 0.0): confidence threshold for valid prediction
    Returns:
        prediction_result (instances): postprocessed predicted instances
    """
    boxes = outputs[0]
    classes = outputs[1]
    has_mask = len(outputs) >= 5
    masks = None if not has_mask else outputs[2]
    scores = outputs[2 if not has_mask else 3]
    model_input_size = (
        int(outputs[3 if not has_mask else 4][0]),
        int(outputs[3 if not has_mask else 4][1]),
    )
    filtered_detections = scores >= conf_threshold
    boxes = Boxes(boxes[filtered_detections])
    scores = scores[filtered_detections]
    classes = classes[filtered_detections]
    out_dict = {"pred_boxes": boxes, "scores": scores, "pred_classes": classes}
    if masks is not None:
        masks = masks[filtered_detections]
        out_dict["pred_masks"] = torch.from_numpy(masks)
    instances = Instances(model_input_size, **out_dict)
    return detector_postprocess(instances, orig_height, orig_width)

def draw_instance_prediction(img: np.ndarray, results: Instances, cfg: "Config"):
    """
    Helper function for visualization prediction results

    Parameters:
        img (np.ndarray): original image for drawing predictions
        results (instances): model predictions
        cfg (Config): model configuration
    Returns:
        img_with_res: image with results
    """
    metadata = MetadataCatalog.get(cfg.DATASETS.TEST[0])
    visualizer = Visualizer(img, metadata, instance_mode=ColorMode.IMAGE)
    img_with_res = visualizer.draw_instance_predictions(results)
    return img_with_res
results = postprocess_detection_result(results, sample_input[0]["height"], sample_input[0]["width"], conf_threshold=0.05)
img_with_res = draw_instance_prediction(np.array(image), results, cfg)
Image.fromarray(img_with_res.get_image())
インスタンスのセグメント化#
上で説明したように、Detectron2 はさまざまなユースケースのモデルを操作する汎用的なアプローチを提供します。インスタンス・セグメント化のユースケース用に事前トレーニングされたモデルを変換して実行する手順は、オブジェクト検出と非常に似ています。
インスタンスのセグメント化 PyTorch モデルをダウンロード#
model_name = "COCO-InstanceSegmentation/mask_rcnn_R_101_FPN_3x"
model, cfg = get_model_and_config(model_name)
sample_input = get_sample_inputs(image_file, cfg)インスタンスのセグメント化モデルを OpenVINO 中間表現に変換#
model_xml_path = MODEL_DIR / (model_name.split("/")[-1] + ".xml")
if not model_xml_path.exists():
ov_model = convert_detectron2_model(model, sample_input)
ov.save_model(ov_model, MODEL_DIR / (model_name.split("/")[-1] + ".xml"))
else:
ov_model = model_xml_path['args']推論デバイスの選択#
OpenVINO を使用して推論を実行するためにドロップダウン・リストからデバイスを選択します
deviceDropdown(description='Device:', index=1, options=('CPU', 'AUTO'), value='AUTO')インスタンスのセグメント化モデルの推論を実行#
オブジェクト検出と比較して、インスタンスのセグメント化モデルには、各オブジェクトのインスタンス・マスクを表す追加の出力があります。ここでの後処理関数はこの違いを処理します。
compiled_model = core.compile_model(ov_model, device.value)results = compiled_model(sample_input[0]["image"])
results = postprocess_detection_result(results, sample_input[0]["height"], sample_input[0]["width"], conf_threshold=0.05)
img_with_res = draw_instance_prediction(np.array(image), results, cfg)
Image.fromarray(img_with_res.get_image())