Stable Diffusion XL と OpenVINO による画像生成#
この Jupyter ノートブックは、ローカルへのインストール後にのみ起動できます。

Stable Diffusion XL または SDXL は、Stable Diffusion 2.1 など以前の Stable Diffusion モデルと比較して、より詳細な画像と構成を備えた、より写実的な出力向けに調整された最新の画像生成モデルです。
Stable Diffusion XL を使用すると、改良された顔生成によってさらにリアルな画像を作成したり、画像内に判読可能なテキストを生成したり、より短いプロンプトを使用してより美しいアートを作成できるようになりました。
パイプライン#
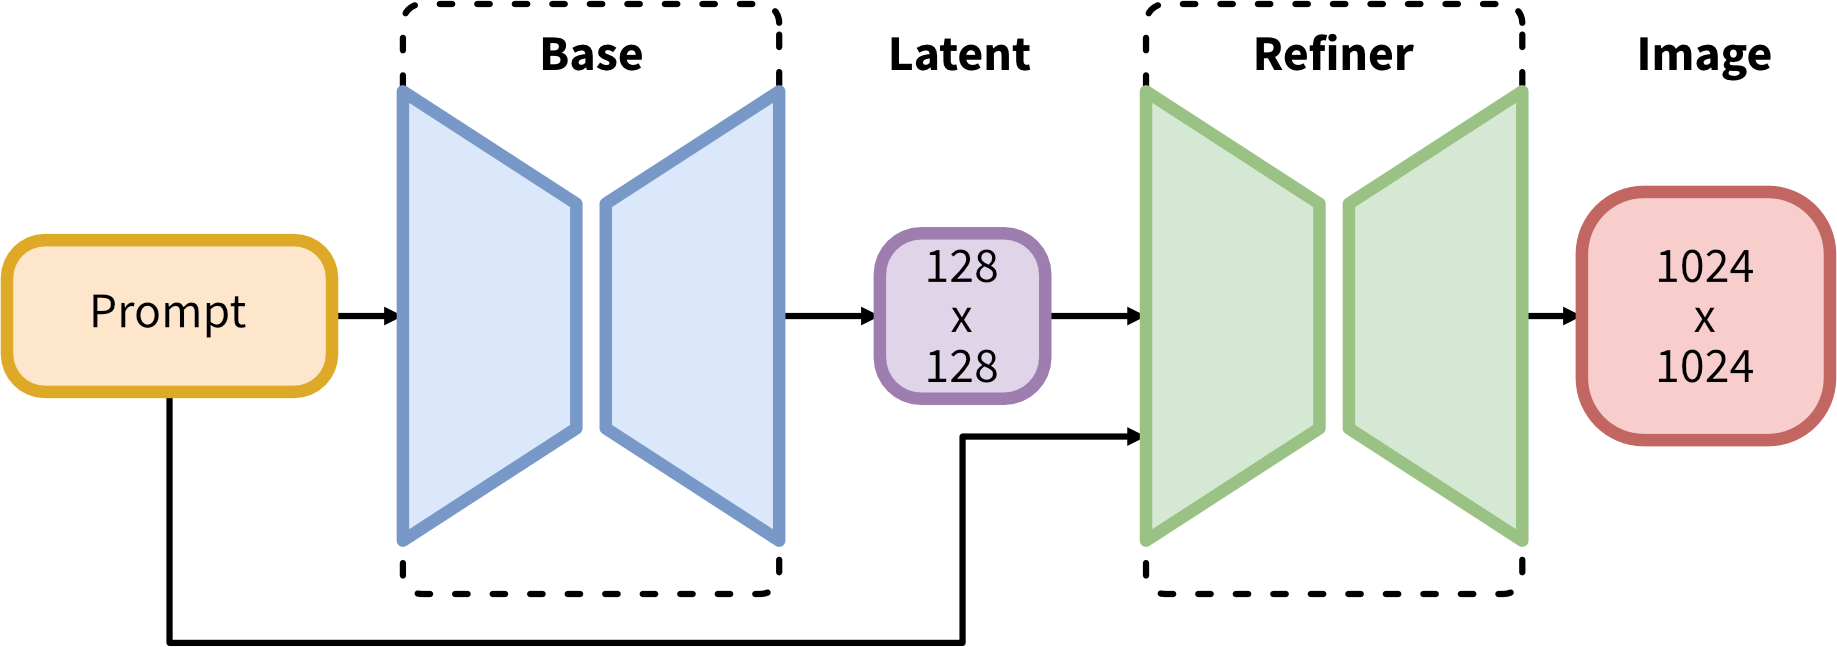
SDXL は、潜在拡散のためのエキスパート・パイプラインの集合体で構成されています。最初のステップでは、基本モデルを使用して (ノイズの多い) 潜在を生成し、その後、最終的なノイズ除去ステップに特化した改良モデルでさらに処理されます。基本モデルは、スタンドアロン・モジュールとして使用することも、次のように 2 段階パイプラインで使用することもできます: 最初にベースモデルを使用して、必要な出力サイズの潜在変数を生成します。2 番目のステップでは、特殊な高解像度モデルを使用し、同じプロンプトを使用して、最初のステップで生成された潜在変数に SDEdit (“イメージからイメージ” とも呼ばれます) と呼ばれる手法を適用します。
Stable Diffusion の以前のバージョンと比較して、SDXL は 3 倍の UNet バックボーンを活用します: モデル・パラメーターの増加は、主に SDXL が 2 番目のテキスト・エンコーダーを使用するため、さらに多くのアテンション・ブロックと大きなクロスアテンション・コンテキストによるものです。複数の新しい調整スキームを設計し、複数のアスペクト比で SDXL をトレーニングし、事後画像間技術を使用して SDXL によって生成されたサンプルの視覚的忠実度を向上させるため改良モデルも導入しています。SDXL のテストでは、Stable Diffusion の以前のバージョンと比較してパフォーマンスが大幅に向上し、ブラックボックスの最先端の画像ジェネレーターに匹敵する結果が達成されました。
このチュートリアルでは、OpenVINO を使用して SDXL モデルを実行する方法について説明します。
Hugging Face Diffusers ライブラリーの事前トレーニング済みモデルを使用します。ユーザー・エクスペリエンスを簡素化するために、Hugging Face の Optimum Intel ライブラリーを使用してモデルを OpenVINO™ IR 形式に変換します。
このチュートリアルは次のステップで構成されます:
前提条件のインストール
Hugging Face Optimum との OpenVINO 統合を使用して、パブリックソースから Stable Diffusion XL Base モデルをダウンロードします。
Stable Diffusion XL ベースを使用して Text2Image 生成パイプラインを実行します
Stable Diffusion XL ベースを使用して Image2Image 生成パイプラインを実行します
OpenVINO と Hugging Face Optimum の統合を使用して、パブリックソースからモデルをダウンロードして変換します。
2 段階の Stable Diffusion XL パイプラインを実行します
注: デモモデルの中には、変換と実行に少なくとも 64 GB の RAM が必要なものもあります。
目次:
前提条件のインストール#
%pip install -q --extra-index-url https://download.pytorch.org/whl/cpu "torch>=2.1" "diffusers>=0.18.0" "invisible-watermark>=0.2.0" "transformers>=4.33.0" "accelerate" "onnx" "peft==0.6.2"
%pip install -q "git+https://github.com/huggingface/optimum-intel.git"
%pip install -q "openvino>=2023.1.0" "gradio>=4.19" "nncf>=2.9.0"
SDXL ベースモデル#
まず、目的とする出力サイズの画像を生成するベースモデルから始めます。 stable-diffusion-xl-base-1.0 は、HuggingFace ハブからダウンロードできます。Optimum Intel と互換性のある OpenVINO 形式ですぐに使用できるモデルがすでに提供されています。
OpenVINO モデルをロードして OpenVINO ランタイムで推論を実行するには、ディフューザー StableDiffusionXLPipeline を Optimum OVStableDiffusionXLPipeline に置き換える必要があります。PyTorch モデルをロードして、その場で OpenVINO 形式に変換する場合は、export=True を設定できます。
save_pretrained メソッドを使用してモデルをディスクに保存できます。
from pathlib import Path
from optimum.intel.openvino import OVStableDiffusionXLPipeline
import gc

model_id = "stabilityai/stable-diffusion-xl-base-1.0"
model_dir = Path("openvino-sd-xl-base-1.0")
推論デバイス SDXL ベースモデルを選択#
OpenVINO を使用して推論を実行するためにドロップダウン・リストからデバイスを選択します
import ipywidgets as widgets
import openvino as ov

core = ov.Core()

device = widgets.Dropdown(
    options=core.available_devices + ["AUTO"],
    value="AUTO",
    description="Device:",
    disabled=False,
)

deviceDropdown(description='Device:', index=4, options=('CPU', 'GPU.0', 'GPU.1', 'GPU.2', 'AUTO'), value='AUTO')メモリー使用量を削減するために重量圧縮を使用するかどうかを以下で選択してください。Optimum Intel は、NNCF による重量圧縮をサポートします。8 ビット圧縮の場合、ビット数やその他の圧縮パラメーターを含む quantization_config=OVWeightQuantizationConfig(bits=8, ...) 引数を from_pretrained() メソッドに提供します。
compress_weights = widgets.Checkbox(
    description="Apply weight compression",
    value=True,

) compress_weightsCheckbox(value=True, description='Apply weight compression')def get_quantization_config(compress_weights):
quantization_config = None
if compress_weights.value:
from optimum.intel import OVWeightQuantizationConfig
quantization_config = OVWeightQuantizationConfig(bits=8)
return quantization_config
quantization_config = get_quantization_config(compress_weights)if not model_dir.exists():
text2image_pipe = OVStableDiffusionXLPipeline.from_pretrained(model_id, compile=False, device=device.value, quantization_config=quantization_config)
text2image_pipe.half()
text2image_pipe.save_pretrained(model_dir)
text2image_pipe.compile()
else:
text2image_pipe = OVStableDiffusionXLPipeline.from_pretrained(model_dir, device=device.value)INFO:nncf:Statistics of the bitwidth distribution:
+--------------+---------------------------+-----------------------------------+
| Num bits (N) | % all parameters (layers) | % ratio-defining parameters |
| | | (layers) |
+==============+===========================+===================================+
| 8 | 100% (794 / 794) | 100% (794 / 794) |
+--------------+---------------------------+-----------------------------------+Output()INFO:nncf:Statistics of the bitwidth distribution:
+--------------+---------------------------+-----------------------------------+
| Num bits (N) | % all parameters (layers) | % ratio-defining parameters |
| | | (layers) |
+==============+===========================+===================================+
| 8 | 100% (32 / 32) | 100% (32 / 32) |
+--------------+---------------------------+-----------------------------------+Output()INFO:nncf:Statistics of the bitwidth distribution:
+--------------+---------------------------+-----------------------------------+
| Num bits (N) | % all parameters (layers) | % ratio-defining parameters |
| | | (layers) |
+==============+===========================+===================================+
| 8 | 100% (40 / 40) | 100% (40 / 40) |
+--------------+---------------------------+-----------------------------------+Output()INFO:nncf:Statistics of the bitwidth distribution:
+--------------+---------------------------+-----------------------------------+
| Num bits (N) | % all parameters (layers) | % ratio-defining parameters |
| | | (layers) |
+==============+===========================+===================================+
| 8 | 100% (74 / 74) | 100% (74 / 74) |
+--------------+---------------------------+-----------------------------------+Output()INFO:nncf:Statistics of the bitwidth distribution:
+--------------+---------------------------+-----------------------------------+
| Num bits (N) | % all parameters (layers) | % ratio-defining parameters |
| | | (layers) |
+==============+===========================+===================================+
| 8 | 100% (195 / 195) | 100% (195 / 195) |
+--------------+---------------------------+-----------------------------------+Output()Compiling the vae_decoder to AUTO ...
Compiling the unet to AUTO ...
Compiling the vae_encoder to AUTO ...
Compiling the text_encoder to AUTO ...
Compiling the text_encoder_2 to AUTO ...Text2Image 生成パイプラインを実行#
これで、テキストプロンプトを使用して画像を生成するモデルを実行できます。評価を高速化し、使用するメモリーを削減するため、num_inference_steps と画像サイズ (高さと幅を使用) を減らします。ニーズに合わせて、またターゲット・ハードウェアに応じて変更できます。また、結果の再現性を確保するため、特定のシードを持つ NumPy ランダム状態に基づく のパラメーターも指定しました。
import numpy as np
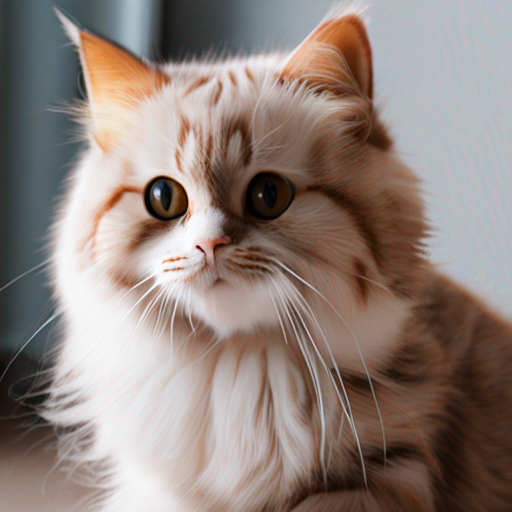
prompt = "cute cat 4k, high-res, masterpiece, best quality, soft lighting, dynamic angle"
image = text2image_pipe(
prompt,
num_inference_steps=15,
height=512,
width=512,
generator=np.random.RandomState(314),
).images[0]
image.save("cat.png")
image0%| | 0/15 [00:00<?, ?it/s]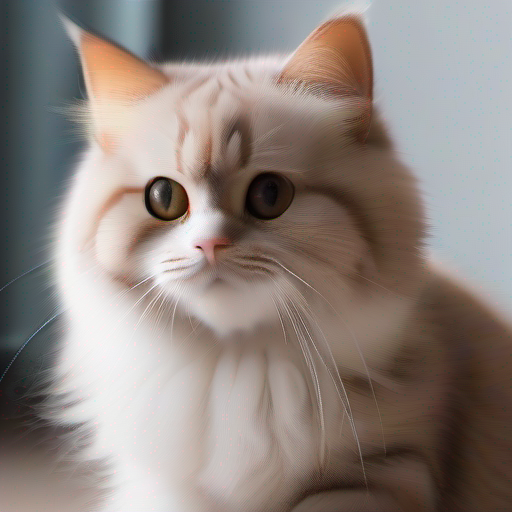
Text2image 生成インタラクティブ・デモ#
import gradio as gr
if text2image_pipe is None:
text2image_pipe = OVStableDiffusionXLPipeline.from_pretrained(model_dir, device=device.value)
prompt = "cute cat 4k, high-res, masterpiece, best quality, soft lighting, dynamic angle"
def generate_from_text(text, seed, num_steps):
result = text2image_pipe(
text,
num_inference_steps=num_steps,
generator=np.random.RandomState(seed),
height=512,
width=512,
).images[0]
return result
with gr.Blocks() as demo:
with gr.Column():
positive_input = gr.Textbox(label="Text prompt")
with gr.Row():
seed_input = gr.Number(precision=0, label="Seed", value=42, minimum=0)
steps_input = gr.Slider(label="Steps", value=10)
btn = gr.Button()
out = gr.Image(label="Result", type="pil", width=512)
btn.click(generate_from_text, [positive_input, seed_input, steps_input], out)
gr.Examples(
[
[prompt, 999, 20],
[
"underwater world coral reef, colorful jellyfish, 35mm, cinematic lighting, shallow depth of field, ultra quality, masterpiece, realistic",
89,
20,
],
[
"a photo realistic happy white poodle dog playing in the grass, extremely detailed, high res, 8k, masterpiece, dynamic angle",
1569,
15,
],
[
"Astronaut on Mars watching sunset, best quality, cinematic effects,",
65245,
12,
],
[
"Black and white street photography of a rainy night in New York, reflections on wet pavement",
48199,
10,
],
],
[positive_input, seed_input, steps_input],
)
# リモートで起動する場合は、server_name と server_port を指定します
# demo.launch(server_name='your server name', server_port='server port in int')
# 詳細については、ドキュメントをご覧ください: https://gradio.app/docs/
# デモを共有するための公開リンクを作成したい場合は、share=True を追加してください
demo.launch()demo.close()
text2image_pipe = None
gc.collect();Image2Image 生成パイプラインを実行#
すでに変換されたモデルを再利用して、Image2Image 生成パイプラインを実行することができます。それには、OVStableDiffusionXLPipeline を OVStableDiffusionXLImage2ImagePipeline に置き換える必要があります。
推論デバイス SDXL リファイナー・モデルを選択#
OpenVINO を使用して推論を実行するためにドロップダウン・リストからデバイスを選択します
deviceDropdown(description='Device:', index=4, options=('CPU', 'GPU.0', 'GPU.1', 'GPU.2', 'AUTO'), value='AUTO')from optimum.intel import OVStableDiffusionXLImg2ImgPipeline
image2image_pipe = OVStableDiffusionXLImg2ImgPipeline.from_pretrained(model_dir, device=device.value)Compiling the vae_decoder to AUTO ...
Compiling the unet to AUTO ...
Compiling the vae_encoder to AUTO ...
Compiling the text_encoder_2 to AUTO ...
Compiling the text_encoder to AUTO ...photo_prompt = "professional photo of a cat, extremely detailed, hyper realistic, best quality, full hd"
photo_image = image2image_pipe(
photo_prompt,
image=image,
num_inference_steps=25,
generator=np.random.RandomState(356),
).images[0]
photo_image.save("photo_cat.png")
photo_image0%| | 0/7 [00:00<?, ?it/s]
Image2Image 生成インタラクティブ・デモ#
import gradio as gr
from diffusers.utils import load_image
import numpy as np

load_image("https://huggingface.co/datasets/optimum/documentation-images/resolve/main/intel/openvino/sd_xl/castle_friedrich.png").resize((512, 512)).save(
    "castle_friedrich.png"
)

if image2image_pipe is None:
    image2image_pipe = OVStableDiffusionXLImg2ImgPipeline.from_pretrained(model_dir)

def generate_from_image(text, image, seed, num_steps):
    result = image2image_pipe(
        text,
        image=image,
        num_inference_steps=num_steps,
        generator=np.random.RandomState(seed),
    ).images[0]
    return result

with gr.Blocks() as demo:
    with gr.Column():
        positive_input = gr.Textbox(label="Text prompt")
        with gr.Row():
            seed_input = gr.Number(precision=0, label="Seed", value=42, minimum=0)
            steps_input = gr.Slider(label="Steps", value=10)
            btn = gr.Button()
        with gr.Row():
            i2i_input = gr.Image(label="Input image", type="pil")
            out = gr.Image(label="Result", type="pil", width=512)
        btn.click(
            generate_from_image,
            [positive_input, i2i_input, seed_input, steps_input],
            out,
        )
        gr.Examples(
            [
                ["amazing landscape from legends", "castle_friedrich.png", 971, 60],
                [
                    "Masterpiece of watercolor painting in Van Gogh style",
                    "cat.png",
                    37890,
                    40,
                ],
            ],
            [positive_input, i2i_input, seed_input, steps_input],
        )

# リモートで起動する場合は、server_name と server_port を指定
# demo.launch(server_name='your server name', server_port='server port in int')
# 詳細については、ドキュメントをご覧ください: https://gradio.app/docs/
# デモを共有するための公開リンクを作成したい場合は、share=True を追加
demo.launch()demo.close()
del image2image_pipe
gc.collect()SDXL リファイナー・モデル#
前述したように、Stable Diffusion XL は 2 段階のアプローチで使用できます。まず、ベースモデルを使用して必要な出力サイズの潜在変数を生成します。2 番目のステップでは、同じプロンプトを使用して、最初のステップで生成された潜在変数を改良する特殊な高解像度モデルを使用します。Stable Diffusion XL Refiner モデルは、ユーザーが指定したプロンプトテキストを利用して、通常の画像を見事な傑作に変換するように設計されています。Stable Diffusion XL Base 後の画像生成の品質を向上させるのに使用できます。リファイナー・モデルは、SDXL ベースモデルによって生成された潜在変数と、生成された画像を改善するためのテキストプロンプトを受け入れます。
メモリー使用量を削減するために重量圧縮を使用するかどうか選択します
compress_weightsquantization_config = get_quantization_config(compress_weights)from optimum.intel import (
OVStableDiffusionXLImg2ImgPipeline,
OVStableDiffusionXLPipeline,
)
from pathlib import Path
refiner_model_id = "stabilityai/stable-diffusion-xl-refiner-1.0"
refiner_model_dir = Path("openvino-sd-xl-refiner-1.0")
if not refiner_model_dir.exists():
refiner = OVStableDiffusionXLImg2ImgPipeline.from_pretrained(refiner_model_id, export=True, compile=False, quantization_config=quantization_config)
refiner.half()
refiner.save_pretrained(refiner_model_dir)
del refiner
gc.collect()推論デバイスの選択#
OpenVINO を使用して推論を実行するためにドロップダウン・リストからデバイスを選択します
deviceDropdown(description='Device:', index=4, options=('CPU', 'GPU.0', 'GPU.1', 'GPU.2', 'AUTO'), value='AUTO')Refinement で Text2Image 生成を実行#
import numpy as np
import gc

model_dir = Path("openvino-sd-xl-base-1.0")
base = OVStableDiffusionXLPipeline.from_pretrained(model_dir, device=device.value)
prompt = "cute cat 4k, high-res, masterpiece, best quality, soft lighting, dynamic angle"
latents = base(
    prompt,
    num_inference_steps=15,
    height=512,
    width=512,
    generator=np.random.RandomState(314),
    output_type="latent",
).images[0]

del base
gc.collect()
Compiling the vae_decoder to AUTO ...
Compiling the unet to AUTO ...
Compiling the text_encoder to AUTO ...
Compiling the text_encoder_2 to AUTO ...
Compiling the vae_encoder to AUTO ...0%| | 0/15 [00:00<?, ?it/s]294refiner = OVStableDiffusionXLImg2ImgPipeline.from_pretrained(refiner_model_dir, device=device.value)Compiling the vae_decoder to AUTO ...
Compiling the unet to AUTO ...
Compiling the text_encoder_2 to AUTO ...
Compiling the vae_encoder to AUTO ...image = refiner(
prompt=prompt,
image=np.transpose(latents[None, :], (0, 2, 3, 1)),
num_inference_steps=15,
generator=np.random.RandomState(314),
).images[0]
image.save("cat_refined.png")
image0%| | 0/4 [00:00<?, ?it/s]