OpenAI CLIP と OpenVINO™ によるゼロショット画像分類#
この Jupyter ノートブックは、ローカルへのインストール後にのみ起動できます。

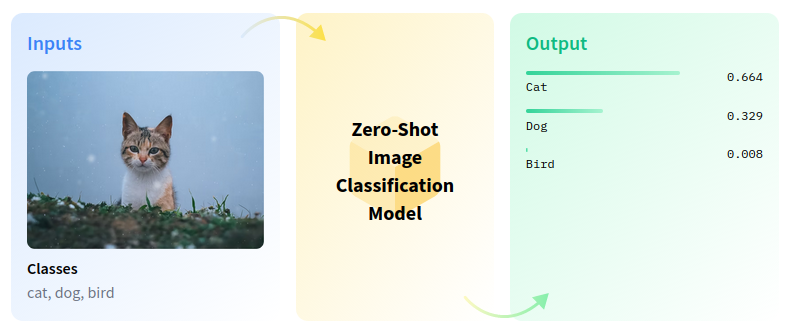
ゼロショット画像分類は、事前のトレーニングやクラスの知識なしに、画像を複数のクラスに分類するコンピューター・ビジョン・タスクです。
zero-shot-pipeline#
ゼロショット学習は、画像検索システムにおけるいくつかの課題を解決します。例えば、ウェブ上のカテゴリーが急速に増加しているため、目に見えないカテゴリーに基づいて画像をインデックスすることは困難です。属性を利用して視覚的特徴とラベルの関係をモデル化することで、ゼロショット学習で目に見えないカテゴリーを画像に関連付けることができます。このチュートリアルでは、OpenAI CLIP モデルを使用してゼロショット画像分類を実行します。また、NNCF を使用してモデルを最適化する方法も示します。
これには次の手順が含まれます:
モデルのダウンロード。
PyTorch モデルをインスタンス化します。
モデル・トランスフォーメーション API を使用して、モデルを OpenVINO IR に変換します。
OpenVINO で CLIP を実行します。
NNCF を使用して変換モデルを量子化します。
量子化モデルの推論結果を確認します。
変換および量子化されたモデルのモデルサイズを比較します。
変換および量子化されたモデルのパフォーマンスを比較します。
インタラクティブなデモを起動
目次:
モデルのインスタンス化#
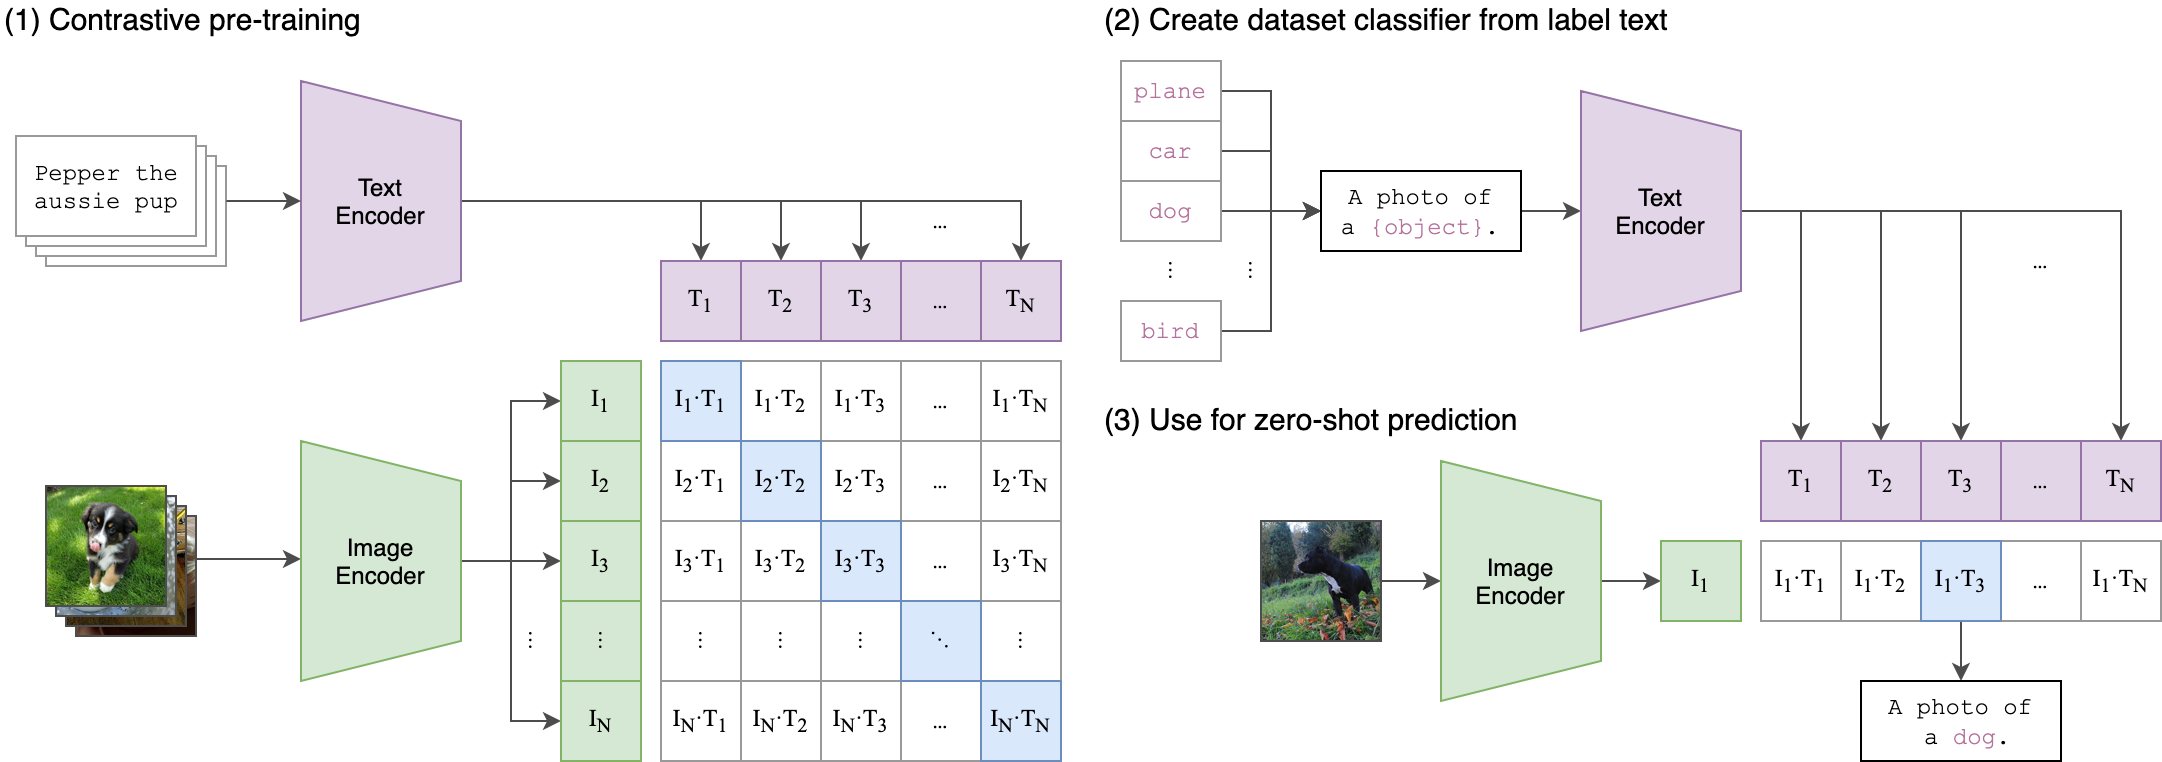
CLIP (Contrastive Language-Image Pre-Training) は、さまざまな (画像、テキスト) ペアでトレーニングされたニューラル・ネットワークです。タスクを直接最適化することなく、与えられた画像に対して最も関連性の高いテキストを予測するように自然言語で指示できます。CLIP は、ViT のようなトランスフォーマーを使用して視覚的特徴を取得し、因果言語モデルによってテキスト特徴を取得します。次に、テキストと視覚的特徴は、同一の次元を持つ潜在空間に投影されます。投影された画像とテキストの特徴間のドット積は、類似度スコアとして使用されます。
clip#
このモデルの詳細については、研究論文、OpenAI ブログ、モデルカード、GitHub リポジトリーをご覧ください。
このノートブックでは、Hugging Face トランスフォーマーから入手できる openai/clip-vit-base-patch16 を使用しますが、他の CLIP ファミリーモデルにも同じ手順を適用できます。
まず、CLIPModel クラス・オブジェクトを作成し、from_pretrained メソッドを使用してモデル構成と重みで初期化する必要があります。モデルは Hugging Face Hub から自動的にダウンロードされ、次回の使用のためにキャッシュされます。CLIPProcessor クラスは、入力データの前処理用のラッパーです。トークナイザーを使用してテキストをエンコードするのと、画像の準備の両方が含まれます。
import platform

%pip install -q --extra-index-url https://download.pytorch.org/whl/cpu "gradio>=4.19" "openvino>=2023.1.0" "transformers[torch]>=4.30" "datasets" "nncf>=2.6.0" "torch>=2.1" Pillow

if platform.system() != "Windows":
     %pip install -q "matplotlib>=3.4"
else:
     %pip install -q "matplotlib>=3.4,<3.7"
Note: you may need to restart the kernel to use updated packages.from transformers import CLIPProcessor, CLIPModel
# 事前学習済みモデルをロード
model = CLIPModel.from_pretrained("openai/clip-vit-base-patch16")
# モデル入力用のプリプロセッサーをロード
processor = CLIPProcessor.from_pretrained("openai/clip-vit-base-patch16")2024-02-26 12:23:32.559340: I tensorflow/core/util/port.cc:110] oneDNN custom operations are on.You may see slightly different numerical results due to floating-point round-off errors from different computation orders.To turn them off, set the environment variable TF_ENABLE_ONEDNN_OPTS=0. 2024-02-26 12:23:32.561128: I tensorflow/tsl/cuda/cudart_stub.cc:28] Could not find cuda drivers on your machine, GPU will not be used. 2024-02-26 12:23:32.599733: I tensorflow/core/platform/cpu_feature_guard.cc:182] This TensorFlow binary is optimized to use available CPU instructions in performance-critical operations.To enable the following instructions: AVX2 AVX512F AVX512_VNNI FMA, in other operations, rebuild TensorFlow with the appropriate compiler flags. 2024-02-26 12:23:33.401048: W tensorflow/compiler/tf2tensorrt/utils/py_utils.cc:38] TF-TRT Warning: Could not find TensorRT
from typing import List
import matplotlib.pyplot as plt
import numpy as np
from PIL import Image

def visualize_result(image: Image, labels: List[str], probs: np.ndarray, top: int = 5):
    """
    Utility function for visualization classification results
    params:
        image: input image
        labels: list of classification labels
        probs: model predicted softmaxed probabilities for each label
        top: number of the highest probability results for visualization
    returns:
        None
    """
    plt.figure(figsize=(64, 64))
    top_labels = np.argsort(-probs)[: min(top, probs.shape[0])]
    top_probs = probs[top_labels]
    plt.subplot(8, 8, 1)
    plt.imshow(image)
    plt.axis("off")

    plt.subplot(8, 8, 2)
    y = np.arange(top_probs.shape[-1])
    plt.grid()
    plt.barh(y, top_probs)
    plt.gca().invert_yaxis()
    plt.gca().set_axisbelow(True)
    plt.yticks(y, [labels[index] for index in top_labels])
    plt.xlabel("probability")
PyTorch モデル推論を実行#
分類を実行するには、ラベルを定義し、RGB 形式で画像を読み込みます。モデルに幅広いテキスト・コンテキストを提供し、ガイダンスを改善するため、“This is a photo of a” というテンプレートを使用してラベルの説明を拡張します。モデル固有の形式の入力データを含む辞書を取得するには、ラベルの説明リストと画像の両方をプロセッサーに渡す必要があります。このモデルは、生のロジット形式で画像とテキストの類似性スコアを予測します。これは、softmax 関数を使用して [0, 1] の範囲に正規化できます。次に、最終結果に対して、類似度スコアが最も高いラベルを選択します。
import requests
from pathlib import Path

sample_path = Path("data/coco.jpg")
sample_path.parent.mkdir(parents=True, exist_ok=True)
r = requests.get("https://storage.openvinotoolkit.org/repositories/openvino_notebooks/data/data/image/coco.jpg")

with sample_path.open("wb") as f:
    f.write(r.content)

image = Image.open(sample_path)

input_labels = [
    "cat",
    "dog",
    "wolf",
    "tiger",
    "man",
    "horse",
    "frog",
    "tree",
    "house",
    "computer",
]
text_descriptions = [f"This is a photo of a {label}" for label in input_labels]

inputs = processor(text=text_descriptions, images=[image], return_tensors="pt", padding=True)

results = model(**inputs)
logits_per_image = results["logits_per_image"] # これは画像とテキストの類似性スコア
probs = logits_per_image.softmax(dim=1).detach().numpy() # ソフトマックスを使ってラベル確率を求めます
visualize_result(image, input_labels, probs[0])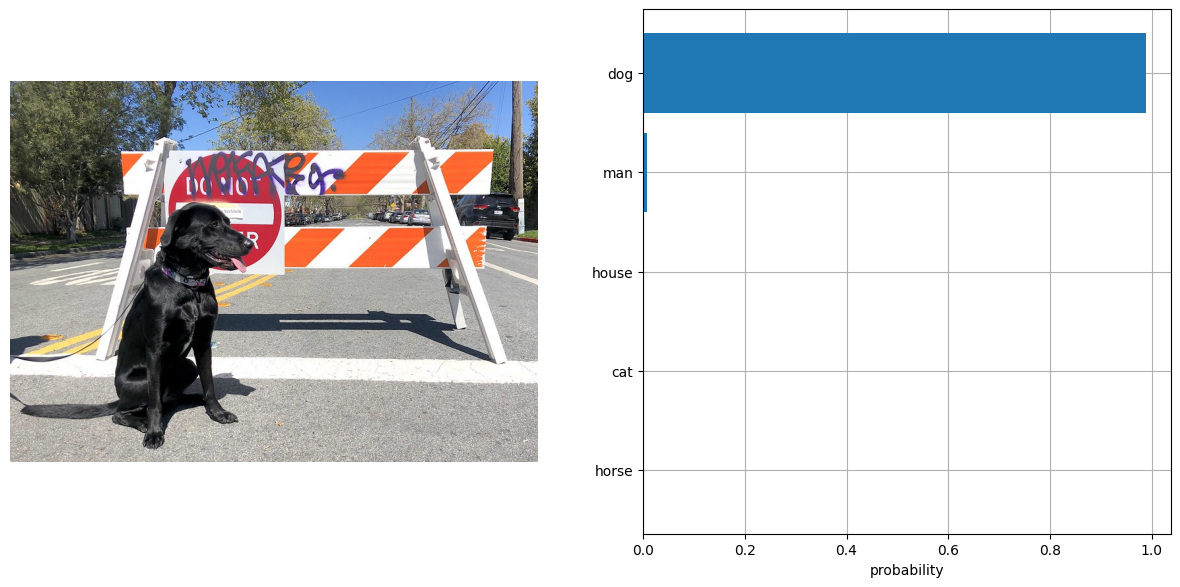
モデルを OpenVINO 中間表現 (IR) 形式に変換#
OpenVINO で最良の結果を得るには、モデルを OpenVINO IR 形式に変換することを推奨します。OpenVINO はモデル・トランスフォーメーション API を介して PyTorch をサポートします。PyTorch モデルを OpenVINO IR 形式に変換するには、モデル・トランスフォーメーション API の ov.convert_model を使用します。ov.convert_model 関数は、デバイスにロードして予測を開始できる状態の OpenVINO モデル・オブジェクトを返します。ov.save_model を使用して、次回の利用のためディスクに保存できます。
import openvino as ov

fp16_model_path = Path("clip-vit-base-patch16.xml")
model.config.torchscript = True

if not fp16_model_path.exists():
    ov_model = ov.convert_model(model, example_input=dict(inputs))
    ov.save_model(ov_model, fp16_model_path)
OpenVINO モデルを実行#
OpenVINO CLIP モデルを使用して予測を行う手順は、PyTorch モデルと同様です。上記の例と同じ入力データを PyTorch で使用してモデルの結果を確認します。
from scipy.special import softmax

# OpenVINO コア・オブジェクト・インスタンスを作成
core = ov.Core()推論デバイスの選択#
OpenVINO を使用して推論を実行するためにドロップダウン・リストからデバイスを選択します
import ipywidgets as widgets

device = widgets.Dropdown(
    options=core.available_devices + ["AUTO"],
    value="AUTO",
    description="Device:",
    disabled=False,
)

deviceDropdown(description='Device:', index=3, options=('CPU', 'GPU.0', 'GPU.1', 'AUTO'), value='AUTO')# デバイスにロードするモデルをコンパイル
compiled_model = core.compile_model(fp16_model_path, device.value)
# 前処理されたデータに対して推論を実行し、画像とテキストの類似性スコアを取得
ov_logits_per_image = compiled_model(dict(inputs))[0]
# スコアに対してソフトマックスを実行
probs = softmax(ov_logits_per_image, axis=1)
# 予測を視覚化
visualize_result(image, input_labels, probs[0])
これで完了です! 同じ結果になったようです。
NNCF を使用してモデルを INT8 に量子化#
このチュートリアルは、NNCF(Neural Network Compression Framework) から 8 ビットのトレーニング後の量子化を適用してモデルを高速化し、OpenVINO™ ツールキットを介して量子化されたモデルを推論する方法を示します。NNCF は、量子化レイヤーをモデルグラフに追加し、トレーニング・データセットのサブセットを使用してこれらの追加の量子化レイヤーのパラメーターを初期化することで、トレーニング後の量子化を可能にします。量子化操作は FP32/FP16 ではなく INT8 で実行されるため、モデル推論が高速化されます。最適化プロセスには次の手順が含まれます:
量子化データセットを準備
NNCF を使用して変換された OpenVINO モデルを量子化します。
ノートブックから同じ入力データを使用してモデルの結果を確認します。
変換および量子化されたモデルのモデルサイズを比較します。
変換および量子化されたモデルのパフォーマンスを比較します。
注: 量子化プロセスを実行するには、さらに時間とメモリーが必要になる場合があります。以下のウィジェットで無効化できます:
to_quantize = widgets.Checkbox(
    value=True,
    description="Quantization",
    disabled=False,
)

to_quantizeCheckbox(value=True, description='Quantization')# skip_kernel_extension モジュールを取得
r = requests.get(
url="https://raw.githubusercontent.com/openvinotoolkit/openvino_notebooks/latest/utils/skip_kernel_extension.py",
)
open("skip_kernel_extension.py", "w").write(r.text)
%load_ext skip_kernel_extensionデータセットの準備#
キャプションのアノテーションが付けられた約 330 万個の画像で構成される Conceptual Captions データセットは、モデルの量子化に使用されます。
%%skip not $to_quantize.value

import requests
from io import BytesIO
import numpy as np
from PIL import Image
from requests.packages.urllib3.exceptions import InsecureRequestWarning
requests.packages.urllib3.disable_warnings(InsecureRequestWarning)

max_length = model.config.text_config.max_position_embeddings

def check_text_data(data):
    """
    Check if the given data is text-based.
    """
    if isinstance(data, str):
        return True
    if isinstance(data, list):
        return all(isinstance(x, str) for x in data)
    return False

def get_pil_from_url(url):
    """
    Downloads and converts an image from a URL to a PIL Image object.
    """
    response = requests.get(url, verify=False, timeout=20)
    image = Image.open(BytesIO(response.content))
    return image.convert("RGB")

def collate_fn(example, image_column="image_url", text_column="caption"):
    """
    Preprocesses an example by loading and transforming image and text data.
    Checks if the text data in the example is valid by calling the `check_text_data` function.
    Downloads the image specified by the URL in the image_column by calling the `get_pil_from_url` function.
    If there is any error during the download process, returns None.
    Returns the preprocessed inputs with transformed image and text data.
    """
    assert len(example) == 1
    example = example[0]

    if not check_text_data(example[text_column]):
        raise ValueError("Text data is not valid")

    url = example[image_column]
    try:
        image = get_pil_from_url(url)
        h, w = image.size
        if h == 1 or w == 1:
            return None
    except Exception:
        return None

    inputs = processor(text=example[text_column], images=[image], return_tensors="pt", padding=True)
    if inputs['input_ids'].shape[1] > max_length:
        return None
return inputs%%skip not $to_quantize.value
import torch
from datasets import load_dataset
from tqdm.notebook import tqdm
def prepare_calibration_data(dataloader, init_steps):
"""
This function prepares calibration data from a dataloader for a specified number of initialization steps.
It iterates over the dataloader, fetching batches and storing the relevant data.
"""
data = []
print(f"Fetching {init_steps} samples for the initialization...")
with tqdm(total=init_steps) as pbar:
for batch in dataloader:
if len(data) == init_steps:
break
if batch:
pbar.update(1)
with torch.no_grad():
data.append(
{
"pixel_values": batch["pixel_values"].to("cpu"),
"input_ids": batch["input_ids"].to("cpu"),
"attention_mask": batch["attention_mask"].to("cpu")
}
)
return data
def prepare_dataset(opt_init_steps=50, max_train_samples=1000):
"""
Prepares a vision-text dataset for quantization.
"""
dataset = load_dataset("google-research-datasets/conceptual_captions", trust_remote_code=True)
train_dataset = dataset["train"].shuffle(seed=42)
dataloader = torch.utils.data.DataLoader(train_dataset, collate_fn=collate_fn, batch_size=1)
calibration_data = prepare_calibration_data(dataloader, opt_init_steps)
return calibration_data%%skip not $to_quantize.value
import logging
import nncf
core = ov.Core()
nncf.set_log_level(logging.ERROR)
int8_model_path = 'clip-vit-base-patch16_int8.xml'
calibration_data = prepare_dataset()
ov_model = core.read_model(fp16_model_path)INFO:nncf:NNCF initialized successfully.Supported frameworks detected: torch, tensorflow, onnx, openvino/home/ea/work/my_optimum_intel/optimum_env/lib/python3.8/site-packages/datasets/load.py:1429: FutureWarning: The repository for conceptual_captions contains custom code which must be executed to correctly load the dataset. You can inspect the repository content at https://hf.co/datasets/conceptual_captions You can avoid this message in future by passing the argument trust_remote_code=True. Passing trust_remote_code=True will be mandatory to load this dataset from the next major release of datasets. warnings.warn(
Fetching 50 samples for the initialization...0%| | 0/50 [00:00<?, ?it/s]量子化を行います#
事前トレーニングされた FP16 モデルから量子化モデルを作成します。
注: 量子化は時間とメモリーを消費する操作です。以下の量子化コードを実行すると、時間がかかる場合があります。
%%skip not $to_quantize.value

if len(calibration_data) == 0:
    raise RuntimeError(
        'Calibration dataset is empty. Please check internet connection and try to download images manually.'     )
calibration_dataset = nncf.Dataset(calibration_data)
quantized_model = nncf.quantize(
    model=ov_model,
    calibration_dataset=calibration_dataset,
    model_type=nncf.ModelType.TRANSFORMER,
    # スムーズ・クォンタム・アルゴリズムは活性化量子化誤差を削減し、グリッドサーチを通じて最適なアルファ値を取得
advanced_parameters=nncf.AdvancedQuantizationParameters(smooth_quant_alpha=0.6)
)
ov.save_model(quantized_model, int8_model_path)
/home/ea/work/my_optimum_intel/optimum_env/lib/python3.8/site-packages/nncf/quantization/algorithms/post_training/pipeline.py:87: FutureWarning: AdvancedQuantizationParameters(smooth_quant_alpha=..) is deprecated.Please, use AdvancedQuantizationParameters(smooth_quant_alphas) option with AdvancedSmoothQuantParameters(convolution=.., matmul=..) as value instead. warning_deprecated(
Output()Output()Output()Output()量子化された OpenVINO モデルを実行#
量子化された OpenVINO CLIP モデルを使用して予測を行う手順は、PyTorch モデルと似ています。ノートブックから同じ入力データを使用してモデルの結果を確認します。
%%skip not $to_quantize.value

# デバイスにロードするモデルをコンパイル
compiled_model = core.compile_model(quantized_model, device.value)
# 前処理されたデータに対して推論を実行し、画像とテキストの類似性スコアを取得
ov_logits_per_image = compiled_model(dict(inputs))[0]
# スコアに対してソフトマックスを実行
probs = softmax(ov_logits_per_image, axis=1)
# 予測を視覚化
visualize_result(image, input_labels, probs[0])
結果は量子化前の fp16 モデルの結果に類似しています。
ファイルサイズの比較#
%%skip not $to_quantize.value

from pathlib import Path

fp16_ir_model_size = Path(fp16_model_path).with_suffix(".bin").stat().st_size / 1024 / 1024
quantized_model_size = Path(int8_model_path).with_suffix(".bin").stat().st_size / 1024 / 1024
print(f"FP16 IR model size: {fp16_ir_model_size:.2f} MB")
print(f"INT8 model size: {quantized_model_size:.2f} MB")
print(f"Model compression rate: {fp16_ir_model_size / quantized_model_size:.3f}")
FP16 IR model size: 285.38 MB
INT8 model size: 143.60 MB
Model compression rate: 1.987FP16 IR と量子化モデルの推論時間を比較#
FP16 と INT8 モデルの推論パフォーマンスを測定するには、キャリブレーション・データセットの推論時間の中央値を使用します。したがって、動的量子化モデルの速度向上を見積もることができます。
注: 最も正確なパフォーマンス推定を行うには、他のアプリケーションを閉じた後、ターミナル/コマンドプロンプトで
benchmark_appを実行することを推奨します。
%%skip not $to_quantize.value

import time

def calculate_inference_time(model_path, calibration_data):
    model = core.compile_model(model_path, device.value)
    inference_time = []
    for batch in calibration_data:
        start = time.perf_counter()
        _ = model(batch)[0]
        end = time.perf_counter()
        delta = end - start
        inference_time.append(delta)
return np.median(inference_time)%%skip not $to_quantize.value
fp16_latency = calculate_inference_time(fp16_model_path, calibration_data)
int8_latency = calculate_inference_time(int8_model_path, calibration_data)
print(f"Performance speed up: {fp16_latency / int8_latency:.3f}")Performance speed up: 1.639インタラクティブなデモ#
さあ、あなたの番です!ゼロショット分類用に、独自の画像とカンマで区切ったラベルのリストを提供できます。
ファイル・アップロード・ウィンドウを使用して画像をアップロードし、テキストフィールドにラベル名を入力します。区切り文字としてカンマを使用します (例: cat、dog、bird)
import gradio as gr

model_path = Path("clip-vit-base-patch16-int8.xml")
if not model_path.exists():
    model_path = Path("clip-vit-base-patch16.xml")
compiled_model = core.compile_model(model_path, device.value)

def classify(image, text):
    """
    Classify image using classes listing.
    Args:
        image (np.ndarray): image that needs to be classified in CHW format.
        text (str): comma-separated list of class labels
    Returns:
        (dict): Mapping between class labels and class probabilities.
    """
    labels = text.split(",")
    text_descriptions = [f"This is a photo of a {label}" for label in labels]
    inputs = processor(text=text_descriptions, images=[image], return_tensors="np", padding=True)
    ov_logits_per_image = compiled_model(dict(inputs))[0]
    probs = softmax(ov_logits_per_image, axis=1)[0]

    return {label: float(prob) for label, prob in zip(labels, probs)}

demo = gr.Interface(
    classify,
    [
        gr.Image(label="Image", type="pil"),
        gr.Textbox(label="Labels", info="Comma-separated list of class labels"),
    ],
    gr.Label(label="Result"),
    examples=[[sample_path, "cat,dog,bird"]],
)
try:
    demo.launch(debug=False)
except Exception:
    demo.launch(share=True, debug=False)
# リモートで起動する場合は、server_name と server_port を指定
# demo.launch(server_name='your server name', server_port='server port in int')
# 詳細はドキュメントをご覧ください: https://gradio.app/docs/