Whisper と OpenVINO™ を使用したビデオ字幕の生成#
この Jupyter ノートブックはオンラインで起動でき、ブラウザーのウィンドウで対話型環境を開きます。ローカルにインストールすることもできます。次のオプションのいずれかを選択します:


Whisper は、ウェブから収集された 680,000 時間の多言語およびマルチタスクの監視データに基づいてトレーニングされた自動音声認識 (ASR) システムです。多言語音声認識に加え、音声翻訳や言語識別も実行できるマルチタスク・モデルです。

asr-training-data-desktop.svg#
このモデルの詳細については、研究論文、OpenAI ブログ、モデルカード、GitHub リポジトリーをご覧ください。
このノートブックでは、Whisper と OpenVINO を使用して、サンプルビデオの字幕を生成します。さらに、INT8 量子化によってモデルのパフォーマンスを向上させる NNCF を使用します。これには次の手順が含まれます。
- モデルをダウンロードします。
- PyTorch モデル・パイプラインをインスタンス化します。
- モデル・トランスフォーメーション API を使用して、モデルを OpenVINO IR に変換します。
- OpenVINO モデルを使用して Whisper パイプラインを実行します。
- NNCF を使用して OpenVINO モデルを量子化します。
- デモのビデオの量子化されたモデルの結果を確認します。
- FP32 モデルと量子化された INT8 モデルのモデルサイズ、パフォーマンス、精度を比較します。
- ビデオ字幕生成のインタラクティブ・デモを起動します。
目次:
必要条件#
依存関係をインストールします。
%pip install -q "openvino>=2024.1.0" "nncf>=2.10.0"
%pip install -q "python-ffmpeg<=1.0.16" moviepy transformers onnx "git+https://github.com/huggingface/optimum-intel.git" "peft==0.6.2" --extra-index-url https://download.pytorch.org/whl/cpu
%pip install -q "git+https://github.com/garywu007/pytube.git" soundfile librosa jiwer
%pip install -q "gradio>=4.19"モデルのインスタンス化#
Whisper は、トランスフォーマー・ベースのエンコーダー/デコーダーモデルであり、シーケンスツーシーケンス・モデルとも呼ばれます。オーディオ・スペクトログラム機能のシーケンスをテキストトークンのシーケンスにマッピングします。まず、生のオーディオ入力は、特徴抽出器の動作によって log-Mel スペクトログラムに変換されます。次に、トランスフォーマー・エンコーダーはスペクトログラムをエンコードして、エンコーダーの隠し状態のシーケンスを形成します。最後に、デコーダーは、以前のトークンとエンコーダーの隠れ状態の両方を条件として、テキストトークンを自己回帰的に予測します。
下の図でモデルのアーキテクチャーを確認できます:

whisper_architecture.svg#
モデルの作成者によってトレーニングされた、さまざまなサイズと機能のモデルがあります。このチュートリアルでは tiny モデルを使用しますが、同じアクションは Whisper ファミリーの他のモデルにも適用できます。
import ipywidgets as widgets

MODELS = [
    "openai/whisper-large-v3",
    "openai/whisper-large-v2",
    "openai/whisper-large",
    "openai/whisper-medium",
    "openai/whisper-small",
    "openai/whisper-base",
    "openai/whisper-tiny",
]

model_id = widgets.Dropdown(
    options=list(MODELS),
    value="openai/whisper-tiny",
    description="Model:",
    disabled=False,
)

model_idDropdown(description='Model:', index=6, options=('openai/whisper-large-v3', 'openai/whisper-large-v2', 'openai…Optimum-Intel を使用してモデルを OpenVINO 中間表現 (IR) 形式に変換#
Hugging Face Optimum API は、Hugging Face Transformers ライブラリーのモデルを OpenVINO™ IR 形式に変換および量子化できる高レベル API です。詳細については、Hugging Face Optimum のドキュメントを参照してください。
Optimum Intel を使用すると、Hugging Face ハブ から最適化されたモデルをロードし、Hugging Face API を使用して OpenVINO ランタイムで推論を実行するパイプラインを作成できます。Optimum 推論モデルは、Hugging Face Transformers モデルと API の互換性があります。つまり、AutoModelForXxx クラスを対応する OVModelForXxx クラスに置き換えるだけで済みます。
以下は、whisper-tiny モデルの例です。
-from transformers import AutoModelForSpeechSeq2Seq
+from optimum.intel.openvino import OVModelForSpeechSeq2Seq
from transformers import AutoTokenizer, pipeline

model_id = "openai/whisper-tiny"
-model = AutoModelForSpeechSeq2Seq.from_pretrained(model_id)
+model = OVModelForSpeechSeq2Seq.from_pretrained(model_id, export=True)モデルクラスの初期化は、from_pretrained メソッドの呼び出しから始まります。Transformers モデルをダウンロードして変換する場合は、パラメーター export=True を追加する必要があります。save_pretrained メソッドを使用して、変換されたモデルを次回に使用するため保存できます。あるいは、Optimum-CLI インターフェイスを使用してモデル変換を行うこともできます。Optimum-Intel と Optimum CLI の使い方の詳細については、チュートリアルをご覧ください。以下のコマンドは、optimum cli を使用して whisper を変換する方法を示しています。
from pathlib import Path

model_dir = model_id.value.split("/")[-1]

if not Path(model_dir).exists(): !optimum-cli export openvino -m {model_id.value} {model_dir} --weight-format fp16推論パイプラインの準備#
下の画像は、Whisper モデルを使用したビデオの文字起こしパイプラインを示しています。
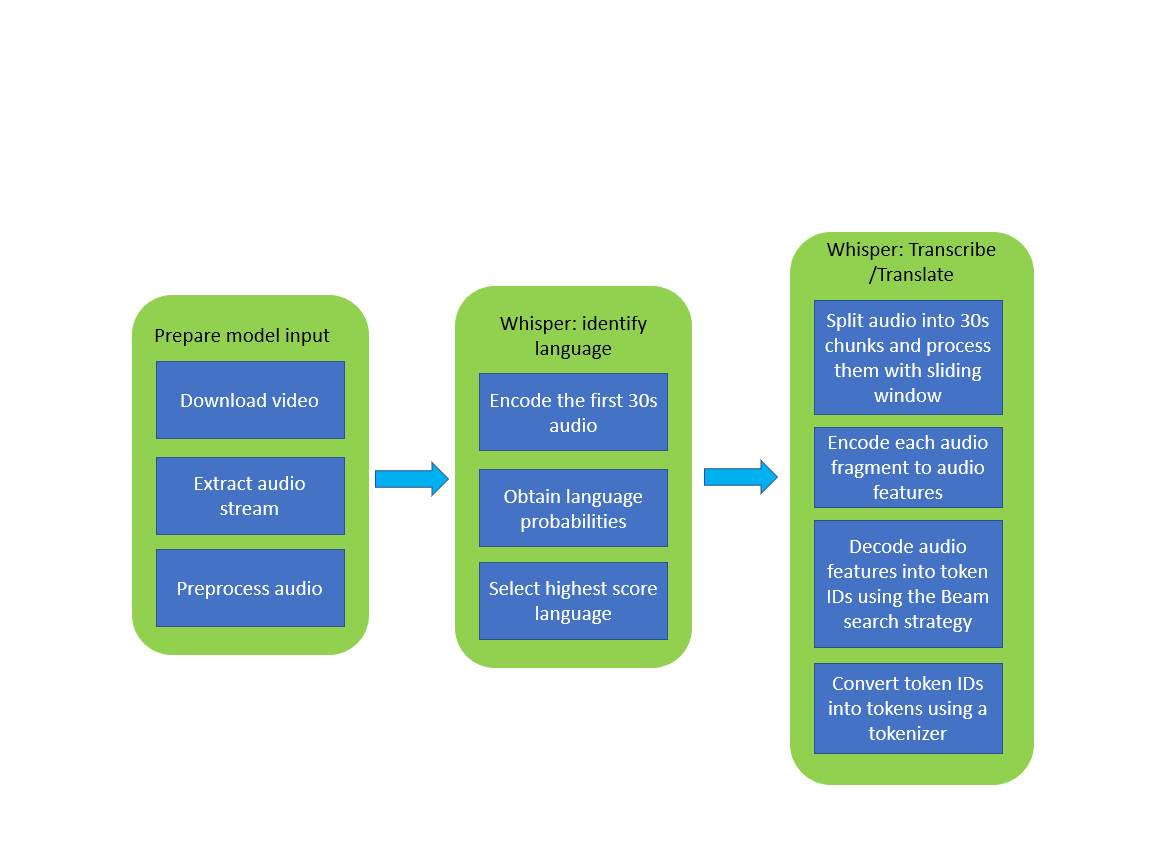
whisper_pipeline.png#
このモデルの使用では、前処理と後処理が重要です。初期化に使用されるクラス WhisperProcessor は、モデルのオーディオ入力データを準備し、それをメルスペクトログラムに変換し、トークナイザーを使用して予測された出力 token_ids を文字列にデコードする役割を担います。トークナイザーとプロセッサーは、OpenVINO モデルとも互換性のあるモデルとともに配布されます。
オリジナルの PyTorch モデルと同様に、OpenVINO モデルも automatic-speech-recognition (自動音声認識) 用の HuggingFace パイプライン・インターフェイスと互換性があります。パイプラインは長い音声の書き起こしに使用できます。Distil-Whisper はチャンク・アルゴリズムを使用して、長い形式のオーディオファイルを転記します。実際には、チャンク化された長い形式のアルゴリズムは、Whisper の論文で OpenAI が提案した順次アルゴリズムよりも 9 倍高速です。チャンク化を有効にするには、chunk_length_s パラメーターをパイプラインに渡します。Distil-Whisper の場合、チャンクの長さは 15 秒が最適です。バッチ処理を有効にするには、引数 batch_size を渡します。
推論デバイスの選択#
OpenVINO を使用して推論を実行するためにドロップダウン・リストからデバイスを選択します
import openvino as ov

core = ov.Core()
import ipywidgets as widgets
device = widgets.Dropdown(
options=core.available_devices + ["AUTO"],
value="AUTO",
description="Device:",
disabled=False,
)
deviceDropdown(description='Device:', index=3, options=('CPU', 'GPU.0', 'GPU.1', 'AUTO'), value='AUTO')from optimum.intel.openvino import OVModelForSpeechSeq2Seq
from transformers import AutoProcessor, pipeline
ov_model = OVModelForSpeechSeq2Seq.from_pretrained(model_dir, device=device.value)
processor = AutoProcessor.from_pretrained(model_dir)
pipe = pipeline(
"automatic-speech-recognition",
model=ov_model,
chunk_length_s=30,
tokenizer=processor.tokenizer,
feature_extractor=processor.feature_extractor,
)2024-06-10 09:43:58.190233: I tensorflow/core/util/port.cc:110] oneDNN custom operations are on.You may see slightly different numerical results due to floating-point round-off errors from different computation orders.To turn them off, set the environment variable TF_ENABLE_ONEDNN_OPTS=0.
2024-06-10 09:43:58.192258: I tensorflow/tsl/cuda/cudart_stub.cc:28] Could not find cuda drivers on your machine, GPU will not be used.
2024-06-10 09:43:58.228701: I tensorflow/core/platform/cpu_feature_guard.cc:182] This TensorFlow binary is optimized to use available CPU instructions in performance-critical operations.To enable the following instructions: AVX2 AVX512F AVX512_VNNI FMA, in other operations, rebuild TensorFlow with the appropriate compiler flags.
2024-06-10 09:43:58.903562: W tensorflow/compiler/tf2tensorrt/utils/py_utils.cc:38] TF-TRT Warning: Could not find TensorRT
WARNING[XFORMERS]: xFormers can't load C++/CUDA extensions. xFormers was built for: PyTorch 2.0.1+cu118 with CUDA 1108 (you have 2.3.0+cu121)
Python 3.8.18 (you have 3.8.10)
Please reinstall xformers (see facebookresearch/xformers)
Memory-efficient attention, SwiGLU, sparse and more won't be available. Set XFORMERS_MORE_DETAILS=1 for more details /home/ea/work/my_optimum_intel/optimum_env/lib/python3.8/site-packages/diffusers/utils/outputs.py:63: UserWarning: torch.utils._pytree._register_pytree_node is deprecated.Please use torch.utils._pytree.register_pytree_node instead.
torch.utils._pytree._register_pytree_node(
Compiling the encoder to AUTO ...
Compiling the decoder to AUTO ...
Compiling the decoder to AUTO ...
Special tokens have been added in the vocabulary, make sure the associated word embeddings are fine-tuned or trained.
ビデオの文字起こしパイプラインを実行#
これで、転写を始める準備が整いました。文字起こししたい YouTube 動画を選択します。ビデオのダウンロードには時間がかかる場合があります。
import ipywidgets as widgets

VIDEO_LINK = "https://youtu.be/kgL5LBM-hFI"
link = widgets.Text(
    value=VIDEO_LINK,
    placeholder="Type link for video",
    description="Video:",
    disabled=False,
)

linkText(value='https://youtu.be/kgL5LBM-hFI', description='Video:', placeholder='Type link for video')from pathlib import Path
from pytube import YouTube
print(f"Downloading video {link.value} started")
output_file = Path("downloaded_video.mp4")
yt = YouTube(link.value)
yt.streams.get_highest_resolution().download(filename=output_file)
print(f"Video saved to {output_file}")Downloading video https://youtu.be/kgL5LBM-hFI started
Video saved to downloaded_video.mp4モデルのタスクを選択します:
転写 - ソース言語で音声転写を生成します (自動的に検出されます)。
翻訳 - 英語へ翻訳付きの音声文字起こしを生成します。
task = widgets.Select(
    options=["transcribe", "translate"],
    value="translate",
    description="Select task:",
    disabled=False,
)
taskSelect(description='Select task:', index=1, options=('transcribe', 'translate'), value='translate')from moviepy.editor import VideoFileClip
from transformers.pipelines.audio_utils import ffmpeg_read
def get_audio(video_file):
"""
Extract audio signal from a given video file, then convert it to float,
then mono-channel format and resample it to the expected sample rate
Parameters:
video_file: path to input video file
Returns:
resampled_audio: mono-channel float audio signal with 16000 Hz sample rate
extracted from video
duration: duration of video fragment in seconds
"""
input_video = VideoFileClip(str(video_file))
duration = input_video.duration
audio_file = video_file.stem + ".wav"
input_video.audio.write_audiofile(audio_file, verbose=False, logger=None)
with open(audio_file, "rb") as f:
inputs = f.read()
audio = ffmpeg_read(inputs, pipe.feature_extractor.sampling_rate)
return {"raw": audio, "sampling_rate": pipe.feature_extractor.sampling_rate}, durationinputs, duration = get_audio(output_file)
transcription = pipe(inputs, generate_kwargs={"task": task.value}, return_timestamps=True)["chunks"]import math
def format_timestamp(seconds: float):
"""
format time in srt-file expected format
"""
assert seconds >= 0, "non-negative timestamp expected"
milliseconds = round(seconds * 1000.0)
hours = milliseconds // 3_600_000
milliseconds -= hours * 3_600_000
minutes = milliseconds // 60_000
milliseconds -= minutes * 60_000
seconds = milliseconds // 1_000
milliseconds -= seconds * 1_000
return (f"{hours}:" if hours > 0 else "00:")+ f"{minutes:02d}:{seconds:02d},{milliseconds:03d}"
def prepare_srt(transcription, filter_duration=None):
"""
Format transcription into srt file format
"""
segment_lines = []
for idx, segment in enumerate(transcription):
# モデルが終了タイムスタンプを予測できなかった場合、音声が単語の途中で途切れたことなどが原因である可能性があります
if segment["timestamp"][1] is None:
segment["timestamp"] = (segment["timestamp"][0], filter_duration)
if filter_duration is not None and (segment["timestamp"][0] >= math.floor(filter_duration) or segment["timestamp"][1] > math.ceil(filter_duration) + 1):
break
segment_lines.append(str(idx + 1) + "\n")
time_start = format_timestamp(segment["timestamp"][0])
time_end = format_timestamp(segment["timestamp"][1])
time_str = f"{time_start} --> {time_end}\n"
segment_lines.append(time_str)
segment_lines.append(segment["text"] + "\n\n")
return segment_lines結果は downloaded_video.srt ファイルに保存されます。SRT は字幕を保存する最も一般的な形式の 1 つであり、多くの最新のビデオプレーヤーと互換性があります。このファイルを使用すると、再生中にビデオにトランスクリプションを埋め込んだり、ffmpeg を使用してビデオファイルに直接挿入したりできます。
srt_lines = prepare_srt(transcription, filter_duration=duration)
# トランスクリプトを保存
with output_file.with_suffix(".srt").open("w") as f:
    f.writelines(srt_lines)
それでは結果を確認します。
widgets.Video.from_file(output_file, loop=False, width=800, height=800)Video(value=b"x00x00x00x18ftypmp42x00x00x00x00isommp42x00x00:'moovx00x00x00lmvhd...", height='800…
print("".join(srt_lines))
1
00:00:00,000 --> 00:00:05,000
 Oh, what's that?

2
00:00:05,000 --> 00:00:08,000
 Oh, wow.

3
00:00:08,000 --> 00:00:10,000
 Hello, humans.

4
00:00:13,000 --> 00:00:15,000
 Focus on me.

5
00:00:15,000 --> 00:00:17,000
 Focus on the guard.

6
00:00:17,000 --> 00:00:20,000
 Don't tell anyone what you're seeing in here.

7
00:00:22,000 --> 00:00:24,000
 Have you seen what's in there?

8
00:00:24,000 --> 00:00:25,000
 They have intel.

9
00:00:25,000 --> 00:00:27,000
This is where it all changes.量子化#
NNCF は、モデルグラフに量子化レイヤーを追加し、トレーニング・データセットのサブセットを使用してこれらの追加の量子化レイヤーのパラメーターを初期化することで、トレーニング後の量子化を可能にします。このフレームワークは、元のトレーニング・コードへの変更が最小限になるように設計されています。
最適化プロセスには次の手順が含まれます:
量子化用のキャリブレーション・データセットを作成します。
nncf.quantizeを実行して、量子化されたエンコーダーおよびデコーダーモデルを取得します。openvino.save_model関数を使用してINT8モデルをシリアル化します。
注: 量子化は時間とメモリーを消費する操作です。以下の量子化コードの実行には時間がかかる場合があります。
Whisper 量子化を実行するかどうかを以下から選択してください。
to_quantize = widgets.Checkbox(
    value=True,
    description="Quantization",
    disabled=False,
)

to_quantizeCheckbox(value=True, description='Quantization')# `skip_kernel_extension` モジュールを取得
import requests
r = requests.get(
url="https://raw.githubusercontent.com/openvinotoolkit/openvino_notebooks/latest/utils/skip_kernel_extension.py",
)
open("skip_kernel_extension.py", "w").write(r.text)
ov_quantized_model = None
%load_ext skip_kernel_extensionキャリブレーション・データセットの準備#
最初のステップは、量子化のキャリブレーション・データセットを準備することです。whisper エンコーダーとデコーダーを別々に量子化するため、各モデルのキャリブレーション・データセットを準備する必要があります。モデル入力をインターセプトしてリストに収集する InferRequestWrapper クラスをインポートします。次に、少量のオーディオサンプルに対してモデル推論を実行します。一般的に、キャリブレーション・データセットのサイズを大きくすると、量子化の品質が向上します。
%%skip not $to_quantize.value

from itertools import islice
from optimum.intel.openvino.quantization import InferRequestWrapper

def collect_calibration_dataset(ov_model: OVModelForSpeechSeq2Seq, calibration_dataset_size: int):
    # モデル要求のプロパティーを上書きし、後で復元できるように元のプロパティーを保存
    encoder_calibration_data = []
    decoder_calibration_data = []
    ov_model.encoder.request = InferRequestWrapper(ov_model.encoder.request, encoder_calibration_data, apply_caching=True)
    ov_model.decoder_with_past.request = InferRequestWrapper(ov_model.decoder_with_past.request, decoder_calibration_data, apply_caching=True)

    pipe = pipeline(
        "automatic-speech-recognition",
        model=ov_model,
        chunk_length_s=30,
        tokenizer=processor.tokenizer,
        feature_extractor=processor.feature_extractor)
    try:
        calibration_dataset = dataset = load_dataset("openslr/librispeech_asr", "clean", split="validation", streaming=True, trust_remote_code=True)
        for sample in tqdm(islice(calibration_dataset, calibration_dataset_size), desc="Collecting calibration data", total=calibration_dataset_size):
            pipe(sample["audio"], generate_kwargs={"task": task.value}, return_timestamps=True)
    finally:
        ov_model.encoder.request = ov_model.encoder.request.request
        ov_model.decoder_with_past.request = ov_model.decoder_with_past.request.request

    return encoder_calibration_data, decoder_calibration_data
Whisper エンコーダーおよびデコーダーモデルの量子化 #
以下では、Whisper エンコーダーおよびデコーダー (履歴付きモデル) で nncf.quantize を呼び出す quantize 関数を実行します。全体の推論時間に占める割合が無視できるため、第 1 ステップのデコーダーは量子化しません。
%%skip not $to_quantize.value

import gc
import shutil
import nncf
from datasets import load_dataset
from tqdm.notebook import tqdm

def extract_input_features(sample):
    input_features = processor(
        sample["audio"]["array"],
        sampling_rate=sample["audio"]["sampling_rate"],
        return_tensors="pt",
    ).input_features
    return input_features

CALIBRATION_DATASET_SIZE = 50
quantized_model_path = Path(f"{model_dir}_quantized")

def quantize(ov_model: OVModelForSpeechSeq2Seq, calibration_dataset_size: int):
    if not quantized_model_path.exists():
        encoder_calibration_data, decoder_calibration_data = collect_calibration_dataset(
            ov_model, calibration_dataset_size
        )
        print("Quantizing encoder")
        quantized_encoder = nncf.quantize(
            ov_model.encoder.model,
            nncf.Dataset(encoder_calibration_data),
            subset_size=len(encoder_calibration_data),
            model_type=nncf.ModelType.TRANSFORMER,
            # スムーズ・クォンタム・アルゴリズムは活性化量子化誤差を削減し、グリッドサーチを通じて最適なアルファ値を取得
advanced_parameters=nncf.AdvancedQuantizationParameters(smooth_quant_alpha=0.50)
        )
        ov.save_model(quantized_encoder, quantized_model_path / "openvino_encoder_model.xml")
        del quantized_encoder
        del encoder_calibration_data
        gc.collect()

        print("Quantizing decoder with past")
        quantized_decoder_with_past = nncf.quantize(
            ov_model.decoder_with_past.model,
            nncf.Dataset(decoder_calibration_data),
            subset_size=len(decoder_calibration_data),
            model_type=nncf.ModelType.TRANSFORMER,
            # スムーズ・クォンタム・アルゴリズムは活性化量子化誤差を削減し、グリッドサーチを通じて最適なアルファ値を取得
    advanced_parameters=nncf.AdvancedQuantizationParameters(smooth_quant_alpha=0.96)
        )
        ov.save_model(quantized_decoder_with_past, quantized_model_path / "openvino_decoder_with_past_model.xml")
        del quantized_decoder_with_past
        del decoder_calibration_data
        gc.collect()

        # 設定ファイルと first-step-decoder を手動でコピー
        model_path = Path(model_dir)
        shutil.copy(model_path / "config.json", quantized_model_path / "config.json")
        shutil.copy(model_path / "generation_config.json", quantized_model_path / "generation_config.json")
        shutil.copy(model_path / "openvino_decoder_model.xml", quantized_model_path / "openvino_decoder_model.xml")
        shutil.copy(model_path / "openvino_decoder_model.bin", quantized_model_path / "openvino_decoder_model.bin")

    quantized_ov_model = OVModelForSpeechSeq2Seq.from_pretrained(quantized_model_path, compile=False)
    quantized_ov_model.to(device.value) quantized_ov_model.compile()
    return quantized_ov_model

ov_quantized_model = quantize(ov_model, CALIBRATION_DATASET_SIZE)
Collecting calibration data: 0%| | 0/50 [00:00<?, ?it/s]Output()Quantizing encoderOutput()INFO:nncf:12 ignored nodes were found by name in the NNCFGraph
INFO:nncf:16 ignored nodes were found by name in the NNCFGraphOutput()Output()Output()Quantizing decoder with pastOutput()INFO:nncf:24 ignored nodes were found by name in the NNCFGraph
INFO:nncf:24 ignored nodes were found by name in the NNCFGraphOutput()Output()Compiling the encoder to AUTO ...
Compiling the decoder to AUTO ...
Compiling the decoder to AUTO ...量子化モデルの推論を実行#
オリジナルモデルと量子化モデルの転写結果を比較してみましょう。
if ov_quantized_model is not None:
    int8_pipe = pipeline(
        "automatic-speech-recognition",
        model=ov_quantized_model,
        chunk_length_s=30,
        tokenizer=processor.tokenizer,
        feature_extractor=processor.feature_extractor,
    )
    inputs, duration = get_audio(output_file)
    transcription = int8_pipe(inputs, generate_kwargs={"task": task.value}, return_timestamps=True)["chunks"]
    srt_lines = prepare_srt(transcription, filter_duration=duration)
    print("".join(srt_lines))
    widgets.Video.from_file(output_file, loop=False, width=800, height=800)
1
00:00:00,000 --> 00:00:05,000
 What's that?

2
00:00:05,000 --> 00:00:07,000
 Oh, wow.

3
00:00:09,000 --> 00:00:11,000
 Hello humans.

4
00:00:14,000 --> 00:00:15,000
 Focus on me.

5
00:00:15,000 --> 00:00:16,000
 Focus on the guard.

6
00:00:18,000 --> 00:00:20,000
 Don't tell anyone what you're seen in here.

7
00:00:22,000 --> 00:00:24,000
 Have you seen what's in there?

8
00:00:24,000 --> 00:00:25,000
 They have intel.

9
00:00:25,000 --> 00:00:27,000
This is where it all changes.元のモデルと量子化されたモデルのパフォーマンスと精度を比較#
最後に、精度とパフォーマンスの観点から、元の Whisper モデルと量子化された Whisper モデルを比較します。
精度を測定するために、1 - WER をメトリックとして使用します。WER は Word Error Rate (単語誤り率) の略です。
推論時間を測定するときは、エンコーダーとデコーダーの過去のモデル転送と、モデル全体の推論を個別に測定します。
%%skip not $to_quantize.value

import time
from contextlib import contextmanager
from jiwer import wer, wer_standardize

TEST_DATASET_SIZE = 50
MEASURE_TIME = False

@contextmanager
def time_measurement():
    global MEASURE_TIME
    try:
        MEASURE_TIME = True
        yield
    finally:
        MEASURE_TIME = False

def time_fn(obj, fn_name, time_list):
    original_fn = getattr(obj, fn_name)

    def wrapper(*args, **kwargs):
        if not MEASURE_TIME:
            return original_fn(\*args, \*\*kwargs)
        start_time = time.perf_counter()
        result = original_fn(\*args, \*\*kwargs)
        end_time = time.perf_counter()
        time_list.append(end_time - start_time)
        return result

    setattr(obj, fn_name, wrapper)

def calculate_transcription_time_and_accuracy(ov_model, test_samples):
    encoder_infer_times = []
    decoder_with_past_infer_times = []
    whole_infer_times = []
    time_fn(ov_model, "generate", whole_infer_times)
    time_fn(ov_model.encoder, "forward", encoder_infer_times)
    time_fn(ov_model.decoder_with_past, "forward", decoder_with_past_infer_times)

    ground_truths = []
    predictions = []
    for data_item in tqdm(test_samples, desc="Measuring performance and accuracy"):
        input_features = extract_input_features(data_item)

        with time_measurement():
            predicted_ids = ov_model.generate(input_features)
        transcription = processor.batch_decode(predicted_ids, skip_special_tokens=True)

        ground_truths.append(data_item["text"])
        predictions.append(transcription[0])

    word_accuracy = (1 - wer(ground_truths, predictions, reference_transform=wer_standardize, hypothesis_transform=wer_standardize)) * 100
    mean_whole_infer_time = sum(whole_infer_times)
    mean_encoder_infer_time = sum(encoder_infer_times)
    mean_decoder_with_time_infer_time = sum(decoder_with_past_infer_times)
    return word_accuracy, (mean_whole_infer_time, mean_encoder_infer_time, mean_decoder_with_time_infer_time)

test_dataset = load_dataset("openslr/librispeech_asr", "clean", split="validation", streaming=True, trust_remote_code=True)
test_dataset = test_dataset.shuffle(seed=42).take(TEST_DATASET_SIZE)
test_samples = [sample for sample in test_dataset]

accuracy_original, times_original = calculate_transcription_time_and_accuracy(ov_model, test_samples)
accuracy_quantized, times_quantized = calculate_transcription_time_and_accuracy(ov_quantized_model, test_samples)
print(f"Encoder performance speedup: {times_original[1] / times_quantized[1]:.3f}")
print(f"Decoder with past performance speedup: {times_original[2] / times_quantized[2]:.3f}")
print(f"Whole pipeline performance speedup: {times_original[0] / times_quantized[0]:.3f}")
print(f"Whisper transcription word accuracy. Original model: {accuracy_original:.2f}%. Quantized model:{accuracy_quantized:.2f}%.")
print(f"Accuracy drop: {accuracy_original - accuracy_quantized:.2f}%.")
Measuring performance and accuracy: 0%| | 0/50 [00:00<?, ?it/s]Measuring performance and accuracy: 0%| | 0/50 [00:00<?, ?it/s]Encoder performance speedup: 1.352
Decoder with past performance speedup: 1.342
Whole pipeline performance speedup: 1.350
Whisper transcription word accuracy. Original model: 81.67%. Quantized model: 83.67%.
Accuracy drop: -1.99%.インタラクティブなデモ#
import gradio as gr

def transcribe(url, task, use_int8):
    output_file = Path("downloaded_video.mp4")
    yt = YouTube(url)
    yt.streams.get_highest_resolution().download(filename=output_file)
    inputs, duration = get_audio(output_file)
    m_pipe = int8_pipe if use_int8 else pipe
    transcription = m_pipe(inputs, generate_kwargs={"task": task.lower()}, return_timestamps=True)["chunks"]
    srt_lines = prepare_srt(transcription, duration)
    with output_file.with_suffix(".srt").open("w") as f:
        f.writelines(srt_lines)
    return [str(output_file), str(output_file.with_suffix(".srt"))]

demo = gr.Interface(
    transcribe,
    [
        gr.Textbox(label="YouTube URL"),
        gr.Radio(["Transcribe", "Translate"], value="Transcribe"),
        gr.Checkbox(value=ov_quantized_model is not None, visible=ov_quantized_model is not None, label="Use INT8"),
    ],
    "video",
    examples=[["https://youtu.be/kgL5LBM-hFI", "Transcribe"]],
    allow_flagging="never",
)
try:
    demo.launch(debug=False)
except Exception:
    demo.launch(share=True, debug=False)
# リモートで起動する場合は、server_name と server_port を指定
# demo.launch(server_name='your server name', server_port='server port in int')
# 詳細はドキュメントをご覧ください: https://gradio.app/docs/
ローカル URL で実行中: http://127.0.0.1:7860 パブリックリンクを作成するには、launch() で share=True を設定します。
Keyboard interruption in main thread... closing server.