OpenVINO™ による人間の行動認識#
この Jupyter ノートブックはオンラインで起動でき、ブラウザーのウィンドウで対話型環境を開きます。ローカルにインストールすることもできます。次のオプションのいずれかを選択します:


このノートブックでは、Open Model Zoo のアクション認識モデルのエンコーダーとデコーダーを使用して、OpenVINO によるライブによる人間のアクション認識を示します。どちらのモデルも、Kinetics-400 データセットの人間の活動を識別するため、シーケンスツーシーケンス ("seq2seq") [1] システムを作成します。モデルは ResNet34 エンコーダー [2] を使用したビデオ・トランスフォーマーのアプローチを採用しています。ノートブックでは、次のパイプラインを作成する方法を示します:
このノートブックの最後では、Web カメラからのライブ推論結果が表示されます。さらに、ビデオファイルをアップロードすることもできます。
注: ウェブカメラを使用するには、ウェブカメラを備えたコンピューター上でこの Jupyter ノートブックを実行する必要があります。サーバー上で実行すると、Web カメラは機能しなくなります。ただし、最終ステップではビデオに対して推論を行うことができます。
[1]seq2seq: 一連の項目を入力と出力に受け取るディープラーニング・モデル。この場合、入力: ビデオフレーム、出力: アクションシーケンスです。この "seq2seq" は、エンコーダーとデコーダーで構成されています。エンコーダーは、デコーダーによって分析される入力 "context" をキャプチャーし、最終的に人間のアクションと信頼性を取得します。
[2] ビデオ・トランスフォーマーと ResNet34。
目次:
%pip install -q "openvino>=2024.0.0" "opencv-python" "tqdm"Note: you may need to restart the kernel to use updated packages.インポート#
import collections
import os
import time
from typing import Tuple, List

from pathlib import Path

import cv2
import numpy as np
from IPython import display
import openvino as ov
from openvino.runtime.ie_api import CompiledModel

# `notebook_utils` モジュールを取得
import requests

r = requests.get(
    url="https://raw.githubusercontent.com/openvinotoolkit/openvino_notebooks/latest/utils/notebook_utils.py",
)
open("notebook_utils.py", "w").write(r.text)
import notebook_utils as utilsモデル#
モデルのダウンロード#
notebook_utils ファイルの関数である download_ir_model を使用します。ディレクトリー構造が自動的に作成され、選択したモデルがダウンロードされます。
この場合、モデル名として "action-recognition-0001" を使用すると、システムは自動的に 2 つのモデル "action-recognition-0001-encoder" と "action-recognition-0001-decoder" をダウンロードします。
注:
"driver-action-recognition-adas-0002"("driver-action-recognition-adas-0002-encoder"+"driver-action-recognition-adas-0002-decoder") など別のモデルをダウンロードする場合は、以下のコードでモデル名を置き換えます。リスト外のモデルを使用する場合は、異なる前処理と後処理が必要になる場合があります。
# モデルがダウンロードされるディレクトリー
base_model_dir = "model"
# Open Model Zoo のモデルの名前
model_name = "action-recognition-0001"
# 選択された精度 (FP32, FP16, FP16-INT8)
precision = "FP16"
model_path_decoder = f"model/intel/{model_name}/{model_name}-decoder/{precision}/{model_name}-decoder.xml"
model_path_encoder = f"model/intel/{model_name}/{model_name}-encoder/{precision}/{model_name}-encoder.xml"
encoder_url =
f"https://storage.openvinotoolkit.org/repositories/open_model_zoo/temp/{model_name}/{model_name}-encoder/{precision}/{model_name}-encoder.xml"
decoder_url =
f"https://storage.openvinotoolkit.org/repositories/open_model_zoo/temp/{model_name}/{model_name}-decoder/{precision}/{model_name}-decoder.xml"

if not os.path.exists(model_path_decoder):
    utils.download_ir_model(decoder_url, Path(model_path_decoder).parent)
if not os.path.exists(model_path_encoder):
    utils.download_ir_model(encoder_url, Path(model_path_encoder).parent)
model/intel/action-recognition-0001/action-recognition-0001-decoder/FP16/action-recognition-0001-decoder.bin:
…model/intel/action-recognition-0001/action-recognition-0001-encoder/FP16/action-recognition-0001-encoder.bin:
…ラベルの読み込み#
このチュートリアルでは Kinetics-400 データセットを使用し、このノートブックに埋め込まれたテキストファイルも提供します。
注:
"driver-action-recognition-adas-0002"モデルを実行は、kinetics.txtファイルをdriver_actions.txtに置き換えます。
# openvino_notebooks ストレージからテキストをダウンロード
vocab_file_path = utils.download_file(
    "https://storage.openvinotoolkit.org/repositories/openvino_notebooks/data/data/text/kinetics.txt",
    directory="data",
)

with vocab_file_path.open(mode="r") as f:
    labels = [line.strip() for line in f]

print(labels[0:9], np.shape(labels))
data/kinetics.txt: 0%| | 0.00/5.82k [00:00<?, ?B/s]['abseiling', 'air drumming', 'answering questions', 'applauding', 'applying cream', 'archery', 'arm wrestling', 'arranging flowers', 'assembling computer'] (400,)モデルのロード#
特定のアーキテクチャーの 2 つのモデル (エンコーダーとデコーダー) をロードします。ダウンロードされたモデルは、ベンダー、モデル名、精度を示す固定構造に配置されます。
OpenVINO ランタイムを初期化します。
*.binおよび*.xmlファイル (重みとアーキテクチャー) からネットワークを読み取ります。指定されたデバイス用にモデルをコンパイルします。
ノードの入力名と出力名を取得します。
モデルを実行するには、数行のコードで済みます。
OpenVINO を使用して推論を実行するデバイスをドロップダウン・リストから選択します。
import ipywidgets as widgets

core = ov.Core()
device = widgets.Dropdown(
    options=core.available_devices + ["AUTO"],
    value="AUTO",
    description="Device:",
    disabled=False,
)

deviceDropdown(description='Device:', index=1, options=('CPU', 'AUTO'), value='AUTO')モデルの初期化関数#
# OpenVINO ランタイムを初期化
core = ov.Core()

def model_init(model_path: str, device: str) -> Tuple:
    """
    Read the network and weights from a file, load the
    model on CPU and get input and output names of nodes

    :param:
        model: model architecture path *.xml
        device: inference device
    :retuns:
        compiled_model: Compiled model
        input_key: Input node for model
        output_key: Output node for model
    """

    # ファイルからネットワークと対応する重みを読み取り
    model = core.read_model(model=model_path)
    # 指定されたデバイス用にモデルをコンパイル
    compiled_model = core.compile_model(model=model, device_name=device)
    # ノードの入力名と出力名を取得
    input_keys = compiled_model.input(0)
    output_keys = compiled_model.output(0)
return input_keys, output_keys, compiled_modelエンコーダーとデコーダーの初期化#
# エンコーダーの初期化
input_key_en, output_keys_en, compiled_model_en = model_init(model_path_encoder, device.value)
# デコーダーの初期化
input_key_de, output_keys_de, compiled_model_de = model_init(model_path_decoder, device.value)

# 入力サイズを取得 - エンコーダー
height_en, width_en = list(input_key_en.shape)[2:]# 入力サイズを取得 - デコーダー
frames2decode = list(input_key_de.shape)[0:][1]ヘルパー関数#
フレームの前処理と後処理には、次のヘルパー関数を使用します:
エンコーダー・モデルを実行する前に入力画像を前処理します。(
center_cropとadaptative_resize)上位 3 つの確率をラベル名にデコードします。(
decode_output)ビデオの関心領域 (ROI)。(
rec_frame_display)ビデオにラベル名を表示するフレームを準備します。(
display_text_fnc)
def center_crop(frame: np.ndarray) -> np.ndarray:
    """
    Center crop squared the original frame to standardize the input image to the encoder model

    :param frame: input frame
    :returns: center-crop-squared frame
    """
    img_h, img_w, _ = frame.shape
    min_dim = min(img_h, img_w)
    start_x = int((img_w - min_dim) / 2.0)
    start_y = int((img_h - min_dim) / 2.0)
    roi = [start_y, (start_y + min_dim), start_x, (start_x + min_dim)]
    return frame[start_y : (start_y + min_dim), start_x : (start_x + min_dim), ...], roi

def adaptive_resize(frame: np.ndarray, size: int) -> np.ndarray:
    """
    The frame going to be resized to have a height of size or a width of size

    :param frame: input frame
    :param size: input size to encoder model
    :returns: resized frame, np.array type
    """
    h, w, _ = frame.shape
    scale = size / min(h, w)
    w_scaled, h_scaled = int(w * scale), int(h * scale)
    if w_scaled == w and h_scaled == h:
        return frame
    return cv2.resize(frame, (w_scaled, h_scaled))

def decode_output(probs: np.ndarray, labels: np.ndarray, top_k: int = 3) -> np.ndarray:
    """
    Decodes top probabilities into corresponding label names

    :param probs: confidence vector for 400 actions
    :param labels: list of actions
    :param top_k: The k most probable positions in the list of labels
    :returns: decoded_labels: The k most probable actions from the labels list
        decoded_top_probs: confidence for the k most probable actions
    """
    top_ind = np.argsort(-1 * probs)[:top_k]
    out_label = np.array(labels)[top_ind.astype(int)]
    decoded_labels = [out_label[0][0], out_label[0][1], out_label[0][2]]
    top_probs = np.array(probs)[0][top_ind.astype(int)]
    decoded_top_probs = [top_probs[0][0], top_probs[0][1], top_probs[0][2]]
    return decoded_labels, decoded_top_probs

def rec_frame_display(frame: np.ndarray, roi) -> np.ndarray:
    """
    Draw a rec frame over actual frame

    :param frame: input frame
    :param roi: Region of interest, image section processed by the Encoder
    :returns: frame with drawed shape
    """

    cv2.line(frame, (roi[2] + 3, roi[0] + 3), (roi[2] + 3, roi[0] + 100), (0, 200, 0), 2)
    cv2.line(frame, (roi[2] + 3, roi[0] + 3), (roi[2] + 100, roi[0] + 3), (0, 200, 0), 2)
    cv2.line(frame, (roi[3] - 3, roi[1] - 3), (roi[3] - 3, roi[1] - 100), (0, 200, 0), 2)
    cv2.line(frame, (roi[3] - 3, roi[1] - 3), (roi[3] - 100, roi[1] - 3), (0, 200, 0), 2)
    cv2.line(frame, (roi[3] - 3, roi[0] + 3), (roi[3] - 3, roi[0] + 100), (0, 200, 0), 2)
    cv2.line(frame, (roi[3] - 3, roi[0] + 3), (roi[3] - 100, roi[0] + 3), (0, 200, 0), 2)
    cv2.line(frame, (roi[2] + 3, roi[1] - 3), (roi[2] + 3, roi[1] - 100), (0, 200, 0), 2)
    cv2.line(frame, (roi[2] + 3, roi[1] - 3), (roi[2] + 100, roi[1] - 3), (0, 200, 0), 2)
    # 実際のフレームに ROI を書き込む
    FONT_STYLE = cv2.FONT_HERSHEY_SIMPLEX
    org = (roi[2] + 3, roi[1] - 3)
    org2 = (roi[2] + 2, roi[1] - 2)
    FONT_SIZE = 0.5
    FONT_COLOR = (0, 200, 0)
    FONT_COLOR2 = (0, 0, 0)
    cv2.putText(frame, "ROI", org2, FONT_STYLE, FONT_SIZE, FONT_COLOR2)
    cv2.putText(frame, "ROI", org, FONT_STYLE, FONT_SIZE, FONT_COLOR)
    return frame

def display_text_fnc(frame: np.ndarray, display_text: str, index: int):
    """
    Include a text on the analyzed frame

    :param frame: input frame
    :param display_text: text to add on the frame
    :param index: index line dor adding text

    """
    # テキスト付き画像を表示する設定
    FONT_COLOR = (255, 255, 255)
    FONT_COLOR2 = (0, 0, 0)
    FONT_STYLE = cv2.FONT_HERSHEY_DUPLEX
    FONT_SIZE = 0.7
    TEXT_VERTICAL_INTERVAL = 25
    TEXT_LEFT_MARGIN = 15
    # 実際のフレームに対する ROI
    (processed, roi) = center_crop(frame)
    # 際のフレーム上に ROI を描画
    frame = rec_frame_display(frame, roi)
    # 実際のフレームの上にテキストを配置
    text_loc = (TEXT_LEFT_MARGIN, TEXT_VERTICAL_INTERVAL * (index + 1))
    text_loc2 = (TEXT_LEFT_MARGIN + 1, TEXT_VERTICAL_INTERVAL * (index + 1) + 1)
    cv2.putText(frame, display_text, text_loc2, FONT_STYLE, FONT_SIZE, FONT_COLOR2)
    cv2.putText(frame, display_text, text_loc, FONT_STYLE, FONT_SIZE, FONT_COLOR)
AI 関数#
上記のパイプラインに従って、次の関数を使用して操作を行います:
エンコーダーを実行する前にフレームを前処理します: (
preprocessing)フレームごとのエンコーダー推論。(
encoder)フレームセットごとのデコーダー推論。(
decoder)デコーダー出力を正規化して、アクション認識ラベルごとに信頼値を取得します。(
softmax)
def preprocessing(frame: np.ndarray, size: int) -> np.ndarray:
    """
    Preparing frame before Encoder.
    The image should be scaled to its shortest dimension at "size"
    and cropped, centered, and squared so that both width and
    height have lengths "size".The frame must be transposed from
    Height-Width-Channels (HWC) to Channels-Height-Width (CHW).
    :param frame: input frame
    :param size: input size to encoder model
    :returns: resized and cropped frame
    """
    # 適応サイズ変更
    preprocessed = adaptive_resize(frame, size)
    # Center_crop
    (preprocessed, roi) = center_crop(preprocessed)
    # フレームを HWC -> CHW にトランスポーズ
    preprocessed = preprocessed.transpose((2, 0, 1))[None,] # HWC -> CHW
    return preprocessed, roi

def encoder(preprocessed: np.ndarray, compiled_model: CompiledModel) -> List:
    """
    Encoder Inference per frame.This function calls the network previously
    configured for the encoder model (compiled_model), extracts the data
    from the output node, and appends it in an array to be used by the decoder.

    :param: preprocessed: preprocessing frame
    :param: compiled_model: Encoder model network
    :returns: encoder_output: embedding layer that is appended with each arriving frame
    """
    output_key_en = compiled_model.output(0)

    # action-recognition-0001-encoder モデルの結果を取得
    infer_result_encoder = compiled_model([preprocessed])[output_key_en]
    return infer_result_encoder

def decoder(encoder_output: List, compiled_model_de: CompiledModel) -> List:
    """
    Decoder inference per set of frames.This function concatenates the embedding layer
    froms the encoder output, transpose the array to match with the decoder input size.
    Calls the network previously configured for the decoder model (compiled_model_de), extracts
    the logits and normalize those to get confidence values along specified axis.
    Decodes top probabilities into corresponding label names

    :param: encoder_output: embedding layer for 16 frames
    :param: compiled_model_de: Decoder model network
    :returns: decoded_labels: The k most probable actions from the labels list
        decoded_top_probs: confidence for the k most probable actions
    """
    # sample_duration フレームを 1 つの配列に連結
    decoder_input = np.concatenate(encoder_output, axis=0)
    # 入力形状ベクトルをデコーダーに整理 (形状: [1X16x512]]
    decoder_input = decoder_input.transpose((2, 0, 1, 3))
    decoder_input = np.squeeze(decoder_input, axis=3)
    output_key_de = compiled_model_de.output(0)
    # action-recognition-0001-decoder モデルの結果を取得
    result_de = compiled_model_de([decoder_input])[output_key_de]
    # 指定された軸に沿って信頼値を取得するためにロジットを正規化
    probs = softmax(result_de - np.max(result_de))
    # 上位の確率を対応するラベル名にデコード
    decoded_labels, decoded_top_probs = decode_output(probs, labels, top_k=3)
    return decoded_labels, decoded_top_probs

def softmax(x: np.ndarray) -> np.ndarray:
    """
    Normalizes logits to get confidence values along specified axis
    x: np.array, axis=None
    """
    exp = np.exp(x)
return exp / np.sum(exp, axis=None)メイン処理関数#
実行中のアクション認識機能は、ウェブカメラまたはビデオファイルのいずれかで実行されます。以下の手順のリストを参照してください:
ターゲット fps で再生するビデオプレーヤーを作成します (
utils.VideoPlayer)。エンコード/デコードするフレームのセットを準備します。
AI 関数の実行
結果を視覚化します。
def run_action_recognition(
    source: str = "0",
    flip: bool = True, use_popup: bool = False,
    compiled_model_en: CompiledModel = compiled_model_en,
    compiled_model_de: CompiledModel = compiled_model_de,
    skip_first_frames: int = 0,
):
    """
    Use the "source" webcam or video file to run the complete pipeline for action-recognition problem
    1.Create a video player to play with target fps
    2.Prepare a set of frames to be encoded-decoded
    3.Preprocess frame before Encoder
    4.Encoder Inference per frame
    5.Decoder inference per set of frames
    6.Visualize the results

    :param: source: webcam "0" or video path
    :param: flip: to be used by VideoPlayer function for flipping capture image
    :param: use_popup: False for showing encoded frames over this notebook, True for creating a popup window.
    :param: skip_first_frames: Number of frames to skip at the beginning of the video.
    :returns: display video over the notebook or in a popup window

    """
    size = height_en # エンコーダー入力サイズ - Cell 5_9 から
    sample_duration = frames2decode # デコーダー入力サイズ - Cell 5_7 から
    # ソースの 1 秒あたりのフレーム数を選択
    fps = 30
    player = None
    try:
        # ビデオプレーヤーを作成
        player = utils.VideoPlayer(source, flip=flip, fps=fps, skip_first_frames=skip_first_frames)
        # キャプチャーを開始
        player.start()
        if use_popup:
            title = "Press ESC to Exit"
            cv2.namedWindow(title, cv2.WINDOW_GUI_NORMAL | cv2.WINDOW_AUTOSIZE)

        processing_times = collections.deque()
        processing_time = 0
        encoder_output = []
        decoded_labels = [0, 0, 0]
        decoded_top_probs = [0, 0, 0]
        counter = 0
        # 推論結果をビデオに表示するテキスト・テンプレートを作成
        text_inference_template = "Infer Time:{Time:.1f}ms,{fps:.1f}FPS"
        text_template = "{label},{conf:.2f}%"

        while True:
            counter = counter + 1

            # ビデオストリームからフレームを読み取り
            frame = player.next()
            if frame is None:
                print("Source ended")
                break

            scale = 1280 / max(frame.shape)

            # 視覚化のための適応的なサイズ変更
            if scale < 1:
                frame = cv2.resize(frame, None, fx=scale, fy=scale, interpolation=cv2.INTER_AREA)

            # エンコーダーで処理するため、2 フレームごとに 1 フレームを選択
            # 16 フレームが処理された後、デコーダーはアクションを見つけ、
            # ラベルがフレーム上にプリントされます

            if counter % 2 == 0:
                # エンコーダーの前にフレームを前処理
                (preprocessed, _) = preprocessing(frame, size)

                # 処理時間を測定
                start_time = time.time()

                # フレームごとのエンコーダー推論
                encoder_output.append(encoder(preprocessed, compiled_model_en))

                # フレームセットごとのデコーダー推論
                # デコーダーモデルで動作するサンプル期間を待機
                if len(encoder_output) == sample_duration:
                    decoded_labels, decoded_top_probs = decoder(encoder_output, compiled_model_de)
                    encoder_output = []

                # 推論の終了。結果を表示
                stop_time = time.time()

                # 処理時間を計算
                processing_times.append(stop_time - start_time)

                # 最後の 200 フレームの処理時間を使用
                if len(processing_times) > 200:
                    processing_times.popleft()

                # 平均処理時間 [ms]
                processing_time = np.mean(processing_times) * 1000
                fps = 1000 / processing_time

            # 結果を視覚化
            for i in range(0, 3):
                display_text = text_template.format(
                    label=decoded_labels[i],
                    conf=decoded_top_probs[i] * 100,
                )
                display_text_fnc(frame, display_text, i)

            display_text = text_inference_template.format(Time=processing_time, fps=fps)
            display_text_fnc(frame, display_text, 3)

            # ちらつきが発生する場合はこの回避策を使用
            if use_popup:
                cv2.imshow(title, frame)
                key = cv2.waitKey(1)
                # escape = 27
                if key == 27:
                    break
            else:
                # numpy 配列を jpg にエンコード
                _, encoded_img = cv2.imencode(".jpg", frame, params=[cv2.IMWRITE_JPEG_QUALITY, 90])
                # IPython イメージを作成
                i = display.Image(data=encoded_img)
                # このノートブックに画像を表示
                display.clear_output(wait=True)
                display.display(i)
# ctrl-c
except KeyboardInterrupt:
    print("Interrupted")
# 異なるエラー
except RuntimeError as e:
    print(e)
finally:
    if player is not None:
        # キャプチャーを停止
        Player.stop().stop()
    if use_popup:
cv2.destroyAllWindows()アクション認識の実行#
ビデオファイルでモデルがどのように動作するか確認します。OpenCV でサポートされている形式であればどれでも動作します。ビデオファイルの実行中はいつでも停止ボタンを押すことができ、次のステップのためウェブカメラが起動します。
注: フレームが破損していると、ビデオが途切れる場合があります。その場合、変換することができます。ビデオに問題が発生した場合は、HandBrake を使用して MPEG 形式を選択してください。
デモの入力ソースとしてウェブカメラを使用する場合、USE_WEBCAM 変数の値を True に変更し、cam_id を指定してください (デフォルト値は 0 ですが、マルチカメラ・システムでは異なる場合があります)。
USE_WEBCAM = False

cam_id = 0
video_file =
"https://archive.org/serve/ISSVideoResourceLifeOnStation720p/ISS%20Video%20Resource_LifeOnStation_720p.mp4"

source = cam_id if USE_WEBCAM else video_file
additional_options = {"skip_first_frames": 600, "flip": False} if not USE_WEBCAM else {"flip": True}
run_action_recognition(source=source, use_popup=False, **additional_options)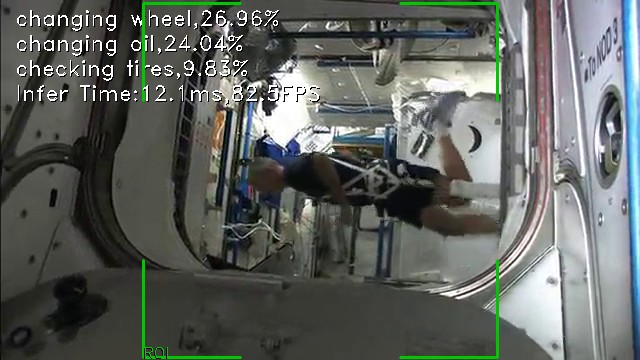
ソースの終わり