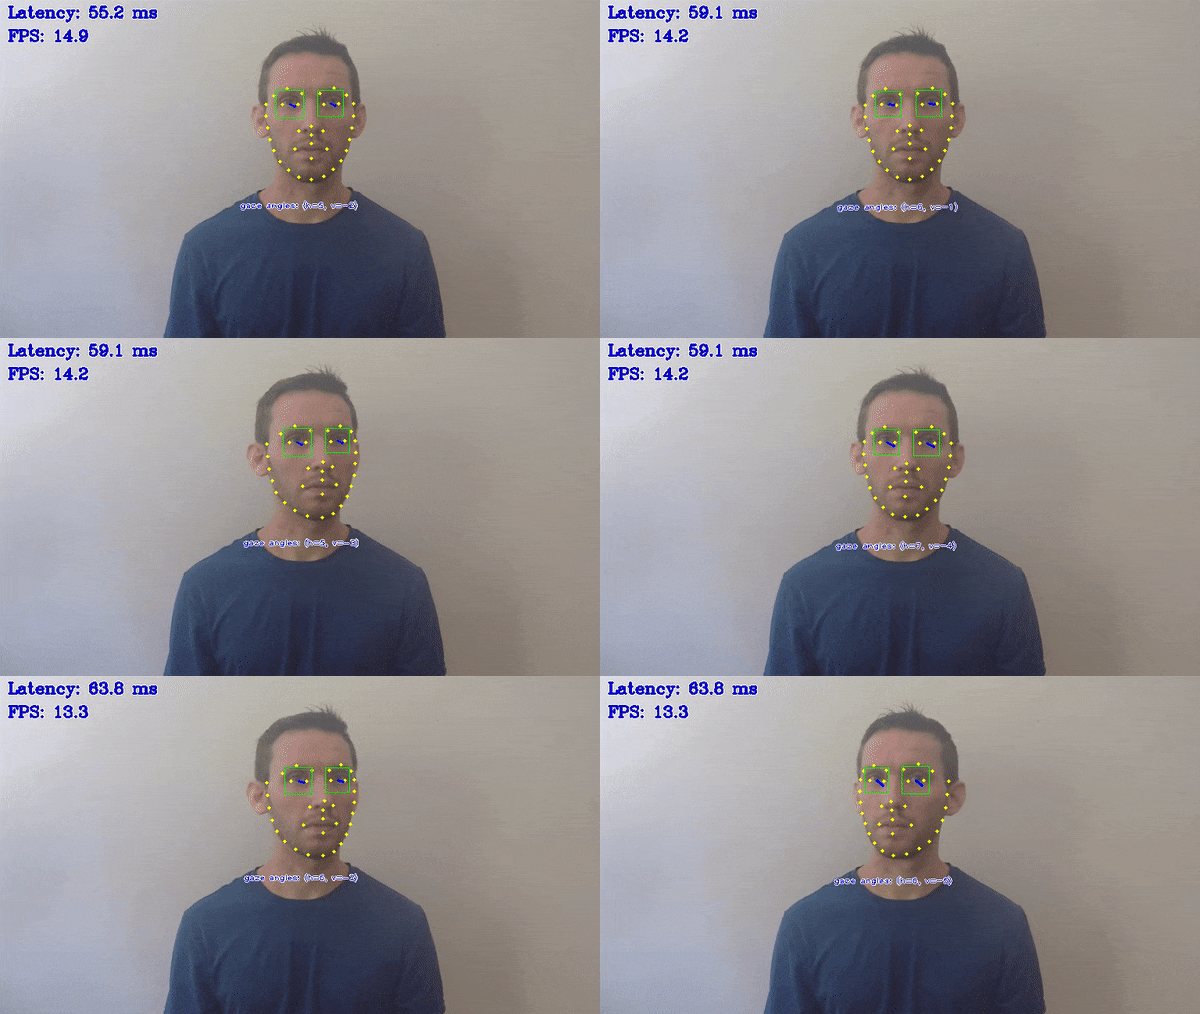
視線推定デモ#

このデモでは、視線推定モデルの動作を紹介します。
このデモは、次の補助ネットワークに依存します:
face-detection-retail-0004または顔を検出するface-detection-adas-0001検出ネットワークhead-pose-estimation-adas-0001、テイトブライアン角度で頭の姿勢を推定し、視線推定モデルの入力とします。facial-landmarks-35-adas-0002または、facial-landmarks-98-detection-0001は、検出された顔のランドマークの座標を推定します。目の隅のキーポイントは、視線推定モデルで目の領域を特定するために使用されます。open-closed-eye-0001、検出された顔の目の状態を推定します。
デモの目的は次のとおりです:
OpenCV* 経由した入力としてのビデオ/カメラ
視線推定結果、およびオプションで補助モデルの推論結果の視覚化
どのように動作するか#
アプリケーションはコマンドライン・パラメーターを読み取り、4 つのモデルを OpenVINO™ ランタイムプラグインにロードします
アプリケーションは OpenCV VideoCapture からフレームを取得します
アプリケーションは補助モデルで推論を実行し、視線推定モデルの入力として機能する頭姿勢角度と目の領域の画像を取得します
アプリケーションは補助モデルの推論結果を利用して視線推定モデルを推論します
アプリケーションは結果を表示します
注: デフォルトでは、Open Model Zoo のデモは BGR チャネル順序での入力を期待します。RGB 順序で動作するようにモデルをトレーニングした場合は、サンプルまたはデモ・アプリケーションでデフォルトのチャネル順序を手動で再配置するか、
--reverse_input_channels引数を指定したモデル・オプティマイザー・ツールを使用してモデルを再変換する必要があります。引数の詳細については、[前処理計算の埋め込み](@ref openvino_docs_MO_DG_Additional_Optimization_Use_Cases) の入力チャネルを反転するセクションを参照してください。
実行の準備#
デモの入力画像またはビデオファイルについては、Open Model Zoo デモの概要のデモに使用できるメディアファイルのセクションを参照してください。デモでサポートされるモデルリストは、<omz_dir>/demos/gaze_estimation_demo/cpp/models.lst ファイルにあります。このファイルは、モデル・ダウンローダーおよびコンバーターのパラメーターとして使用され、モデルをダウンロードし、必要に応じて OpenVINO IR 形式 (*.xml + *.bin) に変換できます。
モデル・ダウンローダーの使用例:
omz_downloader --list models.lstモデル・コンバーターの使用例:
omz_converter --list models.lstサポートされるモデル#
facial-landmarks-35-adas-0002
facial-landmarks-98-detection-0001
face-detection-adas-0001
face-detection-retail-0004
face-detection-retail-0005
gaze-estimation-adas-0002
head-pose-estimation-adas-0001
open-closed-eye-0001
注: 各種デバイス向けのモデル推論サポートの詳細については、インテルの事前トレーニング・モデルのデバイスサポートとパブリックの事前トレーニング・モデルのデバイスサポートの表を参照してください。
実行する#
-h オプションを指定してアプリケーションを実行すると、使用方法が表示されます:
gaze_estimation_demo [OPTION]
Options:

    -h                      Print a usage message.
    -i                      Required. An input to process. The input must be a single image, a folder of images, video file or camera id.
    -loop                   Optional. Enable reading the input in a loop.
    -o "<path>"             Optional. Name of the output file(s) to save.Frames of odd width or height can be truncated. See https://github.com/opencv/opencv/pull/24086
    -limit "<num>"          Optional. Number of frames to store in output.If 0 is set, all frames are stored.
    -res "<WxH>"            Optional. Set camera resolution in format WxH.
    -m "<path>"             Required. Path to an .xml file with a trained person detector model.
    -m_fd "<path>"          Required. Path to an .xml file with a trained Face Detection model.
    -m_hp "<path>"          Required. Path to an .xml file with a trained Head Pose Estimation model.
    -m_lm "<path>"          Required. Path to an .xml file with a trained Facial Landmarks Estimation model.
    -m_es "<path>"          Required. Path to an .xml file with a trained Open/Closed Eye Estimation model.
    -d "<device>"           Optional. Target device for Gaze Estimation network (the list of available devices is shown below). Use "-d HETERO:<comma-separated_devices_list>" format to specify HETERO plugin. The demo will look for a suitable plugin for a specified device. Default value is "CPU".
    -d_fd "<device>"        Optional. Target device for Face Detection network (the list of available devices is shown below). Use "-d HETERO:<comma-separated_devices_list>" format to specify HETERO plugin. The demo will look for a suitable plugin for a specified device.Default value is "CPU".
    -d_hp "<device>"        Optional. Target device for Head Pose Estimation network (the list of available devices is shown below). Use "-d HETERO:<comma-separated_devices_list>" format to specify HETERO plugin. The demo will look for a suitable plugin for a specified device.Default value is "CPU".
    -d_lm "<device>"        Optional. Target device for Facial Landmarks Estimation network (the list of available devices is shown below). Use "-d HETERO:<comma-separated_devices_list>" format to specify HETERO plugin. The demo will look for a suitable plugin for a specified device.Default value is "CPU".
    -d_es "<device>"        Optional. Target device for Open/Closed Eye network (the list of available devices is shown below). Use "-d HETERO:<comma-separated_devices_list>" format to specify HETERO plugin. The demo will look for a suitable plugin for a specified device.Default value is "CPU".
    -fd_reshape             Optional. Reshape Face Detector network so that its input resolution has the same aspect ratio as the input frame.
    -no_show                Optional. Don't show output.
    -r                      Optional. Output inference results as mask histogram.
    -t                      Optional. Probability threshold for Face Detector. The default value is 0.5.
    -u                      Optional. List of monitors to show initially.
オプションのリストを空にしてアプリケーションを実行すると、エラーメッセージが表示されます。
例えば、CPU で推論を行うには、次のコマンドを実行します:
./gaze_estimation_demo \
    -d CPU \
    -i <path_to_video>/input_video.mp4 \
    -m <path_to_model>/gaze-estimation-adas-0002.xml \
    -m_fd <path_to_model>/face-detection-retail-0004.xml \
    -m_hp <path_to_model>/head-pose-estimation-adas-0001.xml \
    -m_lm <path_to_model>/facial-landmarks-35-adas-0002.xml \
-m_es <path_to_model>/open-closed-eye-0001.xml実行時制御キー#
デモでは、実行時に表示される情報を制御できます。次のキーがサポートされます:
G - 視線ベクトルの表示を切り替えます
B - 顔検出器の境界ボックスの表示を切り替えます
O - 頭のポーズ情報の表示を切り替えます
L - 顔のランドマークの表示を切り替えます
E - 目の状態の表示を切り替えます
A - すべての推論結果の表示をオンにします
N - すべての推論結果の表示をオフにします
F - フレームを水平方向に反転します
Esc - デモを終了します
注: 単一の画像を入力として指定すると、デモはすぐに処理してレンダリングし終了します。推論結果を画面上で継続的に視覚化するには、
loopオプションを適用します。これにより、単一の画像がループで処理されます。
-o オプションを使用すると、処理結果を Motion JPEG AVI ファイル、または別の JPEG または PNG ファイルに保存できます:
処理結果を AVI ファイルに保存するには、
avi拡張子を付けた出力ファイル名を指定します (例:-o output.avi)。処理結果を画像として保存するには、出力画像ファイルのテンプレート名を拡張子
jpgまたはpngで指定します (例:-o output_%03d.jpg)。実際のファイル名は、実行時に正規表現%03dをフレーム番号に置き換えることによってテンプレートから構築され、output_000.jpg、output_001.jpgなどになります。カメラなど連続入力ストリームでディスク領域のオーバーランを避けるため、limitオプションを使用して出力ファイルに保存されるデータの量を制限できます。デフォルト値は 1000 です。これを変更するには、-limit Nオプションを適用します。ここで、Nは保存するフレームの数です。
注: Windows* システムには、デフォルトでは Motion JPEG コーデックがインストールされていない場合があります。この場合、OpenVINO ™ インストール・パッケージに付属する、
<INSTALL_DIR>/opencv/ffmpeg-download.ps1にある PowerShell スクリプトを使用して OpenCV FFMPEG バックエンドをダウンロードできます。OpenVINO ™ がシステムで保護されたフォルダーにインストールされている場合 (一般的なケース)、スクリプトは管理者権限で実行する必要があります。あるいは、結果を画像として保存することもできます。
デモの出力#
このデモでは、OpenCV を使用して、マークされた視線ベクトル、およびオプションでマークされた顔のランドマーク、頭の姿勢の角度、および顔の境界ボックスを含む結果のフレームを表示します。デフォルトでは、視線推定結果のみが表示されます。補助ネットワークの推論結果を確認するには、ランタイム制御キーを使用します。デモレポート:
FPS: ビデオフレーム処理の平均レート (1 秒あたりのフレーム数)。
レイテンシー: 1 フレームの処理 (フレームの読み取りから結果の表示まで) に必要な平均時間。
これらのメトリックを使用して、アプリケーション・レベルのパフォーマンスを測定できます。